
Network Camera
Page 3
... as people, based on the image. Multi-Language Display Top page, Single Camera and Multi-Camera page can control the camera at high speed from your favorite domain name (e.g. The Setup, Maintenance and Support pages are available to easily and quickly monitor the camera. You can be displayed in maximum 80 ° per second. DynamicDNS...
... as people, based on the image. Multi-Language Display Top page, Single Camera and Multi-Camera page can control the camera at high speed from your favorite domain name (e.g. The Setup, Maintenance and Support pages are available to easily and quickly monitor the camera. You can be displayed in maximum 80 ° per second. DynamicDNS...

Network Camera
Page 5
... or greater is recommended.) • For viewing multiple cameras Pentium 4 (1.8 GHz or greater is recommended.) Protocol TCP/IP protocol (HTTP, TCP, UDP, IP, DNS, ARP, ICMP) Interface 10/100 Mbps network card installed Web Browser Internet Explorer 6.0 or later (Not included on the Setup CDROM) Audio Audio input/output feature (Microphone or speaker...
... or greater is recommended.) • For viewing multiple cameras Pentium 4 (1.8 GHz or greater is recommended.) Protocol TCP/IP protocol (HTTP, TCP, UDP, IP, DNS, ARP, ICMP) Interface 10/100 Mbps network card installed Web Browser Internet Explorer 6.0 or later (Not included on the Setup CDROM) Audio Audio input/output feature (Microphone or speaker...
Network Camera
Page 6
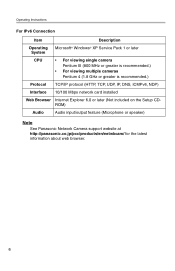
... Microsoft® Windows® XP Service Pack 1 or later System CPU • For viewing single camera Pentium III (800 MHz or greater is recommended.) • For viewing multiple cameras Pentium 4 (1.8 GHz or greater is recommended.) Protocol TCP/IP protocol (HTTP, TCP, UDP, IP...DNS, ICMPv6, NDP) Interface 10/100 Mbps network card installed Web Browser Internet Explorer 6.0 or later (Not included on the Setup CDROM) Audio Audio input/output feature (Microphone or speaker) Note See Panasonic Network Camera support website at http://panasonic.co.jp/pcc/products/en/netwkcam/ for the ...
... Microsoft® Windows® XP Service Pack 1 or later System CPU • For viewing single camera Pentium III (800 MHz or greater is recommended.) • For viewing multiple cameras Pentium 4 (1.8 GHz or greater is recommended.) Protocol TCP/IP protocol (HTTP, TCP, UDP, IP...DNS, ICMPv6, NDP) Interface 10/100 Mbps network card installed Web Browser Internet Explorer 6.0 or later (Not included on the Setup CDROM) Audio Audio input/output feature (Microphone or speaker) Note See Panasonic Network Camera support website at http://panasonic.co.jp/pcc/products/en/netwkcam/ for the ...

Network Camera
Page 7
... Cover Lens (0.5 m [about 20 inches]-Unlimited) Indicator The indicator color shows camera status. Microphone The microphone picks up audio around the camera. (See page 30) Indicator Display Power on Not on the LAN On the LAN Normal Operation*1 Automatic Setting Setup Finished setting Using DHCP Getting IP address*2 Got IP address Updating Firmware...
... Cover Lens (0.5 m [about 20 inches]-Unlimited) Indicator The indicator color shows camera status. Microphone The microphone picks up audio around the camera. (See page 30) Indicator Display Power on Not on the LAN On the LAN Normal Operation*1 Automatic Setting Setup Finished setting Using DHCP Getting IP address*2 Got IP address Updating Firmware...

Network Camera
Page 11
... RESET Button 147 3.5 Default Setting List 148 3.6 Cleaning 158 3.6.1 Cleaning the Main Unit 158 3.7 Setting an IP Address on the Single Camera page or the Multi- Operating Instructions 2.15 Buffering or Transferring Images by Timer 87 2.16 Buffering or Transferring Images by Alarm Signal 96 2.... or Transferring Images by Motion Detection Signal .... 107 2.18 Transfer the Camera Image in Transport Mode 118 2.19 Transfer the Camera Image in Tunnel Mode 119 2.20 Setting the Motion Detection 120 2.21 Notifying Setup of an Alarm Log 123 2.22 Changing Initial Settings on Your PC ...
... RESET Button 147 3.5 Default Setting List 148 3.6 Cleaning 158 3.6.1 Cleaning the Main Unit 158 3.7 Setting an IP Address on the Single Camera page or the Multi- Operating Instructions 2.15 Buffering or Transferring Images by Timer 87 2.16 Buffering or Transferring Images by Alarm Signal 96 2.... or Transferring Images by Motion Detection Signal .... 107 2.18 Transfer the Camera Image in Transport Mode 118 2.19 Transfer the Camera Image in Tunnel Mode 119 2.20 Setting the Motion Detection 120 2.21 Notifying Setup of an Alarm Log 123 2.22 Changing Initial Settings on Your PC ...

Network Camera
Page 13
...http://XXXXX.viewnetcam.com:50000 (in IPv6) 3. The Enter Network Password window is not displayed, see page 15 and page 16, and prepare the requirements. Enter the "http://(IPv6-registered URL):Port Number" on the address bar. • If the camera image is displayed, and enter the user name and password... that were set on the Setup CD-ROM. Note When [Permit access from guest users] is 80 (default), you do not need to...
...http://XXXXX.viewnetcam.com:50000 (in IPv6) 3. The Enter Network Password window is not displayed, see page 15 and page 16, and prepare the requirements. Enter the "http://(IPv6-registered URL):Port Number" on the address bar. • If the camera image is displayed, and enter the user name and password... that were set on the Setup CD-ROM. Note When [Permit access from guest users] is 80 (default), you do not need to...

Network Camera
Page 14
... on the Security: Administrator page, [Login] tab will not be displayed. Click the following tabs to the camera (page 83) B To Multi-Camera page (page 33) D To Setup page (page 40) F To Support page (page 143) Note • • When users other than... an administrator are accessing the camera, [Setup] and [Maintenance] tab will not be displayed. 14 A B C DE F G Version Number Select a language. Operating Instructions 4. A To Single Camera page (page 17) C To Buffered Image page (page 35) E To Maintenance page (...
... on the Security: Administrator page, [Login] tab will not be displayed. Click the following tabs to the camera (page 83) B To Multi-Camera page (page 33) D To Setup page (page 40) F To Support page (page 143) Note • • When users other than... an administrator are accessing the camera, [Setup] and [Maintenance] tab will not be displayed. 14 A B C DE F G Version Number Select a language. Operating Instructions 4. A To Single Camera page (page 17) C To Buffered Image page (page 35) E To Maintenance page (...

Network Camera
Page 18
...exe" on the Camera Setup page (see page 73). The image will be displayed partially. When trying to use audio feature, ActiveX® Controls must be automatically changed to refreshing still images on the General User page (see page 84). • To display the Single Camera page directly, add...Download signed ActiveX Controls". (2) Check "Enable" in "Run ActiveX Controls and plug-ins". • ActiveX Controls can be installed from the file on the Setup CD-ROM. (1) Restart the PC. (2) Confirm that Internet Explorer is not a problem. • To reduce the data traffic, the video can be ...
...exe" on the Camera Setup page (see page 73). The image will be displayed partially. When trying to use audio feature, ActiveX® Controls must be automatically changed to refreshing still images on the General User page (see page 84). • To display the Single Camera page directly, add...Download signed ActiveX Controls". (2) Check "Enable" in "Run ActiveX Controls and plug-ins". • ActiveX Controls can be installed from the file on the Setup CD-ROM. (1) Restart the PC. (2) Confirm that Internet Explorer is not a problem. • To reduce the data traffic, the video can be ...

Network Camera
Page 20
...; Even if [Yes] is checked for Allow Access from Panasonic. Operating Instructions The Banner When the camera accesses the Internet, the banner displays product information about cameras or announcements about the latest firmware, etc. from the Internet on the Automatic Setup page, or [Enable] is checked for Auto Port Forwarding... on the UPnP page for the Connection Mode of Static or DHCP, when the camera is not connected to display the banner can be set at Banner...
...; Even if [Yes] is checked for Allow Access from Panasonic. Operating Instructions The Banner When the camera accesses the Internet, the banner displays product information about cameras or announcements about the latest firmware, etc. from the Internet on the Automatic Setup page, or [Enable] is checked for Auto Port Forwarding... on the UPnP page for the Connection Mode of Static or DHCP, when the camera is not connected to display the banner can be set at Banner...

Network Camera
Page 31
...your PC, an external amplified speaker such as the Panasonic RP-SPT70 or equivalent (customer-provided) must be connected to the camera. The speaker connects to the camera with it. • Talk feature cannot be used by your PC's performance or network environment. For Microphone For Speaker MIC EXTSP [For assistance...or talk from the PC's speakers. Audio that used from a PC when the camera is accessed via a proxy server. • If you are running other websites, the active microphone may pick up on the Setup CD-ROM. • If you use external microphone, excessive length or poor ...
...your PC, an external amplified speaker such as the Panasonic RP-SPT70 or equivalent (customer-provided) must be connected to the camera. The speaker connects to the camera with it. • Talk feature cannot be used by your PC's performance or network environment. For Microphone For Speaker MIC EXTSP [For assistance...or talk from the PC's speakers. Audio that used from a PC when the camera is accessed via a proxy server. • If you are running other websites, the active microphone may pick up on the Setup CD-ROM. • If you use external microphone, excessive length or poor ...

Network Camera
Page 33
... Selects a refresh interval (Motion-60-second interval). Capture Image Button (See page 22) Switches cameras to configure each camera on the Multi-Camera Setup page (see page 13). • The Top page is displayed on another window. Access the camera (see page 128). 1. Selects [320 x 240] (default) or [160 x 120] pixels... Click the [Multi] tab at the View Type, video (Motion JPEG) or audio buttons cannot be displayed. Operating Instructions 1.4 Viewing Multi-Camera page To view multiple cameras on the Multi-Camera page, you select [All] at the top of the page. • Multi...
... Selects a refresh interval (Motion-60-second interval). Capture Image Button (See page 22) Switches cameras to configure each camera on the Multi-Camera Setup page (see page 13). • The Top page is displayed on another window. Access the camera (see page 128). 1. Selects [320 x 240] (default) or [160 x 120] pixels... Click the [Multi] tab at the View Type, video (Motion JPEG) or audio buttons cannot be displayed. Operating Instructions 1.4 Viewing Multi-Camera page To view multiple cameras on the Multi-Camera page, you select [All] at the top of the page. • Multi...

Network Camera
Page 34
... Type, all authentication windows of the configured cameras are displayed in video display. When the image is not displayed on the Network page (see page 128). • Confirm that each camera and that the web browser is connected to the network congestion or the number of accesses, the ...When you may be used . • Confirm the settings on the Multi-Camera page, all images are displayed. Due to the Internet. When viewing 4 cameras on the Multi-Camera page, you view the images on the Multi-Camera Setup page (see page 46 and page 51). The refresh interval may need 3...
... Type, all authentication windows of the configured cameras are displayed in video display. When the image is not displayed on the Network page (see page 128). • Confirm that each camera and that the web browser is connected to the network congestion or the number of accesses, the ...When you may be used . • Confirm the settings on the Multi-Camera page, all images are displayed. Due to the Internet. When viewing 4 cameras on the Multi-Camera page, you view the images on the Multi-Camera Setup page (see page 46 and page 51). The refresh interval may need 3...

Network Camera
Page 40
Click [Setup] tab at the top of the page. (1) (2) (3) (4) (5) (6) (7) (8) (9) (10) (11) (12) (13) (14) (15) (16) (17) (18) 40 Operating Instructions 2 Various Camera Features 2.1 Using Camera Features 1. Access the camera (see page 13). • The Top page is not permitted on the General User page, [Multi-Camera] or [Buffered Image] tab will not be ...the Security: Administrator page, click [Login] tab and log in as an administrator. • When users other than an administrator are accessing the camera, the [Setup] and [Maintenance] tabs are not displayed. • If [View Multi...
Click [Setup] tab at the top of the page. (1) (2) (3) (4) (5) (6) (7) (8) (9) (10) (11) (12) (13) (14) (15) (16) (17) (18) 40 Operating Instructions 2 Various Camera Features 2.1 Using Camera Features 1. Access the camera (see page 13). • The Top page is not permitted on the General User page, [Multi-Camera] or [Buffered Image] tab will not be ...the Security: Administrator page, click [Login] tab and log in as an administrator. • When users other than an administrator are accessing the camera, the [Setup] and [Maintenance] tabs are not displayed. • If [View Multi...

Network Camera
Page 42
... output terminal of the External I/O (see page 132). (18) Indicator Control Sets indicator display (see page 133). *1 If you change [Administrator], [General User], or [Multi-Camera Setup page] settings, changes will not be applied to all video viewers. 42 Restart the camera to make changes applied to the video (Motion JPEG) viewers.
... output terminal of the External I/O (see page 132). (18) Indicator Control Sets indicator display (see page 133). *1 If you change [Administrator], [General User], or [Multi-Camera Setup page] settings, changes will not be applied to all video viewers. 42 Restart the camera to make changes applied to the video (Motion JPEG) viewers.

Network Camera
Page 43
...Uses a static IP address. Normally sets Automatic Setup. Automatic Setup The camera automatically obtains the network settings (subnet mask, default gateway and DNS server address) utilizing a DHCP feature on your network. Click [Network (IPv4)] on your network in the order from 50000 to 50050. &#... In this option. 1. Operating Instructions 2.2 Connecting the Camera to Your IPv4 Network The Network page offers three options to configure the camera in IPv4. • [Automatic Setup] automatically assigns an unused IP address to the camera, and uses UPnPTM (Universal Plug and Play) to...
...Uses a static IP address. Normally sets Automatic Setup. Automatic Setup The camera automatically obtains the network settings (subnet mask, default gateway and DNS server address) utilizing a DHCP feature on your network. Click [Network (IPv4)] on your network in the order from 50000 to 50050. &#... In this option. 1. Operating Instructions 2.2 Connecting the Camera to Your IPv4 Network The Network page offers three options to configure the camera in IPv4. • [Automatic Setup] automatically assigns an unused IP address to the camera, and uses UPnPTM (Universal Plug and Play) to...

Network Camera
Page 44
..., and the Top page is displayed. • If the camera is displayed. Use the Setup Program to the previous page without saving changes. 4. Note The current network settings are deleted. • Checking [Yes] for [Allow Access from the Internet] on the Status page in the ...Maintenance section (see page 135). 5. Operating Instructions DHCP Setup Static Setup • Clicking [Cancel] takes you back to access the camera. 44 Click [Save] when...
..., and the Top page is displayed. • If the camera is displayed. Use the Setup Program to the previous page without saving changes. 4. Note The current network settings are deleted. • Checking [Yes] for [Allow Access from the Internet] on the Status page in the ...Maintenance section (see page 135). 5. Operating Instructions DHCP Setup Static Setup • Clicking [Cancel] takes you back to access the camera. 44 Click [Save] when...

Network Camera
Page 45
...50050. Enter only the number (1-65535). If your network, each data field. To enable Internet access to the camera, check [No]. The port number is 80 by using the Setup Program (see page 159). If you use the camera on your PC (see page 160). To disable Internet... HTTPS: 443, ICQ: 4000 and IRC: 6661- 6667. Ask your ISP or network administrator about the accessible port number over the Internet. Some ISPs do not know the camera IP address while setting [Automatic Setup] or [DHCP Setup], you can search it "Address Translation", "Static IP Masquerade", "Virtual Server" or...
...50050. Enter only the number (1-65535). If your network, each data field. To enable Internet access to the camera, check [No]. The port number is 80 by using the Setup Program (see page 159). If you use the camera on your PC (see page 160). To disable Internet... HTTPS: 443, ICQ: 4000 and IRC: 6661- 6667. Ask your ISP or network administrator about the accessible port number over the Internet. Some ISPs do not know the camera IP address while setting [Automatic Setup] or [DHCP Setup], you can search it "Address Translation", "Static IP Masquerade", "Virtual Server" or...

Network Camera
Page 46
.... Max. But [Space and [>] are not available. Note Set the maximum bandwidth usage seeing the following conditions. - Transferring camera images by your ISP or network administrator, enter them in this data field. Using the DynamicDNS service - Set 4 digits (0-255) and 3 periods such as.... • Select the maximum bandwidth usage from [Unlimited] to the camera, enter the ISPassigned host name. (Host name may change depending on the MultiCamera Setup page - Setting cameras by your ISP or network administrator, enter it in this data field. Bandwidth Usage • The...
.... Max. But [Space and [>] are not available. Note Set the maximum bandwidth usage seeing the following conditions. - Transferring camera images by your ISP or network administrator, enter them in this data field. Using the DynamicDNS service - Set 4 digits (0-255) and 3 periods such as.... • Select the maximum bandwidth usage from [Unlimited] to the camera, enter the ISPassigned host name. (Host name may change depending on the MultiCamera Setup page - Setting cameras by your ISP or network administrator, enter it in this data field. Bandwidth Usage • The...

Network Camera
Page 47
Operating Instructions Setting Connection Type Description • Select [Auto Negotiation] normally. If you cannot access the camera, see page 7 of the Troubleshooting on the Setup CD-ROM. • This setting is valid in both IPv4/IPv6. *1 If you automatically obtain the IP address from the DHCP server, you do not need to set it. [For assistance, please call: 1-800-272-7033] 47
Operating Instructions Setting Connection Type Description • Select [Auto Negotiation] normally. If you cannot access the camera, see page 7 of the Troubleshooting on the Setup CD-ROM. • This setting is valid in both IPv4/IPv6. *1 If you automatically obtain the IP address from the DHCP server, you do not need to set it. [For assistance, please call: 1-800-272-7033] 47

Network Camera
Page 48
... user to use this feature. 1. Automatic Setup The camera is the expanded protocol created for future Internet expansion. Click [Network (IPv6)] on the Setup page. 2. Normally sets Automatic Setup. If you back to the previous page without saving changes. 48 Operating Instructions 2.3 Connecting the Camera to Your IPv6 Network The Network page offers two options to configure the...
... user to use this feature. 1. Automatic Setup The camera is the expanded protocol created for future Internet expansion. Click [Network (IPv6)] on the Setup page. 2. Normally sets Automatic Setup. If you back to the previous page without saving changes. 48 Operating Instructions 2.3 Connecting the Camera to Your IPv6 Network The Network page offers two options to configure the...


