Operating Instructions
Page 5
...video output 46 List of recording, playback and output formats 47 Adjusting the White balance and Black Balance 50 Adjusting the White Balance 50 Adjusting the Black Balance 51 Setting the Electronic Shutter 53 Setting the Shutter Mode and Speed 53 Placing the Camera-recorder in SYNCHRO SCAN Mode 54 Assigning functions to USER buttons 55 Selecting Audio Input Signals and Adjusting Recording Levels 56 Selecting Audio Input Signals 56 Adjusting Recording Levels 56 Selecting Function for the FRONT AUDIO LEVEL Control 57 CH3 and CH4 Recording Levels 57 Setting Time Data 58 Time data...
...video output 46 List of recording, playback and output formats 47 Adjusting the White balance and Black Balance 50 Adjusting the White Balance 50 Adjusting the Black Balance 51 Setting the Electronic Shutter 53 Setting the Shutter Mode and Speed 53 Placing the Camera-recorder in SYNCHRO SCAN Mode 54 Assigning functions to USER buttons 55 Selecting Audio Input Signals and Adjusting Recording Levels 56 Selecting Audio Input Signals 56 Adjusting Recording Levels 56 Selecting Function for the FRONT AUDIO LEVEL Control 57 CH3 and CH4 Recording Levels 57 Setting Time Data 58 Time data...
Operating Instructions
Page 6
... Time Code 62 Externally Locking the Time Code 64 Outputting the time code externally 65 GENLOCK and time code input/output connection and setup 66 Counter Setting and Display 66 Viewfinder Screen Status Displays 67 Lamps in the Viewfinder Screen 67 Viewfinder Status Indication Layout 67 Selecting Viewfinder Display Information 67 Screen displays 68 Warnings ...71 P2 card playback data indication 71 Errors ...72 Camera status display 72 USER buttons assignment information (at mode check 72 Checking and displaying shooting status 73 Setting...
... Time Code 62 Externally Locking the Time Code 64 Outputting the time code externally 65 GENLOCK and time code input/output connection and setup 66 Counter Setting and Display 66 Viewfinder Screen Status Displays 67 Lamps in the Viewfinder Screen 67 Viewfinder Status Indication Layout 67 Selecting Viewfinder Display Information 67 Screen displays 68 Warnings ...71 P2 card playback data indication 71 Errors ...72 Camera status display 72 USER buttons assignment information (at mode check 72 Checking and displaying shooting status 73 Setting...
Operating Instructions
Page 8
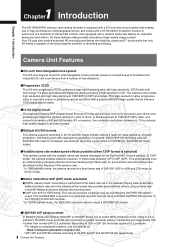
... a large light-receiving area with high sensitivity. 3CCD pixel-shift technology (1/2 pixel) and advanced digital processing produce a high-resolution CCD. This produces high-quality images in all times. Recording at 30P or 25P (50 Hz mode) applies a 2:2 pulldown. * For details on a hard disk recorder such as the AJ-HD1400 DVCPRO HD recorder or the FOCUS FS-100 HDD recorder. * In 720PN (native) mode, the IEEE1394...
... a large light-receiving area with high sensitivity. 3CCD pixel-shift technology (1/2 pixel) and advanced digital processing produce a high-resolution CCD. This produces high-quality images in all times. Recording at 30P or 25P (50 Hz mode) applies a 2:2 pulldown. * For details on a hard disk recorder such as the AJ-HD1400 DVCPRO HD recorder or the FOCUS FS-100 HDD recorder. * In 720PN (native) mode, the IEEE1394...

Operating Instructions
Page 10
... begins recording. HD-SDI output, time code input and output, GEN lock input and USB 2.0 connector are using it far more efficient than systems where tapes or disks have missed. Unlike a VTR system, there is a broadcast industry standard memory card with their moving parts could never match. Starting the recording operation will memorize video and audio for up on a connected DVCPRO HD digital VTR (AJ-HD1400) or FOCUS FS100 HDD recorder...
... begins recording. HD-SDI output, time code input and output, GEN lock input and USB 2.0 connector are using it far more efficient than systems where tapes or disks have missed. Unlike a VTR system, there is a broadcast industry standard memory card with their moving parts could never match. Starting the recording operation will memorize video and audio for up on a connected DVCPRO HD digital VTR (AJ-HD1400) or FOCUS FS100 HDD recorder...
Operating Instructions
Page 22
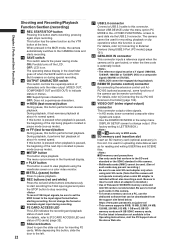
...-converted composite video signals are output. • Use the DOWNCON MODE in pause mode (cue-up mode). 14 FF (fast forward) button During pause, this function is located in the setup menu DISPLAY SETUP screen to stop recording. Be sure to format such cards in this camera. • To format a memory card on a PC, use mini SD card adapter only when using the viewfinder screen or a color video monitor. 17 STILL (pause) button Press to pause playback. 18 REC buttons (red and white) Press the red and white buttons simultaneously to...
...-converted composite video signals are output. • Use the DOWNCON MODE in pause mode (cue-up mode). 14 FF (fast forward) button During pause, this function is located in the setup menu DISPLAY SETUP screen to stop recording. Be sure to format such cards in this camera. • To format a memory card on a PC, use mini SD card adapter only when using the viewfinder screen or a color video monitor. 17 STILL (pause) button Press to pause playback. 18 REC buttons (red and white) Press the red and white buttons simultaneously to...
Operating Instructions
Page 23
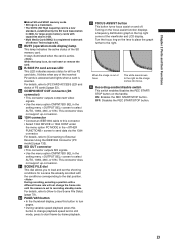
... corner of the SD memory card. This connector does not support up -conversion. 29 1394 connector • Connect an IEEE1394 cable to this button to change playback speed and in the setting menu screen to turn pages. • During variable speed playback press this connector. • Select 1394 DEVICE or 1394 HOST under the menu option PC MODE in 2006, for a scene file already recorded with a different frame...
... corner of the SD memory card. This connector does not support up -conversion. 29 1394 connector • Connect an IEEE1394 cable to this button to change playback speed and in the setting menu screen to turn pages. • During variable speed playback press this connector. • Select 1394 DEVICE or 1394 HOST under the menu option PC MODE in 2006, for a scene file already recorded with a different frame...

Operating Instructions
Page 39
... formats provide a slow motion effect when processed using the 30P recording format for editing extends the BoCe, CoDe, FoGe and GoHe fields into adjacent frames, which causes a drop in the progressive mode. Shooting in the 1080i/480i Progressive Mode Selecting 30P, 24P or 24PA (1080i or 480i mode) in the REC FORMAT in the setting menu RECORDING SETUP screen enables shooting in the progressive mode. ■30P mode This mode enables shooting 30 fps video...
... formats provide a slow motion effect when processed using the 30P recording format for editing extends the BoCe, CoDe, FoGe and GoHe fields into adjacent frames, which causes a drop in the progressive mode. Shooting in the 1080i/480i Progressive Mode Selecting 30P, 24P or 24PA (1080i or 480i mode) in the REC FORMAT in the setting menu RECORDING SETUP screen enables shooting in the progressive mode. ■30P mode This mode enables shooting 30 fps video...
Operating Instructions
Page 44
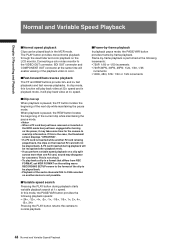
... Speed Playback ■Normal speed playback Clips can be played back in a format that differs from REC FORMAT, set MCR FORMAT on the setting menu RECORDING SETUP screen to the format of the clip to be played back. • Playback of the audio channels CH5 to CH8 recorded on another P2 card is paused, the REW button locates the beginning of the current clip while maintaining the pause mode. • When a P2 card has just been removed...
... Speed Playback ■Normal speed playback Clips can be played back in a format that differs from REC FORMAT, set MCR FORMAT on the setting menu RECORDING SETUP screen to the format of the clip to be played back. • Playback of the audio channels CH5 to CH8 recorded on another P2 card is paused, the REW button locates the beginning of the current clip while maintaining the pause mode. • When a P2 card has just been removed...

Operating Instructions
Page 58
Time data overview Time code Use the TCG switch to select Rec Run or Free Run mode. • Free Run: The time code advances constantly whether the camera is on video in the LCD, viewfinder and VIDEO OUT and other abnormality User bits • There are recorded in the VIDEO AUX area. • The subcode user bits enable the recording of user settings, time, date, time code and similar values, the frame rate data for Recording Setting Time Data This camera records time data such as...
Time data overview Time code Use the TCG switch to select Rec Run or Free Run mode. • Free Run: The time code advances constantly whether the camera is on video in the LCD, viewfinder and VIDEO OUT and other abnormality User bits • There are recorded in the VIDEO AUX area. • The subcode user bits enable the recording of user settings, time, date, time code and similar values, the frame rate data for Recording Setting Time Data This camera records time data such as...

Operating Instructions
Page 60
... digit starts blinking you can change the value. 60 Setting Time Data However, the following events release a user bit slave status. • When the setting menu TC IN UB REGEN or 1394 UB REGEN is set the TCG switch to SET to open the setting menu TC PRESET screen. Set values are retained after the power is turned off . A natively recorded clip is highlighted. Chapter 4 Adjustments and Settings for Recording Setting user bits Use the setting menu UB MODE...
... digit starts blinking you can change the value. 60 Setting Time Data However, the following events release a user bit slave status. • When the setting menu TC IN UB REGEN or 1394 UB REGEN is set the TCG switch to SET to open the setting menu TC PRESET screen. Set values are retained after the power is turned off . A natively recorded clip is highlighted. Chapter 4 Adjustments and Settings for Recording Setting user bits Use the setting menu UB MODE...
Operating Instructions
Page 65
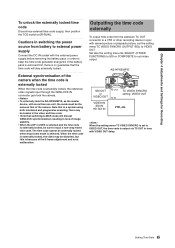
... battery pack is removed first, there is no guarantee that of image stability. • When the 24P or 24PA is selected and the time code is externally locked, be the same as the master device, with camera picture or playback picture, set to VIDEO OUT, the time code is output via TC OUT in order to a VTR or other recording device in loss of the camera. When the setting menu...
... battery pack is removed first, there is no guarantee that of image stability. • When the 24P or 24PA is selected and the time code is externally locked, be the same as the master device, with camera picture or playback picture, set to VIDEO OUT, the time code is output via TC OUT in order to a VTR or other recording device in loss of the camera. When the setting menu...

Operating Instructions
Page 66
... playback. Chapter 4 Adjustments and Settings for Recording GENLOCK and time code input/output connection and setup Camera operating conditions Recording format Video and reference signal to view the counter displays the counter value on the time code indicator in the LCD and in the viewfinder. Counter Setting and Display Pressing the COUNTER button to be output externally SDI OUT (1080i) GENLOCK input VIDEO OUT 1080i 1080i SDI OUT (1080i) SD (480i, 576i) VIDEO OUT Camera setup GL SELECT GL PHASE SDI COMPOSITE SDI Disabled...
... playback. Chapter 4 Adjustments and Settings for Recording GENLOCK and time code input/output connection and setup Camera operating conditions Recording format Video and reference signal to view the counter displays the counter value on the time code indicator in the LCD and in the viewfinder. Counter Setting and Display Pressing the COUNTER button to be output externally SDI OUT (1080i) GENLOCK input VIDEO OUT 1080i 1080i SDI OUT (1080i) SD (480i, 576i) VIDEO OUT Camera setup GL SELECT GL PHASE SDI COMPOSITE SDI Disabled...
Operating Instructions
Page 69
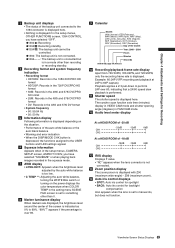
... 60, indicating that a 24/60 speed slow playback is performed. 11 Shutter speed The shutter speed is displayed here. The synchro scan function sets time (minutes) display in VIDEO CAM mode and shutter opening angle (degrees) in the setting menu SCENE FILE screen is set to manual iris, but is in a mode other than recording or recording standby. 4 Recording format and system frequency indication • Recording format • HD1080i: Records in the 1080i DVCPRO HD format • HD720P: Records in the 720P DVCPRO HD...
... 60, indicating that a 24/60 speed slow playback is performed. 11 Shutter speed The shutter speed is displayed here. The synchro scan function sets time (minutes) display in VIDEO CAM mode and shutter opening angle (degrees) in the setting menu SCENE FILE screen is set to manual iris, but is in a mode other than recording or recording standby. 4 Recording format and system frequency indication • Recording format • HD1080i: Records in the 1080i DVCPRO HD format • HD720P: Records in the 720P DVCPRO HD...
Operating Instructions
Page 70
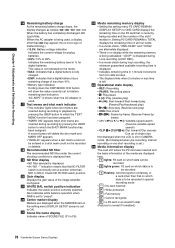
... displayed when pre-recording, interval recording or one-shot recording is set to ON. 23 Scene file name display Indicates name of SCENE FILE (F1 to F6). 24 Media remaining memory display • Setting the setting menu P2 CARD REMAIN (DISPLAY SETUP) to be recorded. • 1 Flashes: Card recognition underway, or a card other than that a digital battery has a remaining charge of less than 10%. • Battery type indication Holding down the DISP/MODE CHK button will delete...
... displayed when pre-recording, interval recording or one-shot recording is set to ON. 23 Scene file name display Indicates name of SCENE FILE (F1 to F6). 24 Media remaining memory display • Setting the setting menu P2 CARD REMAIN (DISPLAY SETUP) to be recorded. • 1 Flashes: Card recognition underway, or a card other than that a digital battery has a remaining charge of less than 10%. • Battery type indication Holding down the DISP/MODE CHK button will delete...
Operating Instructions
Page 72
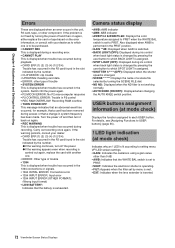
... INPUT ERROR (OTHER FORMAT): (Wrong input format) • LOW BATTERY: Indicates that the battery is set to PRST. For details, see [Assigning Functions to setting menu VF! LED is not working normally. • AUTO KNEE (ON/OFF): Displayed when changing the AUTO KNEE switch position. LED light indication (at mode check) Displays the function assigned to be purchased. • CANNOT REC This is displayed during a recording error. • CANNOT PLAY This is displayed when trouble has occurred during playback. • CARD...
... INPUT ERROR (OTHER FORMAT): (Wrong input format) • LOW BATTERY: Indicates that the battery is set to PRST. For details, see [Assigning Functions to setting menu VF! LED is not working normally. • AUTO KNEE (ON/OFF): Displayed when changing the AUTO KNEE switch position. LED light indication (at mode check) Displays the function assigned to be purchased. • CANNOT REC This is displayed during a recording error. • CANNOT PLAY This is displayed when trouble has occurred during playback. • CARD...
Operating Instructions
Page 79
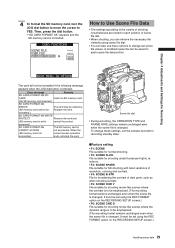
... MENU TO RETURN The card will not be Replace the card. formatted.) SD CARD FORMAT NG WRITE PROTECT Remove the card and (SD memory card is CANNOT ACCESS not accessible. protected.) SD CARD FORMAT NG The SD memory card is write- To change set using the REC FORMAT option on the RECORDING SETUP screen.) • F6: SCENE CINE D File suitable for shooting movie-like scenes where the contrast is to recording standby state. ■Factory setting • F1: SCENE File suitable for shooting movie...
... MENU TO RETURN The card will not be Replace the card. formatted.) SD CARD FORMAT NG WRITE PROTECT Remove the card and (SD memory card is CANNOT ACCESS not accessible. protected.) SD CARD FORMAT NG The SD memory card is write- To change set using the REC FORMAT option on the RECORDING SETUP screen.) • F6: SCENE CINE D File suitable for shooting movie-like scenes where the contrast is to recording standby state. ■Factory setting • F1: SCENE File suitable for shooting movie...

Operating Instructions
Page 126
... SD format. ●AUTO: Changes automatically to the appropriate ratio according to read. ●ON: Lowers background transparency. This function is set respective value using the right and left and right at a 16:9 aspect ratio. Select HIGH for lighting the "!" Chapter 7 Menu Operations Item Description of settings (Items in bold are displayed at selfportrait shooting. ●NORMAL, MIRROR DOWNCON MODE / Switches down-conversion output mode. ●...
... SD format. ●AUTO: Changes automatically to the appropriate ratio according to read. ●ON: Lowers background transparency. This function is set respective value using the right and left and right at a 16:9 aspect ratio. Select HIGH for lighting the "!" Chapter 7 Menu Operations Item Description of settings (Items in bold are displayed at selfportrait shooting. ●NORMAL, MIRROR DOWNCON MODE / Switches down-conversion output mode. ●...

Operating Instructions
Page 129
... unit does not have a rec pause function, select STOP. Enables or disables the access LED. Sets how the REC START/STOP button works for copying files from the P2 card onto an external hard disk drive using a backup unit connected to indicate that automatically engages the CAMERA mode and starts shooting when pressing the START/STOP button in the MCR mode) starts camera recording but does not set +12:45.) ●0:00 Sets the Menu language. ●ENGLISH ●JAPANESE ●...
... unit does not have a rec pause function, select STOP. Enables or disables the access LED. Sets how the REC START/STOP button works for copying files from the P2 card onto an external hard disk drive using a backup unit connected to indicate that automatically engages the CAMERA mode and starts shooting when pressing the START/STOP button in the MCR mode) starts camera recording but does not set +12:45.) ●0:00 Sets the Menu language. ●ENGLISH ●JAPANESE ●...
Operating Instructions
Page 139
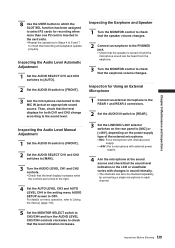
... the level display increases when the controls are turned to the right. 4 Set the AUTO LEVEL CH3 and AUTO LEVEL CH4 in sound intensity. • The channels can be checked separately by connecting a single microphone to each channel. 5 Set the MONITOR SELECT switch to CH3/CH4 and turn the AUDIO LEVEL CH3/CH4 controls clockwise to check that the earphone volume changes. For details on the power supply type of the external microphone. • MIC: For a microphone with internal power...
... the level display increases when the controls are turned to the right. 4 Set the AUTO LEVEL CH3 and AUTO LEVEL CH4 in sound intensity. • The channels can be checked separately by connecting a single microphone to each channel. 5 Set the MONITOR SELECT switch to CH3/CH4 and turn the AUDIO LEVEL CH3/CH4 controls clockwise to check that the earphone volume changes. For details on the power supply type of the external microphone. • MIC: For a microphone with internal power...

Operating Instructions
Page 142
... recording. The camera stops automatically when the voltage drops. necessary. Operation stops. A P2 card was corrupted. Turn the power off and The 1394 cable back on again. Continuous tone Recording and playback stop. Stop recording. *4 again and check recording and playback. Repair the P2 card if the clips on the card are connected. (Normal PC mode operation is Connect a hard disk drive according to Blinks red P2CARD, the (appears only for recording.Stop recording. *3 recording. LOW BATTERY blink orange (4 Hz) Red blinking, and the battery level...
... recording. The camera stops automatically when the voltage drops. necessary. Operation stops. A P2 card was corrupted. Turn the power off and The 1394 cable back on again. Continuous tone Recording and playback stop. Stop recording. *4 again and check recording and playback. Repair the P2 card if the clips on the card are connected. (Normal PC mode operation is Connect a hard disk drive according to Blinks red P2CARD, the (appears only for recording.Stop recording. *3 recording. LOW BATTERY blink orange (4 Hz) Red blinking, and the battery level...


