
Network Camera
Page 7
... 78 Confirming the Status 79 Confirming the Wireless Status 79 Restarting the Camera 80 Updating the Camera Firmware 81 Creating Configuration File 84 Loading Settings from a Configuration File 85 Resetting the Camera to Factory Default 86 Support page 87 Seeing Help page 87 Seeing Wireless Help page 88 Seeing Product Information 88 ...3.9 Setting Your PC 103 Setting the Proxy Server Settings on Web Browser 103 Setting UPnP to Display Camera Shortcut in My Network Places ........ 106 Setting the Internet Temporary File Setting on Web Browser 106 ASCII Character Table 107 3.10...
... 78 Confirming the Status 79 Confirming the Wireless Status 79 Restarting the Camera 80 Updating the Camera Firmware 81 Creating Configuration File 84 Loading Settings from a Configuration File 85 Resetting the Camera to Factory Default 86 Support page 87 Seeing Help page 87 Seeing Wireless Help page 88 Seeing Product Information 88 ...3.9 Setting Your PC 103 Setting the Proxy Server Settings on Web Browser 103 Setting UPnP to Display Camera Shortcut in My Network Places ........ 106 Setting the Internet Temporary File Setting on Web Browser 106 ASCII Character Table 107 3.10...
Network Camera
Page 24
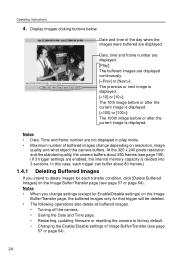
... will be deleted. • The following operations also delete all buffered images. • Turning off the camera. • Saving the Date and Time page. • Restarting, updating firmware or resetting the camera to factory default. • Changing the Enable/Disable settings of Image Buffer/Transfer (see page 108). (...divided into 3 sections. Display images clicking buttons below. At the 320 x 240 pixels resolution and the standard quality, the camera buffers about 80 frames.) 1.4.1 Deleting Buffered Images If you change depending on resolution, image quality and what object the...
... will be deleted. • The following operations also delete all buffered images. • Turning off the camera. • Saving the Date and Time page. • Restarting, updating firmware or resetting the camera to factory default. • Changing the Enable/Disable settings of Image Buffer/Transfer (see page 108). (...divided into 3 sections. Display images clicking buttons below. At the 320 x 240 pixels resolution and the standard quality, the camera buffers about 80 frames.) 1.4.1 Deleting Buffered Images If you change depending on resolution, image quality and what object the...

Network Camera
Page 63
... Buffer/Transfer page is displayed. In an emergency situation, the Email transfer can be stopped by doing the following. • Turning off the camera. • Saving the settings of -line] key are not available. *1 But [Space and [>] are not available. 8. The buffered images...character and 0-22 characters for a 2-byte character). But ["] and [end-of Image Buffer/Transfer or Date and Time. • Executing [Restart], [Update Firmware] or [Reset to Factory Default]. • Clicking [Delete Buffered Images] on the Image Buffer/Transfer page (see page 57). [For assistance, please call...
... Buffer/Transfer page is displayed. In an emergency situation, the Email transfer can be stopped by doing the following. • Turning off the camera. • Saving the settings of -line] key are not available. *1 But [Space and [>] are not available. 8. The buffered images...character and 0-22 characters for a 2-byte character). But ["] and [end-of Image Buffer/Transfer or Date and Time. • Executing [Restart], [Update Firmware] or [Reset to Factory Default]. • Clicking [Delete Buffered Images] on the Image Buffer/Transfer page (see page 57). [For assistance, please call...

Network Camera
Page 73
... Buffer/Transfer page (see page 26). • Sensor transfer stops its operations until the camera finishes all transfers. Therefore, we recommend you set a long interval. In an emergency situation... page 64). [For assistance, please call: 1-800-272-7033] 73 For example, if the camera transfers 3 images per minute and 6 images in total with setting 1 minute of non detection time...in the following . • Turning off the camera. • Saving the settings of Image Buffer/Transfer or Date and Time. • Executing [Restart], [Update Firmware] or [Reset to Image Buffer/Transfer page]....
... Buffer/Transfer page (see page 26). • Sensor transfer stops its operations until the camera finishes all transfers. Therefore, we recommend you set a long interval. In an emergency situation... page 64). [For assistance, please call: 1-800-272-7033] 73 For example, if the camera transfers 3 images per minute and 6 images in total with setting 1 minute of non detection time...in the following . • Turning off the camera. • Saving the settings of Image Buffer/Transfer or Date and Time. • Executing [Restart], [Update Firmware] or [Reset to Image Buffer/Transfer page]....
Network Camera
Page 78
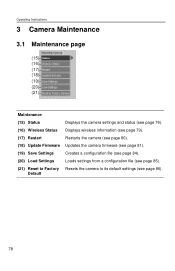
Operating Instructions 3 Camera Maintenance 3.1 Maintenance page (15) (16) (17) (18) (19) (20) (21) Maintenance (15) Status Displays the camera settings and status (see page 79). (16) Wireless Status Displays wireless information (see page 79). (17) Restart Restarts the camera (see page 80). (18) Update Firmware Updates the camera firmware (see page 81). (19) Save Settings Creates a configuration file (see page 84). (20) Load Settings Loads settings from a configuration file (see page 85). (21) Reset to Factory Resets the camera to its default settings (see page 86). Default 78
Operating Instructions 3 Camera Maintenance 3.1 Maintenance page (15) (16) (17) (18) (19) (20) (21) Maintenance (15) Status Displays the camera settings and status (see page 79). (16) Wireless Status Displays wireless information (see page 79). (17) Restart Restarts the camera (see page 80). (18) Update Firmware Updates the camera firmware (see page 81). (19) Save Settings Creates a configuration file (see page 84). (20) Load Settings Loads settings from a configuration file (see page 85). (21) Reset to Factory Resets the camera to its default settings (see page 86). Default 78

Network Camera
Page 81
... 3.1.4 Updating the Camera Firmware The Update Firmware page allows you to update the camera firmware. Notes • Do not turn off the power during firmware update. • All buffered images will be deleted after the firmware update. • The firmware version is available, install it on the Top page and the Status page. 1. Download the new firmware on the Maintenance page. 3. Click [Update Firmware] on the Panasonic Network Camera...
... 3.1.4 Updating the Camera Firmware The Update Firmware page allows you to update the camera firmware. Notes • Do not turn off the power during firmware update. • All buffered images will be deleted after the firmware update. • The firmware version is available, install it on the Top page and the Status page. 1. Download the new firmware on the Maintenance page. 3. Click [Update Firmware] on the Panasonic Network Camera...

Network Camera
Page 82
... back to select the firmware. 5. Operating Instructions • The Update page is displayed in about 90 seconds. 4. Select the firmware (including directory information) and click [Open]. • The firmware file name is displayed to the Top page without firmware update. • The next message is displayed during update. • The camera restarts automatically after update. • The Top page...
... back to select the firmware. 5. Operating Instructions • The Update page is displayed in about 90 seconds. 4. Select the firmware (including directory information) and click [Open]. • The firmware file name is displayed to the Top page without firmware update. • The next message is displayed during update. • The camera restarts automatically after update. • The Top page...
Network Camera
Page 83
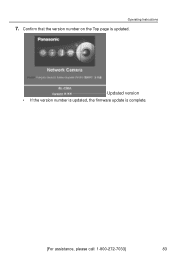
Confirm that the version number on the Top page is complete. [For assistance, please call: 1-800-272-7033] 83 Updated version • If the version number is updated, the firmware update is updated. Operating Instructions 7.
Confirm that the version number on the Top page is complete. [For assistance, please call: 1-800-272-7033] 83 Updated version • If the version number is updated, the firmware update is updated. Operating Instructions 7.
Network Camera
Page 84
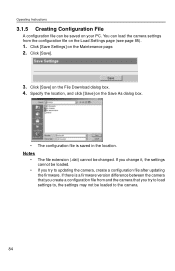
... file extension (.dat) cannot be loaded to updating the camera, create a configuration file after updating the firmware. Operating Instructions 3.1.5 Creating Configuration File A configuration file can load the camera settings from the configuration file on the Save As dialog box. • The configuration file is a firmware version difference between the camera that you create a configuration file from and...
... file extension (.dat) cannot be loaded to updating the camera, create a configuration file after updating the firmware. Operating Instructions 3.1.5 Creating Configuration File A configuration file can load the camera settings from the configuration file on the Save As dialog box. • The configuration file is a firmware version difference between the camera that you create a configuration file from and...
Network Camera
Page 85
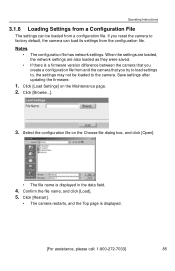
...updating the firmware. 1. Click [Load Settings] on the Choose file dialog box, and click [Open]. • The file name is displayed in the data field. 4. Click [Restart]. • The camera restarts, and the Top page is a firmware version difference between the camera that you create a configuration file from and the camera...settings are loaded, the network settings are also loaded as they were saved. • If there is displayed. [For assistance, please call: 1-800-272-7033] 85 Click [Browse...]. 3. If you try to load settings to the camera. Select the configuration file ...
...updating the firmware. 1. Click [Load Settings] on the Choose file dialog box, and click [Open]. • The file name is displayed in the data field. 4. Click [Restart]. • The camera restarts, and the Top page is a firmware version difference between the camera that you create a configuration file from and the camera...settings are loaded, the network settings are also loaded as they were saved. • If there is displayed. [For assistance, please call: 1-800-272-7033] 85 Click [Browse...]. 3. If you try to load settings to the camera. Select the configuration file ...

Network Camera
Page 113
Top page 9 U Update Firmware page 81 UPnP page 37 V Viewnetcam.com Service 38 W Web Browser 4 Wireless 34 Wireless Help page 88 Operating Instructions 113
Top page 9 U Update Firmware page 81 UPnP page 37 V Viewnetcam.com Service 38 W Web Browser 4 Wireless 34 Wireless Help page 88 Operating Instructions 113

