
Network Camera
Page 7
...Loading Settings from a Configuration File 85 Resetting the Camera to Factory Default 86 Support page 87 Seeing Help page 87 Seeing Wireless Help page 88 Seeing Product Information 88 Seeing Support Information 88 FACTORY DEFAULT RESET Button 89 3.4 Default Setting List 90 3.5 3.5.1 3.5.2 3.6 Cleaning ...Browser 103 Setting UPnP to Display Camera Shortcut in My Network Places ........ 106 Setting the Internet Temporary File Setting on Web Browser 106 ASCII Character Table 107 3.10 File Size and Number of Buffered Images 108 3.11 Specifications 109 Index 111 [For assistance...
...Loading Settings from a Configuration File 85 Resetting the Camera to Factory Default 86 Support page 87 Seeing Help page 87 Seeing Wireless Help page 88 Seeing Product Information 88 Seeing Support Information 88 FACTORY DEFAULT RESET Button 89 3.4 Default Setting List 90 3.5 3.5.1 3.5.2 3.6 Cleaning ...Browser 103 Setting UPnP to Display Camera Shortcut in My Network Places ........ 106 Setting the Internet Temporary File Setting on Web Browser 106 ASCII Character Table 107 3.10 File Size and Number of Buffered Images 108 3.11 Specifications 109 Index 111 [For assistance...

Network Camera
Page 8
..., and page 11 in the order from 50000 to 50050. Enter the administrator's or the general user's user name and password, and the Top page is desired, the port number will be changed because some ISPs block port 80. Operating Instructions 1 Camera Monitoring 1.1 Accessing the Camera 1. E.g. http...(or URL):Port Number" on the address bar, and press [Enter] on your PC. 2. Note When [Prohibiting unregistered users] is 80 (default), you do not need to the camera is displayed. 8 It is changed in the Installation/ Troubleshooting. • If the Internet access to enter port number.
..., and page 11 in the order from 50000 to 50050. Enter the administrator's or the general user's user name and password, and the Top page is desired, the port number will be changed because some ISPs block port 80. Operating Instructions 1 Camera Monitoring 1.1 Accessing the Camera 1. E.g. http...(or URL):Port Number" on the address bar, and press [Enter] on your PC. 2. Note When [Prohibiting unregistered users] is 80 (default), you do not need to the camera is displayed. 8 It is changed in the Installation/ Troubleshooting. • If the Internet access to enter port number.
Network Camera
Page 10
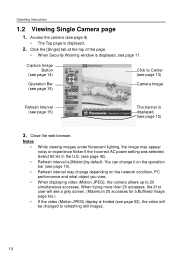
...see page 15) The banner is [Motion] by default. Capture Image Button (see page 14) Operation Bar (see page 15) Click to Center (see page 13) Camera Image Refresh Interval (see page 12) 3. Notes ..., the image may change it on the network condition, PC performance and what object you view. • When displaying video (Motion JPEG), the camera allows up to refreshing still images. 10 ...the top of the page. • When Security Warning window is limited (see page 11. Access the camera (see page 15). • Refresh interval may appear noisy or experience flicker if ...
...see page 15) The banner is [Motion] by default. Capture Image Button (see page 14) Operation Bar (see page 15) Click to Center (see page 13) Camera Image Refresh Interval (see page 12) 3. Notes ..., the image may change it on the network condition, PC performance and what object you view. • When displaying video (Motion JPEG), the camera allows up to refreshing still images. 10 ...the top of the page. • When Security Warning window is limited (see page 11. Access the camera (see page 15). • Refresh interval may appear noisy or experience flicker if ...

Network Camera
Page 15
... Preset End, Right End, Up End and Down End), End Display: Display appears. Sensor Position: When the sensor detects a temperature difference, the camera can be refreshed. [For assistance, please call: 1-800-272-7033] 15 Refresh Interval: Sets a refresh interval. (Motion-60-second interval) Resolution...: Selects [640 x 480] or [320 x 240] (default) pixels. The image will be set up to turn to this position. Image Quality: Selects the image quality. • [Favor Clarity] optimizes the ...
... Preset End, Right End, Up End and Down End), End Display: Display appears. Sensor Position: When the sensor detects a temperature difference, the camera can be refreshed. [For assistance, please call: 1-800-272-7033] 15 Refresh Interval: Sets a refresh interval. (Motion-60-second interval) Resolution...: Selects [640 x 480] or [320 x 240] (default) pixels. The image will be set up to turn to this position. Image Quality: Selects the image quality. • [Favor Clarity] optimizes the ...

Network Camera
Page 21
...Camera page. [For assistance, please call: 1-800-272-7033] 21 Capture Image Button (see page 55). 1. If you need to configure each camera on the Multi-Camera Setup page (see page 14) Switches cameras to 12 camera images. When clicking the camera name, the Single Camera... page is displayed. 2. Operating Instructions 1.3 Viewing Multi-Camera page To view multiple cameras on the Multi-Camera... displayed. Access the camera (see page 8). ...
...Camera page. [For assistance, please call: 1-800-272-7033] 21 Capture Image Button (see page 55). 1. If you need to configure each camera on the Multi-Camera Setup page (see page 14) Switches cameras to 12 camera images. When clicking the camera name, the Single Camera... page is displayed. 2. Operating Instructions 1.3 Viewing Multi-Camera page To view multiple cameras on the Multi-Camera... displayed. Access the camera (see page 8). ...
Network Camera
Page 24
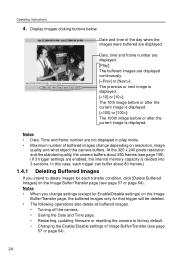
...Play]: The buffered images are enabled, the internal memory capacity is displayed. At the 320 x 240 pixels resolution and the standard quality, the camera buffers about 80 frames.) 1.4.1 Deleting Buffered Images If you change settings (except for Enable/Disable settings) on the Image Buffer/Transfer page, the...into 3 sections. Date and time of Image Buffer/Transfer (see page 57 or page 64). Notes • When you intend to factory default. • Changing the Enable/Disable settings of the day when the images were buffered are not displayed in play mode. • Maximum number...
...Play]: The buffered images are enabled, the internal memory capacity is displayed. At the 320 x 240 pixels resolution and the standard quality, the camera buffers about 80 frames.) 1.4.1 Deleting Buffered Images If you change settings (except for Enable/Disable settings) on the Image Buffer/Transfer page, the...into 3 sections. Date and time of Image Buffer/Transfer (see page 57 or page 64). Notes • When you intend to factory default. • Changing the Enable/Disable settings of the day when the images were buffered are not displayed in play mode. • Maximum number...

Network Camera
Page 25
... or 8 on the mobile phone page. Registered presets 5-8 are available by activating the link on the mobile phones allows you to pan or tilt the camera in four directions: Left, Up, Down or Right. Operating Instructions 1.5 Viewing Still Images on a mobile phone and press [OK]. • When the ...port number is set to 80 (default), it , access the camera again and execute [Disable Privacy Mode] (see page 77). [For assistance, please call: 1-800-272-7033] 25 Enter "http://IP address ...
... or 8 on the mobile phone page. Registered presets 5-8 are available by activating the link on the mobile phones allows you to pan or tilt the camera in four directions: Left, Up, Down or Right. Operating Instructions 1.5 Viewing Still Images on a mobile phone and press [OK]. • When the ...port number is set to 80 (default), it , access the camera again and execute [Disable Privacy Mode] (see page 77). [For assistance, please call: 1-800-272-7033] 25 Enter "http://IP address ...

Network Camera
Page 30
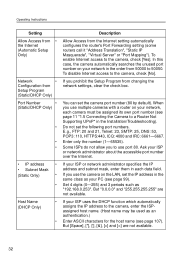
... without saving changes. 30 Normally sets Automatic Setup. Automatic Setup The camera automatically obtains the network settings (subnet mask, default gateway and DNS server address) utilizing a DHCP feature on the Setup page. 2. The camera also automatically searches the unused IP address on your network in the proper data field. Uses ISP DHCP server function. •...
... without saving changes. 30 Normally sets Automatic Setup. Automatic Setup The camera automatically obtains the network settings (subnet mask, default gateway and DNS server address) utilizing a DHCP feature on the Setup page. 2. The camera also automatically searches the unused IP address on your network in the proper data field. Uses ISP DHCP server function. •...
Network Camera
Page 32
...page 107). When you use port 80. If your network, each data field. If your ISP or network administrator about the accessible port number over the Internet. Do not set the camera port number (80 by default). Some ISPs do not allow you prohibit the Setup ... (0-255) and 3 periods such as an authentication.) Enter ASCII characters for the host name (see page 11 "1.5 Connecting the Camera to use the camera on your ISP or network administrator specifies the IP address and subnet mask, enter them in the Installation/Troubleshooting). Operating Instructions Setting Allow ...
...page 107). When you use port 80. If your network, each data field. If your ISP or network administrator about the accessible port number over the Internet. Do not set the camera port number (80 by default). Some ISPs do not allow you prohibit the Setup ... (0-255) and 3 periods such as an authentication.) Enter ASCII characters for the host name (see page 11 "1.5 Connecting the Camera to use the camera on your ISP or network administrator specifies the IP address and subnet mask, enter them in the Installation/Troubleshooting). Operating Instructions Setting Allow ...

Network Camera
Page 33
...8226; Address*1 (Static/DHCP Only) • • DNS server address is required in the following file sizes. For the wireless connection, [Auto Negotiation] must be restricted. • Select the maximum bandwidth usage from the DHCP server, you do not ...cameras by their host names on the image quality or how bright the object is not displayed." But "0.0.0.0" and "255.255.255.255" are not available. Max. Operating Instructions Setting Description Default Gateway*1 • (Static/DHCP Only) • If you have the assigned Default Gateway address by your ISP or network...
...8226; Address*1 (Static/DHCP Only) • • DNS server address is required in the following file sizes. For the wireless connection, [Auto Negotiation] must be restricted. • Select the maximum bandwidth usage from the DHCP server, you do not ...cameras by their host names on the image quality or how bright the object is not displayed." But "0.0.0.0" and "255.255.255.255" are not available. Max. Operating Instructions Setting Description Default Gateway*1 • (Static/DHCP Only) • If you have the assigned Default Gateway address by your ISP or network...

Network Camera
Page 37
... page 106). 3. Click [Go to access the camera from the Internet. See http://panasonic.co.jp/pcc/products/en/netwkcam/technic/rtr_setup for details and see page 32). Enable UPnP Windows component before using this feature as the default setting. Click [Save] when finished. • ... is displayed. [For assistance, please call: 1-800-272-7033] 37 Note If the network setting is available. After the UPnP is displayed. 4. Setting Description Auto Port Forwarding • If the network setting is [Static] or [DHCP], enabling auto port forwarding allows you use this feature ...
... page 106). 3. Click [Go to access the camera from the Internet. See http://panasonic.co.jp/pcc/products/en/netwkcam/technic/rtr_setup for details and see page 32). Enable UPnP Windows component before using this feature as the default setting. Click [Save] when finished. • ... is displayed. [For assistance, please call: 1-800-272-7033] 37 Note If the network setting is available. After the UPnP is displayed. 4. Setting Description Auto Port Forwarding • If the network setting is [Static] or [DHCP], enabling auto port forwarding allows you use this feature ...

Network Camera
Page 43
... be selected as minimum home position maximum. [For assistance, please call: 1-800-272-7033] 43 Select from the following options. • Auto (default) - Daylight (4000 K) (Daylight) • Fixed Outdoor - Solar light (6000 K) • Hold - Setting [Hold] keeps the current white... AC Power Source Frequency Pan Range*1 Description • The camera name is also saved in each language (1-15 characters for a 1-byte character and 1-7 characters for the United States. • 50 Hz • 60 Hz (default) Select from the following options. • Minimum - White...
... be selected as minimum home position maximum. [For assistance, please call: 1-800-272-7033] 43 Select from the following options. • Auto (default) - Daylight (4000 K) (Daylight) • Fixed Outdoor - Solar light (6000 K) • Hold - Setting [Hold] keeps the current white... AC Power Source Frequency Pan Range*1 Description • The camera name is also saved in each language (1-15 characters for a 1-byte character and 1-7 characters for the United States. • 50 Hz • 60 Hz (default) Select from the following options. • Minimum - White...

Network Camera
Page 53
... interval-60-second interval) Language • Select the initial language from Panasonic. Operating Instructions Setting Description Image Resolution • Select the image resolution. 640 x 480 pixels (Only for the Single Camera page) 320 x 240 pixels (default) 160 x 120 pixels (Only for the Multi-Camera page) Image Quality • Select the image quality. [Favor Clarity...
... interval-60-second interval) Language • Select the initial language from Panasonic. Operating Instructions Setting Description Image Resolution • Select the image resolution. 640 x 480 pixels (Only for the Single Camera page) 320 x 240 pixels (default) 160 x 120 pixels (Only for the Multi-Camera page) Image Quality • Select the image quality. [Favor Clarity...

Network Camera
Page 59
Operating Instructions Setting Image Resolution Image Quality Description • Select image resolution (640 x 480, 320 x 240 (default) or 160 x 120 pixels) to buffer or transfer. • Select the image quality. [Favor Clarity] optimizes for good quality. [Standard] offers standard quality. [Favor Motion] optimizes for enhanced motion. [Mobile Phone] is for a transfer to a mobile phone. Set the image buffer frequencies, and click [Next>]. • Clicking [ Note 640 x 480 pixels cannot be set for a transfer to a mobile phone. 6.
Operating Instructions Setting Image Resolution Image Quality Description • Select image resolution (640 x 480, 320 x 240 (default) or 160 x 120 pixels) to buffer or transfer. • Select the image quality. [Favor Clarity] optimizes for good quality. [Standard] offers standard quality. [Favor Motion] optimizes for enhanced motion. [Mobile Phone] is for a transfer to a mobile phone. Set the image buffer frequencies, and click [Next>]. • Clicking [ Note 640 x 480 pixels cannot be set for a transfer to a mobile phone. 6.

Network Camera
Page 60
Operating Instructions 7. Select the transfer method, and click [Next>]. • Clicking [
Operating Instructions 7. Select the transfer method, and click [Next>]. • Clicking [

Network Camera
Page 63
... to Image Buffer/Transfer page]. • The Image Buffer/Transfer page is displayed. mails may be deleted by doing the following. • Turning off the camera. • Saving the settings of -line] key are not available. *1 But [Space and [>] are not available. 8. Click [Go to set a ... a long interval. But ["] and [end-of Image Buffer/Transfer or Date and Time. • Executing [Restart], [Update Firmware] or [Reset to Factory Default]. • Clicking [Delete Buffered Images] on the Image Buffer/Transfer page (see page 57). [For assistance, please call: 1-800-272-7033] 63 In ...
... to Image Buffer/Transfer page]. • The Image Buffer/Transfer page is displayed. mails may be deleted by doing the following. • Turning off the camera. • Saving the settings of -line] key are not available. *1 But [Space and [>] are not available. 8. Click [Go to set a ... a long interval. But ["] and [end-of Image Buffer/Transfer or Date and Time. • Executing [Restart], [Update Firmware] or [Reset to Factory Default]. • Clicking [Delete Buffered Images] on the Image Buffer/Transfer page (see page 57). [For assistance, please call: 1-800-272-7033] 63 In ...

Network Camera
Page 66
Operating Instructions Setting Lens Position • When Triggered Description Set [Move to sensor position] to move the lens to the sensor position (see page 17) when the pyroelectric infrared sensor detects temperature differences. 6. Set the image settings, and click [Next>]. • Clicking [
Operating Instructions Setting Lens Position • When Triggered Description Set [Move to sensor position] to move the lens to the sensor position (see page 17) when the pyroelectric infrared sensor detects temperature differences. 6. Set the image settings, and click [Next>]. • Clicking [

Network Camera
Page 69
Select the transfer method, and click [Next>]. Operating Instructions • Clicking [ 8.
Select the transfer method, and click [Next>]. Operating Instructions • Clicking [ 8.

Network Camera
Page 73
...; Executing [Restart], [Update Firmware] or [Reset to Image Buffer/Transfer page]. • The Image Buffer/Transfer page is displayed. Operating Instructions 11. In an emergency situation, the Email transfer can be deleted by enabling privacy mode using a mobile phone (see page 64). [For assistance,... please call: 1-800-272-7033] 73 Click [Go to Factory Default]. • Clicking [Delete Buffered Images] on the Image Buffer/Transfer page (see page 26). • Sensor transfer stops its operations until the camera finishes all transfers. Notes • If you to set a short ...
...; Executing [Restart], [Update Firmware] or [Reset to Image Buffer/Transfer page]. • The Image Buffer/Transfer page is displayed. Operating Instructions 11. In an emergency situation, the Email transfer can be deleted by enabling privacy mode using a mobile phone (see page 64). [For assistance,... please call: 1-800-272-7033] 73 Click [Go to Factory Default]. • Clicking [Delete Buffered Images] on the Image Buffer/Transfer page (see page 26). • Sensor transfer stops its operations until the camera finishes all transfers. Notes • If you to set a short ...
Network Camera
Page 78
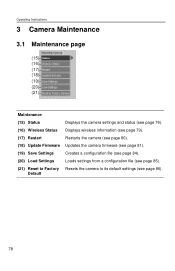
Default 78 Operating Instructions 3 Camera Maintenance 3.1 Maintenance page (15) (16) (17) (18) (19) (20) (21) Maintenance (15) Status Displays the camera settings and status (see page 79). (16) Wireless Status Displays wireless information (see page 79). (17) Restart Restarts the camera (see page 80). (18) Update Firmware Updates the camera firmware (see page 81). (19) Save Settings Creates a configuration file (see page 84). (20) Load Settings Loads settings from a configuration file (see page 85). (21) Reset to Factory Resets the camera to its default settings (see page 86).
Default 78 Operating Instructions 3 Camera Maintenance 3.1 Maintenance page (15) (16) (17) (18) (19) (20) (21) Maintenance (15) Status Displays the camera settings and status (see page 79). (16) Wireless Status Displays wireless information (see page 79). (17) Restart Restarts the camera (see page 80). (18) Update Firmware Updates the camera firmware (see page 81). (19) Save Settings Creates a configuration file (see page 84). (20) Load Settings Loads settings from a configuration file (see page 85). (21) Reset to Factory Resets the camera to its default settings (see page 86).


