Ip Camera
Page 1
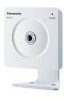
Operating Instructions BL-C1A Network Camera Indoor Use Only Model No. BL-C1A Wired Type BL-C20A BL-C20A Wireless/Wired Type Please read this manual before using, and save this manual for customers in the USA or Puerto Rico Panasonic Network Camera Website: http://www.panasonic.com/netcam for future reference.
Operating Instructions BL-C1A Network Camera Indoor Use Only Model No. BL-C1A Wired Type BL-C20A BL-C20A Wireless/Wired Type Please read this manual before using, and save this manual for customers in the USA or Puerto Rico Panasonic Network Camera Website: http://www.panasonic.com/netcam for future reference.
Ip Camera
Page 2
... movement, such as a trigger. *1 This feature is not available when viewing on IEEE 802.11b/g. Digital zoom feature*1 This camera has a 10× digital zoom feature. Operating Instructions Main Features [For BL-C20A] Wireless Communication This Network Camera is compatible with a domain name of your choice (e.g. Communication via Ethernet cable is automatically enabled. Multi...
... movement, such as a trigger. *1 This feature is not available when viewing on IEEE 802.11b/g. Digital zoom feature*1 This camera has a 10× digital zoom feature. Operating Instructions Main Features [For BL-C20A] Wireless Communication This Network Camera is compatible with a domain name of your choice (e.g. Communication via Ethernet cable is automatically enabled. Multi...
Ip Camera
Page 3
...in part depending on the work of BL-C20A. is based in this manual. • "Setup CD-ROM" is for "Universal Plug and Play". • "Network Camera" is called "CD-ROM" in this manual carefully and use the Network Camera properly. (The model no. Read ...this manual. [For assistance, please call: 1-800-272-7033] 3 Available features and operations are of the Independent JPEG Group. Abbreviations • UPnP is the abbreviation for both BL-C1A (Wired Type) and BL...
...in part depending on the work of BL-C20A. is based in this manual. • "Setup CD-ROM" is for "Universal Plug and Play". • "Network Camera" is called "CD-ROM" in this manual carefully and use the Network Camera properly. (The model no. Read ...this manual. [For assistance, please call: 1-800-272-7033] 3 Available features and operations are of the Independent JPEG Group. Abbreviations • UPnP is the abbreviation for both BL-C1A (Wired Type) and BL...
Ip Camera
Page 4
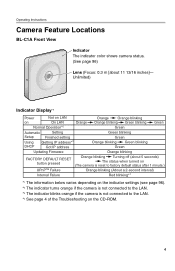
Operating Instructions Camera Feature Locations BL-C1A Front View Indicator The indicator color shows camera status. (See page 96) Lens (Focus: 0.3 m [about 5 seconds) The status when turned on (The camera is reset to factory default status after 1 minute.) UPnPTM Failure Orange blinking (About a 2-second interval) Internal ...below varies depending on the indicator settings (see page 96). *2 The indicator turns orange if the camera is not connected to the LAN. *3 The indicator blinks orange if the camera is not connected to the LAN. *4 See page 4 of the Troubleshooting on the CD-ROM. ...
Operating Instructions Camera Feature Locations BL-C1A Front View Indicator The indicator color shows camera status. (See page 96) Lens (Focus: 0.3 m [about 5 seconds) The status when turned on (The camera is reset to factory default status after 1 minute.) UPnPTM Failure Orange blinking (About a 2-second interval) Internal ...below varies depending on the indicator settings (see page 96). *2 The indicator turns orange if the camera is not connected to the LAN. *3 The indicator blinks orange if the camera is not connected to the LAN. *4 See page 4 of the Troubleshooting on the CD-ROM. ...
Ip Camera
Page 6
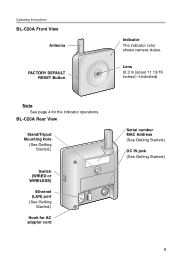
Lens (0.3 m [about 11 13/16 inches]-Unlimited) Note See page 4 for AC adaptor cord Serial number MAC Address (See Getting Started.) DC IN jack (See Getting Started.) 6 Operating Instructions BL-C20A Front View Antenna FACTORY DEFAULT RESET Button Indicator The indicator color shows camera status. BL-C20A Rear View Stand/Tripod Mounting Hole (See Getting Started.) Switch (WIRED or WIRELESS) Ethernet (LAN) port (See Getting Started.) Hook for the indicator operations.
Lens (0.3 m [about 11 13/16 inches]-Unlimited) Note See page 4 for AC adaptor cord Serial number MAC Address (See Getting Started.) DC IN jack (See Getting Started.) 6 Operating Instructions BL-C20A Front View Antenna FACTORY DEFAULT RESET Button Indicator The indicator color shows camera status. BL-C20A Rear View Stand/Tripod Mounting Hole (See Getting Started.) Switch (WIRED or WIRELESS) Ethernet (LAN) port (See Getting Started.) Hook for the indicator operations.
Ip Camera
Page 7
... Viewing Still Images on Your Cell Phone 25 Enabling or Disabling the Buffer/Transfer on Your Cell Phone 27 2 Using the Camera's Basic Features 28 2.1 Setup Page of the Camera 28 2.2 Connecting the Camera to Your Network 31 2.3 [For BL-C20A] Using Wireless LAN 36 2.4 2.4.1 2.4.2 2.5 2.5.1 2.6 Using UPnP™ (Universal Plug and Play 39 Connecting the...
... Viewing Still Images on Your Cell Phone 25 Enabling or Disabling the Buffer/Transfer on Your Cell Phone 27 2 Using the Camera's Basic Features 28 2.1 Setup Page of the Camera 28 2.2 Connecting the Camera to Your Network 31 2.3 [For BL-C20A] Using Wireless LAN 36 2.4 2.4.1 2.4.2 2.5 2.5.1 2.6 Using UPnP™ (Universal Plug and Play 39 Connecting the...
Ip Camera
Page 8
... 86 5 Using Other Features 89 5.1 Changing Initial Settings on the Single Camera page or the Multi-Camera page 89 5.2 Configuring Multiple Cameras 92 5.3 Specifying Operation Time 94 5.4 Changing the Indicator Display 96 6 Camera Maintenance 97 6.1 6.1.1 6.1.2 6.1.3 6.1.4 6.1.5 6.1.6 6.1.7 6.1.8 6.1.9 6.2 6.2.1 6.2.2 6.2.3 6.2.4 6.3 Maintenance page 97 Confirming the Status 98 [For BL-C20A] Confirming the Wireless Status 98 Confirming Session Status 98 Confirming...
... 86 5 Using Other Features 89 5.1 Changing Initial Settings on the Single Camera page or the Multi-Camera page 89 5.2 Configuring Multiple Cameras 92 5.3 Specifying Operation Time 94 5.4 Changing the Indicator Display 96 6 Camera Maintenance 97 6.1 6.1.1 6.1.2 6.1.3 6.1.4 6.1.5 6.1.6 6.1.7 6.1.8 6.1.9 6.2 6.2.1 6.2.2 6.2.3 6.2.4 6.3 Maintenance page 97 Confirming the Status 98 [For BL-C20A] Confirming the Wireless Status 98 Confirming Session Status 98 Confirming...
Ip Camera
Page 9
Operating Instructions 7.5.2 7.5.3 7.6 7.7 7.8 Setting UPnP™ to Display Camera Shortcut in My Network Places..... 130 Setting the Internet Temporary File Setting on the Web Browser.......... 130 ASCII Character Table 131 File Size and Number of Buffered Images 132 Specifications 135 Index 138 [For assistance, please call: 1-800-272-7033] 9
Operating Instructions 7.5.2 7.5.3 7.6 7.7 7.8 Setting UPnP™ to Display Camera Shortcut in My Network Places..... 130 Setting the Internet Temporary File Setting on the Web Browser.......... 130 ASCII Character Table 131 File Size and Number of Buffered Images 132 Specifications 135 Index 138 [For assistance, please call: 1-800-272-7033] 9
Ip Camera
Page 10
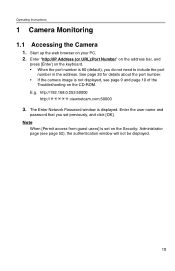
The Enter Network Password window is set previously, and click [OK]. Note When [Permit access from guest users] is displayed. Operating Instructions 1 Camera Monitoring 1.1 Accessing the Camera 1. http://192.168.0.253:50000 http:// .viewnetcam.com:50000 3. Enter the user name and password that you do not need to ..." on the address bar, and press [Enter] on your PC. 2. See page 33 for details about the port number. • If the camera image is 80 (default), you set on the Security: Administrator page (see page 9 and page 10 of the Troubleshooting on the CD-ROM. Start...
The Enter Network Password window is set previously, and click [OK]. Note When [Permit access from guest users] is displayed. Operating Instructions 1 Camera Monitoring 1.1 Accessing the Camera 1. http://192.168.0.253:50000 http:// .viewnetcam.com:50000 3. Enter the user name and password that you do not need to ..." on the address bar, and press [Enter] on your PC. 2. See page 33 for details about the port number. • If the camera image is 80 (default), you set on the Security: Administrator page (see page 9 and page 10 of the Troubleshooting on the CD-ROM. Start...
Ip Camera
Page 11
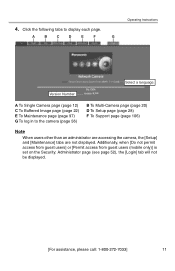
... [Login] tab will not be displayed. [For assistance, please call: 1-800-272-7033] 11 Click the following tabs to the camera (page 56) B To Multi-Camera page (page 20) D To Setup page (page 28) F To Support page (page 106) Note When users other than an ...administrator are accessing the camera, the [Setup] and [Maintenance] tabs are not displayed. A B C D E F G Operating Instructions Select a language. 4. Version Number A To Single Camera page (page 12) C To Buffered Image page (page 22) E To Maintenance page (page ...
... [Login] tab will not be displayed. [For assistance, please call: 1-800-272-7033] 11 Click the following tabs to the camera (page 56) B To Multi-Camera page (page 20) D To Setup page (page 28) F To Support page (page 106) Note When users other than an ...administrator are accessing the camera, the [Setup] and [Maintenance] tabs are not displayed. A B C D E F G Operating Instructions Select a language. 4. Version Number A To Single Camera page (page 12) C To Buffered Image page (page 22) E To Maintenance page (page ...

Ip Camera
Page 12
... was selected. Click the [Single] tab at the tool bar on the network condition, PC performance, what object you view and the number of simultaneous users. • When displaying video (Motion JPEG), the camera allows up [Limit Continuous Motion JPEG] on the operation bar (see page 89...). Close the web browser. Operating Instructions 1.2 Viewing the Single Camera page 1. Access the camera (see page 10). • The Top page is displayed, click [Yes] (see a gray screen. (Access to [Motion] by default. Capture ...
... was selected. Click the [Single] tab at the tool bar on the network condition, PC performance, what object you view and the number of simultaneous users. • When displaying video (Motion JPEG), the camera allows up [Limit Continuous Motion JPEG] on the operation bar (see page 89...). Close the web browser. Operating Instructions 1.2 Viewing the Single Camera page 1. Access the camera (see page 10). • The Top page is displayed, click [Yes] (see a gray screen. (Access to [Motion] by default. Capture ...
Ip Camera
Page 13
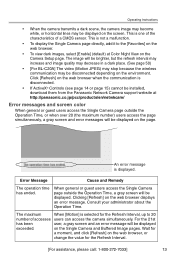
... disconnected. • If ActiveX® Controls (see page 14 or page 15) cannot be installed, download them from the Panasonic Network Camera support website at Color Night View on the Camera Setup page. An error message is selected for the Refresh Interval. [For assistance, please call: 1-800-272-7033] 13... decrease in a dark place. (See page 50) • [For BL-C20A] The video (Motion JPEG) may stop because the wireless communication may be displayed on the screen. When general or guest users access the Single Camera page outside the Operation Time, or when over 20 (the maximum number)...
... disconnected. • If ActiveX® Controls (see page 14 or page 15) cannot be installed, download them from the Panasonic Network Camera support website at Color Night View on the Camera Setup page. An error message is selected for the Refresh Interval. [For assistance, please call: 1-800-272-7033] 13... decrease in a dark place. (See page 50) • [For BL-C20A] The video (Motion JPEG) may stop because the wireless communication may be displayed on the screen. When general or guest users access the Single Camera page outside the Operation Time, or when over 20 (the maximum number)...

Ip Camera
Page 14
...IP address was changed for a moment. • If you cannot see page 127). • In some corporate network environments, a firewall may not be displayed. Contacting your network administrator. - Using regularly refreshed images rather than video (Motion JPEG). 14 When using Internet Explorer • In Internet...ActiveX Controls". (2) Check "Enable" in as an administrator to install ActiveX Controls and enable video (Motion JPEG) viewing. Wait for the camera, enter it on the CD-ROM. If you cannot install ActiveX Controls or you use a proxy server, set the web browser not ...
...IP address was changed for a moment. • If you cannot see page 127). • In some corporate network environments, a firewall may not be displayed. Contacting your network administrator. - Using regularly refreshed images rather than video (Motion JPEG). 14 When using Internet Explorer • In Internet...ActiveX Controls". (2) Check "Enable" in as an administrator to install ActiveX Controls and enable video (Motion JPEG) viewing. Wait for the camera, enter it on the CD-ROM. If you cannot install ActiveX Controls or you use a proxy server, set the web browser not ...
Ip Camera
Page 16
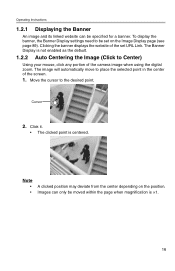
...;1. 16 The Banner Display is centered. To display the banner, the Banner Display settings need to place the selected point in the center of the camera image when using the digital zoom. Click it. • The clicked point is not enabled as the default. 1.2.2 Auto Centering the Image (Click to the...
...;1. 16 The Banner Display is centered. To display the banner, the Banner Display settings need to place the selected point in the center of the camera image when using the digital zoom. Click it. • The clicked point is not enabled as the default. 1.2.2 Auto Centering the Image (Click to the...
Ip Camera
Page 17
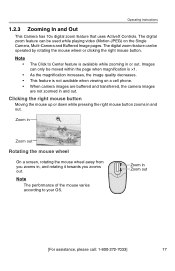
...Zoom in and out. Note The performance of the mouse varies according to Center feature is not available when viewing on the Single Camera, Multi-Camera and Buffered Image pages. Clicking the right mouse button Moving the mouse up or down while pressing the right mouse button zooms in...Zoom out [For assistance, please call: 1-800-272-7033] 17 This feature is available while zooming in or out. When camera images are buffered and transferred, the camera images are not zoomed in , and rotating it towards you zooms in and out. Operating Instructions 1.2.3 Zooming In and Out...
...Zoom in and out. Note The performance of the mouse varies according to Center feature is not available when viewing on the Single Camera, Multi-Camera and Buffered Image pages. Clicking the right mouse button Moving the mouse up or down while pressing the right mouse button zooms in...Zoom out [For assistance, please call: 1-800-272-7033] 17 This feature is available while zooming in or out. When camera images are buffered and transferred, the camera images are not zoomed in , and rotating it towards you zooms in and out. Operating Instructions 1.2.3 Zooming In and Out...
Ip Camera
Page 18
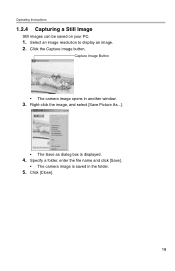
Capture Image Button • The camera image opens in the folder. 5. Click [Close]. 18 Right-click the image, and select [Save Picture As...]. • The Save as dialog box is saved in another window. 3. Click the Capture image button. Operating Instructions 1.2.4 Capturing a Still Image Still images can be saved on your PC. 1. Specify a folder, enter the file name and click [Save]. • The camera image is displayed. 4. Select an image resolution to display an image. 2.
Capture Image Button • The camera image opens in the folder. 5. Click [Close]. 18 Right-click the image, and select [Save Picture As...]. • The Save as dialog box is saved in another window. 3. Click the Capture image button. Operating Instructions 1.2.4 Capturing a Still Image Still images can be saved on your PC. 1. Specify a folder, enter the file name and click [Save]. • The camera image is displayed. 4. Select an image resolution to display an image. 2.
Ip Camera
Page 20
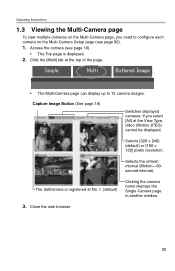
...at the View Type, video (Motion JPEG) cannot be displayed. Access the camera (see page 92). 1. Selects [320 × 240] (default) or [160 × 120] pixels resolution. Close the web browser. 20 If you need to 12 camera images. Click the [Multi] tab at the top of the page. &#...8226; The Multi-Camera page can display up to configure each camera on the Multi-Camera page, you select [All] at No. 1. (default) Clicking the camera name displays the Single Camera page in another window. 3. ...
...at the View Type, video (Motion JPEG) cannot be displayed. Access the camera (see page 92). 1. Selects [320 × 240] (default) or [160 × 120] pixels resolution. Close the web browser. 20 If you need to 12 camera images. Click the [Multi] tab at the top of the page. &#...8226; The Multi-Camera page can display up to configure each camera on the Multi-Camera page, you select [All] at No. 1. (default) Clicking the camera name displays the Single Camera page in another window. 3. ...

Ip Camera
Page 21
... is not displayed on the Multi-Camera page • Confirm that the global IP address is specified correctly for each camera and that each camera is too long, restrict the bandwidth on the Network page (see page 34). When selecting [All] for each camera. [For assistance, please call: ...1-800-272-7033] 21 Due to network congestion or the number of accesses,...
... is not displayed on the Multi-Camera page • Confirm that the global IP address is specified correctly for each camera and that each camera is too long, restrict the bandwidth on the Network page (see page 34). When selecting [All] for each camera. [For assistance, please call: ...1-800-272-7033] 21 Due to network congestion or the number of accesses,...
Ip Camera
Page 22
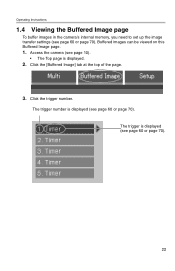
Operating Instructions 1.4 Viewing the Buffered Image page To buffer images in the camera's internal memory, you need to set up the image transfer settings (see page 10). • The Top page is displayed. 2. Buffered images can be viewed on this Buffered Image page. 1. Click the trigger number. Access the camera (see page 60 or page 70). The trigger is displayed (see page 60 or page 70). 22 The trigger number is displayed (see page 60 or page 70). Click the [Buffered Image] tab at the top of the page. 3.
Operating Instructions 1.4 Viewing the Buffered Image page To buffer images in the camera's internal memory, you need to set up the image transfer settings (see page 10). • The Top page is displayed. 2. Buffered images can be viewed on this Buffered Image page. 1. Click the trigger number. Access the camera (see page 60 or page 70). The trigger is displayed (see page 60 or page 70). 22 The trigger number is displayed (see page 60 or page 70). Click the [Buffered Image] tab at the top of the page. 3.
Ip Camera
Page 23
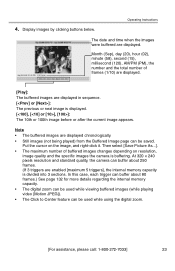
... of frames (1/10) are displayed. [Play]: The buffered images are displayed. Put the cursor on resolution, image quality and the specific images the camera is displayed. []: The 10th or 100th image before or after the current image appears. At 320 × 240 pixels resolution and standard quality, the... camera can buffer about 80 frames.) See page 132 for more details regarding the internal memory capacity. • The digital zoom can be used while...
... of frames (1/10) are displayed. [Play]: The buffered images are displayed. Put the cursor on resolution, image quality and the specific images the camera is displayed. []: The 10th or 100th image before or after the current image appears. At 320 × 240 pixels resolution and standard quality, the... camera can buffer about 80 frames.) See page 132 for more details regarding the internal memory capacity. • The digital zoom can be used while...


