Ip Camera
Page 2
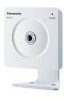
... using the Motion Detection function as people, based on a single page. bob.viewnetcam.com) instead of network. The Setup, Maintenance and Support pages are displayed only in English, French, German, Italian, Spanish, Russian, Simplified Chinese, Korean or Japanese. Operating Instructions Main Features [For BL-C20A] Wireless Communication This Network Camera is compatible with a domain name of your choice (e.g. Color Night View Mode The color night view mode provides better image quality and low light performance...
... using the Motion Detection function as people, based on a single page. bob.viewnetcam.com) instead of network. The Setup, Maintenance and Support pages are displayed only in English, French, German, Italian, Spanish, Russian, Simplified Chinese, Korean or Japanese. Operating Instructions Main Features [For BL-C20A] Wireless Communication This Network Camera is compatible with a domain name of your choice (e.g. Color Night View Mode The color night view mode provides better image quality and low light performance...
Ip Camera
Page 4
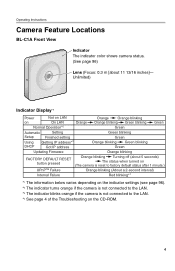
... indicator blinks orange if the camera is not connected to the LAN. *4 See page 4 of the Troubleshooting on LAN On LAN Orange Orange Orange blinking Orange blinking Green blinking Green Normal Operation*2 Green Automatic Setting Setup Finished setting Green blinking Green Using DHCP Getting IP address*3 Got IP address Orange blinking Green blinking Green Updating Firmware Orange blinking FACTORY DEFAULT RESET button pressed Orange blinking Turning off (about 11 13/16 inches]- Unlimited) Indicator Display*1 Power on Not...
... indicator blinks orange if the camera is not connected to the LAN. *4 See page 4 of the Troubleshooting on LAN On LAN Orange Orange Orange blinking Orange blinking Green blinking Green Normal Operation*2 Green Automatic Setting Setup Finished setting Green blinking Green Using DHCP Getting IP address*3 Got IP address Orange blinking Green blinking Green Updating Firmware Orange blinking FACTORY DEFAULT RESET button pressed Orange blinking Turning off (about 11 13/16 inches]- Unlimited) Indicator Display*1 Power on Not...
Ip Camera
Page 7
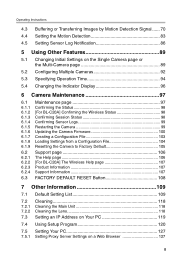
... Phone 27 2 Using the Camera's Basic Features 28 2.1 Setup Page of the Camera 28 2.2 Connecting the Camera to Your Network 31 2.3 [For BL-C20A] Using Wireless LAN 36 2.4 2.4.1 2.4.2 2.5 2.5.1 2.6 Using UPnP™ (Universal Plug and Play 39 Connecting the Camera to a Router that Supports UPnP 40 Connecting the Camera to a Router that does not Support UPnP™ ...... 41 Registering with the DynamicDNS service 42 DynamicDNS Service 46 Setting the Date and Time 48 2.7 Changing Camera Settings 50 3 Registering Users 52 3.1 Changing...
... Phone 27 2 Using the Camera's Basic Features 28 2.1 Setup Page of the Camera 28 2.2 Connecting the Camera to Your Network 31 2.3 [For BL-C20A] Using Wireless LAN 36 2.4 2.4.1 2.4.2 2.5 2.5.1 2.6 Using UPnP™ (Universal Plug and Play 39 Connecting the Camera to a Router that Supports UPnP 40 Connecting the Camera to a Router that does not Support UPnP™ ...... 41 Registering with the DynamicDNS service 42 DynamicDNS Service 46 Setting the Date and Time 48 2.7 Changing Camera Settings 50 3 Registering Users 52 3.1 Changing...
Ip Camera
Page 8
... Camera 99 Updating the Camera Firmware 100 Creating a Configuration File 103 Loading Settings from a Configuration File 104 Resetting the Camera to Factory Default 105 Support page 106 The Help page 106 [For BL-C20A] The Wireless Help page 107 Product Information 107 Support Information 107 FACTORY DEFAULT RESET Button 108 7 Other Information 109 7.1 Default Setting List 109 7.2 7.2.1 7.2.2 7.3 Cleaning 118 Cleaning the Main Unit 118 Cleaning the Lens 118 Setting an IP Address on Your PC 119 7.4 Using Setup Program 120 7.5 Setting...
... Camera 99 Updating the Camera Firmware 100 Creating a Configuration File 103 Loading Settings from a Configuration File 104 Resetting the Camera to Factory Default 105 Support page 106 The Help page 106 [For BL-C20A] The Wireless Help page 107 Product Information 107 Support Information 107 FACTORY DEFAULT RESET Button 108 7 Other Information 109 7.1 Default Setting List 109 7.2 7.2.1 7.2.2 7.3 Cleaning 118 Cleaning the Main Unit 118 Cleaning the Lens 118 Setting an IP Address on Your PC 119 7.4 Using Setup Program 120 7.5 Setting...

Ip Camera
Page 12
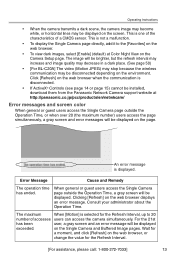
... Security Warning window is displayed. 2. The 21st user will be refreshed. • The digital zoom can be operated only when displaying video (Motion JPEG). • The refresh interval is set up to 20 simultaneous accesses. Capture Image Button (See page 18) Operation Bar (See page 19) Features on the Image Display page (see a gray screen. (Access to refreshing still images. Note • While viewing images under fluorescent lighting, the image may change depending on the web browser...
... Security Warning window is displayed. 2. The 21st user will be refreshed. • The digital zoom can be operated only when displaying video (Motion JPEG). • The refresh interval is set up to 20 simultaneous accesses. Capture Image Button (See page 18) Operation Bar (See page 19) Features on the Image Display page (see a gray screen. (Access to refreshing still images. Note • While viewing images under fluorescent lighting, the image may change depending on the web browser...
Ip Camera
Page 13
... video (Motion JPEG) may stop because the wireless communication may be displayed on the screen. The maximum When [Motion] is one of the characteristics of accesses users can access the camera simultaneously. Click [Refresh] on the web browser when the communication is disconnected. • If ActiveX® Controls (see page 14 or page 15) cannot be installed, download them from the Panasonic Network Camera support website at Color Night View on the web browser, or change...
... video (Motion JPEG) may stop because the wireless communication may be displayed on the screen. The maximum When [Motion] is one of the characteristics of accesses users can access the camera simultaneously. Click [Refresh] on the web browser when the communication is disconnected. • If ActiveX® Controls (see page 14 or page 15) cannot be installed, download them from the Panasonic Network Camera support website at Color Night View on the web browser, or change...

Ip Camera
Page 14
... address was changed for the camera, enter it on the CD-ROM. Contacting your network administrator. - If you cannot install ActiveX Controls or you use a proxy server, set the web browser not to view a video (Motion JPEG) for the first time, a Security Warning for ActiveX Controls will be used for a moment. • If you cannot see page 127). • In some corporate network environments, a firewall may be displayed. Using regularly refreshed images rather than video (Motion...
... address was changed for the camera, enter it on the CD-ROM. Contacting your network administrator. - If you cannot install ActiveX Controls or you use a proxy server, set the web browser not to view a video (Motion JPEG) for the first time, a Security Warning for ActiveX Controls will be used for a moment. • If you cannot see page 127). • In some corporate network environments, a firewall may be displayed. Using regularly refreshed images rather than video (Motion...

Ip Camera
Page 21
... video (Motion JPEG) can be used . (See page 11 of accesses, the refresh interval may increase. For Internet access, local IP addresses (192.168. . ) cannot be used while using an Ethernet switching hub instead of moving subject are displayed in video display. Operating Instructions Note • • • • • The digital zoom feature and the Click to Center feature can be displayed on the Multi-Camera page, you view images...
... video (Motion JPEG) can be used . (See page 11 of accesses, the refresh interval may increase. For Internet access, local IP addresses (192.168. . ) cannot be used while using an Ethernet switching hub instead of moving subject are displayed in video display. Operating Instructions Note • • • • • The digital zoom feature and the Click to Center feature can be displayed on the Multi-Camera page, you view images...
Ip Camera
Page 26
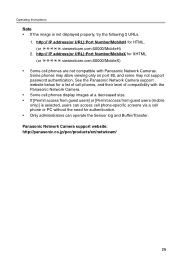
Panasonic Network Camera support website: http://panasonic.co.jp/pcc/products/en/netwkcam/ 26 Operating Instructions Note • If the image is selected, users can access cell phone-specific screens via a cell phone or PC without the need for authentication. • Only administrators can operate the Sensor log and Buffer/Transfer. http:// IP address(or URL):Port Number/MobileH for a list of cell phones, and their level of compatibility with Panasonic Network Cameras. http:// IP address(or...
Panasonic Network Camera support website: http://panasonic.co.jp/pcc/products/en/netwkcam/ 26 Operating Instructions Note • If the image is selected, users can access cell phone-specific screens via a cell phone or PC without the need for authentication. • Only administrators can operate the Sensor log and Buffer/Transfer. http:// IP address(or URL):Port Number/MobileH for a list of cell phones, and their level of compatibility with Panasonic Network Cameras. http:// IP address(or...
Ip Camera
Page 38
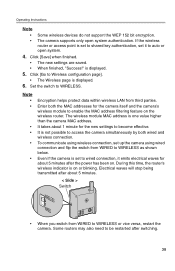
... also need to Wireless configuration page]. • The Wireless page is displayed. 6. The wireless module MAC address is displayed. 5. It is set to wired connection, it to become effective. Electrical waves will stop being transmitted after about 1 minute for the new settings to auto or open system authentication. Click [Go to be restarted after the power has been on. Operating Instructions Note • Some wireless devices do not support...
... also need to Wireless configuration page]. • The Wireless page is displayed. 6. The wireless module MAC address is displayed. 5. It is set to wired connection, it to become effective. Electrical waves will stop being transmitted after about 1 minute for the new settings to auto or open system authentication. Click [Go to be restarted after the power has been on. Operating Instructions Note • Some wireless devices do not support...

Ip Camera
Page 41
... IP address for how to allow access from those offered on your home network. *1 "Port forwarding" may differ from the Internet with the DynamicDNS service. Each camera must be called "Address translation", "Static IP Masquerade", "Virtual server" or "Port mapping" in other products. [For assistance, please call: 1-800-272-7033] 41 Enable port forwarding*1 on the router. Operating Instructions 2.4.2 Connecting the Camera to enable port forwarding on the router. (4) Click [Save] without changing the settings. (5) Click...
... IP address for how to allow access from those offered on your home network. *1 "Port forwarding" may differ from the Internet with the DynamicDNS service. Each camera must be called "Address translation", "Static IP Masquerade", "Virtual server" or "Port mapping" in other products. [For assistance, please call: 1-800-272-7033] 41 Enable port forwarding*1 on the router. Operating Instructions 2.4.2 Connecting the Camera to enable port forwarding on the router. (4) Click [Save] without changing the settings. (5) Click...

Ip Camera
Page 65
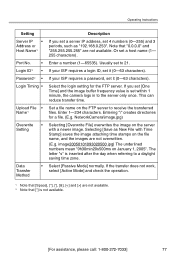
.... Select [Passive Mode] normally. Operating Instructions Setting Server IP • Address or Host Name*1 Port No. • Login ID*2 • Password*2 • Login Timing • Upload File • Name*1 Overwrite • Setting Data • Transfer Method Description If you set [One Time] and the image buffer frequency value is set within 1 minute, the camera logs in to the server only once. If your ISP requires a password, set it (0-63 characters...
.... Select [Passive Mode] normally. Operating Instructions Setting Server IP • Address or Host Name*1 Port No. • Login ID*2 • Password*2 • Login Timing • Upload File • Name*1 Overwrite • Setting Data • Transfer Method Description If you set [One Time] and the image buffer frequency value is set within 1 minute, the camera logs in to the server only once. If your ISP requires a password, set it (0-63 characters...
Ip Camera
Page 77
.... (E.g. Select the login setting for a file. (E.g. Set a file name on January 1, 2005". Select [Passive Mode] normally. If your ISP requires a password, set a host name (1- 255 characters). Operating Instructions Setting Server IP • Address or Host Name*1 Port No. • Login ID*2 • Password*2 • Login Timing • Upload File • Name*1 Overwrite • Setting Data • Transfer Method Description If you set [One Time] and the image buffer frequency value...
.... (E.g. Select the login setting for a file. (E.g. Set a file name on January 1, 2005". Select [Passive Mode] normally. If your ISP requires a password, set a host name (1- 255 characters). Operating Instructions Setting Server IP • Address or Host Name*1 Port No. • Login ID*2 • Password*2 • Login Timing • Upload File • Name*1 Overwrite • Setting Data • Transfer Method Description If you set [One Time] and the image buffer frequency value...
Ip Camera
Page 100
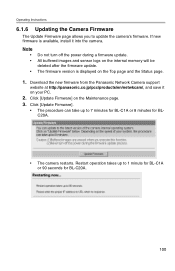
... firmware is displayed on the internal memory will be deleted after the firmware update. Download the new firmware from the Panasonic Network Camera support website at http://panasonic.co.jp/pcc/products/en/netwkcam/, and save it into the camera. Note • • • Do not turn off the power during a firmware update. Restart operation takes up to 7 minutes for BL-C1A or 8 minutes for BL-C20A. 100 Operating Instructions 6.1.6 Updating the Camera Firmware The Update Firmware...
... firmware is displayed on the internal memory will be deleted after the firmware update. Download the new firmware from the Panasonic Network Camera support website at http://panasonic.co.jp/pcc/products/en/netwkcam/, and save it into the camera. Note • • • Do not turn off the power during a firmware update. Restart operation takes up to 7 minutes for BL-C1A or 8 minutes for BL-C20A. 100 Operating Instructions 6.1.6 Updating the Camera Firmware The Update Firmware...
Ip Camera
Page 105
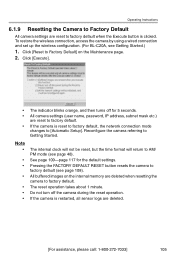
... factory default, the network connection mode changes to Factory Default] on the internal memory are deleted when resetting the camera to factory default when the Execute button is clicked. Reconfigure the camera referring to AM/ PM mode (see page 48). All buffered images on the Maintenance page. 2. Operating Instructions 6.1.9 Resetting the Camera to Factory Default All camera settings are reset to factory default. Click [Reset to [Automatic Setup]. See page 109-page 117 for 5 seconds. • All camera settings (user name, password, IP address...
... factory default, the network connection mode changes to Factory Default] on the internal memory are deleted when resetting the camera to factory default when the Execute button is clicked. Reconfigure the camera referring to AM/ PM mode (see page 48). All buffered images on the Maintenance page. 2. Operating Instructions 6.1.9 Resetting the Camera to Factory Default All camera settings are reset to factory default. Click [Reset to [Automatic Setup]. See page 109-page 117 for 5 seconds. • All camera settings (user name, password, IP address...

Ip Camera
Page 108
... restore the wireless connection, access the camera by using a wired connection and set up the wireless configuration. (For BL-C20A, see page 48). Operating Instructions 6.3 FACTORY DEFAULT RESET Button There is restarted, all sensor logs are deleted when resetting the camera to factory default. See page 109-page 117 for 5 seconds. • Do not turn off for the default settings. All buffered images on the side of the camera. FACTORY DEFAULT RESET Button (Press the button with a pointed object.) Pressing the FACTORY DEFAULT RESET button resets the camera...
... restore the wireless connection, access the camera by using a wired connection and set up the wireless configuration. (For BL-C20A, see page 48). Operating Instructions 6.3 FACTORY DEFAULT RESET Button There is restarted, all sensor logs are deleted when resetting the camera to factory default. See page 109-page 117 for 5 seconds. • Do not turn off for the default settings. All buffered images on the side of the camera. FACTORY DEFAULT RESET Button (Press the button with a pointed object.) Pressing the FACTORY DEFAULT RESET button resets the camera...
Ip Camera
Page 120
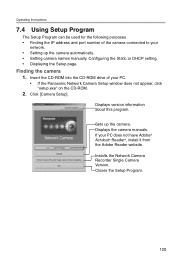
... Closes the Setup Program. 120 Installs the Network Camera Recorder Single Camera Version. Sets up the camera automatically. • Setting camera names manually. If your network. • Setting up the camera. Displays the camera manuals. Displays version information about this program. Operating Instructions 7.4 Using Setup Program The Setup Program can be used for the following purposes. • Finding the IP address and port number of your PC. • If the Panasonic Network Camera Setup window does not appear, click "setup.exe" on the CD-ROM. 2. Configuring the...
... Closes the Setup Program. 120 Installs the Network Camera Recorder Single Camera Version. Sets up the camera automatically. • Setting camera names manually. If your network. • Setting up the camera. Displays the camera manuals. Displays version information about this program. Operating Instructions 7.4 Using Setup Program The Setup Program can be used for the following purposes. • Finding the IP address and port number of your PC. • If the Panasonic Network Camera Setup window does not appear, click "setup.exe" on the CD-ROM. 2. Configuring the...
Ip Camera
Page 125
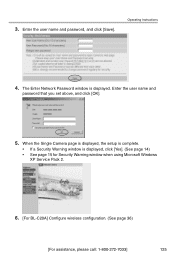
Operating Instructions 4. The Enter Network Password window is displayed, click [Yes]. (See page 14) • See page 15 for Security Warning window when using Microsoft Windows XP Service Pack 2. 6. [For BL-C20A] Configure wireless configuration. (See page 36) [For assistance, please call: 1-800-272-7033] 125 When the Single Camera page is displayed, the setup is complete. • If a Security Warning window is displayed. Enter the user name and password that you set above, and click [OK]. 5. 3. Enter the user name and password, and click [Save].
Operating Instructions 4. The Enter Network Password window is displayed, click [Yes]. (See page 14) • See page 15 for Security Warning window when using Microsoft Windows XP Service Pack 2. 6. [For BL-C20A] Configure wireless configuration. (See page 36) [For assistance, please call: 1-800-272-7033] 125 When the Single Camera page is displayed, the setup is complete. • If a Security Warning window is displayed. Enter the user name and password that you set above, and click [OK]. 5. 3. Enter the user name and password, and click [Save].

Ip Camera
Page 127
... accessed via a proxy server, problems may be increased. How to the camera. Operating Instructions 7.5 Setting Your PC 7.5.1 Setting Proxy Server Settings on a Web Browser If a proxy server is not used to protect your network when connected to the Internet. If you are not required. Start up Internet Explorer. (The example is recommended. • The firewall of a proxy server in a corporate environment may prevent access to Set Proxy Server Settings 1. Consult your network administrator before installing the camera...
... accessed via a proxy server, problems may be increased. How to the camera. Operating Instructions 7.5 Setting Your PC 7.5.1 Setting Proxy Server Settings on a Web Browser If a proxy server is not used to protect your network when connected to the Internet. If you are not required. Start up Internet Explorer. (The example is recommended. • The firewall of a proxy server in a corporate environment may prevent access to Set Proxy Server Settings 1. Consult your network administrator before installing the camera...
Ip Camera
Page 135
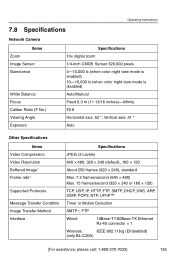
Operating Instructions 7.8 Specifications Network Camera Items Zoom Image Sensor Illuminance White Balance Focus Caliber Ratio (F No.) Viewing Angle Exposure Specifications 10× digital zoom 1/4-inch CMOS Sensor 320,000 pixels 4-10,000 lx (when color night view mode is enabled) 10-10,000 lx (when color night view mode is disabled) Auto/Manual Fixed 0.3 m (11 13/16 inches)-Infinity F2.8 Horizontal axis: 53 °, Vertical axis: 41 ° Auto Other Specifications Items Video Compression Video Resolution Buffered Image*1 Frame rate*2 Supported Protocols Message...
Operating Instructions 7.8 Specifications Network Camera Items Zoom Image Sensor Illuminance White Balance Focus Caliber Ratio (F No.) Viewing Angle Exposure Specifications 10× digital zoom 1/4-inch CMOS Sensor 320,000 pixels 4-10,000 lx (when color night view mode is enabled) 10-10,000 lx (when color night view mode is disabled) Auto/Manual Fixed 0.3 m (11 13/16 inches)-Infinity F2.8 Horizontal axis: 53 °, Vertical axis: 41 ° Auto Other Specifications Items Video Compression Video Resolution Buffered Image*1 Frame rate*2 Supported Protocols Message...


