
Operating Instructions
Page 2
... be automatically configured, making setup quick and easy. Digital zoom The camera has a digital zoom feature that best suits your needs. You can use your mobile phone to zoom in its range that are being recorded. The sensor can be used to trigger the camera to transfer images to buffer or transfer camera images when the camera detects motion in the camera image. Main Features On-site and remote camera monitoring Camera images can be monitored from view and protect...
... be automatically configured, making setup quick and easy. Digital zoom The camera has a digital zoom feature that best suits your needs. You can use your mobile phone to zoom in its range that are being recorded. The sensor can be used to trigger the camera to transfer images to buffer or transfer camera images when the camera detects motion in the camera image. Main Features On-site and remote camera monitoring Camera images can be monitored from view and protect...

Operating Instructions
Page 3
All camera pages can be displayed in either wired or wireless mode. Operating Instructions 3 Viewnetcam.com support After registering your choosing, such as bob.viewnetcam.com. Wireless connectivity (BL-C131A only) The BL-C131A supports wireless standards IEEE 802.11b and IEEE 802.11g, giving you can access the camera while away from home using the camera in English, Simplified Chinese, and Japanese. Multi-language support The most commonly used in English, French, German...
All camera pages can be displayed in either wired or wireless mode. Operating Instructions 3 Viewnetcam.com support After registering your choosing, such as bob.viewnetcam.com. Wireless connectivity (BL-C131A only) The BL-C131A supports wireless standards IEEE 802.11b and IEEE 802.11g, giving you can access the camera while away from home using the camera in English, Simplified Chinese, and Japanese. Multi-language support The most commonly used in English, French, German...

Operating Instructions
Page 5
... Mobile Phone 66 4 Configuring the Camera for Access from the Internet 67 4.1 4.2 4.2.1 4.2.2 4.3 Configuring Port Forwarding 71 Configuring the Camera to Use a Dynamic DNS Service 74 Configuring the Camera to Use Viewnetcam.com 75 Configuring the Camera to Use a Third-party Dynamic DNS Service 78 Confirming Internet Access 80 5 Changing Camera Settings 81 5.1 5.1.1 5.1.2 5.2 5.2.1 5.2.2 5.3 Network Settings ...81 Network (IPv4) Settings 82 Proxy Server Settings ...87 Using the Camera in Wireless Mode (BL-C131A Only 88 Configuring the Camera for Wireless Connection (BL-C131A...
... Mobile Phone 66 4 Configuring the Camera for Access from the Internet 67 4.1 4.2 4.2.1 4.2.2 4.3 Configuring Port Forwarding 71 Configuring the Camera to Use a Dynamic DNS Service 74 Configuring the Camera to Use Viewnetcam.com 75 Configuring the Camera to Use a Third-party Dynamic DNS Service 78 Confirming Internet Access 80 5 Changing Camera Settings 81 5.1 5.1.1 5.1.2 5.2 5.2.1 5.2.2 5.3 Network Settings ...81 Network (IPv4) Settings 82 Proxy Server Settings ...87 Using the Camera in Wireless Mode (BL-C131A Only 88 Configuring the Camera for Wireless Connection (BL-C131A...
Operating Instructions
Page 6
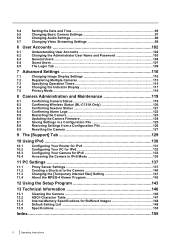
... Specifying Operation Times 115 7.4 Changing the Indicator Display 117 7.5 Privacy Mode ...118 8 Camera Administration and Maintenance 119 8.1 Confirming Camera Status 119 8.2 Confirming Wireless Status (BL-C131A Only 120 8.3 Confirming Session Status 121 8.4 Confirming Alarm Logs 122 8.5 Restarting the Camera 123 8.6 Updating the Camera Firmware 124 8.7 Saving Settings in a Configuration File 125 8.8 Restoring Settings from a Configuration File 126 8.9 Resetting the Camera 127 9 The [Support] Tab 129 10 Using IPv6 130 10.1 Configuring Your Router for...
... Specifying Operation Times 115 7.4 Changing the Indicator Display 117 7.5 Privacy Mode ...118 8 Camera Administration and Maintenance 119 8.1 Confirming Camera Status 119 8.2 Confirming Wireless Status (BL-C131A Only 120 8.3 Confirming Session Status 121 8.4 Confirming Alarm Logs 122 8.5 Restarting the Camera 123 8.6 Updating the Camera Firmware 124 8.7 Saving Settings in a Configuration File 125 8.8 Restoring Settings from a Configuration File 126 8.9 Resetting the Camera 127 9 The [Support] Tab 129 10 Using IPv6 130 10.1 Configuring Your Router for...

Operating Instructions
Page 10
... image quality may decrease (i.e., images may not be displayed in a dark environment, Color Night View mode (if enabled; Using the [Refresh Rate] selector in 4:3 full-screen mode; see Page 110) Note • If no camera image is a characteristic of objects being viewed. Too many users are displayed. The camera is accessed can configure the camera to automatically switch from displaying video images to the 1.4 Wireless Connection Issues (BL-C131A Only) in wireless mode, refer to still images. The image refresh rate may be installed...
... image quality may decrease (i.e., images may not be displayed in a dark environment, Color Night View mode (if enabled; Using the [Refresh Rate] selector in 4:3 full-screen mode; see Page 110) Note • If no camera image is a characteristic of objects being viewed. Too many users are displayed. The camera is accessed can configure the camera to automatically switch from displaying video images to the 1.4 Wireless Connection Issues (BL-C131A Only) in wireless mode, refer to still images. The image refresh rate may be installed...

Operating Instructions
Page 25
... digital zoom feature when displaying MJPEG video) *1 Overlays are displayed only if they are used . Set the [Video Display Time] for general users (see Page 104) and for the camera (see Page 82 or Page 133). When viewing video images, we recommend connecting the cameras using an Ethernet switching hub instead of bandwidth are streamed using their corresponding buttons or controls will need to enter a valid user name and password in 192 ´ 144 pixel resolution, images are displayed...
... digital zoom feature when displaying MJPEG video) *1 Overlays are displayed only if they are used . Set the [Video Display Time] for general users (see Page 104) and for the camera (see Page 82 or Page 133). When viewing video images, we recommend connecting the cameras using an Ethernet switching hub instead of bandwidth are streamed using their corresponding buttons or controls will need to enter a valid user name and password in 192 ´ 144 pixel resolution, images are displayed...

Operating Instructions
Page 58
... and changes in object brightness, however, in some cases the camera may not be detected as motion. The camera's motion detection feature detects motion differently than the Network Camera Recorder software (sold separately). Motion detection can vary by artificial light sources (such as fluorescent lights) as desired if the object's color is similar to see how the current settings detect motion. 58 Operating Instructions The motion detection feature is disabled when panning and tilting the camera lens, i.e., moving the camera lens...
... and changes in object brightness, however, in some cases the camera may not be detected as motion. The camera's motion detection feature detects motion differently than the Network Camera Recorder software (sold separately). Motion detection can vary by artificial light sources (such as fluorescent lights) as desired if the object's color is similar to see how the current settings detect motion. 58 Operating Instructions The motion detection feature is disabled when panning and tilting the camera lens, i.e., moving the camera lens...
Operating Instructions
Page 68
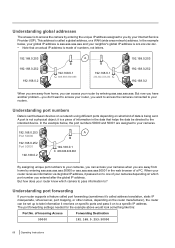
... web browser of your router by entering aaa.aaa.aaa.aaa. But now you have another problem-you don't want to access the cameras connected to your routers. When your router receives information via its global IP address, it passes it is sent between devices on a network using different ports depending on which camera to pass information to a specific IP address. This address is not a physical object; Understanding port forwarding...
... web browser of your router by entering aaa.aaa.aaa.aaa. But now you have another problem-you don't want to access the cameras connected to your routers. When your router receives information via its global IP address, it passes it is sent between devices on a network using different ports depending on which camera to pass information to a specific IP address. This address is not a physical object; Understanding port forwarding...
Operating Instructions
Page 71
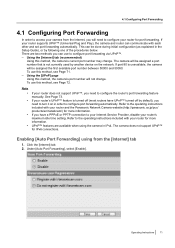
... time setting. If your router's UPnP™ feature is turned off by default), you will not change . 4.1 Configuring Port Forwarding 4.1 Configuring Port Forwarding In order to access your camera from the [Internet] tab 1. If your router supports UPnP™ (Universal Plug and Play), the camera and router can be assigned a port number that is unavailable, the camera will be done during initial configuration (as explained in IPv4. There are available when using from the Internet, you need...
... time setting. If your router's UPnP™ feature is turned off by default), you will not change . 4.1 Configuring Port Forwarding 4.1 Configuring Port Forwarding In order to access your camera from the [Internet] tab 1. If your router supports UPnP™ (Universal Plug and Play), the camera and router can be assigned a port number that is unavailable, the camera will be done during initial configuration (as explained in IPv4. There are available when using from the Internet, you need...
Operating Instructions
Page 82
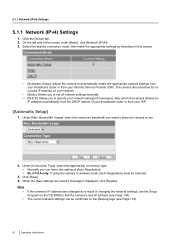
... you to set all network settings manually. - [DHCP]: Allows you can be selected. 3. Click [Save]. 4. The current network settings can leave this setting at [Auto Negotiation]. • BL-C131A only: If using the camera in this section. - [Automatic Setup]: Allows the camera to use the Setup Program on the [Status] page (see Page 143). Under [Max. Note • • If the camera's IP address was changed as described in wireless mode, [Auto Negotiation...
... you to set all network settings manually. - [DHCP]: Allows you can be selected. 3. Click [Save]. 4. The current network settings can leave this setting at [Auto Negotiation]. • BL-C131A only: If using the camera in this section. - [Automatic Setup]: Allows the camera to use the Setup Program on the [Status] page (see Page 143). Under [Max. Note • • If the camera's IP address was changed as described in wireless mode, [Auto Negotiation...
Operating Instructions
Page 87
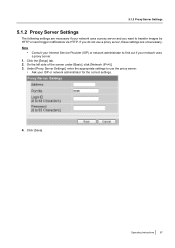
... Server Settings], enter the appropriate settings to find out if your network uses a proxy server. 1. Operating Instructions 87 If you do not use the proxy server. • Ask your network uses a proxy server and you want to transfer images by HTTP or send trigger notifications via HTTP. Click [Save]. Click the [Setup] tab. 2. Note • Consult your Internet Service Provider (ISP) or network administrator to use a proxy server, these settings are...
... Server Settings], enter the appropriate settings to find out if your network uses a proxy server. 1. Operating Instructions 87 If you do not use the proxy server. • Ask your network uses a proxy server and you want to transfer images by HTTP or send trigger notifications via HTTP. Click [Save]. Click the [Setup] tab. 2. Note • Consult your Internet Service Provider (ISP) or network administrator to use a proxy server, these settings are...
Operating Instructions
Page 95
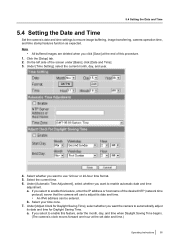
... enable this feature, enter the IP address or host name of the desired NTP (network time protocol) server that the camera will use 12-hour or 24-hour time format. 5. Select your time zone. 7. If you want to ensure image buffering, image transferring, camera operation time, and time stamp features function as expected. Under [Time Setting], select the current month, day, and year. 4. Select the current time. 6. Under [Automatic Time Adjustment...
... enable this feature, enter the IP address or host name of the desired NTP (network time protocol) server that the camera will use 12-hour or 24-hour time format. 5. Select your time zone. 7. If you want to ensure image buffering, image transferring, camera operation time, and time stamp features function as expected. Under [Time Setting], select the current month, day, and year. 4. Select the current time. 6. Under [Automatic Time Adjustment...
Operating Instructions
Page 124
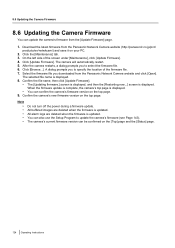
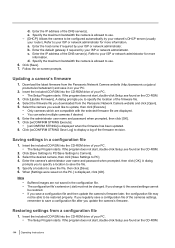
... firmware is displayed. On the left side of the firmware file. 7. Click [Browse...]. Note Do not turn off the power during a firmware update. You can update the camera's firmware from the [Update Firmware] page. 1. The camera will automatically restart. 5. Download the latest firmware from the Panasonic Network Camera website and click [Open]. Select the firmware file you to select the firmware file. 6. 8.6 Updating the Camera Firmware 8.6 Updating the Camera Firmware You can also use the Setup Program to update the camera's firmware...
... firmware is displayed. On the left side of the firmware file. 7. Click [Browse...]. Note Do not turn off the power during a firmware update. You can update the camera's firmware from the [Update Firmware] page. 1. The camera will automatically restart. 5. Download the latest firmware from the Panasonic Network Camera website and click [Open]. Select the firmware file you to select the firmware file. 6. 8.6 Updating the Camera Firmware 8.6 Updating the Camera Firmware You can also use the Setup Program to update the camera's firmware...
Operating Instructions
Page 126
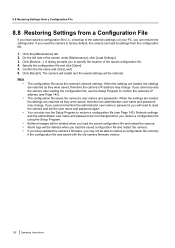
... camera's network settings. If you reset the camera to factory default, the camera can also use the Setup Program to restore a configuration file correctly if the configuration file was saved with the old camera firmware version. 126 Operating Instructions The camera will restart and the saved settings will be able to confirm the camera's IP address (see Page 143). If you cannot remember the administrator user name or password, you cannot access the camera after loading the configuration...
... camera's network settings. If you reset the camera to factory default, the camera can also use the Setup Program to restore a configuration file correctly if the configuration file was saved with the old camera firmware version. 126 Operating Instructions The camera will restart and the saved settings will be able to confirm the camera's IP address (see Page 143). If you cannot remember the administrator user name or password, you cannot access the camera after loading the configuration...

Operating Instructions
Page 130
... support IPv6 yet, your Network Camera will be ready as IPv6 services become more information about IPv6 access, ask your web browser, therefore, you can be used to eventually replace IPv4, the current standard Internet protocol. We recommend using IPv6. 1. The Setup Program can access the camera using Viewnetcam.com, a Dynamic DNS service designed for IPv6 (see Page 132). 3. Preparations for accessing the camera using the camera in your ISP about IPv6-compatible services. Configure...
... support IPv6 yet, your Network Camera will be ready as IPv6 services become more information about IPv6 access, ask your web browser, therefore, you can be used to eventually replace IPv4, the current standard Internet protocol. We recommend using IPv6. 1. The Setup Program can access the camera using Viewnetcam.com, a Dynamic DNS service designed for IPv6 (see Page 132). 3. Preparations for accessing the camera using the camera in your ISP about IPv6-compatible services. Configure...

Operating Instructions
Page 134
... connections. • BL-C131A only: If using the camera in wireless mode, [Auto Negotiation] must be assigned to the camera. • The default port number is 80, however, note that these are available for both IPv4 and IPv6 connections. • Refer to allow access from the Internet using port 80. Bandwidth Usage], select the maximum bandwidth you can leave this setting at [Auto Negotiation]. • This setting is effective for access...
... connections. • BL-C131A only: If using the camera in wireless mode, [Auto Negotiation] must be assigned to the camera. • The default port number is 80, however, note that these are available for both IPv4 and IPv6 connections. • Refer to allow access from the Internet using port 80. Bandwidth Usage], select the maximum bandwidth you can leave this setting at [Auto Negotiation]. • This setting is effective for access...
Operating Instructions
Page 143
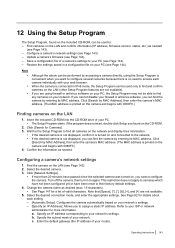
... MAC address. Wait for the Setup Program to access each setting. - [Automatic Setup]: Configures the camera automatically based on your PC (see Page 143). - Confirm the information as needed (see Page 144). Turn off the camera, then turn it is turned on and connected to the network. • If the desired camera is no need to find all cameras on the network and display their factory default settings. 4. Select the desired connection mode, and enter the appropriate settings...
... MAC address. Wait for the Setup Program to access each setting. - [Automatic Setup]: Configures the camera automatically based on your PC (see Page 143). - Confirm the information as needed (see Page 144). Turn off the camera, then turn it is turned on and connected to the network. • If the desired camera is no need to find all cameras on the network and display their factory default settings. 4. Select the desired connection mode, and enter the appropriate settings...
Operating Instructions
Page 144
... your ISP or network administrator for more information. Follow the on the PC.] is displayed when the firmware has been updated. 8. Updating a camera's firmware 1. Insert the included CD-ROM into the CD-ROM drive of your PC. • The Setup Program starts. Select the firmware file you change it on the CD-ROM. 144 Operating Instructions Enter the administrator user name and password when prompted...
... your ISP or network administrator for more information. Follow the on the PC.] is displayed when the firmware has been updated. 8. Updating a camera's firmware 1. Insert the included CD-ROM into the CD-ROM drive of your PC. • The Setup Program starts. Select the firmware file you change it on the CD-ROM. 144 Operating Instructions Enter the administrator user name and password when prompted...
Installation Guide
Page 1
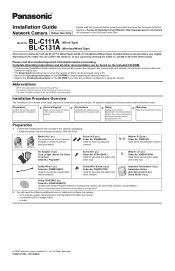
... the power supply and network, as well how to mount or place the camera for regular use. • The Setup Guide describes how to set up the camera (described in the Important Information document) - You can be accessed from a PC. Abbreviations • UPnP is referred to as "the CD-ROM" in the USA and Puerto Rico BL-C111A Model No. (Wired Type) BL-C131A (Wireless/Wired Type) This manual...
... the power supply and network, as well how to mount or place the camera for regular use. • The Setup Guide describes how to set up the camera (described in the Important Information document) - You can be accessed from a PC. Abbreviations • UPnP is referred to as "the CD-ROM" in the USA and Puerto Rico BL-C111A Model No. (Wired Type) BL-C131A (Wireless/Wired Type) This manual...
Installation Guide
Page 2
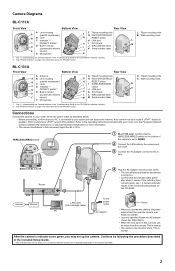
... be near the camera and easily accessible. • Use only specified Panasonic AC adaptor (Order No. Camera Diagrams BL-C111A Front View Bottom View Rear View A Lens housing A (pan/tilt mechanism) B B Lens C Indicator*1/ C PRIVACY button*2 D D Built-in sensor (pyroelectric infrared E sensor) E Microphone F Tripod mounting hole F G FACTORY DEFAULT G RESET button H LAN port H I DC IN jack I WIRELESS/WIRED J switch J LAN port K K DC IN jack L L MAC address label M M Serial number label *1 See 1.1 Understanding the Camera Indicator in the Troubleshooting Guide on the...
... be near the camera and easily accessible. • Use only specified Panasonic AC adaptor (Order No. Camera Diagrams BL-C111A Front View Bottom View Rear View A Lens housing A (pan/tilt mechanism) B B Lens C Indicator*1/ C PRIVACY button*2 D D Built-in sensor (pyroelectric infrared E sensor) E Microphone F Tripod mounting hole F G FACTORY DEFAULT G RESET button H LAN port H I DC IN jack I WIRELESS/WIRED J switch J LAN port K K DC IN jack L L MAC address label M M Serial number label *1 See 1.1 Understanding the Camera Indicator in the Troubleshooting Guide on the...


