

Operating Instructions
Page 1
TQBJ0235 ENGLISH PT-AX200U Before operating this product, please read the instructions carefully and save this manual for future use. Operating Instructions LCD Projector Model No.
TQBJ0235 ENGLISH PT-AX200U Before operating this product, please read the instructions carefully and save this manual for future use. Operating Instructions LCD Projector Model No.
Operating Instructions
Page 2
Model number: PT-AX200U Serial number: WARNING: TO REDUCE THE RISK OF FIRE OR ELECTRIC SHOCK, ...you might require. The exclamation point within the product's enclosure that may result. Power Supply: This LCD Projector is equipped with the projector as an accessory can only be of sufficient magnitude to constitute a risk of the grounding plug. ... feature. CAUTION: The AC power cord which is intended to alert the user to the presence of your Panasonic LCD projector. The lightning flash with your product may be found on its bottom. If you are unable to insert the...
Model number: PT-AX200U Serial number: WARNING: TO REDUCE THE RISK OF FIRE OR ELECTRIC SHOCK, ...you might require. The exclamation point within the product's enclosure that may result. Power Supply: This LCD Projector is equipped with the projector as an accessory can only be of sufficient magnitude to constitute a risk of the grounding plug. ... feature. CAUTION: The AC power cord which is intended to alert the user to the presence of your Panasonic LCD projector. The lightning flash with your product may be found on its bottom. If you are unable to insert the...
Operating Instructions
Page 3
...to at the directive 2004/108/EC, article 9(2) Panasonic Testing Center Panasonic Service Europe, a division of projector, you wish to computers or peripheral devices. Pursuant to connect PC for external control of Panasonic Marketing Europe GmbH Winsbergring 15, 22525 Hamburg, F.R. Information...dealer or an experienced radio/TV technician for help. Declaration of Conformity Model Number: PT-AX200U Trade Name: Panasonic Responsible party: Panasonic Corporation of North America Address: One Panasonic Way, Secaucus, New Jersey 07094 Telephone number: (888) 411 - 1996 This device ...
...to at the directive 2004/108/EC, article 9(2) Panasonic Testing Center Panasonic Service Europe, a division of projector, you wish to computers or peripheral devices. Pursuant to connect PC for external control of Panasonic Marketing Europe GmbH Winsbergring 15, 22525 Hamburg, F.R. Information...dealer or an experienced radio/TV technician for help. Declaration of Conformity Model Number: PT-AX200U Trade Name: Panasonic Responsible party: Panasonic Corporation of North America Address: One Panasonic Way, Secaucus, New Jersey 07094 Telephone number: (888) 411 - 1996 This device ...

Operating Instructions
Page 4
... ENGLISH Prepare the remote control See "Remote control" on page 27. Adjust the image See "Menu Navigation" on page 11. 4. Set up your projector See "Setting up 14 Screen size and throw distance 14 Projection method 15 Front leg adjusters and throwing angle 15 Lens shift and positioning 16...COMPONENT IN/VIDEO IN/S-VIDEO IN 18 Connecting to COMPUTER IN/HDMI IN 18 Basic Operation Switching the projector on/off 19 Power cord 19 POWER indicator 19 Switching on the projector 20 Switching off " on the button backlight 22 Switching the preset settings 22 Adjusting the image 23...
... ENGLISH Prepare the remote control See "Remote control" on page 27. Adjust the image See "Menu Navigation" on page 11. 4. Set up your projector See "Setting up 14 Screen size and throw distance 14 Projection method 15 Front leg adjusters and throwing angle 15 Lens shift and positioning 16...COMPONENT IN/VIDEO IN/S-VIDEO IN 18 Connecting to COMPUTER IN/HDMI IN 18 Basic Operation Switching the projector on/off 19 Power cord 19 POWER indicator 19 Switching on the projector 20 Switching off " on the button backlight 22 Switching the preset settings 22 Adjusting the image 23...

Operating Instructions
Page 5
... 39 LAMP RUNTIME 39 TEST PATTERN 39 Contents Maintenance TEMP and LAMP Indicators 40 Managing the indicated problems 40 Care and Replacement 41 Cleaning the projector 41 Replacing the lamp unit 42 Troubleshooting 44 Appendix Technical Information 45 List of compatible signals 45 Serial terminal 46 Specifications 48 Ceiling mount bracket...
... 39 LAMP RUNTIME 39 TEST PATTERN 39 Contents Maintenance TEMP and LAMP Indicators 40 Managing the indicated problems 40 Care and Replacement 41 Cleaning the projector 41 Replacing the lamp unit 42 Troubleshooting 44 Appendix Technical Information 45 List of compatible signals 45 Serial terminal 46 Specifications 48 Ceiling mount bracket...

Operating Instructions
Page 6
...that might be dangerous. Do not use other than an authorized ceiling mount bracket. Failure to modify or disassemble the projector. Do not place the projector into the projector or drop them away from the batteries. If dust builds up on soft materials such as necklaces or hairpins. ...rub your eye, it , fire or electric shocks could result. If installation is not carried out correctly, there is coming from the projector, disconnect the power plug from becoming covered in your eye, and immediately wash away the liquid with metallic objects such as carpets or sponge...
...that might be dangerous. Do not use other than an authorized ceiling mount bracket. Failure to modify or disassemble the projector. Do not place the projector into the projector or drop them away from the batteries. If dust builds up on soft materials such as necklaces or hairpins. ...rub your eye, it , fire or electric shocks could result. If installation is not carried out correctly, there is coming from the projector, disconnect the power plug from becoming covered in your eye, and immediately wash away the liquid with metallic objects such as carpets or sponge...

Operating Instructions
Page 7
... in damage or injury. Do not place any heavy objects on cloth or papers, as these materials could result in direct sunlight. Failure to the projector. When inserting the batteries, make sure the polarities (+ and -) are used, they may explode or leak, and fire, injury or contamination of... the lamp is being used . Do not place your eyes. If you look directly into this is emitted from the projector's lens. Replacement of the battery compartment and surrounding area may result. If improperly handled, explosion might result. The lamp can cause fire or ...
... in damage or injury. Do not place any heavy objects on cloth or papers, as these materials could result in direct sunlight. Failure to the projector. When inserting the batteries, make sure the polarities (+ and -) are used, they may explode or leak, and fire, injury or contamination of... the lamp is being used . Do not place your eyes. If you look directly into this is emitted from the projector's lens. Replacement of the battery compartment and surrounding area may result. If improperly handled, explosion might result. The lamp can cause fire or ...

Operating Instructions
Page 8
... for an extended period of the battery compartment and surrounding area may be handled with the lens cover when transporting the projector. The projector may be damaged, which are constantly making efforts to carry out all installation work . See "Ceiling mount bracket safeguards"... on the power plug, the resulting humidity may damage the projector. Important Information Precautions with the Authorized Service Center regarding cleaning costs. Keeping or leaving the remote control with operation. Be ...
... for an extended period of the battery compartment and surrounding area may be handled with the lens cover when transporting the projector. The projector may be damaged, which are constantly making efforts to carry out all installation work . See "Ceiling mount bracket safeguards"... on the power plug, the resulting humidity may damage the projector. Important Information Precautions with the Authorized Service Center regarding cleaning costs. Keeping or leaving the remote control with operation. Be ...

Operating Instructions
Page 9
...the same image for long periods of time, as follows. The lamp may remain as fixed points of the lens with your LCD. Especially the consecutive use the projector consecutively 6 hours every day, the optical components may need to be magnified and projected onto the screen. Optical components If ...from indoor lamps from fingerprints or anything else, this will be replaced in less than 10 hours, or the frequent switching on or off the projector once and try after the instructed lamp replacement timing. ENGLISH - 9 The lamp may greatly affect on the liquid crystal panel. If the ...
...the same image for long periods of time, as follows. The lamp may remain as fixed points of the lens with your LCD. Especially the consecutive use the projector consecutively 6 hours every day, the optical components may need to be magnified and projected onto the screen. Optical components If ...from indoor lamps from fingerprints or anything else, this will be replaced in less than 10 hours, or the frequent switching on or off the projector once and try after the instructed lamp replacement timing. ENGLISH - 9 The lamp may greatly affect on the liquid crystal panel. If the ...
Operating Instructions
Page 10
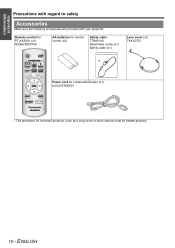
Remote control for PT-AX200U (x1) N2QAYB000194 AA batteries for remote control (x2) Safety cable TTRA0140 Attachment screw (x1) Safety cable (x1) Lens cover (x1) TKKL5372 Power cord for continental Europe (x1) K2CG3FR00001 * The protectors for enclosed products, such as a plug cover or foam cartons must be treated properly. 10 - ENGLISH Important Information Precautions with regard to safety Accessories Make sure the following accessories are provided with your projector.
Remote control for PT-AX200U (x1) N2QAYB000194 AA batteries for remote control (x2) Safety cable TTRA0140 Attachment screw (x1) Safety cable (x1) Lens cover (x1) TKKL5372 Power cord for continental Europe (x1) K2CG3FR00001 * The protectors for enclosed products, such as a plug cover or foam cartons must be treated properly. 10 - ENGLISH Important Information Precautions with regard to safety Accessories Make sure the following accessories are provided with your projector.

Operating Instructions
Page 11
.... • Use manganese batteries or alkaline batteries with ENTER. (page 27) Reset some of the remote control on page 22. ENGLISH - 11 Preparation About Your Projector Remote control POWER button While the MAIN POWER button is on, switch between stand-by mode and projection mode. (page 19) PICTURE MODE buttons Switch...
.... • Use manganese batteries or alkaline batteries with ENTER. (page 27) Reset some of the remote control on page 22. ENGLISH - 11 Preparation About Your Projector Remote control POWER button While the MAIN POWER button is on, switch between stand-by mode and projection mode. (page 19) PICTURE MODE buttons Switch...

Operating Instructions
Page 12
... dirt. Return to the previous menu. (page 27) Air exhaust port Heated air comes out of this may cause damage or injury. • While the projector is on, switch between stand-by mode and project mode. (page 19) Control panel INPUT SELECT Switch to cycle through the menus with F G H I, and ... (page 31) RETURN Return to the previous menu. (page 27) Navigate through the input method. (page 21) MENU Display the main menu. Preparation About Your Projector Projector body J Top and front view POWER While the MAIN POWER is not in use, keep the lens cover to protect the lens. 12 -
... dirt. Return to the previous menu. (page 27) Air exhaust port Heated air comes out of this may cause damage or injury. • While the projector is on, switch between stand-by mode and project mode. (page 19) Control panel INPUT SELECT Switch to cycle through the menus with F G H I, and ... (page 31) RETURN Return to the previous menu. (page 27) Navigate through the input method. (page 21) MENU Display the main menu. Preparation About Your Projector Projector body J Top and front view POWER While the MAIN POWER is not in use, keep the lens cover to protect the lens. 12 -

Operating Instructions
Page 13
...from your computer. VIDEO IN Connect an RCA composite video cable. MAIN POWER Switch the projector on/off (page 19) AC IN Connect the power cord to supply electronic power to the projector. (page 19) Air intake port Lamp unit compartment (page 41) Security lock Attach ... place anything within 10 cm (4") of them as this may cause damage or injury. • The projector should only be used with the projector. Connecting terminals (page 18/page 46) About Your Projector S-VIDEO IN Connect a S-VIDEO signal cable. Compatible with the Kensington MicroSaver Security System. (page 50...
...from your computer. VIDEO IN Connect an RCA composite video cable. MAIN POWER Switch the projector on/off (page 19) AC IN Connect the power cord to supply electronic power to the projector. (page 19) Air intake port Lamp unit compartment (page 41) Security lock Attach ... place anything within 10 cm (4") of them as this may cause damage or injury. • The projector should only be used with the projector. Connecting terminals (page 18/page 46) About Your Projector S-VIDEO IN Connect a S-VIDEO signal cable. Compatible with the Kensington MicroSaver Security System. (page 50...

Operating Instructions
Page 14
J Calculation methods for screen dimensions You can tilt the projector body less than approximately ± 30° vertically. You can calculate more detailed screen dimension from the screen diagonal. Projected image SH SD SW Screen ... with the screen. Calculate and define the throw distance as it may result in shortening the component's life. • For the best quality of the projector. • Make sure the projector lens surface is parallel with 2.0x zoom lens. NOTE: • Do not use the...
J Calculation methods for screen dimensions You can tilt the projector body less than approximately ± 30° vertically. You can calculate more detailed screen dimension from the screen diagonal. Projected image SH SD SW Screen ... with the screen. Calculate and define the throw distance as it may result in shortening the component's life. • For the best quality of the projector. • Make sure the projector lens surface is parallel with 2.0x zoom lens. NOTE: • Do not use the...

Operating Instructions
Page 15
... the image" on page 36. • Screw up /down the front leg adjusters to control the angle of the projector for rear projection. • When mounting the projector in the projector, See "INSTALLATION" on page 50. Do not touch the air exhaust port directly. • If keystone distortion occurs,... see "KEYSTONE" on page 21. Front leg adjusters and throwing angle You can use the projector with any of the air exhaust port. NOTE: • Heated air comes out of the following 4 projection methods. ENGLISH - 15 Setting up...
... the image" on page 36. • Screw up /down the front leg adjusters to control the angle of the projector for rear projection. • When mounting the projector in the projector, See "INSTALLATION" on page 50. Do not touch the air exhaust port directly. • If keystone distortion occurs,... see "KEYSTONE" on page 21. Front leg adjusters and throwing angle You can use the projector with any of the air exhaust port. NOTE: • Heated air comes out of the following 4 projection methods. ENGLISH - 15 Setting up...

Operating Instructions
Page 16
... horizontally off -center from the screen and then adjust the image position with the lens shift feature. Q Horizontal shift You can place the projector where the projector lens is up to adjust the projected image position. 3. J Adjusting the lens shift lever 1. Screw the shift lever clockwise to 63%... and the adjust the image position with the lens shift feature. Screen Shifting the lever left Q Vertical shift You can place the projector where the projector lens is up to lock. Up to about 63 % of the projection Shifting the lever right: Moving to screen's left : Moving...
... horizontally off -center from the screen and then adjust the image position with the lens shift feature. Q Horizontal shift You can place the projector where the projector lens is up to adjust the projected image position. 3. J Adjusting the lens shift lever 1. Screw the shift lever clockwise to 63%... and the adjust the image position with the lens shift feature. Screen Shifting the lever left Q Vertical shift You can place the projector where the projector lens is up to lock. Up to about 63 % of the projection Shifting the lever right: Moving to screen's left : Moving...

Operating Instructions
Page 17
... when the shift lever is at the horizontal limit of the shift range, you cannot move the lever to the horizontal limit. • When the projector is tilted and you adjust KEYSTONE, the center of the screen and the lens need to be realigned. • Do not attempt to locate the... screen and the projector by considering the lens shift possibilities. ENGLISH - 17 Setting up J Projector location range You can determine where to pull hard the shift lever while adjusting as this may damage the...
... when the shift lever is at the horizontal limit of the shift range, you cannot move the lever to the horizontal limit. • When the projector is tilted and you adjust KEYSTONE, the center of the screen and the lens need to be realigned. • Do not attempt to locate the... screen and the projector by considering the lens shift possibilities. ENGLISH - 17 Setting up J Projector location range You can determine where to pull hard the shift lever while adjusting as this may damage the...

Operating Instructions
Page 18
... be connected from each peripheral device. "Serial terminal" on page 45. The peripheral devices must be turned off. Getting Started Connections Before connecting to the projector Read and follow the operating and connecting instructions of each peripheral device directly to the audio reproduction system. Confirm the type of video signals.
... be connected from each peripheral device. "Serial terminal" on page 45. The peripheral devices must be turned off. Getting Started Connections Before connecting to the projector Read and follow the operating and connecting instructions of each peripheral device directly to the audio reproduction system. Confirm the type of video signals.

Operating Instructions
Page 19
... in use other than the provided power cord. • Ensure all the way in standby. Basic Operation ENGLISH - 19 NOTE: • While the projector is cooling the lamp, do not switch the MAIN POWER button off the power to a wall outlet. Hold the plug and unplug the power cord... from the wall outlet. 2. Make sure the shape of the power plug and the AC IN connector on and the projector is ready to projection mode. POWER indicator POWER indicator Indicator status No illumination or flashing Red Lit Green Flashing Lit Orange Lit Flashing Status ...
... in use other than the provided power cord. • Ensure all the way in standby. Basic Operation ENGLISH - 19 NOTE: • While the projector is cooling the lamp, do not switch the MAIN POWER button off the power to a wall outlet. Hold the plug and unplug the power cord... from the wall outlet. 2. Make sure the shape of the power plug and the AC IN connector on and the projector is ready to projection mode. POWER indicator POWER indicator Indicator status No illumination or flashing Red Lit Green Flashing Lit Orange Lit Flashing Status ...

Operating Instructions
Page 20
... cooling the lamp, then illuminates red when it is ready to modify the lens cover which may flicker for the characteristics of the projector. The STARTUP LOGO is displayed. Press the POWER button. To return to the projection, press ENTER to select OK and press the... 10 seconds without any operation. Press the POWER button. NOTE: • • When starting up in red. 2. The confirmation screen is displayed on the projector POWER indicator 1. Press I to select CANCEL or press MENU/RETURN. 2. Switching off . 20 - NOTE: • Press the POWER twice or for a while...
... cooling the lamp, then illuminates red when it is ready to modify the lens cover which may flicker for the characteristics of the projector. The STARTUP LOGO is displayed. Press the POWER button. To return to the projection, press ENTER to select OK and press the... 10 seconds without any operation. Press the POWER button. NOTE: • • When starting up in red. 2. The confirmation screen is displayed on the projector POWER indicator 1. Press I to select CANCEL or press MENU/RETURN. 2. Switching off . 20 - NOTE: • Press the POWER twice or for a while...


