Brochure
Page 2
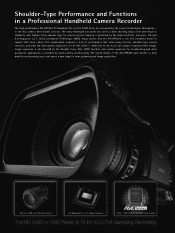
The newly developed 22x zoom lens covers a wide shooting range, from wide-angle to telephoto, and features three manual rings for news gathering and image acquisition. 28 mm to 616 mm, 22x Zoom Lens 2.2-Megapixel U.L.T. Image Sensors 1920 ×...for broadcasting and other production applications is provided by incorporating the newest technologies throughout - in a Professional Handheld Camera Recorder The high-performance AG-HPX250 P2 handheld fills out the P2HD Series by multi-camera synchronizing. This combination produces a level of performance that rivals many full-...
The newly developed 22x zoom lens covers a wide shooting range, from wide-angle to telephoto, and features three manual rings for news gathering and image acquisition. 28 mm to 616 mm, 22x Zoom Lens 2.2-Megapixel U.L.T. Image Sensors 1920 ×...for broadcasting and other production applications is provided by incorporating the newest technologies throughout - in a Professional Handheld Camera Recorder The high-performance AG-HPX250 P2 handheld fills out the P2HD Series by multi-camera synchronizing. This combination produces a level of performance that rivals many full-...
Brochure
Page 3
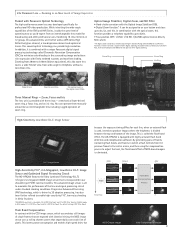
...Digital Zoom, and ND Filter • Hand-shake correction with Panasonic Optical Technology The high-performance zoom lens was developed specifically for professional HD video production. You can operate them manually almost like an interchangeable lens including rugged operation of the lens and... used while operating the Dynamic Range Stretch (DRS) or Scan Reverse functions. Image Sensor and Optimized Signal Processing Circuit The AG-HPX250 features the Ultra Luminance Technology (U.L.T.) 1/3-type 2.2-megapixel 3MOS image sensor that sequentially scans each line, when an external flash...
...Digital Zoom, and ND Filter • Hand-shake correction with Panasonic Optical Technology The high-performance zoom lens was developed specifically for professional HD video production. You can operate them manually almost like an interchangeable lens including rugged operation of the lens and... used while operating the Dynamic Range Stretch (DRS) or Scan Reverse functions. Image Sensor and Optimized Signal Processing Circuit The AG-HPX250 features the Ultra Luminance Technology (U.L.T.) 1/3-type 2.2-megapixel 3MOS image sensor that sequentially scans each line, when an external flash...
Brochure
Page 12
...on Windows PCs and Macs. SDHC logo marks are registered trademark of other operating requirements, refer to the P2 installation manual. http://pro-av.panasonic.net/ Notes Regarding the Handling of Business Solutions Business Group have received ISO14001:2004-the Environmental Management System certification. ...+66 2 731 8888 Turkey +90 216 578 3700 U.A.E. (for details, visit https://eww.pavc.panasonic.co.jp/pro-av/sales_o/p2/partners.html). The P2 driver and the P2 installation manual can be downloaded free from other companies (for All Middle East) +971 4 8862142 Ukraine +380 ...
...on Windows PCs and Macs. SDHC logo marks are registered trademark of other operating requirements, refer to the P2 installation manual. http://pro-av.panasonic.net/ Notes Regarding the Handling of Business Solutions Business Group have received ISO14001:2004-the Environmental Management System certification. ...+66 2 731 8888 Turkey +90 216 578 3700 U.A.E. (for details, visit https://eww.pavc.panasonic.co.jp/pro-av/sales_o/p2/partners.html). The P2 driver and the P2 installation manual can be downloaded free from other companies (for All Middle East) +971 4 8862142 Ukraine +380 ...

Operating Instructions
Page 1
... Instructions Vol.2 Memory Card Camera-Recorder Model No. Displays Menu Reference Before operating this product, please read the instructions carefully and save this manual for the P2HD 5 Year Warranty Repair Program. For instructions on basic operations of Vol. 1. M0811HO0 -FJ ENGLISH VQT3T24A (E) For details... the Memory Card Camera-Recorder, refer to Operating Instructions Vol. 1 (printed documents) contained in the supplied CD-ROM. AG-HPX250P AG-HPX250EN 2 Volume Note that Operation Instructions Vol. 2 describes advanced operations of the Memory Card Camera-Recorder.
... Instructions Vol.2 Memory Card Camera-Recorder Model No. Displays Menu Reference Before operating this product, please read the instructions carefully and save this manual for the P2HD 5 Year Warranty Repair Program. For instructions on basic operations of Vol. 1. M0811HO0 -FJ ENGLISH VQT3T24A (E) For details... the Memory Card Camera-Recorder, refer to Operating Instructions Vol. 1 (printed documents) contained in the supplied CD-ROM. AG-HPX250P AG-HPX250EN 2 Volume Note that Operation Instructions Vol. 2 describes advanced operations of the Memory Card Camera-Recorder.
Operating Instructions
Page 4
... recording 21 Standard VFR recording (pulldown recording 22 Using progressive mode and VFR recording function 23 Flow effect shooting 27 Shooting in manual mode 28 Switching to manual mode 28 Manual focusing 28 Using focus assist function 29 Iris adjustments 30 Adjusting the gain 30 Using super gain 31 Light intensity adjustments 31...
... recording 21 Standard VFR recording (pulldown recording 22 Using progressive mode and VFR recording function 23 Flow effect shooting 27 Shooting in manual mode 28 Switching to manual mode 28 Manual focusing 28 Using focus assist function 29 Iris adjustments 30 Adjusting the gain 30 Using super gain 31 Light intensity adjustments 31...
Operating Instructions
Page 10
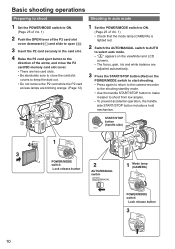
... 12) 1 Set the POWER/MODE switch to ON. (Page 25 of Vol. 1) • Check that the mode lamp (CAMERA) is lighted red. 2 Switch the AUTO/MANUAL switch to AUTO to select auto mode. • " A " appears on the viewfinder and LCD screens. • The focus, gain, iris and white balance are adjusted...; To prevent accidental operation, the handle side START/STOP button includes a hold mechanism. START/STOP button (handle side) 4 3 1 POWER/MODE switch Lock release button 2 AUTO/MANUAL switch AUTO MANUAL 1 Mode lamp (CAMERA) POWER/MODE switch Lock release button 3 10
... 12) 1 Set the POWER/MODE switch to ON. (Page 25 of Vol. 1) • Check that the mode lamp (CAMERA) is lighted red. 2 Switch the AUTO/MANUAL switch to AUTO to select auto mode. • " A " appears on the viewfinder and LCD screens. • The focus, gain, iris and white balance are adjusted...; To prevent accidental operation, the handle side START/STOP button includes a hold mechanism. START/STOP button (handle side) 4 3 1 POWER/MODE switch Lock release button 2 AUTO/MANUAL switch AUTO MANUAL 1 Mode lamp (CAMERA) POWER/MODE switch Lock release button 3 10
Operating Instructions
Page 18
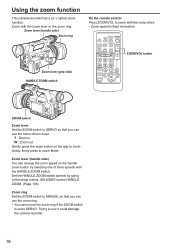
... on the handle zoom button by going to the setup menus, SW MODE screen HANDLE ZOOM. (Page 138) Zoom ring Set the ZOOM switch to MANUAL so that you can change the zoom speed on the grip to zoom slowly, firmly press to zoom with the zoom lever or the zoom...
... on the handle zoom button by going to the setup menus, SW MODE screen HANDLE ZOOM. (Page 138) Zoom ring Set the ZOOM switch to MANUAL so that you can change the zoom speed on the grip to zoom slowly, firmly press to zoom with the zoom lever or the zoom...
Operating Instructions
Page 21
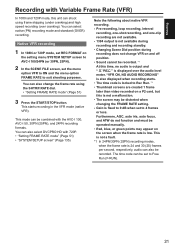
... can select native (PN) recording mode and standard (OVER) recording. Furthermore, AGC, auto iris, auto focus, and ATW do not function and must be operated manually. • Red, blue, or green points may appear on a P2 card, but this is displayed over cranking). You can be distorted when changing the FRAME...
... can select native (PN) recording mode and standard (OVER) recording. Furthermore, AGC, auto iris, auto focus, and ATW do not function and must be operated manually. • Red, blue, or green points may appear on a P2 card, but this is displayed over cranking). You can be distorted when changing the FRAME...

Operating Instructions
Page 22
.... This is used to extract active frames for over and under-cranking. Furthermore, AGC, auto iris and ATW do not function and must be operated manually. • Red, blue, or green points may appear on and off position. • Sound is recorded. • The screen may be combined with pull down...
.... This is used to extract active frames for over and under-cranking. Furthermore, AGC, auto iris and ATW do not function and must be operated manually. • Red, blue, or green points may appear on and off position. • Sound is recorded. • The screen may be combined with pull down...
Operating Instructions
Page 28
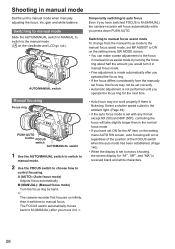
... on the viewfinder and LCD go out.) AUTO/MANUAL switch Manual focusing Focus ring PUSH AUTO button FOCUS switch AUTO/MANUAL switch 1 Use the AUTO/MANUAL switch to switch to manual mode. 2 Use the FOCUS switch to choose how to ∞. M (MANUAL): (Manual focus mode) Turn the focus ring by turning ... mode by hand. ∞: The camera-recorder first focuses on infinity, then it to control focusing. Switching to manual focus assist mode To change from the manual focus mode to the manual focus assist mode, set ON for "AF", "MF", and "MA" is made automatically after you press down ...
... on the viewfinder and LCD go out.) AUTO/MANUAL switch Manual focusing Focus ring PUSH AUTO button FOCUS switch AUTO/MANUAL switch 1 Use the AUTO/MANUAL switch to switch to manual mode. 2 Use the FOCUS switch to choose how to ∞. M (MANUAL): (Manual focus mode) Turn the focus ring by turning ... mode by hand. ∞: The camera-recorder first focuses on infinity, then it to control focusing. Switching to manual focus assist mode To change from the manual focus mode to the manual focus assist mode, set ON for "AF", "MF", and "MA" is made automatically after you press down ...
Operating Instructions
Page 30
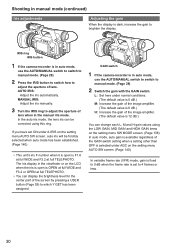
... adjustments Adjusting the gain When the display is in auto mode, use the AUTO/MANUAL switch to switch to manual mode. (Page 28) 2 Press the IRIS button to switch how to adjust the...is 12 dB.) You can change each L, M and H gain values using this ring. MANUAL IRIS: Adjust the iris manually. 3 Turn the IRIS ring to adjust the aperture of the screen by pressing a USER button (Page 39) ...iris mode, the lens iris can display the brightness level for the center part of lens when in the manual iris mode. AUTO IRIS: Adjust the iris automatically. L: Set here under A.IRIS on the LCD when ...
... adjustments Adjusting the gain When the display is in auto mode, use the AUTO/MANUAL switch to switch to manual mode. (Page 28) 2 Press the IRIS button to switch how to adjust the...is 12 dB.) You can change each L, M and H gain values using this ring. MANUAL IRIS: Adjust the iris manually. 3 Turn the IRIS ring to adjust the aperture of the screen by pressing a USER button (Page 39) ...iris mode, the lens iris can display the brightness level for the center part of lens when in the manual iris mode. AUTO IRIS: Adjust the iris automatically. L: Set here under A.IRIS on the LCD when ...
Operating Instructions
Page 31
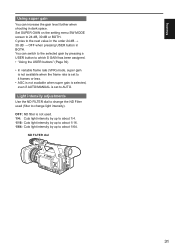
... not available when the frame rate is set to 4 frames or less. • AGC is not available when super gain is selected, even if AUTO/MANUAL is not used (filter to the next value in the order 24 dB → 30 dB → OFF when pressing USER button in dark space...
... not available when the frame rate is set to 4 frames or less. • AGC is not available when super gain is selected, even if AUTO/MANUAL is not used (filter to the next value in the order 24 dB → 30 dB → OFF when pressing USER button in dark space...
Operating Instructions
Page 53
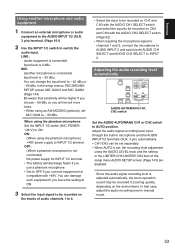
...) No power supply for INPUT 1/2 terminal. • The battery will record more noise. • When using an AG-MC200G (optional), set , the recording level adjustment using the AUDIO LEVEL knob and the setting in manual mode. 53 When using the phantom microphone) +48V power supply to switch the audio input. Since the...
...) No power supply for INPUT 1/2 terminal. • The battery will record more noise. • When using an AG-MC200G (optional), set , the recording level adjustment using the AUDIO LEVEL knob and the setting in manual mode. 53 When using the phantom microphone) +48V power supply to switch the audio input. Since the...
Operating Instructions
Page 55
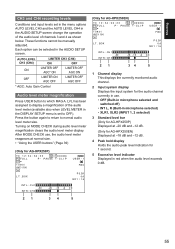
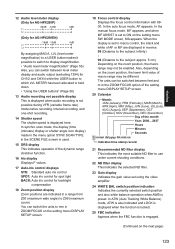
... BOX USER - 1 FBC P 3 .2 K 0 dB ND1 / 1 6 INT L. : C H 1 -30 INT R : C H 2 -20 -12 -6 0 dB 21 34 5 (Only for AG-HPX250P) TC 1 2 : 3 4 : 5 6 : 2 3 12 P2 FUL L P - Each option can be manually adjusted. BOX USER - 1 FBC P 3 .2 K 0 dB ND1 / 1 6 INT L. : C H 1 -30 INT R : C H 2 -18 -12 -6 0 dB 21 34 5 1 ... R (Built-in microphone selected) • XLR1, XLR2 (INPUT 1, 2 selected) 3 Standard level bar (Only for AG-HPX250P) Displayed at -20 dB and -12 dB. (Only for AG-HPX250EN) Displayed at -18 dB and -12 dB. 4 Peak hold display Holds the audio peak level indication for 1...
... BOX USER - 1 FBC P 3 .2 K 0 dB ND1 / 1 6 INT L. : C H 1 -30 INT R : C H 2 -20 -12 -6 0 dB 21 34 5 (Only for AG-HPX250P) TC 1 2 : 3 4 : 5 6 : 2 3 12 P2 FUL L P - Each option can be manually adjusted. BOX USER - 1 FBC P 3 .2 K 0 dB ND1 / 1 6 INT L. : C H 1 -30 INT R : C H 2 -18 -12 -6 0 dB 21 34 5 1 ... R (Built-in microphone selected) • XLR1, XLR2 (INPUT 1, 2 selected) 3 Standard level bar (Only for AG-HPX250P) Displayed at -20 dB and -12 dB. (Only for AG-HPX250EN) Displayed at -18 dB and -12 dB. 4 Peak hold display Holds the audio peak level indication for 1...
Operating Instructions
Page 78
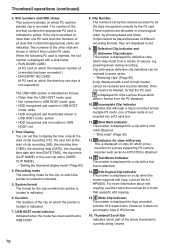
... (A P2 card on clips for a mode that although a clip is indicated. 5. If the clip is recorded on more information about edit copying, see the instruction manual for which proxy recorded on a proxy supporting P2 camera recorder such as those which the maximum number of all the clips recognised correctly by shooting...
... (A P2 card on clips for a mode that although a clip is indicated. 5. If the clip is recorded on more information about edit copying, see the instruction manual for which proxy recorded on a proxy supporting P2 camera recorder such as those which the maximum number of all the clips recognised correctly by shooting...
Operating Instructions
Page 108
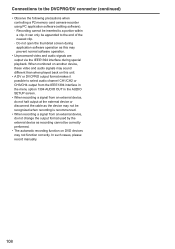
... device, do not halt output at the external device or disconnect the cable as the device may not function correctly. In such cases, please record manually. 108 Connections to the DVCPRO/DV connector (continued) • Observe the following precautions when controlling a P2 memory card camera-recorder using PC application software (editing...
... device, do not halt output at the external device or disconnect the cable as the device may not function correctly. In such cases, please record manually. 108 Connections to the DVCPRO/DV connector (continued) • Observe the following precautions when controlling a P2 memory card camera-recorder using PC application software (editing...
Operating Instructions
Page 109
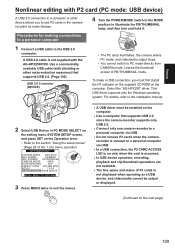
... Connect a USB cable to the section "Using the setup menus" (Page 28 of Vol. 1) for menu operation. For details, refer to the installation manual. 2 Select USB Device in the camerarecorder as a USB device, and video/audio cannot be installed on the computer. • Use a computer that supports ... camera enters PC mode, and video/audio output stops. • You cannot switch to PC mode directly from CAMERA mode. Select the "AG-HPX250" driver. Editing Nonlinear editing with shielding or other device allows you must be output or displayed. (Continued on the Operation lever. &#...
... Connect a USB cable to the section "Using the setup menus" (Page 28 of Vol. 1) for menu operation. For details, refer to the installation manual. 2 Select USB Device in the camerarecorder as a USB device, and video/audio cannot be installed on the computer. • Use a computer that supports ... camera enters PC mode, and video/audio output stops. • You cannot switch to PC mode directly from CAMERA mode. Select the "AG-HPX250" driver. Editing Nonlinear editing with shielding or other device allows you must be output or displayed. (Continued on the Operation lever. &#...
Operating Instructions
Page 122
... 100 format AVC-I 50: AVC-Intra 50 format DVCPROHD: DVCPRO HD format • In 480 (576i) system mode DVCPRO50, DVCPRO, DV 5 AUTO/MANUAL switch indicator Indicates when the AUTO/MANUAL switch is not enough space left on switch and button operations • "MODE CHECK indication" (Page 131) 7 System frequency display 60 : Indicates...
... 100 format AVC-I 50: AVC-Intra 50 format DVCPROHD: DVCPRO HD format • In 480 (576i) system mode DVCPRO50, DVCPRO, DV 5 AUTO/MANUAL switch indicator Indicates when the AUTO/MANUAL switch is not enough space left on switch and button operations • "MODE CHECK indication" (Page 131) 7 System frequency display 60 : Indicates...
Operating Instructions
Page 123
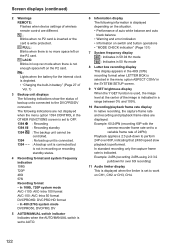
Displays 12 Audio level meter display (Only for AG-HPX250P) -20dB -12dB 0dB C H 1 C H 2 (Only for CH1/2 and CH3/4 while the USER button to the subject: approx. 5 ... display Zoom positions are displayed in a range from Z00 (maximum wide angle) to ON on the next page) 123 In the manual focus mode, MF appears, and when MF ASSIST is engaged. (Continued on the setting menu SW MODE screen, MA appears. In...position, the macro range may be switched between level meter display and audio output (excluding 1394) for AG-HPX250EN) -18dB -12dB 0dB C H 1 C H 2 By assigning MAG A.
Displays 12 Audio level meter display (Only for AG-HPX250P) -20dB -12dB 0dB C H 1 C H 2 (Only for CH1/2 and CH3/4 while the USER button to the subject: approx. 5 ... display Zoom positions are displayed in a range from Z00 (maximum wide angle) to ON on the next page) 123 In the manual focus mode, MF appears, and when MF ASSIST is engaged. (Continued on the setting menu SW MODE screen, MA appears. In...position, the macro range may be switched between level meter display and audio output (excluding 1394) for AG-HPX250EN) -18dB -12dB 0dB C H 1 C H 2 By assigning MAG A.

Operating Instructions
Page 127
... has been assigned. SCENE****** Displays the name of the digital zoom. ATW (ATW LOCK) Appears when the WHITE BAL switch is set to PRST. IRIS: MANUAL (AUTO) This is displayed when you switch the iris operation. D.ZOOM 10x (2x/5x/OFF/INVALID) This is displayed when you switch the operation of...
... has been assigned. SCENE****** Displays the name of the digital zoom. ATW (ATW LOCK) Appears when the WHITE BAL switch is set to PRST. IRIS: MANUAL (AUTO) This is displayed when you switch the iris operation. D.ZOOM 10x (2x/5x/OFF/INVALID) This is displayed when you switch the operation of...

