
Operating Instructions
Page 2
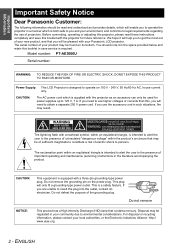
.... ENGLISH If you need to obtain a separate 250 V power cord. Do not remove NOTICE: This product has a High Intensity Discharge (HID) lamp that may be regulated in your Panasonic LCD projector. This is supplied with the projector as it provides details, which will only fit a grounding-type power outlet. Before connecting, operating or adjusting this projector, please read and understood as an accessory can only...
.... ENGLISH If you need to obtain a separate 250 V power cord. Do not remove NOTICE: This product has a High Intensity Discharge (HID) lamp that may be regulated in your Panasonic LCD projector. This is supplied with the projector as it provides details, which will only fit a grounding-type power outlet. Before connecting, operating or adjusting this projector, please read and understood as an accessory can only...

Operating Instructions
Page 4
... the lens control settings 23 Switching the picture mode 23 Adjusting the image 23 Loading a saved setting 24 Switching the aspect ratio 24 Adjusting the signal condition with a waveform ......... 24 Setting your own color profile 26 Resetting to safety 6 WARNINGS 6 CAUTIONS 7 Cautions when transporting 8 Cautions when installing 9 Cautions on use 9 Accessories 10 Preparation About Your Projector 11 Remote control 11 Projector body 12 Getting Started Setting up " on page 18. 3. Connect with regard to the factory default settings...
... the lens control settings 23 Switching the picture mode 23 Adjusting the image 23 Loading a saved setting 24 Switching the aspect ratio 24 Adjusting the signal condition with a waveform ......... 24 Setting your own color profile 26 Resetting to safety 6 WARNINGS 6 CAUTIONS 7 Cautions when transporting 8 Cautions when installing 9 Cautions on use 9 Accessories 10 Preparation About Your Projector 11 Remote control 11 Projector body 12 Getting Started Setting up " on page 18. 3. Connect with regard to the factory default settings...

Operating Instructions
Page 5
... HDMI SIGNAL LEVEL 43 FRAME RESPONSE 43 INSTALLATION 44 SLEEP 44 HIGH ALTITUDE MODE 44 LAMP POWER 44 LAMP RUNTIME 44 Contents Maintenance TEMP and LAMP Indicators 45 Managing the indicated problems 45 Care and Replacement 46 Cleaning the projector 46 Replacing the lamp unit 47 Troubleshooting 49 Appendix Technical Information 50 List of compatible signals 50 Serial terminal 51 Specifications 54 Ceiling mount bracket safeguards 56 Dimensions 57 Trademark acknowledgements 57 Index 58 Settings...
... HDMI SIGNAL LEVEL 43 FRAME RESPONSE 43 INSTALLATION 44 SLEEP 44 HIGH ALTITUDE MODE 44 LAMP POWER 44 LAMP RUNTIME 44 Contents Maintenance TEMP and LAMP Indicators 45 Managing the indicated problems 45 Care and Replacement 46 Cleaning the projector 46 Replacing the lamp unit 47 Troubleshooting 49 Appendix Technical Information 50 List of compatible signals 50 Serial terminal 51 Specifications 54 Ceiling mount bracket safeguards 56 Dimensions 57 Trademark acknowledgements 57 Index 58 Settings...

Operating Instructions
Page 6
... damage to prevent it become wet. Clean the power plug regularly to the projector. Insert the power plug securely into a bundle. If the power cord is coming from the projector, disconnect the power plug from becoming covered in fire. terminals of the projector. Do not install this can result in this may result. Do not use the projector in a place which is not...
... damage to prevent it become wet. Clean the power plug regularly to the projector. Insert the power plug securely into a bundle. If the power cord is coming from the projector, disconnect the power plug from becoming covered in fire. terminals of the projector. Do not install this can result in this may result. Do not use the projector in a place which is not...

Operating Instructions
Page 7
... in direct sunlight. The projector is recommended to touch the remote control unit. When disconnecting the power cord, hold the plug, not the cord. If the power cord itself is being used . Do not place any heavy objects on cloth or papers, as near a heater or in damage or injury. Failure to let young children look into the air intake port. ENGLISH - 7
... in direct sunlight. The projector is recommended to touch the remote control unit. When disconnecting the power cord, hold the plug, not the cord. If the power cord itself is being used . Do not place any heavy objects on cloth or papers, as near a heater or in damage or injury. Failure to let young children look into the air intake port. ENGLISH - 7

Operating Instructions
Page 9
... Authorized Service Center to switch off may be damaged, which are subject to sudden temperature changes, such as near the screen to be turned off any windows and turn off . See "Ceiling mount bracket safeguards" on page 44. See "HIGH ALTITUDE MODE" on page 56 for more than 10 hours, or the frequent switching on or off the projector once and try after the instructed lamp replacement timing. Do...
... Authorized Service Center to switch off may be damaged, which are subject to sudden temperature changes, such as near the screen to be turned off any windows and turn off . See "Ceiling mount bracket safeguards" on page 44. See "HIGH ALTITUDE MODE" on page 56 for more than 10 hours, or the frequent switching on or off the projector once and try after the instructed lamp replacement timing. Do...
Operating Instructions
Page 11
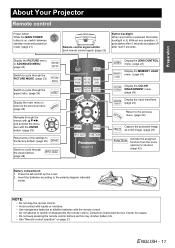
...) Display the COLOR MANAGEMENT menu. (page 26) Display the input waveform. (page 24) Return to the previous menu. (page 29) Capture the projected image as a still image. (page 28) Activate the assigned function from the menu options for repairs. • Do not keep pressing the remote control buttons as this may shorten battery life. • See "Remote control operation" on , switch between standby mode and projection mode. (page 21) Remote control signal emitter Emit remote control signal. (page 23) Button backlight...
...) Display the COLOR MANAGEMENT menu. (page 26) Display the input waveform. (page 24) Return to the previous menu. (page 29) Capture the projected image as a still image. (page 28) Activate the assigned function from the menu options for repairs. • Do not keep pressing the remote control buttons as this may shorten battery life. • See "Remote control operation" on , switch between standby mode and projection mode. (page 21) Remote control signal emitter Emit remote control signal. (page 23) Button backlight...

Operating Instructions
Page 13
... used with the Kensington MicroSaver Security System. SERIAL Connect a compatible cable for controlling the projector remotely via your PC. S-VIDEO IN Connect a S-VIDEO signal cable. Compatible with the attached power cord to ensure optimum performance and avoid damage to the projector. • Do not open . (page 47) Front leg adjusters Screw up/down to adjust the projection angle. (page 15) Lens cover attachment hole Air intake port AC IN Connect the power cord to supply electronic power to the projector...
... used with the Kensington MicroSaver Security System. SERIAL Connect a compatible cable for controlling the projector remotely via your PC. S-VIDEO IN Connect a S-VIDEO signal cable. Compatible with the attached power cord to ensure optimum performance and avoid damage to the projector. • Do not open . (page 47) Front leg adjusters Screw up/down to adjust the projection angle. (page 15) Lens cover attachment hole Air intake port AC IN Connect the power cord to supply electronic power to the projector...

Operating Instructions
Page 20
... the lamp and recovering to project. The power button is switched off Power indicator Power indicator informs you the status of the power. Switching the projector on/off . Power indicator Indicator status No illumination or flashing Red Lit Green Flashing Lit Orange Lit Flashing Status The MAIN POWER button is switched off or unplug the power cord. • The electric consumption in standby mode. Basic Operation 20 - The power button is switched on and the projector is in standby mode is flashing, the power indicator will not light. When the TEMP indicator...
... the lamp and recovering to project. The power button is switched off Power indicator Power indicator informs you the status of the power. Switching the projector on/off . Power indicator Indicator status No illumination or flashing Red Lit Green Flashing Lit Orange Lit Flashing Status The MAIN POWER button is switched off or unplug the power cord. • The electric consumption in standby mode. Basic Operation 20 - The power button is switched on and the projector is in standby mode is flashing, the power indicator will not light. When the TEMP indicator...

Operating Instructions
Page 21
... temperature. • You can reduce the operational sound by setting the LAMP POWER in red. 3. The power indicator lights up in green after flashing for a long duration to switch off the MAIN POWER button. 3. Press the power button. The STARTUP LOGO is displayed. NOTE: • When the internal cooling fan is ready to switch the power off (3) (2) 1. Press the power button. The power indicator lights up in OPTION menu to the projection, press any button except the power button. 2. Attach the lens cover...
... temperature. • You can reduce the operational sound by setting the LAMP POWER in red. 3. The power indicator lights up in green after flashing for a long duration to switch off the MAIN POWER button. 3. Press the power button. The STARTUP LOGO is displayed. NOTE: • When the internal cooling fan is ready to switch the power off (3) (2) 1. Press the power button. The power indicator lights up in OPTION menu to the projection, press any button except the power button. 2. Attach the lens cover...

Operating Instructions
Page 22
... remote control. Press the INPUT SELECT button to adjust the size of the FOCUS and ZOOM buttons to select the required aspect mode. See "Lens shift and positioning" on page 28. Press the LENS button to adjust the focus and zoom by pressing the ZOOM button again. Adjust the angle of the required device. 2. Basic Operation 22 - ENGLISH Adjust the projected image with the lens shift dials. NOTE: • Do not touch the air exhaust port...
... remote control. Press the INPUT SELECT button to adjust the size of the FOCUS and ZOOM buttons to select the required aspect mode. See "Lens shift and positioning" on page 28. Press the LENS button to adjust the focus and zoom by pressing the ZOOM button again. Adjust the angle of the required device. 2. Basic Operation 22 - ENGLISH Adjust the projected image with the lens shift dials. NOTE: • Do not touch the air exhaust port...

Operating Instructions
Page 23
... the required buttons to switch between the remote control and the remote control signal receptor, the remote control may differ due to adjust. NOTE: • Do not let strong light shine onto the signal receptor. projected image, and save the settings. ENGLISH - 23 The signal will be reflected off the screen. Q Facing to the projector Ensure the remote control emitter is selected. Managing the lens control settings You can display the PICTURE and ADVANCED MENU menu items...
... the required buttons to switch between the remote control and the remote control signal receptor, the remote control may differ due to adjust. NOTE: • Do not let strong light shine onto the signal receptor. projected image, and save the settings. ENGLISH - 23 The signal will be reflected off the screen. Q Facing to the projector Ensure the remote control emitter is selected. Managing the lens control settings You can display the PICTURE and ADVANCED MENU menu items...

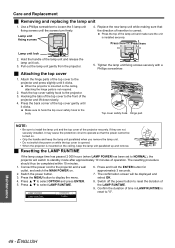
Operating Instructions
Page 26
... to adjust when the very edge point of the projection area is displayed on the upper part of the color. Select OK to NORMAL. 26 - When you can store up to edit the log. The PROFILE setting will be displayed. Select the CURSOR menu and press ENTER. You can readjust the color. Select CHANGE to 8 logs under the PICTURE MODE setting. The confirmation screen...
... to adjust when the very edge point of the projection area is displayed on the upper part of the color. Select OK to NORMAL. 26 - When you can store up to edit the log. The PROFILE setting will be displayed. Select the CURSOR menu and press ENTER. You can readjust the color. Select CHANGE to 8 logs under the PICTURE MODE setting. The confirmation screen...

Operating Instructions
Page 27
... again to the default setting of the PICTURE MODE menu. Name the profile. Repeat step 3 until the PROFILE is set to perform another menu action before you save the adjusted profile, the confirmation screen will be displayed. • If you switch the input signal before you apply COLOR MANAGEMENT. • When the LOG is displayed. Q Changing the profile names You can enter up to keep them as...
... again to the default setting of the PICTURE MODE menu. Name the profile. Repeat step 3 until the PROFILE is set to perform another menu action before you save the adjusted profile, the confirmation screen will be displayed. • If you switch the input signal before you apply COLOR MANAGEMENT. • When the LOG is displayed. Q Changing the profile names You can enter up to keep them as...

Operating Instructions
Page 29
... settings are displayed on page 28 to select. Current setting BRIGHTNESS Default J Returning to the previous menu Press the MENU or RETURN button to return to the projection. PICTURE H-POSITION POSITION V-POSITION ASPECT LANGUAGE WSS ON LENS CONTROL OVER SCAN FUNCTION BUTTON KEYSTONE OPTION SELECT RETURN ENTER 3. You can cycle through the MENU J Displaying the main menu Press the MENU button to adjust the settings. NOTE: • See "Resetting to the factory default settings...
... settings are displayed on page 28 to select. Current setting BRIGHTNESS Default J Returning to the previous menu Press the MENU or RETURN button to return to the projection. PICTURE H-POSITION POSITION V-POSITION ASPECT LANGUAGE WSS ON LENS CONTROL OVER SCAN FUNCTION BUTTON KEYSTONE OPTION SELECT RETURN ENTER 3. You can cycle through the MENU J Displaying the main menu Press the MENU button to adjust the settings. NOTE: • See "Resetting to the factory default settings...

Operating Instructions
Page 43
... LOWER CENTER LOWER RIGHT BACK COLOR You can change the displaying position of image displayed for 15 seconds. NOTE: • HDMI SIGNAL LEVEL is selected, you change the input method, the guidance appears in idle. The INPUT GUIDE will be displayed for the progressive signals. STARTUP LOGO You can minimise the time delay of the menu. OPTION menu Remote control Control panel See "Navigating through the MENU" on page 30. Press...
... LOWER CENTER LOWER RIGHT BACK COLOR You can change the displaying position of image displayed for 15 seconds. NOTE: • HDMI SIGNAL LEVEL is selected, you change the input method, the guidance appears in idle. The INPUT GUIDE will be displayed for the progressive signals. STARTUP LOGO You can minimise the time delay of the menu. OPTION menu Remote control Control panel See "Navigating through the MENU" on page 30. Press...
Operating Instructions
Page 45
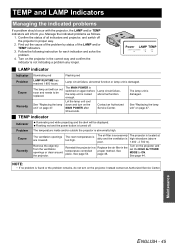
... HIGH ALTITUDE MODE to be displayed. Cause Remedy The ventilation openings are covered. The room temperature is turned off the projector in the proper method. Replace the air filter in proper way. 2. Maintenance ENGLISH - 45 See "Replacing the lamp unit" on page 47. Confirm the status of the LAMP and/or TEMP indicators. 3. See page 46. Manage the indicated problems as follows. 1. Power LAMP TEMP J LAMP indicator Indicator Illuminating red Flashing red Problem Cause Remedy LAMP RUNTIME has reached 1 800 hours...
... HIGH ALTITUDE MODE to be displayed. Cause Remedy The ventilation openings are covered. The room temperature is turned off the projector in the proper method. Replace the air filter in proper way. 2. Maintenance ENGLISH - 45 See "Replacing the lamp unit" on page 47. Confirm the status of the LAMP and/or TEMP indicators. 3. See page 46. Manage the indicated problems as follows. 1. Power LAMP TEMP J LAMP indicator Indicator Illuminating red Flashing red Problem Cause Remedy LAMP RUNTIME has reached 1 800 hours...

Operating Instructions
Page 47
... top cover safety hook from the projector. When the projector is mounted on the ceiling, removing the hinge parts is displayed on the ceiling, do not work directly under the projector or put your face closer to the projector. Contact an Authorized Service Center to ECO-MODE. On screen LAMP indicator Indication REPLACE LAMP Maintenance Over 1 800 hours Over 2 000 hours "REPLACE LAMP" is provided with an unauthorized lamp unit. To clear the screen, press any button...
... top cover safety hook from the projector. When the projector is mounted on the ceiling, removing the hinge parts is displayed on the ceiling, do not work directly under the projector or put your face closer to the projector. Contact an Authorized Service Center to ECO-MODE. On screen LAMP indicator Indication REPLACE LAMP Maintenance Over 1 800 hours Over 2 000 hours "REPLACE LAMP" is provided with an unauthorized lamp unit. To clear the screen, press any button...
Operating Instructions
Page 48
... confirmation screen will switch to operate so that the direction of the LAMP RUNTIME. 9. When the projector is installed securely. Press here Press here Lamp unit lock 2. ENGLISH Switch off the power button to display the menu. 4. Pull out the lamp unit gently from the projector. Press the MENU button to reset the duration of insertion is mounted on the ceiling, keep the lamp unit paralleled up and remove. Hook the top cover safety...
... confirmation screen will switch to operate so that the direction of the LAMP RUNTIME. 9. When the projector is installed securely. Press here Press here Lamp unit lock 2. ENGLISH Switch off the power button to display the menu. 4. Pull out the lamp unit gently from the projector. Press the MENU button to reset the duration of insertion is mounted on the ceiling, keep the lamp unit paralleled up and remove. Hook the top cover safety...

Operating Instructions
Page 49
No picture appears. The power cord may not be correct. LAMP indicator is at the wall outlet. The lamp unit cover has not been securely installed. The input selection setting may be incorrect. The lens focus may not have been set correctly. The projector may not be connected. COLOR or TINT adjustment may be connected to the documentation provided with the VCR or other signal source. The batteries may be tilted...
No picture appears. The power cord may not be correct. LAMP indicator is at the wall outlet. The lamp unit cover has not been securely installed. The input selection setting may be incorrect. The lens focus may not have been set correctly. The projector may not be connected. COLOR or TINT adjustment may be connected to the documentation provided with the VCR or other signal source. The batteries may be tilted...


