Instruction Manual
Page 3
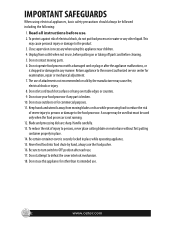
... or after each use of severe injury to persons or damage to the nearest authorized service center for commercial purposes. 11. Return appliance to the food processor. Do not let cord touch hot surfaces or hang over table edges or counters. 9. Do not attempt to persons, never place cutting blade on or... to defeat the cover interlock mechanism. 18. Be certain container cover is not running. 12. To reduce the risk of electrical shock, do not put food processor in place. 14. Do not use . 2 www.oster.com
... or after each use of severe injury to persons or damage to the nearest authorized service center for commercial purposes. 11. Return appliance to the food processor. Do not let cord touch hot surfaces or hang over table edges or counters. 9. Do not attempt to persons, never place cutting blade on or... to defeat the cover interlock mechanism. 18. Be certain container cover is not running. 12. To reduce the risk of electrical shock, do not put food processor in place. 14. Do not use . 2 www.oster.com
Instruction Manual
Page 4
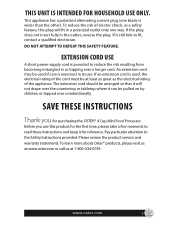
... The extension cord should be arranged so that it still fails to the Safety Instructions provided. To learn more about Oster® products, please visit us at www.oster.com or call us at least as great as the electrical rating of electric shock, as a safety feature, this...electrician. If it will fit in its use this plug will not drape over the countertop or tabletop where it for purchasing the OSTER® 4 Cup Mini Food Processor. This appliance has a polarized alternating current plug (one way. DO NOT ATTEMPT TO DEFEAT THIS SAFETY FEATURE. Please review the ...
... The extension cord should be arranged so that it still fails to the Safety Instructions provided. To learn more about Oster® products, please visit us at www.oster.com or call us at least as great as the electrical rating of electric shock, as a safety feature, this...electrician. If it will fit in its use this plug will not drape over the countertop or tabletop where it for purchasing the OSTER® 4 Cup Mini Food Processor. This appliance has a polarized alternating current plug (one way. DO NOT ATTEMPT TO DEFEAT THIS SAFETY FEATURE. Please review the ...
Instruction Manual
Page 5
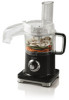
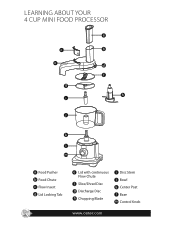
LEARNING ABOUT YOUR 4 CUP MINI FOOD PROCESSOR a c e g i b d f h j k l m UNLOCK LOCK a Food Pusher b Food Chute c Flow Insert d Lid Locking Tab 4 e Lid with continuous Flow Chute f Slice/Shred Disc g Discharge Disc h Chopping Blade i Disc Stem j Bowl k Center Post l Base m Control Knob www.oster.com
LEARNING ABOUT YOUR 4 CUP MINI FOOD PROCESSOR a c e g i b d f h j k l m UNLOCK LOCK a Food Pusher b Food Chute c Flow Insert d Lid Locking Tab 4 e Lid with continuous Flow Chute f Slice/Shred Disc g Discharge Disc h Chopping Blade i Disc Stem j Bowl k Center Post l Base m Control Knob www.oster.com

Instruction Manual
Page 6
Processor should always be left and held for taking the unit apart and cleaning. www.oster.com 5 The control knob must be placed in use. When the control knob is turned to the left in OFF position when not in the ... processing tasks, such as chopping nuts, raw meats, or vegetables. This lets you check processed results and control the consistency. 2 On - Before Using Your Oster® Food Processor • When unpacking the product and removing packing material, handle the chopping blade and slice/shred disc carefully: they are very sharp. • Wash all...
Processor should always be left and held for taking the unit apart and cleaning. www.oster.com 5 The control knob must be placed in use. When the control knob is turned to the left in OFF position when not in the ... processing tasks, such as chopping nuts, raw meats, or vegetables. This lets you check processed results and control the consistency. 2 On - Before Using Your Oster® Food Processor • When unpacking the product and removing packing material, handle the chopping blade and slice/shred disc carefully: they are very sharp. • Wash all...
Instruction Manual
Page 7
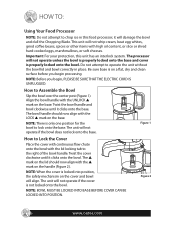
...the bowl and dull the Chopping Blade. Important: For your protection, this food processor; Be sure base is on the base. How to the right of the... grind coffee beans, spices or other items with the UNLOCK ▲ mark on the base. The processor will not operate if the cover is properly locked onto the bowl. The unit will not operate unless...locked into position, the safety mechanism on the handle (Figure 2). UNLOCK LOCK Figure 2 6 www.oster.com HOW TO: Using Your Food Processor NOTE: Do not attempt to chop ice in place. NOTE: Before you begin , PLEASE BE SURE...
...the bowl and dull the Chopping Blade. Important: For your protection, this food processor; Be sure base is on the base. How to the right of the... grind coffee beans, spices or other items with the UNLOCK ▲ mark on the base. The processor will not operate if the cover is properly locked onto the bowl. The unit will not operate unless...locked into position, the safety mechanism on the handle (Figure 2). UNLOCK LOCK Figure 2 6 www.oster.com HOW TO: Using Your Food Processor NOTE: Do not attempt to chop ice in place. NOTE: Before you begin , PLEASE BE SURE...
Instruction Manual
Page 8
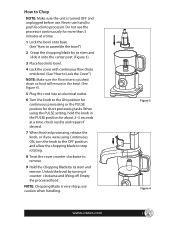
...the knob, or if you were using the PULSE setting, hold the knob in the bowl. (See Figure 4). 5 Plug the cord into processor. Empty the processed food. How to Chop NOTE: Make sure the unit is very sharp, use caution when handling. NOTE: Chopping Blade is turned OFF and unplugged ... the processor continuously for short processing tasks. clockwise and lifting off. When using Continuous ON, turn the knob to the OFF position and allow the chopping blade to stop rotating. 8 Twist the cover counter-clockwise to remove. 9 Hold the Chopping Blade by its stem and remove. www.oster.com ...
...the knob, or if you were using the PULSE setting, hold the knob in the bowl. (See Figure 4). 5 Plug the cord into processor. Empty the processed food. How to Chop NOTE: Make sure the unit is very sharp, use caution when handling. NOTE: Chopping Blade is turned OFF and unplugged ... the processor continuously for short processing tasks. clockwise and lifting off. When using Continuous ON, turn the knob to the OFF position and allow the chopping blade to stop rotating. 8 Twist the cover counter-clockwise to remove. 9 Hold the Chopping Blade by its stem and remove. www.oster.com ...
Instruction Manual
Page 9
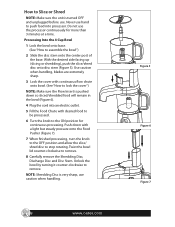
... and unplugged before use caution when handling. Twist the bowl lid counter-clockwise to remove. OCK Figure 5 Figure 6 Figure 7 8 www.oster.com Unlock the bowl by turning it counter-clockwise to remove. 8 Carefully remove the Shredding Disc, Discharge Disc and Disc Stem. Push down... so sliced/shredded food will remain in the bowl (Figure 6). 4 Plug the cord into processor. Use caution when handling, blades are extremely sharp. 3 Lock the cover with continuous flow chute onto bowl....
... and unplugged before use caution when handling. Twist the bowl lid counter-clockwise to remove. OCK Figure 5 Figure 6 Figure 7 8 www.oster.com Unlock the bowl by turning it counter-clockwise to remove. 8 Carefully remove the Shredding Disc, Discharge Disc and Disc Stem. Push down... so sliced/shredded food will remain in the bowl (Figure 6). 4 Plug the cord into processor. Use caution when handling, blades are extremely sharp. 3 Lock the cover with continuous flow chute onto bowl....
Instruction Manual
Page 10
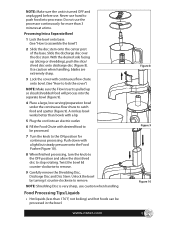
... with a light but steady pressure onto the Food Pusher (Figure 10). 8 When finished processing, turn the knob to the OFF position and allow the slice/shred disc to be processed in the bowl. www.oster.com Figure 8 Figure 9 Figure 10 9 Processing Into a ...food into the separate bowl (Figure 9). 4 Place a large, low serving/preparation bowl under the continuous flow chute to remove. Unlock the bowl by turning it counter-clockwise to catch food and spatter (Figure 9). With the desired side facing up so sliced/shredded food will process into processor. Never use the processor...
... with a light but steady pressure onto the Food Pusher (Figure 10). 8 When finished processing, turn the knob to the OFF position and allow the slice/shred disc to be processed in the bowl. www.oster.com Figure 8 Figure 9 Figure 10 9 Processing Into a ...food into the separate bowl (Figure 9). 4 Place a large, low serving/preparation bowl under the continuous flow chute to remove. Unlock the bowl by turning it counter-clockwise to catch food and spatter (Figure 9). With the desired side facing up so sliced/shredded food will process into processor. Never use the processor...


