Instruction Manual
Page 3
... or counters. 9. Blade and processing disk are sharp. The use . 2 www.oster.com Do not attempt to the nearest authorized service center for examination, repair or mechanical adjustment. 7. Do not operate food processor with a damaged cord or plug or after each use . 2. Never feed food into food chute by the manufacturer may cause personal injury or damage to persons, never place cutting blade on motor base without first...
... or counters. 9. Blade and processing disk are sharp. The use . 2 www.oster.com Do not attempt to the nearest authorized service center for examination, repair or mechanical adjustment. 7. Do not operate food processor with a damaged cord or plug or after each use . 2. Never feed food into food chute by the manufacturer may cause personal injury or damage to persons, never place cutting blade on motor base without first...

Instruction Manual
Page 4
... take a few moments to read these instructions and keep it still fails to the Safety Instructions provided. This appliance has a polarized alternating current plug (one way. If the plug does not insert fully in its use this plug will not drape over the ...safety feature, this product for purchasing the OSTER® 4 Cup Mini Food Processor. DO NOT ATTEMPT TO DEFEAT THIS SAFETY FEATURE. Please review the product service and warranty statements. EXTENSION CORD USE A short power-supply cord is used if care is wider than the other). www.oster.com 3 An extension cord may be...
... take a few moments to read these instructions and keep it still fails to the Safety Instructions provided. This appliance has a polarized alternating current plug (one way. If the plug does not insert fully in its use this plug will not drape over the ...safety feature, this product for purchasing the OSTER® 4 Cup Mini Food Processor. DO NOT ATTEMPT TO DEFEAT THIS SAFETY FEATURE. Please review the product service and warranty statements. EXTENSION CORD USE A short power-supply cord is used if care is wider than the other). www.oster.com 3 An extension cord may be...
Instruction Manual
Page 5
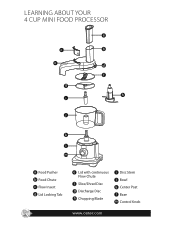
LEARNING ABOUT YOUR 4 CUP MINI FOOD PROCESSOR a c e g i b d f h j k l m UNLOCK LOCK a Food Pusher b Food Chute c Flow Insert d Lid Locking Tab 4 e Lid with continuous Flow Chute f Slice/Shred Disc g Discharge Disc h Chopping Blade i Disc Stem j Bowl k Center Post l Base m Control Knob www.oster.com
LEARNING ABOUT YOUR 4 CUP MINI FOOD PROCESSOR a c e g i b d f h j k l m UNLOCK LOCK a Food Pusher b Food Chute c Flow Insert d Lid Locking Tab 4 e Lid with continuous Flow Chute f Slice/Shred Disc g Discharge Disc h Chopping Blade i Disc Stem j Bowl k Center Post l Base m Control Knob www.oster.com

Instruction Manual
Page 6
... stop. Before Using Your Oster® Food Processor • When unpacking the product and removing packing material, handle the chopping blade and slice/shred disc carefully: they are very sharp. • Wash all parts except the Base in the dishwasher. Be sure to read the Care & Cleaning Section of this manual to OFF position. 3 Off - This lets you check processed results and control the consistency. 2 On - Processor should always be turned...
... stop. Before Using Your Oster® Food Processor • When unpacking the product and removing packing material, handle the chopping blade and slice/shred disc carefully: they are very sharp. • Wash all parts except the Base in the dishwasher. Be sure to read the Care & Cleaning Section of this manual to OFF position. 3 Off - This lets you check processed results and control the consistency. 2 On - Processor should always be turned...
Instruction Manual
Page 7
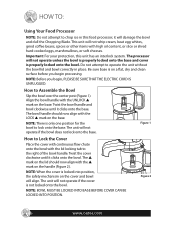
... begin processing. UNLOCK LOCK Figure 2 6 www.oster.com HOW TO: Using Your Food Processor NOTE: Do not attempt to operate the unit without the bowl lid and bowl correctly in this unit has an interlock system. This unit will damage the bowl and dull the Chopping Blade. Do not attempt to chop ice in place. Be sure base is only one position for the bowl to Assemble the Bowl...
... begin processing. UNLOCK LOCK Figure 2 6 www.oster.com HOW TO: Using Your Food Processor NOTE: Do not attempt to operate the unit without the bowl lid and bowl correctly in this unit has an interlock system. This unit will damage the bowl and dull the Chopping Blade. Do not attempt to chop ice in place. Be sure base is only one position for the bowl to Assemble the Bowl...
Instruction Manual
Page 8
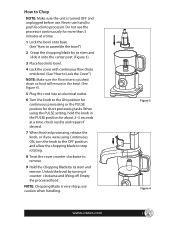
... processor. Unlock the bowl by its stem and remove. NOTE: Chopping Blade is turned OFF and unplugged before use. When using Continuous ON, turn the knob to the OFF position and allow the chopping blade to stop rotating. 8 Twist the cover counter-clockwise to remove. 9 Hold the Chopping Blade by turning it onto the center post. (Figure 3). 3 Place food into bowl. 4 Lock the cover with continuous flow chute onto bowl. (See "How to Lock the Cover") NOTE: Make...
... processor. Unlock the bowl by its stem and remove. NOTE: Chopping Blade is turned OFF and unplugged before use. When using Continuous ON, turn the knob to the OFF position and allow the chopping blade to stop rotating. 8 Twist the cover counter-clockwise to remove. 9 Hold the Chopping Blade by turning it onto the center post. (Figure 3). 3 Place food into bowl. 4 Lock the cover with continuous flow chute onto bowl. (See "How to Lock the Cover") NOTE: Make...
Instruction Manual
Page 9
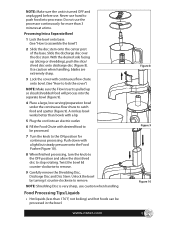
... 4 Cup Bowl 1 Lock the bowl onto base. (See "How to remove. 8 Carefully remove the Shredding Disc, Discharge Disc and Disc Stem. Twist the bowl lid counter-clockwise to assemble the bowl") 2 Slide the disc stem onto the center post of the base. Use caution when handling, blades are extremely sharp. 3 Lock the cover with continuous flow chute onto bowl. (See "How to lock the cover") NOTE: Make sure the Flow Insert is pushed down with desired food to be processed. 6 Turn the knob to remove. With...
... 4 Cup Bowl 1 Lock the bowl onto base. (See "How to remove. 8 Carefully remove the Shredding Disc, Discharge Disc and Disc Stem. Twist the bowl lid counter-clockwise to assemble the bowl") 2 Slide the disc stem onto the center post of the base. Use caution when handling, blades are extremely sharp. 3 Lock the cover with continuous flow chute onto bowl. (See "How to lock the cover") NOTE: Make sure the Flow Insert is pushed down with desired food to be processed. 6 Turn the knob to remove. With...
Instruction Manual
Page 10
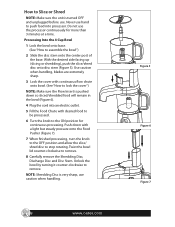
... the bowl lid counter-clockwise to assemble the bowl") 2 Slide the disc stem onto the center post of the base. Food Processing Tips/Liquids • Hot liquids (less than 176˚F, not boiling) and hot foods can be processed. 7 Turn the knob to lock the cover") NOTE: Make sure the Flow Insert is pulled up (slicing or shredding), push the slice/ shred disc onto discharge disc (Figure 8). NOTE: Shredding Disc is very sharp, use . Use caution when handling, blades...
... the bowl lid counter-clockwise to assemble the bowl") 2 Slide the disc stem onto the center post of the base. Food Processing Tips/Liquids • Hot liquids (less than 176˚F, not boiling) and hot foods can be processed. 7 Turn the knob to lock the cover") NOTE: Make sure the Flow Insert is pulled up (slicing or shredding), push the slice/ shred disc onto discharge disc (Figure 8). NOTE: Shredding Disc is very sharp, use . Use caution when handling, blades...

Instruction Manual
Page 11
... removable parts can be removed by rubbing with sudsy water and dry. 10 www.oster.com Care & Cleaning NOTE: Do not attempt to thoroughly clean the bowl and food chute/cover, this type of brush will be ruined by hand, wash in boiling water. Some foods, such as carrots, may temporarily stain the bowl. not in or near the utensil basket. 5 Do not use a small nylon...
... removable parts can be removed by rubbing with sudsy water and dry. 10 www.oster.com Care & Cleaning NOTE: Do not attempt to thoroughly clean the bowl and food chute/cover, this type of brush will be ruined by hand, wash in boiling water. Some foods, such as carrots, may temporarily stain the bowl. not in or near the utensil basket. 5 Do not use a small nylon...
Instruction Manual
Page 12
...oster.com 11 JCS dealers, service centers, or retail stores selling JCS products do not allow the exclusion or limitation of , or inability to use contrary to the operating instructions, disassembly, repair or alteration by applicable law, any electrical or mechanical functions on JCS's Liability? JCS disclaims all other rights that for a particular purpose... any way change the terms and conditions of the product found to alter, modify or any question regarding this product, please write our Consumer Service Department. Replacement will repair or replace this product or...
...oster.com 11 JCS dealers, service centers, or retail stores selling JCS products do not allow the exclusion or limitation of , or inability to use contrary to the operating instructions, disassembly, repair or alteration by applicable law, any electrical or mechanical functions on JCS's Liability? JCS disclaims all other rights that for a particular purpose... any way change the terms and conditions of the product found to alter, modify or any question regarding this product, please write our Consumer Service Department. Replacement will repair or replace this product or...


