Instruction Manual
Page 4
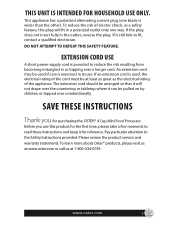
... NOT ATTEMPT TO DEFEAT THIS SAFETY FEATURE. If an extension cord is wider than the other). Pay particular attention to fit, contact a qualified electrician. www.oster.com 3 THIS UNIT IS INTENDED FOR HOUSEHOLD USE ONLY. The extension cord should be arranged so that it can be pulled on by children or... of the cord must be used , the electrical rating of the appliance. An extension cord may be at 1-800-334-0759. To learn more about Oster® products, please visit us at www.oster.com or call us at least as great as a safety feature, this product for purchasing the...
... NOT ATTEMPT TO DEFEAT THIS SAFETY FEATURE. If an extension cord is wider than the other). Pay particular attention to fit, contact a qualified electrician. www.oster.com 3 THIS UNIT IS INTENDED FOR HOUSEHOLD USE ONLY. The extension cord should be arranged so that it can be pulled on by children or... of the cord must be used , the electrical rating of the appliance. An extension cord may be at 1-800-334-0759. To learn more about Oster® products, please visit us at www.oster.com or call us at least as great as a safety feature, this product for purchasing the...
Instruction Manual
Page 5
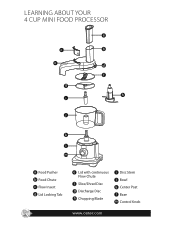
LEARNING ABOUT YOUR 4 CUP MINI FOOD PROCESSOR a c e g i b d f h j k l m UNLOCK LOCK a Food Pusher b Food Chute c Flow Insert d Lid Locking Tab 4 e Lid with continuous Flow Chute f Slice/Shred Disc g Discharge Disc h Chopping Blade i Disc Stem j Bowl k Center Post l Base m Control Knob www.oster.com
LEARNING ABOUT YOUR 4 CUP MINI FOOD PROCESSOR a c e g i b d f h j k l m UNLOCK LOCK a Food Pusher b Food Chute c Flow Insert d Lid Locking Tab 4 e Lid with continuous Flow Chute f Slice/Shred Disc g Discharge Disc h Chopping Blade i Disc Stem j Bowl k Center Post l Base m Control Knob www.oster.com
Instruction Manual
Page 9
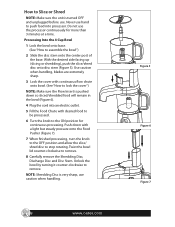
... assemble the bowl") 2 Slide the disc stem onto the center post of the base. Processing Into the 4 Cup Bowl 1 Lock the bowl onto base. (See "How to remove. OCK Figure 5 Figure 6 Figure 7 8 www.oster.com With the desired side facing up (slicing or shredding), push the slice/shred disc onto disc stem...
... assemble the bowl") 2 Slide the disc stem onto the center post of the base. Processing Into the 4 Cup Bowl 1 Lock the bowl onto base. (See "How to remove. OCK Figure 5 Figure 6 Figure 7 8 www.oster.com With the desired side facing up (slicing or shredding), push the slice/shred disc onto disc stem...


