Owner Manual
Page 1
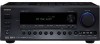
Following the instructions in this manual thoroughly before making any connections and plugging it in. Please retain this manual for purchasing an Onkyo AV Receiver. Contents Introduction 2 Connections 20 First Time Setup 38 Basic Operations 51 Advanced Operations 64 Advanced Setup 68 Zone 2 74 Controlling Other Components ....78 Specifications 83 Troubleshooting 84 En AV Receiver TX-SR603X Instruction Manual Thank you to obtain optimum performance and listening enjoyment from your new AV Receiver. Please read this manual will enable you for future reference.
Following the instructions in this manual thoroughly before making any connections and plugging it in. Please retain this manual for purchasing an Onkyo AV Receiver. Contents Introduction 2 Connections 20 First Time Setup 38 Basic Operations 51 Advanced Operations 64 Advanced Setup 68 Zone 2 74 Controlling Other Components ....78 Specifications 83 Troubleshooting 84 En AV Receiver TX-SR603X Instruction Manual Thank you to obtain optimum performance and listening enjoyment from your new AV Receiver. Please read this manual will enable you for future reference.

Owner Manual
Page 8
...and set the volume for Zone 2. M MEMORY button (59) This button is selected, the F Remote-control sensor (13) This sensor receives control signals from the remote controller. O RETURN button This button is used to the previously displayed onscreen setup menu. P Arrow/TUNING/PRESET... the remote controller. B ZONE 2 indicator (76) This indicator lights up when the AV receiver is in parentheses show where you can find the main explanation for Zone 2. Front & Rear Panels Front Panel TX-SR603X 1 234 5 6 7 8 9 0 A B C DE FG H STANDBY/ON ZONE2 OFF ZONE 2 LEVEL PHONES TUNING...
...and set the volume for Zone 2. M MEMORY button (59) This button is selected, the F Remote-control sensor (13) This sensor receives control signals from the remote controller. O RETURN button This button is used to the previously displayed onscreen setup menu. P Arrow/TUNING/PRESET... the remote controller. B ZONE 2 indicator (76) This indicator lights up when the AV receiver is in parentheses show where you can find the main explanation for Zone 2. Front & Rear Panels Front Panel TX-SR603X 1 234 5 6 7 8 9 0 A B C DE FG H STANDBY/ON ZONE2 OFF ZONE 2 LEVEL PHONES TUNING...

Owner Manual
Page 11
...Front & Rear Panels-Continued Rear Panel TX-SR603X 1B CD 5 6 G H 9JK L IR IN DIGITAL COAXIAL IN 1 IN 2 OPTICAL IN 1 12 V TRIGGER OUT ZONE 2 COMPONENT VIDEO IN 3 IN 2 IN 1 OUT Y PB AV RECEIVER MODEL NO. L FRONT, CENTER, SURROUND & SURROUND BACK SPEAKERS (22) These terminal posts... are for connecting an FM antenna. TX-SR 603X ANTENNA AM VIDEO 3 VIDEO 2 FM 75 VIDEO 1 PR IN 2 ZONE 2 SPEAKERS MONITOR DVD...
...Front & Rear Panels-Continued Rear Panel TX-SR603X 1B CD 5 6 G H 9JK L IR IN DIGITAL COAXIAL IN 1 IN 2 OPTICAL IN 1 12 V TRIGGER OUT ZONE 2 COMPONENT VIDEO IN 3 IN 2 IN 1 OUT Y PB AV RECEIVER MODEL NO. L FRONT, CENTER, SURROUND & SURROUND BACK SPEAKERS (22) These terminal posts... are for connecting an FM antenna. TX-SR 603X ANTENNA AM VIDEO 3 VIDEO 2 FM 75 VIDEO 1 PR IN 2 ZONE 2 SPEAKERS MONITOR DVD...

Owner Manual
Page 22
...speakers: • Only connect speakers with the TX-SR603X's rear panel. If you use speakers with a lower impedance, and use 4 or 5 speakers, connect each of the two surround speakers to each speaker terminal. Doing so may damage the AV receiver. • Don't connect one speaker to...phase and will sound unnatural. • Unnecessarily long, or very thin speaker cables may be connected to the SURROUND SPEAKERS terminals. Connecting the AV Receiver-Continued Speaker Connection Precautions Read the following illustration shows which speaker should be avoided. • If you use ...
...speakers: • Only connect speakers with the TX-SR603X's rear panel. If you use speakers with a lower impedance, and use 4 or 5 speakers, connect each of the two surround speakers to each speaker terminal. Doing so may damage the AV receiver. • Don't connect one speaker to...phase and will sound unnatural. • Unnecessarily long, or very thin speaker cables may be connected to the SURROUND SPEAKERS terminals. Connecting the AV Receiver-Continued Speaker Connection Precautions Read the following illustration shows which speaker should be avoided. • If you use ...

Owner Manual
Page 25
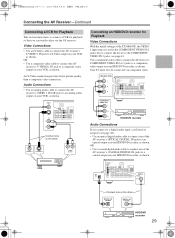
... the analog TAPE OUT. Optical Optical Analog Analog Only front left and right 25 The AV receiver supports several connection formats for video. DVD player, etc. DVD player, etc. Note: The TX-SR603X can select both the audio and video outputs of your other AV components to the AV... receiver by using any one for compatibility with a wide range of the following sections as a guide. For video ...
... the analog TAPE OUT. Optical Optical Analog Analog Only front left and right 25 The AV receiver supports several connection formats for video. DVD player, etc. DVD player, etc. Note: The TX-SR603X can select both the audio and video outputs of your other AV components to the AV... receiver by using any one for compatibility with a wide range of the following sections as a guide. For video ...
Owner Manual
Page 29
... AV receiver's COMPONENT VIDEO IN2 or 3 jacks to assign it (see page 43. TX-SR 603X ANTENNA AM VIDEO 3 VIDEO 2 FM 75 VIDEO 1 PR IN 2 ZONE 2 SPEAKERS L MONITOR DVD OUT V L R R S IN OUT IN OUT IN IN ZONE 2 IN 3 LINEOUT IN OUT IN IN OUT IN OUT IN FRONT SURROUND CENTER ..., see page 42). • Use an optical digital audio cable to connect one of the TX-SR603X, the VIDEO 1 input source is set for Playback Video Connections With the initial settings of the AV receiver's COAXIAL DIGITAL IN jacks to a composite video output on your HDD/DVD recorder, as shown....
... AV receiver's COMPONENT VIDEO IN2 or 3 jacks to assign it (see page 43. TX-SR 603X ANTENNA AM VIDEO 3 VIDEO 2 FM 75 VIDEO 1 PR IN 2 ZONE 2 SPEAKERS L MONITOR DVD OUT V L R R S IN OUT IN OUT IN IN ZONE 2 IN 3 LINEOUT IN OUT IN IN OUT IN OUT IN FRONT SURROUND CENTER ..., see page 42). • Use an optical digital audio cable to connect one of the TX-SR603X, the VIDEO 1 input source is set for Playback Video Connections With the initial settings of the AV receiver's COAXIAL DIGITAL IN jacks to a composite video output on your HDD/DVD recorder, as shown....


