

Owner Manual
Page 4
... power cord (adapter varies from country to country.) Speaker cable labels * Power-plug adapter Only supplied in the plug. MIYAGI ONKYO EUROPE ELECTRONICS GmbH 1 Speaker Cable 2 FRONT LEFT FRONT LEFT FRONT RIGHT FRONT RIGHT SURROUND LEFT SURROUND LEFT SURROUND RIGHT SURROUND RIGHT...and fit a suitable plug. Specifications and operations are coloured in accordance with the following accessories: Remote controller & two batteries (AA/R6) (Note for China: The battery for the remote controller is not supplied for this unit.) Speaker setup microphone Indoor FM antenna AM loop antenna Power ...
... power cord (adapter varies from country to country.) Speaker cable labels * Power-plug adapter Only supplied in the plug. MIYAGI ONKYO EUROPE ELECTRONICS GmbH 1 Speaker Cable 2 FRONT LEFT FRONT LEFT FRONT RIGHT FRONT RIGHT SURROUND LEFT SURROUND LEFT SURROUND RIGHT SURROUND RIGHT...and fit a suitable plug. Specifications and operations are coloured in accordance with the following accessories: Remote controller & two batteries (AA/R6) (Note for China: The battery for the remote controller is not supplied for this unit.) Speaker setup microphone Indoor FM antenna AM loop antenna Power ...

Owner Manual
Page 5
... Zone 2 104 Using Zone 2 105 Using the Remote Controller in Zone 2 and Multiroom Control Kits 107 Controlling Other Components Controlling Other Components 108 Preprogrammed Remote Control Codes 108 Looking up for Remote Control Code 108 Entering Remote Control Codes 110 Remote Control Codes for Onkyo Components Connected via V 111 Resetting REMOTE MODE Buttons 111 Resetting the Remote Controller 111 Controlling a TV 112 Controlling a DVD Player, or DVD Recorder .......... 113...
... Zone 2 104 Using Zone 2 105 Using the Remote Controller in Zone 2 and Multiroom Control Kits 107 Controlling Other Components Controlling Other Components 108 Preprogrammed Remote Control Codes 108 Looking up for Remote Control Code 108 Entering Remote Control Codes 110 Remote Control Codes for Onkyo Components Connected via V 111 Resetting REMOTE MODE Buttons 111 Resetting the Remote Controller 111 Controlling a TV 112 Controlling a DVD Player, or DVD Recorder .......... 113...

Owner Manual
Page 8
... can find the main explanation for use with music. E ZONE 2 and OFF buttons (105) The [ZONE 2] button is being received from the remote controller. G ZONE 2 LEVEL/TONE LEVEL buttons [-] & [+] buttons (57, 106) Used to select either bass or treble. K MUSIC button (69)... button is used to set the AV receiver to display various information about the currently selected input source. F Remote control sensor (13) This sensor receives control signals from the remote controller. L GAME button (69) Selects the listening modes intended for clarity. O TUNING MODE button (61) This...
... can find the main explanation for use with music. E ZONE 2 and OFF buttons (105) The [ZONE 2] button is being received from the remote controller. G ZONE 2 LEVEL/TONE LEVEL buttons [-] & [+] buttons (57, 106) Used to select either bass or treble. K MUSIC button (69)... button is used to set the AV receiver to display various information about the currently selected input source. F Remote control sensor (13) This sensor receives control signals from the remote controller. L GAME button (69) Selects the listening modes intended for clarity. O TUNING MODE button (61) This...
Owner Manual
Page 11
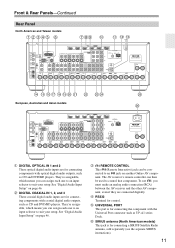
To use V, you can assign each one to an input selector to an V jack on another Onkyo AV component. G SIRIUS antenna (North American models) This jack is for connecting the component with the Universal Port connector such as CD and DVD/BD ... G HIJ K L MN O P QR S TU V W XY European, Australian and Asian models Z [ B DIGITAL OPTICAL IN 1 and 2 These optical digital audio inputs are connected digitally. The AV receiver's remote controller can be used to suit your setup. They're assignable, which means you can assign each one to an input selector to...
To use V, you can assign each one to an input selector to an V jack on another Onkyo AV component. G SIRIUS antenna (North American models) This jack is for connecting the component with the Universal Port connector such as CD and DVD/BD ... G HIJ K L MN O P QR S TU V W XY European, Australian and Asian models Z [ B DIGITAL OPTICAL IN 1 and 2 These optical digital audio inputs are connected digitally. The AV receiver's remote controller can be used to suit your setup. They're assignable, which means you can assign each one to an input selector to...

Owner Manual
Page 13
...- light or inverter-type fluorescent lights. trol sensor. • When the remote control codes have been registered and you want to operate another remote controller of batteries. • If you want to operate an Onkyo component without V connection, point the remote controller at the AV receiver's remote control sensor. 13 troller, because the buttons may not work reliably. •...
...- light or inverter-type fluorescent lights. trol sensor. • When the remote control codes have been registered and you want to operate another remote controller of batteries. • If you want to operate an Onkyo component without V connection, point the remote controller at the AV receiver's remote control sensor. 13 troller, because the buttons may not work reliably. •...
Owner Manual
Page 14
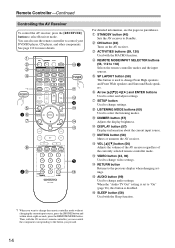
.... M VOL [R]/[X] button (56) Adjusts the volume of the AV receiver regardless of the currently selected remote controller mode. O RETURN button Returns to 118) Selects the remote controller modes and the input sources. J DIMMER button (57) Adjusts the display brightness. When the "Audio ...(56, 112 to the previous display when changing settings. L MUTING button (58) Mutes or unmutes the AV receiver. Remote Controller-Continued Controlling the AV Receiver To control the AV receiver, press the [RECEIVER] button to select and adjust settings. C ON button (40) Turns on the...
.... M VOL [R]/[X] button (56) Adjusts the volume of the AV receiver regardless of the currently selected remote controller mode. O RETURN button Returns to 118) Selects the remote controller modes and the input sources. J DIMMER button (57) Adjusts the display brightness. When the "Audio ...(56, 112 to the previous display when changing settings. L MUTING button (58) Mutes or unmutes the AV receiver. Remote Controller-Continued Controlling the AV Receiver To control the AV receiver, press the [RECEIVER] button to select and adjust settings. C ON button (40) Turns on the...

Owner Manual
Page 15
Remote Controller-Continued ■ Controlling the tuner To control the AV receiver's tuner, press the [TUNER] (or [RECEIVER]) button. Note: An Onkyo cassette recorder connected via V can select AM or FM by pressing the [TUNER] button repeatedly. 1 Arrow [R]/[X] buttons Used to select radio ...(see page 118). 15 You can also be controlled in the Direct tuning mode. Also you can select a preset directly. button (62) Used to select radio presets. 5 Number buttons (61, 62) Used to tune into radio stations. 2 D.TUN button (61) (TUNER remote mode only) Selects the Direct tuning mode. ...
Remote Controller-Continued ■ Controlling the tuner To control the AV receiver's tuner, press the [TUNER] (or [RECEIVER]) button. Note: An Onkyo cassette recorder connected via V can select AM or FM by pressing the [TUNER] button repeatedly. 1 Arrow [R]/[X] buttons Used to select radio ...(see page 118). 15 You can also be controlled in the Direct tuning mode. Also you can select a preset directly. button (62) Used to select radio presets. 5 Number buttons (61, 62) Used to tune into radio stations. 2 D.TUN button (61) (TUNER remote mode only) Selects the Direct tuning mode. ...

Owner Manual
Page 38
... hookup shown below.) ■ If Your iPod Doesn't Support Video: Connect your RI Dock's audio output jacks to the AV receiver's TV/TAPE IN L/R jacks. (Onkyo DSA2 hookup shown below.) IN L R TV/TAPE GAME V IN IN L R GAME VCR/DVR V IN IN L R VCR/DVR Connect one or the other ■ ... an Onkyo DS-A1 RI Dock Connect its video output jack to the AV receiver's GAME IN S or VCR/DVR IN S jack. Connecting the AV receiver-Continued Connecting an RI Dock Not all iPod models output video. Notes: • Enter the appropriate remote control code before using the AV receiver's remote controller for ...
... hookup shown below.) ■ If Your iPod Doesn't Support Video: Connect your RI Dock's audio output jacks to the AV receiver's TV/TAPE IN L/R jacks. (Onkyo DSA2 hookup shown below.) IN L R TV/TAPE GAME V IN IN L R GAME VCR/DVR V IN IN L R VCR/DVR Connect one or the other ■ ... an Onkyo DS-A1 RI Dock Connect its video output jack to the AV receiver's GAME IN S or VCR/DVR IN S jack. Connecting the AV receiver-Continued Connecting an RI Dock Not all iPod models output video. Notes: • Enter the appropriate remote control code before using the AV receiver's remote controller for ...
Owner Manual
Page 39
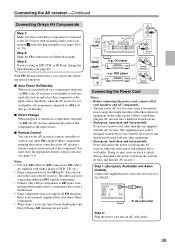
... Always disconnect the power cord from the AV receiver while the other than the one to control your other V-capable Onkyo components, pointing the remote controller at the AV receiver's remote control sensor instead of your speakers and AV components. • Turning on the AV receiver may... will automatically turn on and select that component as the input source. ■ Remote Control You can con- Connecting the AV receiver-Continued Connecting Onkyo V Components Step 1: Make sure that each Onkyo component is connected to the AV receiver with an analog audio cable (connection a in...
... Always disconnect the power cord from the AV receiver while the other than the one to control your other V-capable Onkyo components, pointing the remote controller at the AV receiver's remote control sensor instead of your speakers and AV components. • Turning on the AV receiver may... will automatically turn on and select that component as the input source. ■ Remote Control You can con- Connecting the AV receiver-Continued Connecting Onkyo V Components Step 1: Make sure that each Onkyo component is connected to the AV receiver with an analog audio cable (connection a in...
Owner Manual
Page 40
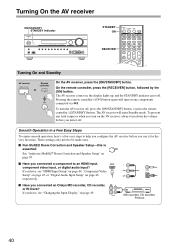
... If you have , see "Changing the Input Display" on page 49. OUT IN TV/TAPE MD recorder, CD recorder, RI Dock 40 On the remote controller, press the [RECEIVER] button, followed by the [ON] button. The AV receiver comes on the AV receiver, always turn it for the very first... time. To prevent any components connected via V. Pressing the remote controller's [ON] button again will enter Standby mode. To turn on page 46 respectively. ■ Have you connected an Onkyo MD recorder, CD recorder, or RI Dock? Smooth Operation in a Few Easy Steps To ...
... If you have , see "Changing the Input Display" on page 49. OUT IN TV/TAPE MD recorder, CD recorder, RI Dock 40 On the remote controller, press the [RECEIVER] button, followed by the [ON] button. The AV receiver comes on the AV receiver, always turn it for the very first... time. To prevent any components connected via V. Pressing the remote controller's [ON] button again will enter Standby mode. To turn on page 46 respectively. ■ Have you connected an Onkyo MD recorder, CD recorder, or RI Dock? Smooth Operation in a Few Easy Steps To ...
Owner Manual
Page 41
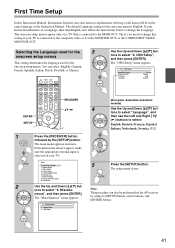
... from the onscreen menu or explanations referring to the menu will be performed on your TV. OSD Setup", and then press [ENTER]. Input/Output Assign 2. Remote Controller Setup 9. There's no need to change the Language. Speaker Setup 3. Miscellaneous 7. tons to select: English, Deutsch, Français, Español, Italiano, Nederlands, Svenska...
... from the onscreen menu or explanations referring to the menu will be performed on your TV. OSD Setup", and then press [ENTER]. Input/Output Assign 2. Remote Controller Setup 9. There's no need to change the Language. Speaker Setup 3. Miscellaneous 7. tons to select: English, Deutsch, Français, Español, Italiano, Nederlands, Svenska...
Owner Manual
Page 42
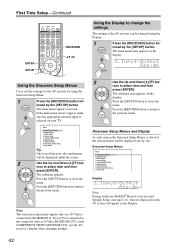
... 9. The submenu appears. tons to the previous menu. Press the [RETURN] button to return to select item and then press [ENTER]. Audio Adjust 4. Remote Controller Setup 9. Using the Onscreen Setup Menus Carry out the settings for the AV receiver by the [SETUP] button. If the main menu doesn't appear, make ...
... 9. The submenu appears. tons to the previous menu. Press the [RETURN] button to return to select item and then press [ENTER]. Audio Adjust 4. Remote Controller Setup 9. Using the Onscreen Setup Menus Carry out the settings for the AV receiver by the [SETUP] button. If the main menu doesn't appear, make ...

Owner Manual
Page 43
... [VIDEO] button on the AV receiver The "Input/Output Assign" menu by the [SETUP] button. Tip: The "Resolution" setting can also be performed on the remote controller. tons to select "1. tons to select "1. Digital Audio Input 3 Use the Up and Down [R]/[X] but - Monitor Out Resolution Through 43
... [VIDEO] button on the AV receiver The "Input/Output Assign" menu by the [SETUP] button. Tip: The "Resolution" setting can also be performed on the remote controller. tons to select "1. tons to select "1. Digital Audio Input 3 Use the Up and Down [R]/[X] but - Monitor Out Resolution Through 43

Owner Manual
Page 49
... area. 5 Press the [SETUP] button. First Time Setup-Continued 3 Use the Up and Down [R]/[X] but not at the same time. • Enter the appropriate remote control code before using its [SETUP] button, arrow buttons, and [ENTER] button. or 2 or Press and hold down the [TV/ TAPE], [GAME] or [VCR/...but - Repeat this setting. Note: This procedure can only be performed on the AV receiver by using the AV receiver's remote controller for V to work properly, you connect an V-capable Onkyo MiniDisc recorder, CD recorder, or RI Dock to the TV/TAPE IN/ OUT jacks, or connect an RI Dock to...
... area. 5 Press the [SETUP] button. First Time Setup-Continued 3 Use the Up and Down [R]/[X] but not at the same time. • Enter the appropriate remote control code before using its [SETUP] button, arrow buttons, and [ENTER] button. or 2 or Press and hold down the [TV/ TAPE], [GAME] or [VCR/...but - Repeat this setting. Note: This procedure can only be performed on the AV receiver by using the AV receiver's remote controller for V to work properly, you connect an V-capable Onkyo MiniDisc recorder, CD recorder, or RI Dock to the TV/TAPE IN/ OUT jacks, or connect an RI Dock to...

Owner Manual
Page 56
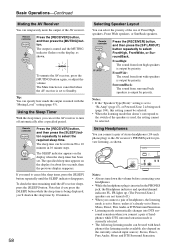
...select the input source. The volume level can be displayed as an absolute value. To adjust the volume, use the MASTER VOLUME control, or the remote controller's VOL [R]/[X] button. The AV receiver is designed for home theater enjoyment. Basic Operations Selecting the Input Source This section explains how...that 's connected to or watch). Select a listening mode and enjoy! MASTER VOLUME INPUT SELECTOR RECEIVER VOL R/X Input selector buttons 1 AV receiver Remote controller or Use the AV receiver's input selector buttons to -2 dB, -81.5 dB through +18.0 dB (relative display).
...select the input source. The volume level can be displayed as an absolute value. To adjust the volume, use the MASTER VOLUME control, or the remote controller's VOL [R]/[X] button. The AV receiver is designed for home theater enjoyment. Basic Operations Selecting the Input Source This section explains how...that 's connected to or watch). Select a listening mode and enjoy! MASTER VOLUME INPUT SELECTOR RECEIVER VOL R/X Input selector buttons 1 AV receiver Remote controller or Use the AV receiver's input selector buttons to -2 dB, -81.5 dB through +18.0 dB (relative display).

Owner Manual
Page 57
... seconds, then the previously displayed information reappears. SP LAYOUT DIMMER MUTING SLEEP Note: This procedure can also be performed on the remote controller by the front speakers from -10 dB to +10 dB in 2 dB steps. ■ Treble You can adjust the ...multichannel PCM, the signal format, number of channels, and sampling frequency is displayed. Remote controller Press the [RECEIVER] button, and then press the [DIMMER] button repeatedly to cycle through the available information. Remote controller Press the [RECEIVER] button, and then press the [DISPLAY] button repeatedly to ...
... seconds, then the previously displayed information reappears. SP LAYOUT DIMMER MUTING SLEEP Note: This procedure can also be performed on the remote controller by the front speakers from -10 dB to +10 dB in 2 dB steps. ■ Treble You can adjust the ...multichannel PCM, the signal format, number of channels, and sampling frequency is displayed. Remote controller Press the [RECEIVER] button, and then press the [DIMMER] button repeatedly to cycle through the available information. Remote controller Press the [RECEIVER] button, and then press the [DISPLAY] button repeatedly to ...
Owner Manual
Page 58
... mode automatically changes into DTS surround sensation when you connect a pair of Front High speakers, Front Wide speakers, or SurrBack speakers. Remote controller Press the [RECEIVER] button, and then press the [SLEEP] button repeatedly to select: FrontHigh, FrontWide, or SurroundBack. If you press...indicator flashes on the display for private listening, as shown. To check the time remaining until the SLEEP indicator disappears. Remote controller Press the [RECEIVER] button, and then press the [SP LAYOUT] button repeatedly to select the required sleep time. The...
... mode automatically changes into DTS surround sensation when you connect a pair of Front High speakers, Front Wide speakers, or SurrBack speakers. Remote controller Press the [RECEIVER] button, and then press the [SLEEP] button repeatedly to select: FrontHigh, FrontWide, or SurroundBack. If you press...indicator flashes on the display for private listening, as shown. To check the time remaining until the SLEEP indicator disappears. Remote controller Press the [RECEIVER] button, and then press the [SP LAYOUT] button repeatedly to select the required sleep time. The...

Owner Manual
Page 59
...top box connected to the AV receiver is selected, with simple commands by simply pressing one button. The AV receiver is turned on the remote controller. *2. The AV receiver turns off . 2. The input selector of the AV receiver is set to operate other ACTIVITIES buttons during the ...the AV receiver may not be performed. *3. The default actions are described below. Press the ACTIVITIES buttons to the normal macro mode. The Onkyo CD player connected to the AV receiver is turned on . 4. If you cannot use other components halfway, press the [ALL OFF] to...
...top box connected to the AV receiver is selected, with simple commands by simply pressing one button. The AV receiver is turned on the remote controller. *2. The AV receiver turns off . 2. The input selector of the AV receiver is set to operate other ACTIVITIES buttons during the ...the AV receiver may not be performed. *3. The default actions are described below. Press the ACTIVITIES buttons to the normal macro mode. The Onkyo CD player connected to the AV receiver is turned on . 4. If you cannot use other components halfway, press the [ALL OFF] to...

Owner Manual
Page 61
... [TUNER] button, the input source changes between AM and FM. Press the buttons repeatedly to select AM or FM, followed by entering the appropriate frequency. 1 Remote controller Press the [TUNER] button repeatedly to change the frequency one step at a time. Tuning into weak FM stereo stations If the signal from the display...
... [TUNER] button, the input source changes between AM and FM. Press the buttons repeatedly to select AM or FM, followed by entering the appropriate frequency. 1 Remote controller Press the [TUNER] button repeatedly to change the frequency one step at a time. Tuning into weak FM stereo stations If the signal from the display...

Owner Manual
Page 62
The preset number flashes. Repeat this procedure for easy identification (see page 89). Note: 1 You can also use the remote controller's number buttons to select a preset directly. 3 While the preset number is displayed instead of the band and frequency. 2 Selecting Presets ... channel is deleted and its number disappears from 1 through 40. Its name is flashing (about 8 seconds), use the PRESET [F]/[S] buttons, or the remote controller's CH [+/-] button. The preset is stored and the preset number stops flashing. MEMORY, TUNING MODE 4 Press the [MEMORY] button again to 40 ...
The preset number flashes. Repeat this procedure for easy identification (see page 89). Note: 1 You can also use the remote controller's number buttons to select a preset directly. 3 While the preset number is displayed instead of the band and frequency. 2 Selecting Presets ... channel is deleted and its number disappears from 1 through 40. Its name is flashing (about 8 seconds), use the PRESET [F]/[S] buttons, or the remote controller's CH [+/-] button. The preset is stored and the preset number stops flashing. MEMORY, TUNING MODE 4 Press the [MEMORY] button again to 40 ...


