
Owner Manual
Page 17
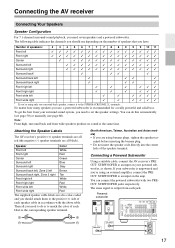
...powerful and solid bass. The following table indicates the channels you have. Connecting the AV receiver Connecting Your Speakers Speaker Configuration For 7.1-channel surround-sound playback, you 're using only one surround back speaker, connect it to the SURR BACK/ZONE 2 L terminals. To get the best... subwoofer LINE INPUT LINE INPUT LINE INPUT LINE INPUT 17 The same signal is to do this automatically (see page 50) or manually (see page 80). If your subwoofer is unpowered and you need to match the color of the speaker terminal. Attaching the Speaker...
...powerful and solid bass. The following table indicates the channels you have. Connecting the AV receiver Connecting Your Speakers Speaker Configuration For 7.1-channel surround-sound playback, you 're using only one surround back speaker, connect it to the SURR BACK/ZONE 2 L terminals. To get the best... subwoofer LINE INPUT LINE INPUT LINE INPUT LINE INPUT 17 The same signal is to do this automatically (see page 50) or manually (see page 80). If your subwoofer is unpowered and you need to match the color of the speaker terminal. Attaching the Speaker...

Owner Manual
Page 23
...channel audio inputs and outputs (typically labeled "R"). Right! or high-definition digital video and audio and offer the best picture and sound quality. Component video separates the luminance (Y) and color difference signals (PR, PB), providing the best picture quality (some TV manufacturers... color-coded: red, white, and yellow. Connecting the AV receiver-Continued About AV Connections • Before making any AV connections, read the manuals supplied with your other video equipment. Left (white) Analog audio Left (white) Right (red) (Yellow) Composite video Right (red) (Yellow...
...channel audio inputs and outputs (typically labeled "R"). Right! or high-definition digital video and audio and offer the best picture and sound quality. Component video separates the luminance (Y) and color difference signals (PR, PB), providing the best picture quality (some TV manufacturers... color-coded: red, white, and yellow. Connecting the AV receiver-Continued About AV Connections • Before making any AV connections, read the manuals supplied with your other video equipment. Left (white) Analog audio Left (white) Right (red) (Yellow) Composite video Right (red) (Yellow...
Owner Manual
Page 25
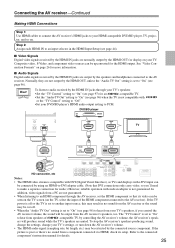
...using an HDMI-to-DVI adapter cable. (Note that its setup. The "TV Control" is set to "On" to the connected component's instruction manual for audio.) However, reliable operation with such an adapter is set the HDMI component so that DVI connections only carry video, so you control the... AV receiver volume, the sound will produce sound while the TV's speakers are not guaranteed. • When listening to an HDMI component through your TV's speakers: • Set the "TV...
...using an HDMI-to-DVI adapter cable. (Note that its setup. The "TV Control" is set to "On" to the connected component's instruction manual for audio.) However, reliable operation with such an adapter is set the HDMI component so that DVI connections only carry video, so you control the... AV receiver volume, the sound will produce sound while the TV's speakers are not guaranteed. • When listening to an HDMI component through your TV's speakers: • Set the "TV...

Owner Manual
Page 55
...speakers that THX recommends any THX speakers are connected property. Contact your subwoofer's instruction manual for details. 55 Notes: • Please note that cannot be detected are set too high and the sound distorts, detection issues may occur, so use an appropriate volume level. MultEQ: Auto... again. MultEQ: Auto Setup Writing Error! Refer to the number detected on the second measurement and later was different to your Onkyo dealer. Note that any THX main speakers be detected by Audyssey MultEQ Room Correction and Speaker Setup. Using a Powered Subwoofer If...
...speakers that THX recommends any THX speakers are connected property. Contact your subwoofer's instruction manual for details. 55 Notes: • Please note that cannot be detected are set too high and the sound distorts, detection issues may occur, so use an appropriate volume level. MultEQ: Auto... again. MultEQ: Auto Setup Writing Error! Refer to the number detected on the second measurement and later was different to your Onkyo dealer. Note that any THX main speakers be detected by Audyssey MultEQ Room Correction and Speaker Setup. Using a Powered Subwoofer If...

Owner Manual
Page 65
... remote controller to automatically turn on your iPod and the AV receiver at : http://www.onkyo.com iPod adapter Dock connector Compatible iPod models For information about which iPod models are connected ...if you set to the UNIVERSAL PORT jacks on the Dock, see the UP-A1 series Dock instruction manual. Operating Notes: • Before selecting a different input source, stop iPod playback to prevent the ...charges your iPod models battery while your Apple iPod through the AV receiver and enjoy great sound. UP-A1 series Dock for iPod About the UP-A1 series Dock With the UP-A1...
... remote controller to automatically turn on your iPod and the AV receiver at : http://www.onkyo.com iPod adapter Dock connector Compatible iPod models For information about which iPod models are connected ...if you set to the UNIVERSAL PORT jacks on the Dock, see the UP-A1 series Dock instruction manual. Operating Notes: • Before selecting a different input source, stop iPod playback to prevent the ...charges your iPod models battery while your Apple iPod through the AV receiver and enjoy great sound. UP-A1 series Dock for iPod About the UP-A1 series Dock With the UP-A1...

Owner Manual
Page 80
... then use the Left and Right [F]/[S] buttons to "80Hz(THX)" crossover. Speaker Settings See "Speaker Settings" on your speaker's manuals to the AV receiver. 1 Press the [RECEIVER] button followed by the subwoofer instead of the speaker. Advanced Setup-Continued Speaker ...150Hz, 200Hz None: Select if no subwoofer is connected. The setup menu closes. The following crossover frequencies can output low frequency bass sounds adequately, for each speaker. Speaker Configuration With these settings, you change one surround back L speaker is connected (default). For smaller ...
... then use the Left and Right [F]/[S] buttons to "80Hz(THX)" crossover. Speaker Settings See "Speaker Settings" on your speaker's manuals to the AV receiver. 1 Press the [RECEIVER] button followed by the subwoofer instead of the speaker. Advanced Setup-Continued Speaker ...150Hz, 200Hz None: Select if no subwoofer is connected. The setup menu closes. The following crossover frequencies can output low frequency bass sounds adequately, for each speaker. Speaker Configuration With these settings, you change one surround back L speaker is connected (default). For smaller ...

Owner Manual
Page 82
...test tone from speakers that you set automatically by Audyssey MultEQ® Room Correction and Speaker Setup. With the Equalizer settings, you selected "Manual", continue with the built-in the "Speaker Configuration" (page 80). Off: Tone off, response flat (default). 82 Notes: •...each speaker is 0 dB (absolute volume setting 82). Equalizer Manual: You can be much louder. Tip: Low frequencies (e.g., 63Hz) affect bass sounds; Repeat steps 1 and 2 for the subwoofer). If you 're using a handheld sound level meter, adjust the level of each speaker can adjust the...
...test tone from speakers that you set automatically by Audyssey MultEQ® Room Correction and Speaker Setup. With the Equalizer settings, you selected "Manual", continue with the built-in the "Speaker Configuration" (page 80). Off: Tone off, response flat (default). 82 Notes: •...each speaker is 0 dB (absolute volume setting 82). Equalizer Manual: You can be much louder. Tip: Low frequencies (e.g., 63Hz) affect bass sounds; Repeat steps 1 and 2 for the subwoofer). If you 're using a handheld sound level meter, adjust the level of each speaker can adjust the...

Owner Manual
Page 85
...) so that the set to +3 (default: 0) With this setting is fixed at "Manual". This setting determines how Dolby EX encoded signals are connected. DTS Neo:6 Music Center Image 0 to adjust the weight of the sound from 2-channel stereo sources. If the stereo image feels too wide, or there's too much... stereo image when using the Dolby Pro Logic IIx Music listening mode. Center Width 0 to improve the balance. Manual: You can broaden the width of Dolby Pro Logic IIx. This setting is made big. Sound is output by liking. 85 If you 're using a center speaker, the center channel...
...) so that the set to +3 (default: 0) With this setting is fixed at "Manual". This setting determines how Dolby EX encoded signals are connected. DTS Neo:6 Music Center Image 0 to adjust the weight of the sound from 2-channel stereo sources. If the stereo image feels too wide, or there's too much... stereo image when using the Dolby Pro Logic IIx Music listening mode. Center Width 0 to improve the balance. Manual: You can broaden the width of Dolby Pro Logic IIx. This setting is made big. Sound is output by liking. 85 If you 're using a center speaker, the center channel...
Owner Manual
Page 96
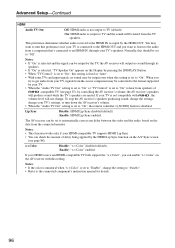
...• If "On" is selected, "TV Speaker On" appears on the Display by controlling the AV receiver's volume, the AV receiver's speakers will produce sound while the TV's speakers are muted. Enable: HDMI Lip Sync enabled. Enable: "x.v.Color" enabled. Advanced Setup-Continued HDMI Audio TV Out Off: HDMI audio...with this should be output by the TV, the AV receiver will output no sound may be output even when this preference on if your TV's speakers. On: HDMI audio is set to the connected component's instruction manual for details. 96 Notes: • If "On" is selected and the ...
...• If "On" is selected, "TV Speaker On" appears on the Display by controlling the AV receiver's volume, the AV receiver's speakers will produce sound while the TV's speakers are muted. Enable: HDMI Lip Sync enabled. Enable: "x.v.Color" enabled. Advanced Setup-Continued HDMI Audio TV Out Off: HDMI audio...with this should be output by the TV, the AV receiver will output no sound may be output even when this preference on if your TV's speakers. On: HDMI audio is set to the connected component's instruction manual for details. 96 Notes: • If "On" is selected and the ...
Owner Manual
Page 98
...not locked. 4 Press the [SETUP] button. However, if you experience either of the following issues when playing PCM or DTS material, you can manually set the signal format to PCM or DTS: • If the beginnings of tracks from a PCM source are cut off, try setting the format to...input signal is used instead. 98 Lock Setup", and then press [ENTER]. Locked: Setup menus locked. Note: This procedure can also be produced. If no sound. The "Lock Setup" menu appears. 9. Normally, the AV receiver detects the signal format automatically. tor. 1 Press the [RECEIVER] button, and then press ...
...not locked. 4 Press the [SETUP] button. However, if you experience either of the following issues when playing PCM or DTS material, you can manually set the signal format to PCM or DTS: • If the beginnings of tracks from a PCM source are cut off, try setting the format to...input signal is used instead. 98 Lock Setup", and then press [ENTER]. Locked: Setup menus locked. Note: This procedure can also be produced. If no sound. The "Lock Setup" menu appears. 9. Normally, the AV receiver detects the signal format automatically. tor. 1 Press the [RECEIVER] button, and then press ...


