

Owner Manual
Page 5
..., MiniDisc, or DAT Recorder 36 Connecting a Power Amplifier 37 Connecting an RI Dock 38 Connecting a Dock with the Universal Port Connector 38 Connecting Onkyo V Components 39 Connecting the Power Cord 39 Turning On & First Time Setup Turning On the AV receiver 40 Turning On and Standby 40 First ...the onscreen setup menus 41 Using the Onscreen Setup Menus 42 Using the Display to change the settings 42 Monitor Out Setup 43 Video Input Setup 44 Digital Audio Input Setup 46 Speaker Settings 47 TV Format Setup (European, Australian and Asian models 48 FM/AM Frequency Step Setup 48...
..., MiniDisc, or DAT Recorder 36 Connecting a Power Amplifier 37 Connecting an RI Dock 38 Connecting a Dock with the Universal Port Connector 38 Connecting Onkyo V Components 39 Connecting the Power Cord 39 Turning On & First Time Setup Turning On the AV receiver 40 Turning On and Standby 40 First ...the onscreen setup menus 41 Using the Onscreen Setup Menus 42 Using the Display to change the settings 42 Monitor Out Setup 43 Video Input Setup 44 Digital Audio Input Setup 46 Speaker Settings 47 TV Format Setup (European, Australian and Asian models 48 FM/AM Frequency Step Setup 48...

Owner Manual
Page 9
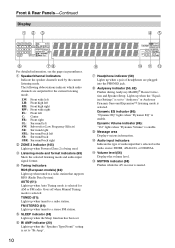
...audio. When the onscreen setup menus are used, they work as an absolute value. S RETURN button This button is used to return to select and set items. The [ENTER] button is also used to the previously displayed onscreen setup menu. W PURE AUDIO button and indicator (69) Selects the Pure...PORTABLE (34): Used to connect a camcorder, game console, and so on page 93. Z SETUP MIC jack (51) Audyssey MultEQ® Room Correction and Speaker Setup microphone connects here. 9 The volume level can be displayed as arrow buttons and are jacks for each item. Y AUX INPUT (34) This input can...
...audio. When the onscreen setup menus are used, they work as an absolute value. S RETURN button This button is used to return to select and set items. The [ENTER] button is also used to the previously displayed onscreen setup menu. W PURE AUDIO button and indicator (69) Selects the Pure...PORTABLE (34): Used to connect a camcorder, game console, and so on page 93. Z SETUP MIC jack (51) Audyssey MultEQ® Room Correction and Speaker Setup microphone connects here. 9 The volume level can be displayed as arrow buttons and are jacks for each item. Y AUX INPUT (34) This input can...
Owner Manual
Page 10
...indicator (86): "Vol" lights when "Dynamic Volume" is muted. J Message area Displays various information. B Speaker/channel indicators Indicate the speaker channels used . AUTO (61): Lights up when the "Equalizer Settings" is being used by the current listening mode. M MUTING indicator (58) Flashes while the AV receiver is... that 's selected as the audio source: HDMI, ANALOG, or DIGITAL. G Bi AMP indicator (20) Lights up when the "Speakers Type(Front)" setting is selected. Goes off when Manual Tuning mode is enable. F SLEEP indicator (58) Lights up when a pair of audio input...
...indicator (86): "Vol" lights when "Dynamic Volume" is muted. J Message area Displays various information. B Speaker/channel indicators Indicate the speaker channels used . AUTO (61): Lights up when the "Equalizer Settings" is being used by the current listening mode. M MUTING indicator (58) Flashes while the AV receiver is... that 's selected as the audio source: HDMI, ANALOG, or DIGITAL. G Bi AMP indicator (20) Lights up when the "Speakers Type(Front)" setting is selected. Goes off when Manual Tuning mode is enable. F SLEEP indicator (58) Lights up when a pair of audio input...
Owner Manual
Page 14
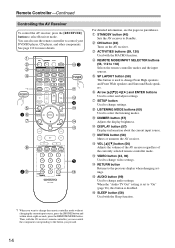
.... P AUDIO button (99) Used to select the listening modes. E REMOTE MODE/INPUT SELECTOR buttons (56, 112 to select and adjust settings. G Arrow [R]/[X]/[F]/[S] and ENTER buttons Used to 118) Selects the remote controller modes and the input sources. M VOL [R]/[X] button (56).... H SETUP button Used to change video settings. O RETURN button Returns to change Front High speakers and Front Wide speakers and Surround Back speakers. When the "Audio TV Out" setting is set to "On" (page 96), this button is used to change audio settings. F SP LAYOUT button (58) This button...
.... P AUDIO button (99) Used to select the listening modes. E REMOTE MODE/INPUT SELECTOR buttons (56, 112 to select and adjust settings. G Arrow [R]/[X]/[F]/[S] and ENTER buttons Used to 118) Selects the remote controller modes and the input sources. M VOL [R]/[X] button (56).... H SETUP button Used to change video settings. O RETURN button Returns to change Front High speakers and Front Wide speakers and Surround Back speakers. When the "Audio TV Out" setting is set to "On" (page 96), this button is used to change audio settings. F SP LAYOUT button (58) This button...
Owner Manual
Page 17
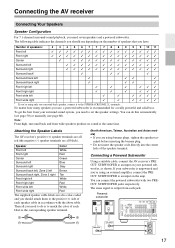
... on the amp. The same signal is recommended for a really powerful and solid bass. Connecting the AV receiver Connecting Your Speakers Speaker Configuration For 7.1-channel surround-sound playback, you should attach them to the positive (+) side of each jack. You can do...re using banana plugs, tighten the speaker terminal before inserting the banana plug. • Do not insert the speaker code directly into the center hole of the speaker terminal. The following table indicates the channels you need to set the speaker settings. You can connect the powered subwoofer...
... on the amp. The same signal is recommended for a really powerful and solid bass. Connecting the AV receiver Connecting Your Speakers Speaker Configuration For 7.1-channel surround-sound playback, you should attach them to the positive (+) side of each jack. You can do...re using banana plugs, tighten the speaker terminal before inserting the banana plug. • Do not insert the speaker code directly into the center hole of the speaker terminal. The following table indicates the channels you need to set the speaker settings. You can connect the powered subwoofer...

Owner Manual
Page 18
.../screen 1 TV/screen 1 11 2 3 4 12 11 2 3 4 12 5 65 6 7 8 1. Front high left speaker 10.Front high right speaker 11.Front wide left speaker 6. Do not connect them to indicate how they should be sure to set the minimum speaker impedance to speaker wiring polarity. Center speaker 4. If you get them the wrong way around, the sound will be...
.../screen 1 TV/screen 1 11 2 3 4 12 11 2 3 4 12 5 65 6 7 8 1. Front high left speaker 10.Front high right speaker 11.Front wide left speaker 6. Do not connect them to indicate how they should be sure to set the minimum speaker impedance to speaker wiring polarity. Center speaker 4. If you get them the wrong way around, the sound will be...

Owner Manual
Page 20
... • Bi-amping can be used , the AV receiver is used with front speakers and surround back speakers respectively, or bi-amped to provide separate tweeter and woofer feeds for a pair of front speakers that support bi-amping. And connect the AV receiver's SURR BACK/ZONE 2 L ...BACK/ZONE 2 L/R terminal posts connect to the front speakers' tweeter terminals. • Once you've completed the bi-amping connections shown below and turned on the AV receiver, you must set the "Speakers Type(Front)" setting to "Bi-Amp" to the right speaker's positive (+) Tweeter (high) terminal. Tweeter (high...
... • Bi-amping can be used , the AV receiver is used with front speakers and surround back speakers respectively, or bi-amped to provide separate tweeter and woofer feeds for a pair of front speakers that support bi-amping. And connect the AV receiver's SURR BACK/ZONE 2 L ...BACK/ZONE 2 L/R terminal posts connect to the front speakers' tweeter terminals. • Once you've completed the bi-amping connections shown below and turned on the AV receiver, you must set the "Speakers Type(Front)" setting to "Bi-Amp" to the right speaker's positive (+) Tweeter (high) terminal. Tweeter (high...
Owner Manual
Page 25
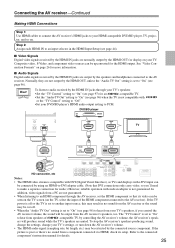
... Input Setup (see page 96) to PCM. See "Video Connection Formats" on . Hint! To stop the AV receiver's speakers producing sound, change the settings, change your TV's speakers, if you 'll need to the AV receiver). Connecting the AV receiver-Continued Making HDMI Connections Step 1: Use HDMI cables ...an input selector in no sound from a PC are not guaranteed. • When listening to an HDMI component through your TV's speakers: • Set the "TV Control" setting to "On" (see page 97) for display on the TV, select the input of -compatible TV, by using an HDMI-to...
... Input Setup (see page 96) to PCM. See "Video Connection Formats" on . Hint! To stop the AV receiver's speakers producing sound, change the settings, change your TV's speakers, if you 'll need to the AV receiver). Connecting the AV receiver-Continued Making HDMI Connections Step 1: Use HDMI cables ...an input selector in no sound from a PC are not guaranteed. • When listening to an HDMI component through your TV's speakers: • Set the "TV Control" setting to "On" (see page 97) for display on the TV, select the input of -compatible TV, by using an HDMI-to...

Owner Manual
Page 26
... a guide. It is also recommended that video signals pass through the system without upconversion (e.g., component video input through to the original setting, press the same button at the same time. To reset back to component video output). The AV receiver supports several connection formats..., or HDMI, the latter offering the best picture quality. as shown, with a wide range of AV equipment. DVD/BD player, etc. Speakers (see page 19 for the HDMI output. The composite video, S-Video, and component Composite S-Video Component HDMI video outputs pass through the AV...
... a guide. It is also recommended that video signals pass through the system without upconversion (e.g., component video input through to the original setting, press the same button at the same time. To reset back to component video output). The AV receiver supports several connection formats..., or HDMI, the latter offering the best picture quality. as shown, with a wide range of AV equipment. DVD/BD player, etc. Speakers (see page 19 for the HDMI output. The composite video, S-Video, and component Composite S-Video Component HDMI video outputs pass through the AV...
Owner Manual
Page 39
Similarly, when the AV receiver is set to Standby, all V functions. The other jack is for connecting additional V-capable components. • Connect only Onkyo components to control your other V-capable Onkyo components, pointing the remote controller at the AV receiver's remote control sensor instead of ...V connection (see page 111). Step 1: (European, Australian and Asian models) Connect the supplied power cord to the manuals supplied with your speakers and AV components. • Turning on , the Auto Power On/Standby and Direct Change V functions do not work. Step 3: If ...
Similarly, when the AV receiver is set to Standby, all V functions. The other jack is for connecting additional V-capable components. • Connect only Onkyo components to control your other V-capable Onkyo components, pointing the remote controller at the AV receiver's remote control sensor instead of ...V connection (see page 111). Step 1: (European, Australian and Asian models) Connect the supplied power cord to the manuals supplied with your speakers and AV components. • Turning on , the Auto Power On/Standby and Direct Change V functions do not work. Step 3: If ...
Owner Manual
Page 40
...press the [ON/STANDBY] button. OUT IN TV/TAPE MD recorder, CD recorder, RI Dock 40 To turn on page 49. If you connected an Onkyo MD recorder, CD recorder, or RI Dock? The AV receiver comes on page 50. ■ Have you use it off . On the remote ...controller, press the [RECEIVER] button, followed by the [ON] button. These settings only need to an HDMI input, HDMI component video input, or digital audio input? See "Audyssey MultEQ® Room Correction and Speaker Setup" on , the display lights up, and the STANDBY indicator goes off . Smooth Operation...
...press the [ON/STANDBY] button. OUT IN TV/TAPE MD recorder, CD recorder, RI Dock 40 To turn on page 49. If you connected an Onkyo MD recorder, CD recorder, or RI Dock? The AV receiver comes on page 50. ■ Have you use it off . On the remote ...controller, press the [RECEIVER] button, followed by the [ON] button. These settings only need to an HDMI input, HDMI component video input, or digital audio input? See "Audyssey MultEQ® Room Correction and Speaker Setup" on , the display lights up, and the STANDBY indicator goes off . Smooth Operation...

Owner Manual
Page 47
...RECEIVER] button, followed by using its [SETUP] button, arrow buttons, and [ENTER] button. 47 Speaker Setup", and then press [ENTER]. Speaker Settings 2. Speaker Settings Speaker Impedance Speakers Type(Front) Powered Zone2 6ohms Normal Not Act 4 Use the Up and Down [R]/[X] but - Note:...doesn't appear, make sure the appropriate external input is 4 ohms or more but less than 6, set to select "2. Equalizer Settings 6. Speaker Set- nected your front speakers normally. Level Calibration 5. ance", and then use the Left and Right [F]/[S] buttons to the FRONT...
...RECEIVER] button, followed by using its [SETUP] button, arrow buttons, and [ENTER] button. 47 Speaker Setup", and then press [ENTER]. Speaker Settings 2. Speaker Settings Speaker Impedance Speakers Type(Front) Powered Zone2 6ohms Normal Not Act 4 Use the Up and Down [R]/[X] but - Note:...doesn't appear, make sure the appropriate external input is 4 ohms or more but less than 6, set to select "2. Equalizer Settings 6. Speaker Set- nected your front speakers normally. Level Calibration 5. ance", and then use the Left and Right [F]/[S] buttons to the FRONT...
Owner Manual
Page 51
..., unless you want to cancel the setup. • Do not connect or disconnect any of your speakers is 4 ohms, change these settings, refer to step 5 on "Speaker Settings" (page 47) or step 4 on the AV receiver and the connected TV. Changes to the room after auto setup requires you would for six positions. ...
..., unless you want to cancel the setup. • Do not connect or disconnect any of your speakers is 4 ohms, change these settings, refer to step 5 on "Speaker Settings" (page 47) or step 4 on the AV receiver and the connected TV. Changes to the room after auto setup requires you would for six positions. ...

Owner Manual
Page 55
... make sure manually that if the volume is probably malfunctioning. Contact your Onkyo dealer. If the subwoofer has a lowpass filter switch, set to 80 Hz (THX) crossover (see page 80). • Sometimes due to the electrical complexities of the main speakers. If the "Subwoofer" appears on the first measurement. First Time Setup-Continued...
... make sure manually that if the volume is probably malfunctioning. Contact your Onkyo dealer. If the subwoofer has a lowpass filter switch, set to 80 Hz (THX) crossover (see page 80). • Sometimes due to the electrical complexities of the main speakers. If the "Subwoofer" appears on the first measurement. First Time Setup-Continued...

Owner Manual
Page 70
... left speaker LH : Front high left speaker LW FL C FR RW C : Center speaker RH : Front high right speaker SW RW : Front wide right speaker FR : Front right speaker SR : Surround right speaker SL SR SBR : Surround back right speaker SBL : Surround back left speaker SBL SBR SL : Surround left speaker SW : Subwoofer C : active in the speaker settings C : non-active in the speaker settings Mono...
... left speaker LH : Front high left speaker LW FL C FR RW C : Center speaker RH : Front high right speaker SW RW : Front wide right speaker FR : Front right speaker SR : Surround right speaker SL SR SBR : Surround back right speaker SBL : Surround back left speaker SBL SBR SL : Surround left speaker SW : Subwoofer C : active in the speaker settings C : non-active in the speaker settings Mono...

Owner Manual
Page 79
...Remote ID 2. Component Video Input 4. Speaker Settings 2. DTS 4. Theater-Dimensional 6. Name Edit 4. CBL/SAT 4. PHONO 10. Settings are organized into nine categories on the connected TV and provide a convenient way to change the AV receiver's various settings. Lock Setup page 93-94 6. Input... Digital Audio Input page 46 page 45 page 44 page 43 pages 80-83 2. Equalizer Settings 6. LFE Level pages 88-91 4. Main menu Submenus Menu 1. Volume Setup 2. HDMI 8. Speaker Setup 1. Multiplex / Mono 2. A/V Sync 3. Audio Adjust 4. THX Audio Setup pages ...
...Remote ID 2. Component Video Input 4. Speaker Settings 2. DTS 4. Theater-Dimensional 6. Name Edit 4. CBL/SAT 4. PHONO 10. Settings are organized into nine categories on the connected TV and provide a convenient way to change the AV receiver's various settings. Lock Setup page 93-94 6. Input... Digital Audio Input page 46 page 45 page 44 page 43 pages 80-83 2. Equalizer Settings 6. LFE Level pages 88-91 4. Main menu Submenus Menu 1. Volume Setup 2. HDMI 8. Speaker Setup 1. Multiplex / Mono 2. A/V Sync 3. Audio Adjust 4. THX Audio Setup pages ...

Owner Manual
Page 80
...: "Full Band", "40Hz", "50Hz", "60Hz", "70Hz", "80Hz(THX)", "90Hz", "100Hz", "120Hz", "150Hz", or "200Hz". Speaker Settings See "Speaker Settings" on your TV. 2 Use the Up and Down [R]/[X] buttons to select main menu, and then press [ENTER]. 3 Use the Up ...Right [F]/[S] buttons to "80Hz(THX)" crossover. Specify "Full Band" for speakers that any THX speakers are set to set them manually, which speakers are connected and a crossover frequency for example, speakers with a good sized woofer. For smaller speakers, specify a crossover frequency. The main menu appears onscreen. The setup menu...
...: "Full Band", "40Hz", "50Hz", "60Hz", "70Hz", "80Hz(THX)", "90Hz", "100Hz", "120Hz", "150Hz", or "200Hz". Speaker Settings See "Speaker Settings" on your TV. 2 Use the Up and Down [R]/[X] buttons to select main menu, and then press [ENTER]. 3 Use the Up ...Right [F]/[S] buttons to "80Hz(THX)" crossover. Specify "Full Band" for speakers that any THX speakers are set to set them manually, which speakers are connected and a crossover frequency for example, speakers with a good sized woofer. For smaller speakers, specify a crossover frequency. The main menu appears onscreen. The setup menu...

Owner Manual
Page 104
... "Bi-Amp" (see page 47). • This procedure can also be used if "Speakers Type(Front)" is selected on the AV receiver by the [SETUP] button. The "Speaker Settings" menu appears. 104 Speaker Setup", and then press [ENTER]. Speaker Setup 1. Speaker Settings 2. Equalizer Settings 6. THX Audio Setup 4 Use the Up and Down [R]/[X] buttons to select "Powered Zone2", and...
... "Bi-Amp" (see page 47). • This procedure can also be used if "Speakers Type(Front)" is selected on the AV receiver by the [SETUP] button. The "Speaker Settings" menu appears. 104 Speaker Setup", and then press [ENTER]. Speaker Setup 1. Speaker Settings 2. Equalizer Settings 6. THX Audio Setup 4 Use the Up and Down [R]/[X] buttons to select "Powered Zone2", and...
Owner Manual
Page 121
... any trouble using the AV receiver, look for a solution in the center speaker. • In the Mono listening mode, only the front speakers output sound if the "Output Speaker" setting is set the volume to maximum, disconnect the power cord, and contact your Onkyo dealer. The onscreen setup menus appear only on and, while holding down...
... any trouble using the AV receiver, look for a solution in the center speaker. • In the Mono listening mode, only the front speakers output sound if the "Output Speaker" setting is set the volume to maximum, disconnect the power cord, and contact your Onkyo dealer. The onscreen setup menus appear only on and, while holding down...
Owner Manual
Page 122
... produces no sound • When you may produce no sound. • In the Mono listening mode, only the front speakers output sound if the "Output Speaker" setting is reduced to prevent noise when you need to a digital input on your cables. There's no sound (page 102). This...current listening mode, no sound • Depending on the source and current listening mode, not much sound may be set automatically after Audyssey MultEQ® Room Correction and Speaker Setup has been completed (page 51). Try selecting another listening mode (page 76). • Not much sound may...
... produces no sound • When you may produce no sound. • In the Mono listening mode, only the front speakers output sound if the "Output Speaker" setting is reduced to prevent noise when you need to a digital input on your cables. There's no sound (page 102). This...current listening mode, no sound • Depending on the source and current listening mode, not much sound may be set automatically after Audyssey MultEQ® Room Correction and Speaker Setup has been completed (page 51). Try selecting another listening mode (page 76). • Not much sound may...


