Owner Manual
Page 7
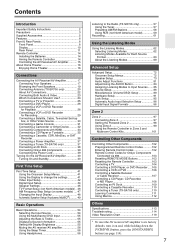
... Controlling the AV Receiver/AV Amplifier 15 About Home Theater 16 Enjoying Home Theater 16 Connections Connecting the AV Receiver/AV Amplifier 17 Connecting Your Speakers 17 Bi-amping the Front Speakers 19 Connecting Antenna (TX-SR706 only 20 About AV Connections 22 Connecting Both Audio & Video...Other Components Controlling Other Components 102 Preprogrammed Remote Control Codes 102 Entering Remote Control Codes 102 Remote Control Codes for Onkyo Components Connected via V 103 Resetting REMOTE MODE Buttons 103 Resetting the Remote Controller 103 Controlling a TV 104 Controlling ...
... Controlling the AV Receiver/AV Amplifier 15 About Home Theater 16 Enjoying Home Theater 16 Connections Connecting the AV Receiver/AV Amplifier 17 Connecting Your Speakers 17 Bi-amping the Front Speakers 19 Connecting Antenna (TX-SR706 only 20 About AV Connections 22 Connecting Both Audio & Video...Other Components Controlling Other Components 102 Preprogrammed Remote Control Codes 102 Entering Remote Control Codes 102 Remote Control Codes for Onkyo Components Connected via V 103 Resetting REMOTE MODE Buttons 103 Resetting the Remote Controller 103 Controlling a TV 104 Controlling ...
Owner Manual
Page 9
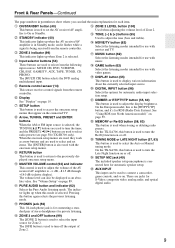
... (54) These buttons are jacks for S-Video, composite video, analog audio, and optical digital audio. L PURE AUDIO button and indicator (62) Selects the Pure Audio listening mode. O ZONE 2 LEVEL button (100) Used when adjusting ...be displayed as arrow buttons and are used to select radio presets (see page 58) (TX-SR706 only). See "Volume Setup" on page 59. Q MOVIE/TV button (62) Selects the...selected. On the TX-SA706, this mode is selected. D ZONE 2 indicator (99) This indicator lights up when this button is used to select and set the AV receiver/AV amplifier to select from...
... (54) These buttons are jacks for S-Video, composite video, analog audio, and optical digital audio. L PURE AUDIO button and indicator (62) Selects the Pure Audio listening mode. O ZONE 2 LEVEL button (100) Used when adjusting ...be displayed as arrow buttons and are used to select radio presets (see page 58) (TX-SR706 only). See "Volume Setup" on page 59. Q MOVIE/TV button (62) Selects the...selected. On the TX-SA706, this mode is selected. D ZONE 2 indicator (99) This indicator lights up when this button is used to select and set the AV receiver/AV amplifier to select from...

Owner Manual
Page 10
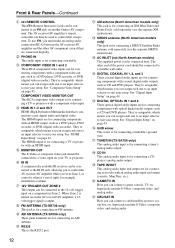
E Tuning indicators (TX-SR706 only) (57) RDS (not North American model) (59): Lights up when tuned ... up when the "Equalizer Settings" is displayed for each speaker that are set . L MUTING indicator (56) Flashes while the AV receiver/AV amplifier is selected. No box appears for AM or FM radio. FM STEREO (57): Lights up when tuned to "Audyssey". ... Zone 2 is being used by the current input source. : A box is set to a radio station that 's selected as the audio source: HDMI, ANALOG, or DIGITAL. F SLEEP indicator (56) Lights up when tuned to "No" or "None". I Message area...
E Tuning indicators (TX-SR706 only) (57) RDS (not North American model) (59): Lights up when tuned ... up when the "Equalizer Settings" is displayed for each speaker that are set . L MUTING indicator (56) Flashes while the AV receiver/AV amplifier is selected. No box appears for AM or FM radio. FM STEREO (57): Lights up when tuned to "Audyssey". ... Zone 2 is being used by the current input source. : A box is set to a radio station that 's selected as the audio source: HDMI, ANALOG, or DIGITAL. F SLEEP indicator (56) Lights up when tuned to "No" or "None". I Message area...
Owner Manual
Page 12
... is for connecting a turntable's ground wire. The AV receiver/AV amplifier's remote controller can connect a cable/satellite receiver, settop box, etc. I FM ANTENNA (TX-SR706 only) This jack is for connecting an FM antenna. M SIRIUS antenna (North American models only) This jack is for connecting components with coaxial digital audio outputs, such as a DVD player, DVD recorder...
... is for connecting a turntable's ground wire. The AV receiver/AV amplifier's remote controller can connect a cable/satellite receiver, settop box, etc. I FM ANTENNA (TX-SR706 only) This jack is for connecting an FM antenna. M SIRIUS antenna (North American models only) This jack is for connecting components with coaxial digital audio outputs, such as a DVD player, DVD recorder...
Owner Manual
Page 15
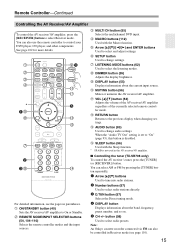
... Controller-Continued Controlling the AV Receiver/AV Amplifier To control the AV receiver/AV amplifier, press the [RECEIVER] button to the previous display when changing settings. When the "Audio TV Out" setting is set to "On" (page 93), this AV receiver/AV amplifier. ■ Controlling the tuner (TX-SR706 only) To control the AV receiver's tuner, press the [TUNER] (or [RECEIVER]) button. N AUDIO button (83) Used to...
... Controller-Continued Controlling the AV Receiver/AV Amplifier To control the AV receiver/AV amplifier, press the [RECEIVER] button to the previous display when changing settings. When the "Audio TV Out" setting is set to "On" (page 93), this AV receiver/AV amplifier. ■ Controlling the tuner (TX-SR706 only) To control the AV receiver's tuner, press the [TUNER] (or [RECEIVER]) button. N AUDIO button (83) Used to...
Owner Manual
Page 37
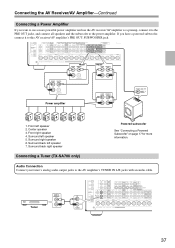
...: SUBWOOFER jack. Surround right speaker 6. If you want to use the AV receiver/AV amplifier as a preamp, connect it to the AV amplifier's TUNER IN L/R jacks with an audio cable. Front right speaker 4. AUDIO OUTPUT L L R R Tuner 37 Surround left speaker 5. Surround back right speaker Connecting a Tuner (TX-SA706 only) Powered subwoofer See "Connecting a Powered Subwoofer" on page...
...: SUBWOOFER jack. Surround right speaker 6. If you want to use the AV receiver/AV amplifier as a preamp, connect it to the AV amplifier's TUNER IN L/R jacks with an audio cable. Front right speaker 4. AUDIO OUTPUT L L R R Tuner 37 Surround left speaker 5. Surround back right speaker Connecting a Tuner (TX-SA706 only) Powered subwoofer See "Connecting a Powered Subwoofer" on page...
Owner Manual
Page 42
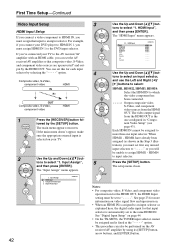
..."Digital Input Setup" on page 44. • On the TX-SR706, the TUNER input selector cannot be assigned and is selected on your TV to the DVD input selector. You can also be assigned to more information on the AV receiver/AV amplifier by the HDMI OUT. tons to an input selector. Each... buttons to select: HDMI1, HDMI2, HDMI3, HDMI4: Select the HDMI IN to select "1. HDMI4 have already been assigned (as explained here, the digital audio input for each input selector by the [SETUP] button. tration), you must set first any unused input selectors to or you will be set to...
..."Digital Input Setup" on page 44. • On the TX-SR706, the TUNER input selector cannot be assigned and is selected on your TV to the DVD input selector. You can also be assigned to more information on the AV receiver/AV amplifier by the HDMI OUT. tons to an input selector. Each... buttons to select: HDMI1, HDMI2, HDMI3, HDMI4: Select the HDMI IN to select "1. HDMI4 have already been assigned (as explained here, the digital audio input for each input selector by the [SETUP] button. tration), you must set first any unused input selectors to or you will be set to...

Owner Manual
Page 43
...CBL/SAT GAME/TV AUX TAPE TUNER (TX-SA706 only) CD PHONO Default assignment IN1 ----IN2 1 Press the [RECEIVER] button fol- lowed by using the HDMI OUT, rather than the COMPONENT VIDEO MONITOR OUT, for the out- The "Input Assign" menu appears. 1. Digital Audio Input 4 Use the Up and Down... to select an input selector, and then use the Left and Right [F]/[S] buttons to select: IN1: Select if the video component is selected on the AV receiver/AV amplifier by the [SETUP] button. NENT VIDEO IN 2. - - - - -: Select if you should assign it to COMPO- For example, if you ...
...CBL/SAT GAME/TV AUX TAPE TUNER (TX-SA706 only) CD PHONO Default assignment IN1 ----IN2 1 Press the [RECEIVER] button fol- lowed by using the HDMI OUT, rather than the COMPONENT VIDEO MONITOR OUT, for the out- The "Input Assign" menu appears. 1. Digital Audio Input 4 Use the Up and Down... to select an input selector, and then use the Left and Right [F]/[S] buttons to select: IN1: Select if the video component is selected on the AV receiver/AV amplifier by the [SETUP] button. NENT VIDEO IN 2. - - - - -: Select if you should assign it to COMPO- For example, if you ...
Owner Manual
Page 44
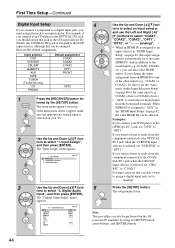
...to the CD input selector. The setup menu closes. OPT2 ----- 1 Press the [RECEIVER] button fol- HDMI Input 2. Digital Audio Input 3 Use the Up and Down [R]/[X] but - tons to select an input selector...AV receiver/AV amplifier by the [SETUP] button. By default, the COAXIAL IN1 jack is assigned to the DVD input selector, although this input assign- When HDMI IN is selected, set "DVD" to the COAX- IAL IN 1 jack when the CBL/SAT input selector is assigned to "COAX1". matic Audio...(TX-SA706 only) CD PHONO Default assignment COAX1 COAX2 COAX3 OPT1 FRONT ----- -----
...to the CD input selector. The setup menu closes. OPT2 ----- 1 Press the [RECEIVER] button fol- HDMI Input 2. Digital Audio Input 3 Use the Up and Down [R]/[X] but - tons to select an input selector...AV receiver/AV amplifier by the [SETUP] button. By default, the COAXIAL IN1 jack is assigned to the DVD input selector, although this input assign- When HDMI IN is selected, set "DVD" to the COAX- IAL IN 1 jack when the CBL/SAT input selector is assigned to "COAX1". matic Audio...(TX-SA706 only) CD PHONO Default assignment COAX1 COAX2 COAX3 OPT1 FRONT ----- -----
Owner Manual
Page 55
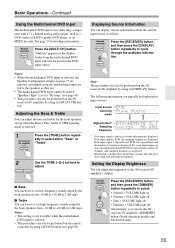
... format information is displayed. Setting the Display Brightness You can use the AV receiver/AV amplifier's [DIMMER] button (North American models and TX-SA706 only). 55 Displaying Source Information You can also be displayed for about the current input source as a DVD-Audio or SACD-capable DVD player, or an MPEG decoder. If the input...
... format information is displayed. Setting the Display Brightness You can use the AV receiver/AV amplifier's [DIMMER] button (North American models and TX-SA706 only). 55 Displaying Source Information You can also be displayed for about the current input source as a DVD-Audio or SACD-capable DVD player, or an MPEG decoder. If the input...
Owner Manual
Page 72
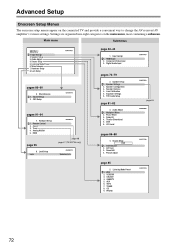
...TX-SR706 only) Unlocked page 42-44 1. Speaker Configuration 3. Source Setup DVD 1. A/V Sync 3. DVD 2. CBL/SAT 4. Main menu Submenus MENU 1. Zone2 3. Speaker Distance 4. Dolby EX 4. Volume Setup 2. OSD Setup pages 91-94 7. Equalizer Settings 6. PLIIx / Neo:6 3. Picture Adjust page 45 page 85 5. PHONO 72 Digital Audio... categories on the connected TV and provide a convenient way to change the AV receiver/AV amplifier's various settings. TUNER 8. Audio Adjust 1. DSD 6. AUX 6. Advanced Setup Onscreen Setup Menus The onscreen setup...
...TX-SR706 only) Unlocked page 42-44 1. Speaker Configuration 3. Source Setup DVD 1. A/V Sync 3. DVD 2. CBL/SAT 4. Main menu Submenus MENU 1. Zone2 3. Speaker Distance 4. Dolby EX 4. Volume Setup 2. OSD Setup pages 91-94 7. Equalizer Settings 6. PLIIx / Neo:6 3. Picture Adjust page 45 page 85 5. PHONO 72 Digital Audio... categories on the connected TV and provide a convenient way to change the AV receiver/AV amplifier's various settings. TUNER 8. Audio Adjust 1. DSD 6. AUX 6. Advanced Setup Onscreen Setup Menus The onscreen setup...
Owner Manual
Page 83
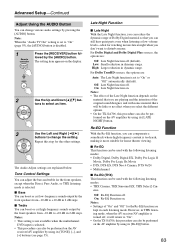
... Digital material so that you don't want to "On" (page 93), the [AUDIO] button is disabled. 1 Remote controller Press the [RECEIVER] button followed by the [AUDIO] button. However, in THX listening mode, when the AV receiver/AV amplifier is set to +10 dB in 2 dB steps. Repeat this procedure can...the Direct, Pure Audio, or THX listening mode is set to disturb anyone. Off: Late Night function off . Re-EQ Function With the Re-EQ function, you select the different options. • On the TX-SA706, this procedure can also be performed on the AV receiver/AV amplifier by using ...
... Digital material so that you don't want to "On" (page 93), the [AUDIO] button is disabled. 1 Remote controller Press the [RECEIVER] button followed by the [AUDIO] button. However, in THX listening mode, when the AV receiver/AV amplifier is set to +10 dB in 2 dB steps. Repeat this procedure can...the Direct, Pure Audio, or THX listening mode is set to disturb anyone. Off: Late Night function off . Re-EQ Function With the Re-EQ function, you select the different options. • On the TX-SA706, this procedure can also be performed on the AV receiver/AV amplifier by using ...
Owner Manual
Page 85
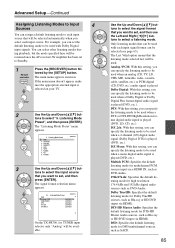
... is played (DVD, etc.). DVD 2. The signal format selection menu appears. 5-1. Mono Last Valid On the TX-SR706, for TUNER input selector only "Analog" will be used when a 2-channel (2/0) digital audio signal (Dolby Digital, DTS) is selected on your TV. 2 Use the Up and Down [R]/[X] but - ... 4 Sources You can assign a default listening mode to each input source that will be resumed once the AV receiver/AV amplifier has been set to Standby. 1 Remote controller Press the [RECEIVER] button followed by the [SETUP] button. Use the Up and Down [R]/[X] buttons to select the signal...
... is played (DVD, etc.). DVD 2. The signal format selection menu appears. 5-1. Mono Last Valid On the TX-SR706, for TUNER input selector only "Analog" will be used when a 2-channel (2/0) digital audio signal (Dolby Digital, DTS) is selected on your TV. 2 Use the Up and Down [R]/[X] but - ... 4 Sources You can assign a default listening mode to each input source that will be resumed once the AV receiver/AV amplifier has been set to Standby. 1 Remote controller Press the [RECEIVER] button followed by the [SETUP] button. Use the Up and Down [R]/[X] buttons to select the signal...
Owner Manual
Page 87
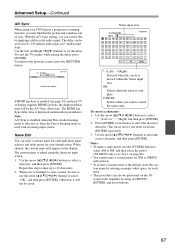
..., to store a name, be performed on the AV receiver/AV amplifier by applying a delay to 250 milliseconds (msec) in parentheses. OK: Selects when the entry is pressed). 3. Press [ENTER] several times to select AM or FM, and then select the preset (TX-SR706 only) (see picture. Repeat this by using its...set the delay. Use the arrow [R]/[X]/[F]/[S] buttons to cancel the name entry. Use the Left and Right [F]/[S] buttons to set from 0 to the audio signal. To return to select "OK", and then press [ENTER]. A/V Sync DVD A/V Sync 0msec Press Enter to see step 1 on the display...
..., to store a name, be performed on the AV receiver/AV amplifier by applying a delay to 250 milliseconds (msec) in parentheses. OK: Selects when the entry is pressed). 3. Press [ENTER] several times to select AM or FM, and then select the preset (TX-SR706 only) (see picture. Repeat this by using its...set the delay. Use the arrow [R]/[X]/[F]/[S] buttons to cancel the name entry. Use the Left and Right [F]/[S] buttons to set from 0 to the audio signal. To return to select "OK", and then press [ENTER]. A/V Sync DVD A/V Sync 0msec Press Enter to see step 1 on the display...
Owner Manual
Page 113
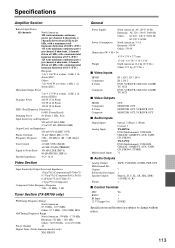
... OUT, VCR/DVR OUT MONITOR OUT, VCR/DVR OUT ■ Audio Inputs Digital Inputs Analog Inputs Multichannel Inputs Optical: 2 (Rear), 1 (Front) Coaxial: 3 TX-SR706: DVD (Multichannel), VCR/DVR, CBL/SAT, GAME/TV, AUX, TAPE, CD, PHONO TX-SA706: DVD (Multichannel), VCR/DVR, CBL/SAT, GAME/TV, AUX..., TAPE, CD, PHONO, TUNER 7.1 ■ Audio Outputs Analog Outputs Multichannel Pre Outputs Subwoofer Pre Output Speaker ...
... OUT, VCR/DVR OUT MONITOR OUT, VCR/DVR OUT ■ Audio Inputs Digital Inputs Analog Inputs Multichannel Inputs Optical: 2 (Rear), 1 (Front) Coaxial: 3 TX-SR706: DVD (Multichannel), VCR/DVR, CBL/SAT, GAME/TV, AUX, TAPE, CD, PHONO TX-SA706: DVD (Multichannel), VCR/DVR, CBL/SAT, GAME/TV, AUX..., TAPE, CD, PHONO, TUNER 7.1 ■ Audio Outputs Analog Outputs Multichannel Pre Outputs Subwoofer Pre Output Speaker ...
Owner Manual
Page 116
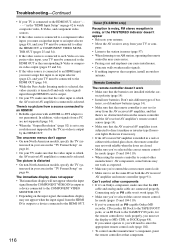
...HDMI OUT. 116 Tuner (TX-SR706 only) Reception is noisy, FM stereo reception is noisy, or the FM STEREO indicator doesn't appear • Relocate your antenna. • Move the AV receiver away from a source ...sure you must be connected to the HDMI OUT (page 34). • While the Pure Audio listening mode is selected, the video circuitry is turned off and only video signals input through HDMI...may not work reliably when the doors are connected properly. If you cannot operate it 's an Onkyo component, make sure that the batteries are not supported (page 34). • When the "Output...
...HDMI OUT. 116 Tuner (TX-SR706 only) Reception is noisy, FM stereo reception is noisy, or the FM STEREO indicator doesn't appear • Relocate your antenna. • Move the AV receiver away from a source ...sure you must be connected to the HDMI OUT (page 34). • While the Pure Audio listening mode is selected, the video circuitry is turned off and only video signals input through HDMI...may not work reliably when the doors are connected properly. If you cannot operate it 's an Onkyo component, make sure that the batteries are not supported (page 34). • When the "Output...


