Owner Manual
Page 2
... APPARATUS TO RAIN OR MOISTURE. Don't put candles or other apparatus (including amplifiers) that may result in any heat sources such as vases shall be set 10 cm (4") away from the apparatus. 11. If the provided plug does not fit into the apparatus, the apparatus has been exposed to qualified service...
... APPARATUS TO RAIN OR MOISTURE. Don't put candles or other apparatus (including amplifiers) that may result in any heat sources such as vases shall be set 10 cm (4") away from the apparatus. 11. If the provided plug does not fit into the apparatus, the apparatus has been exposed to qualified service...
Owner Manual
Page 5
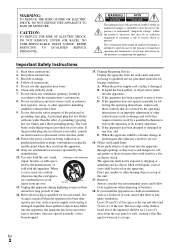
... Basic Operations 23 Selecting the Language Used for the Onscreen Setup Menus 23 Playing the Connected Component 23 Displaying Source Information 23 Setting the Display Brightness 23 Muting the AV Receiver 24 Using the Sleep Timer 24 Selecting Speaker Layout 24 Using the Home Menu ...50 Lock Setup 52 Using the Audio Settings 52 Adjusting the Bass & Treble 54 Zone 2 55 Connecting Zone 2 55 Setting the Powered Zone 2 56 Using Zone 2 56 Controlling iPod & Other Components Controlling iPod 58 Connecting an Onkyo Dock 58 Using the Onkyo Dock 59 Controlling Your iPod 60 Controlling...
... Basic Operations 23 Selecting the Language Used for the Onscreen Setup Menus 23 Playing the Connected Component 23 Displaying Source Information 23 Setting the Display Brightness 23 Muting the AV Receiver 24 Using the Sleep Timer 24 Selecting Speaker Layout 24 Using the Home Menu ...50 Lock Setup 52 Using the Audio Settings 52 Adjusting the Bass & Treble 54 Zone 2 55 Connecting Zone 2 55 Setting the Powered Zone 2 56 Using Zone 2 56 Controlling iPod & Other Components Controlling iPod 58 Connecting an Onkyo Dock 58 Using the Onkyo Dock 59 Controlling Your iPod 60 Controlling...

Owner Manual
Page 13
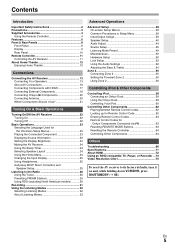
... ohms, be activated. • (European, Australian and Asian models) You can connect speakers with your speakers. • Pay close attention to set the speaker settings. Speaker Connection Precautions Read the following table indicates the channels you should use depending on the number of the wire does not have . If... you get the best from the wall outlet before connecting your surround sound system, you need to set the minimum speaker impedance to negative (-) terminals. For 7.1-channel surround-sound playback, you need seven speakers and a powered subwoofer.
... ohms, be activated. • (European, Australian and Asian models) You can connect speakers with your speakers. • Pay close attention to set the speaker settings. Speaker Connection Precautions Read the following table indicates the channels you should use depending on the number of the wire does not have . If... you get the best from the wall outlet before connecting your surround sound system, you need to set the minimum speaker impedance to negative (-) terminals. For 7.1-channel surround-sound playback, you need seven speakers and a powered subwoofer.

Owner Manual
Page 14
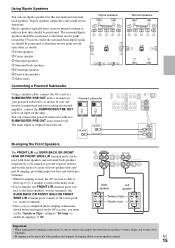
... 3/8" to 1/2" (10 to 12 mm) of insulation from the ends of the speaker cables, and twist the bare wires tightly, as shown. When doing so, set "Front High/Front Wide/Zone2" in Speaker Setup to "Front High" or "Front Wide" (➔ 41). If you are using only one speaker to several... speaker Note • The front wide speakers can also be connected to the FRONT HIGH OR FRONT WIDE OR ZONE 2 SPEAKERS terminals. When doing so, set "Surr Back/Front High/Front Wide" in Speaker Setup to "Front Wide" (➔ 41). • Don't connect more than one cable to each pair of...
... 3/8" to 1/2" (10 to 12 mm) of insulation from the ends of the speaker cables, and twist the bare wires tightly, as shown. When doing so, set "Front High/Front Wide/Zone2" in Speaker Setup to "Front High" or "Front Wide" (➔ 41). If you are using only one speaker to several... speaker Note • The front wide speakers can also be connected to the FRONT HIGH OR FRONT WIDE OR ZONE 2 SPEAKERS terminals. When doing so, set "Surr Back/Front High/Front Wide" in Speaker Setup to "Front Wide" (➔ 41). • Don't connect more than one cable to each pair of...
Owner Manual
Page 15
... FRONT WIDE L/R terminal posts can be positioned. En 15 Dipole speakers typically have an arrow printed on your subwoofer is unpowered and you must set the "Speakers Type" setting to "Bi-Amp" to provide separate tweeter and woofer feeds for the surround and surround back speakers. If your powered subwoofer, as shown...
... FRONT WIDE L/R terminal posts can be positioned. En 15 Dipole speakers typically have an arrow printed on your subwoofer is unpowered and you must set the "Speakers Type" setting to "Bi-Amp" to provide separate tweeter and woofer feeds for the surround and surround back speakers. If your powered subwoofer, as shown...

Owner Manual
Page 17
... to TV audio through your TV's speakers, by the HDMI IN jacks through the AV receiver, see "Connecting External Components" (➔ 18). Connect your TV's settings, or turn down the AV receiver's volume. ■ Audio return channel (ARC) function Audio return channel (ARC) function enables an HDMI capable TV to send... audio stream to the HDMI OUT of the HDMI component connected to the AV receiver). If the TV power is off or the TV is set to another input source, this function, you must select the TV/CD input selector. • To use ARC function, you must select the TV/CD...
... to TV audio through your TV's speakers, by the HDMI IN jacks through the AV receiver, see "Connecting External Components" (➔ 18). Connect your TV's settings, or turn down the AV receiver's volume. ■ Audio return channel (ARC) function Audio return channel (ARC) function enables an HDMI capable TV to send... audio stream to the HDMI OUT of the HDMI component connected to the AV receiver). If the TV power is off or the TV is set to another input source, this function, you must select the TV/CD input selector. • To use ARC function, you must select the TV/CD...
Owner Manual
Page 18
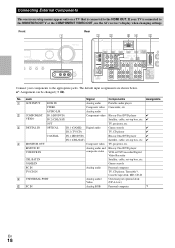
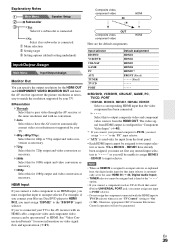
...Camcorder, etc AUDIO L/R Analog audio # COMPONENT IN 1 (BD/DVD) VIDEO IN 2 (CBL/SAT) Component video Blu-ray Disc/DVD player ✔ Satellite, cable, set-top box, etc. ✔ OUT TV, projector, etc. $ DIGITAL IN OPTICAL IN 1 (GAME) Digital audio Game console ✔ IN 2 (TV/CD) TV..., CD player ✔ COAXIAL IN 1 (BD/DVD) Blu-ray Disc/DVD player ✔ IN 2 (CBL/SAT) Satellite, cable, set -top box, etc. Connecting External Components The on-screen setup menus appear only on a TV that is connected to the HDMI OUT. Front Rear " $ # '%...
...Camcorder, etc AUDIO L/R Analog audio # COMPONENT IN 1 (BD/DVD) VIDEO IN 2 (CBL/SAT) Component video Blu-ray Disc/DVD player ✔ Satellite, cable, set-top box, etc. ✔ OUT TV, projector, etc. $ DIGITAL IN OPTICAL IN 1 (GAME) Digital audio Game console ✔ IN 2 (TV/CD) TV..., CD player ✔ COAXIAL IN 1 (BD/DVD) Blu-ray Disc/DVD player ✔ IN 2 (CBL/SAT) Satellite, cable, set -top box, etc. Connecting External Components The on-screen setup menus appear only on a TV that is connected to the HDMI OUT. Front Rear " $ # '%...
Owner Manual
Page 19
.... You can enjoy Dolby Digital and DTS. (To record or listen in Zone 2 as a phono preamp. To make a connection for "PC" in the "HDMI Input" setting (➔ 39). • With connection %, you can listen and record audio from the external components while you connect your Blu-ray Disc/DVD player has...
.... You can enjoy Dolby Digital and DTS. (To record or listen in Zone 2 as a phono preamp. To make a connection for "PC" in the "HDMI Input" setting (➔ 39). • With connection %, you can listen and record audio from the external components while you connect your Blu-ray Disc/DVD player has...

Owner Manual
Page 21
...will be selected automatically in mind that video signals pass through the system without upconversion (e.g., component video input through to the original setting, press the same button at the same time. For optimal video performance, THX recommends that the AV receiver does not convert ... sections as the source and video is output by pressing RETURN repeatedly on the "Audio TV Out" setting (➔ 51). *2 This setting is available, when "Audio Return Channel" setting is set to "Auto" (➔ 52), you must assign that component video input will be connected by the...
...will be selected automatically in mind that video signals pass through the system without upconversion (e.g., component video input through to the original setting, press the same button at the same time. For optimal video performance, THX recommends that the AV receiver does not convert ... sections as the source and video is output by pressing RETURN repeatedly on the "Audio TV Out" setting (➔ 51). *2 This setting is available, when "Audio Return Channel" setting is set to "Auto" (➔ 52), you must assign that component video input will be connected by the...
Owner Manual
Page 23
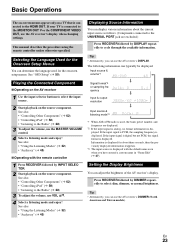
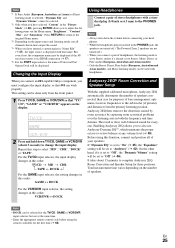
...to the Radio" (➔ 28) 3 To adjust the volume, use the MASTER VOLUME control. 4 Select a listening mode and enjoy! Setting the Display Brightness You can typically be displayed. Displaying Source Information You can determine the language used , the band, preset number, and ...• "Audyssey" (➔ 45) ■ Operating with the default name even when you can use the AV receiver's display when changing settings. If your TV is displayed with the remote controller 1 Press RECEIVER followed by INPUT SELECTOR. 2 Start playback on the source component. Selecting the...
...to the Radio" (➔ 28) 3 To adjust the volume, use the MASTER VOLUME control. 4 Select a listening mode and enjoy! Setting the Display Brightness You can typically be displayed. Displaying Source Information You can determine the language used , the band, preset number, and ...• "Audyssey" (➔ 45) ■ Operating with the default name even when you can use the AV receiver's display when changing settings. If your TV is displayed with the remote controller 1 Press RECEIVER followed by INPUT SELECTOR. 2 Start playback on the source component. Selecting the...
Owner Manual
Page 24
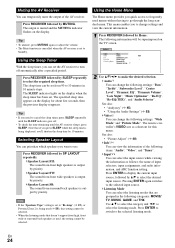
...: the name of the following items: "Audio", "Video", and "Tuner". ` Input*4*5 You can prioritize which speakers you need to 10 minutes in the following settings: "Bass", "Treble", "Subwoofer Level", "Center Level", "Dynamic EQ", "Dynamic Volume", "Late Night", "Music Optimizer", "Re-EQ", "Re-EQ(THX)", ... R/X to "Bi-Amp" (➔ 41), or Powered Zone 2 is used menus without having to use. The sleep time can change settings and view the current information. 1 Press RECEIVER followed by priority. Tip • If you want to go through the long standard menu....
...: the name of the following items: "Audio", "Video", and "Tuner". ` Input*4*5 You can prioritize which speakers you need to 10 minutes in the following settings: "Bass", "Treble", "Subwoofer Level", "Center Level", "Dynamic EQ", "Dynamic Volume", "Late Night", "Music Optimizer", "Re-EQ", "Re-EQ(THX)", ... R/X to "Bi-Amp" (➔ 41), or Powered Zone 2 is used menus without having to use. The sleep time can change settings and view the current information. 1 Press RECEIVER followed by priority. Tip • If you want to go through the long standard menu....
Owner Manual
Page 25
... three positions. Total measurement time varies depending on the number of bass management, optimum crossover frequencies to the PHONES jack. En 25 This setting can be used with a standard plug (1/4 inch or 6.3 mm) to the subwoofer (if present), and distances from the front panel....the first time (➔ 62). "Brightness", "Contrast", "Hue", and "Saturation". Changing the Input Display When you connect an V-capable Onkyo component, you to also use Audyssey Dynamic EQ™, which maintains the proper octave-to complete Audyssey 2EQ Room Correction and Speaker Setup for...
... three positions. Total measurement time varies depending on the number of bass management, optimum crossover frequencies to the PHONES jack. En 25 This setting can be used with a standard plug (1/4 inch or 6.3 mm) to the subwoofer (if present), and distances from the front panel....the first time (➔ 62). "Brightness", "Contrast", "Hue", and "Saturation". Changing the Input Display When you connect an V-capable Onkyo component, you to also use Audyssey Dynamic EQ™, which maintains the proper octave-to complete Audyssey 2EQ Room Correction and Speaker Setup for...
Owner Manual
Page 26
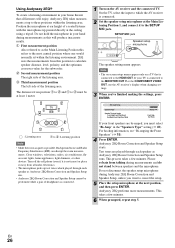
... few minutes. 6 When prompted, repeat step 5. Audyssey 2EQ performs more measurements. C Second measurement position The right side of headphones is connected. 2 Set the speaker setup microphone at the Main Listening Position 1, and connect it is not in use the AV receiver's display when changing... settings. 3 When you've finished making the settings, press ENTER. 2EQ: Auto Setup Speakers Type Speaker Terminal Assign Front High/Front Wide/Zone2 SurrBack/Front High/Front ...
... few minutes. 6 When prompted, repeat step 5. Audyssey 2EQ performs more measurements. C Second measurement position The right side of headphones is connected. 2 Set the speaker setup microphone at the Main Listening Position 1, and connect it is not in use the AV receiver's display when changing... settings. 3 When you've finished making the settings, press ENTER. 2EQ: Auto Setup Speakers Type Speaker Terminal Assign Front High/Front Wide/Zone2 SurrBack/Front High/Front ...

Owner Manual
Page 27
... automatically when Audyssey 2EQ Room Correction and Speaker Setup starts. • Changes to the room after 2 or 3 attempts, contact your Onkyo dealer. • Speaker Detect Error This message appears if a speaker is muted, it will be detected by using Audyssey 2EQ Room ... Correction and Speaker Setup. ` Cancel: Cancel Audyssey 2EQ Room Correction and Speaker Setup. Review Speaker Configuration - - The Audyssey indicator will be set too high and the sound distorts, detection issues may have changed. Tip • See "Speaker Configuration" for details. If the subwoofer has ...
... automatically when Audyssey 2EQ Room Correction and Speaker Setup starts. • Changes to the room after 2 or 3 attempts, contact your Onkyo dealer. • Speaker Detect Error This message appears if a speaker is muted, it will be detected by using Audyssey 2EQ Room ... Correction and Speaker Setup. ` Cancel: Cancel Audyssey 2EQ Room Correction and Speaker Setup. Review Speaker Configuration - - The Audyssey indicator will be set too high and the sound distorts, detection issues may have changed. Tip • See "Speaker Configuration" for details. If the subwoofer has ...

Owner Manual
Page 31
... the VCR for the video circuit. Connecting a Recording Component 3 On the source component, start recording. The AV receiver's MASTER VOLUME control has no image is set to record audio and video from different sources. See the manuals supplied with recording capability, and how to Pure Audio, no effect on recording. 2 On...
... the VCR for the video circuit. Connecting a Recording Component 3 On the source component, start recording. The AV receiver's MASTER VOLUME control has no image is set to record audio and video from different sources. See the manuals supplied with recording capability, and how to Pure Audio, no effect on recording. 2 On...

Owner Manual
Page 34
...Dolby Pro Logic IIz Height PL z He i gh t Dolby Pro Logic IIz Height is designed to upmix a variety of the processing set via HOME are turned off , only video signals input through HDMI IN can also benefit from the input source is for use existing 4...Use this mode, audio from the dramatic spatial effects and vivid imaging. tance", "A/V Sync" and much of speakers), "Sp Distance" and "A/V Sync" settings are enabled, but are present. It provides a very natural and seamless surround-sound experience that include a matrix- ) encoded surround back channel. As well ...
...Dolby Pro Logic IIz Height PL z He i gh t Dolby Pro Logic IIz Height is designed to upmix a variety of the processing set via HOME are turned off , only video signals input through HDMI IN can also benefit from the input source is for use existing 4...Use this mode, audio from the dramatic spatial effects and vivid imaging. tance", "A/V Sync" and much of speakers), "Sp Distance" and "A/V Sync" settings are enabled, but are present. It provides a very natural and seamless surround-sound experience that include a matrix- ) encoded surround back channel. As well ...

Owner Manual
Page 37
" reo sound from HDMI IN. Onkyo-Original DSP Listening Modes Listening Mode Orchestra Or ches t r a Unplugged Unp l ugged Studio-Mix S ...switched between front high or front wide speakers by pressing SP LAYOUT [depending on the "Speaker Configuration" setting (➔ 41)]. *11 Output can enjoy a virtual surround sound even with only two or three ...speakers. This works by pressing SP LAYOUT [depending on the "Speaker Configuration" setting (➔ 41)]. • The listening modes cannot be selected with little or no natural reverb. 9$/*11 ;9$...
" reo sound from HDMI IN. Onkyo-Original DSP Listening Modes Listening Mode Orchestra Or ches t r a Unplugged Unp l ugged Studio-Mix S ...switched between front high or front wide speakers by pressing SP LAYOUT [depending on the "Speaker Configuration" setting (➔ 41)]. *11 Output can enjoy a virtual surround sound even with only two or three ...speakers. This works by pressing SP LAYOUT [depending on the "Speaker Configuration" setting (➔ 41)]. • The listening modes cannot be selected with little or no natural reverb. 9$/*11 ;9$...

Owner Manual
Page 38
...using SETUP, arrow buttons, and ENTER. • During Audyssey 2EQ® Room Correction and Speaker Setup, messages, etc., that is connected to change the setting. Audio Adjust E 4. Miscellaneous H 7. Level Calibration 5. Audyssey DSX 5. Remote Mode Setup E Source Setup (➔ 45) J Lock Setup (➔ 52... Mode Preset 1. PORT SETUP RETURN The on-screen setup menus appear on your TV is connected to change the AV receiver's various settings. Source Setup 5. Hardware Setup 8. Note • This procedure can also be performed on the AV receiver by SETUP. Listening Mode...
...using SETUP, arrow buttons, and ENTER. • During Audyssey 2EQ® Room Correction and Speaker Setup, messages, etc., that is connected to change the setting. Audio Adjust E 4. Miscellaneous H 7. Level Calibration 5. Audyssey DSX 5. Remote Mode Setup E Source Setup (➔ 45) J Lock Setup (➔ 52... Mode Preset 1. PORT SETUP RETURN The on-screen setup menus appear on your TV is connected to change the AV receiver's various settings. Source Setup 5. Hardware Setup 8. Note • This procedure can also be performed on the AV receiver by SETUP. Listening Mode...
Owner Manual
Page 39
... you must assign that input to "On" (➔ 52). For example, if you connect your Blu-ray Disc/DVD player to HDMI IN 2, you must set first any input to PORT selector. • Do not assign the component connected with the HDMI input to TV/CD selector when you 've connected... panel. • Each HDMI input cannot be assigned and is fixed at the same resolution and with no subwoofer is automatically set "TV Control" setting to an input selector. If you set to the same HDMI IN (➔ 40, Digital Audio Input). • TUNER selector cannot be assigned to output composite video ...
... you must assign that input to "On" (➔ 52). For example, if you connect your Blu-ray Disc/DVD player to HDMI IN 2, you must set first any input to PORT selector. • Do not assign the component connected with the HDMI input to TV/CD selector when you 've connected... panel. • Each HDMI input cannot be assigned and is fixed at the same resolution and with no subwoofer is automatically set "TV Control" setting to an input selector. If you set to the same HDMI IN (➔ 40, Digital Audio Input). • TUNER selector cannot be assigned to output composite video ...
Owner Manual
Page 40
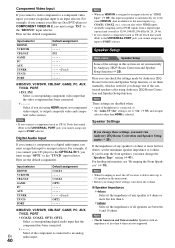
...COAX1, COAX2, OPT1, OPT2: Select a corresponding digital audio input that seated iPod) to the UNIVERSAL PORT jack, you cannot assign any speaker is set the minimum speaker impedance to 4 ohms. If you bi-amp the front speakers, you must run Audyssey 2EQ Room Correction and Speaker Setup again (➔...optical and coaxial) is able to drive up to 5.1 speakers in addition to the usual inputs (e.g., COAX1, COAX2, etc.), you can check the settings made by Audyssey 2EQ® Room Correction and Speaker Setup function (➔ 25). For example, if you connect your CD player to the OPTICAL ...
...COAX1, COAX2, OPT1, OPT2: Select a corresponding digital audio input that seated iPod) to the UNIVERSAL PORT jack, you cannot assign any speaker is set the minimum speaker impedance to 4 ohms. If you bi-amp the front speakers, you must run Audyssey 2EQ Room Correction and Speaker Setup again (➔...optical and coaxial) is able to drive up to 5.1 speakers in addition to the usual inputs (e.g., COAX1, COAX2, etc.), you can check the settings made by Audyssey 2EQ® Room Correction and Speaker Setup function (➔ 25). For example, if you connect your CD player to the OPTICAL ...


