Owner Manual
Page 2
...water. 6. A polarized plug has two blades with dry cloth. 7. A grounding type plug has two blades and a third grounding prong. Protect the power cord from the apparatus. 11. Only use caution when moving the cart/appara- fied by the manufacturer. 12. When a cart is damaged, liquid ...issues and follow local regulations when disposing of the polarized or grounding-type plug. The rear edge of any way, such as power-supply cord or plug is used, use attachments/accessories specified by the manufacturer, or sold with arrowhead symbol, within an equilateral triangle...
...water. 6. A polarized plug has two blades with dry cloth. 7. A grounding type plug has two blades and a third grounding prong. Protect the power cord from the apparatus. 11. Only use caution when moving the cart/appara- fied by the manufacturer. 12. When a cart is damaged, liquid ...issues and follow local regulations when disposing of the polarized or grounding-type plug. The rear edge of any way, such as power-supply cord or plug is used, use attachments/accessories specified by the manufacturer, or sold with arrowhead symbol, within an equilateral triangle...

Owner Manual
Page 3
... Hearing Loss Caution Excessive sound pressure from earphones and headphones can be determined by the party responsible for an extended period, remove the power cord from country to disconnect this unit, use only, recording copyrighted material is used in a residential installation. Batteries and Heat Exposure... • This unit's top and rear panels may not work properly the next time you do not intend to correct the interference by your Onkyo dealer. 3. En 3 Precautions 1. However, there is no guarantee that the plug is normal. • If you turn on the unit's...
... Hearing Loss Caution Excessive sound pressure from earphones and headphones can be determined by the party responsible for an extended period, remove the power cord from country to disconnect this unit, use only, recording copyrighted material is used in a residential installation. Batteries and Heat Exposure... • This unit's top and rear panels may not work properly the next time you do not intend to correct the interference by your Onkyo dealer. 3. En 3 Precautions 1. However, there is no guarantee that the plug is normal. • If you turn on the unit's...

Owner Manual
Page 4
...in the plug. Check for the ASTA mark or the BSI mark on the body of color. For European Models Declaration of Conformity We, ONKYO EUROPE ELECTRONICS GmbH LIEGNITZERSTRASSE 6, 82194 GROEBENZELL, GERMANY declare in own responsibility, that indicated on the plug. Specifications and operations are coloured in accordance...use the remote controller, point it off and fit a suitable plug. For British models Replacement and mounting of an AC plug on the power supply cord of this unit should be performed only by ASTA or BSI to BS1362 and have the following code: Blue: Neutral Brown: ...
...in the plug. Check for the ASTA mark or the BSI mark on the body of color. For European Models Declaration of Conformity We, ONKYO EUROPE ELECTRONICS GmbH LIEGNITZERSTRASSE 6, 82194 GROEBENZELL, GERMANY declare in own responsibility, that indicated on the plug. Specifications and operations are coloured in accordance...use the remote controller, point it off and fit a suitable plug. For British models Replacement and mounting of an AC plug on the power supply cord of this unit should be performed only by ASTA or BSI to BS1362 and have the following code: Blue: Neutral Brown: ...
Owner Manual
Page 5
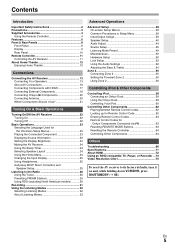
... Bass & Treble 54 Zone 2 55 Connecting Zone 2 55 Setting the Powered Zone 2 56 Using Zone 2 56 Controlling iPod & Other Components Controlling iPod 58 Connecting an Onkyo Dock 58 Using the Onkyo Dock 59 Controlling Your iPod 60 Controlling Other Components 62 Preprogrammed Remote Control ...Codes 62 Looking up for Remote Control Code 62 Entering Remote Control Codes 63 Remote Control Codes for Onkyo Components Connected via V 63 Resetting REMOTE MODE Buttons 64 Resetting the Remote Controller 64 Controlling Other Components 64 Others Troubleshooting...
... Bass & Treble 54 Zone 2 55 Connecting Zone 2 55 Setting the Powered Zone 2 56 Using Zone 2 56 Controlling iPod & Other Components Controlling iPod 58 Connecting an Onkyo Dock 58 Using the Onkyo Dock 59 Controlling Your iPod 60 Controlling Other Components 62 Preprogrammed Remote Control ...Codes 62 Looking up for Remote Control Code 62 Entering Remote Control Codes 63 Remote Control Codes for Onkyo Components Connected via V 63 Resetting REMOTE MODE Buttons 64 Resetting the Remote Controller 64 Controlling Other Components 64 Others Troubleshooting...
Owner Manual
Page 6
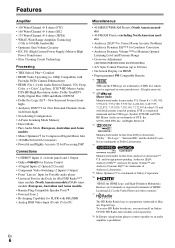
...Digital Music files • 192 kHz/24-bit D/A Converters • Powerful and Highly Accurate 32-bit Processing DSP Connections • 6 HDMI*6 Inputs (1 on front panel) and 1 Output • Onkyo Q for Loudness Correction • Audyssey Dynamic Volume™*4 to Maintain Optimal... WRAT-Wide Range Amplifier Technology (5 Hz to 100 kHz bandwidth) • Optimum Gain Volume Circuitry • H.C.P.S. (High Current Power Supply) Massive High Power Transformer • Jitter Cleaning Circuit Technology Processing • THX Select2 Plus*1 Certified • HDMI Video Upscaling (to an audio ...
...Digital Music files • 192 kHz/24-bit D/A Converters • Powerful and Highly Accurate 32-bit Processing DSP Connections • 6 HDMI*6 Inputs (1 on front panel) and 1 Output • Onkyo Q for Loudness Correction • Audyssey Dynamic Volume™*4 to Maintain Optimal... WRAT-Wide Range Amplifier Technology (5 Hz to 100 kHz bandwidth) • Optimum Gain Volume Circuitry • H.C.P.S. (High Current Power Supply) Massive High Power Transformer • Jitter Cleaning Circuit Technology Processing • THX Select2 Plus*1 Certified • HDMI Video Upscaling (to an audio ...

Owner Manual
Page 7
... trademarks of their respective owners. and its subsidiaries. Taxes and a one-time activation fee may apply. THX Select2 Plus requirements define hundreds of parameters, including power amplifier performance, and pre-amplifier performance and operation for home theater playback. * Apple and iPod are the property of Sirius XM Radio Inc.
... trademarks of their respective owners. and its subsidiaries. Taxes and a one-time activation fee may apply. THX Select2 Plus requirements define hundreds of parameters, including power amplifier performance, and pre-amplifier performance and operation for home theater playback. * Apple and iPod are the property of Sirius XM Radio Inc.
Owner Manual
Page 10
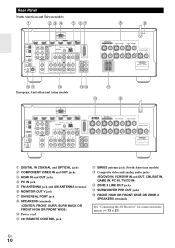
... ANTENNA jack and AM ANTENNA terminal G MONITOR OUT V jack H UNIVERSAL PORT jack I SPEAKERS terminals (CENTER, FRONT, SURR, SURR BACK OR FRONT HIGH OR FRONT WIDE) J Power cord K V REMOTE CONTROL jack L SIRIUS antenna jack (North American models) M Composite video and analog audio jacks (BD/DVD IN, VCR/DVR IN and OUT, CBL...
... ANTENNA jack and AM ANTENNA terminal G MONITOR OUT V jack H UNIVERSAL PORT jack I SPEAKERS terminals (CENTER, FRONT, SURR, SURR BACK OR FRONT HIGH OR FRONT WIDE) J Power cord K V REMOTE CONTROL jack L SIRIUS antenna jack (North American models) M Composite video and analog audio jacks (BD/DVD IN, VCR/DVR IN and OUT, CBL...

Owner Manual
Page 13
... Surround back right, Zone 2 right Color White Red Green Blue Gray Brown Tan The supplied speaker cable labels are all you need seven speakers and a powered subwoofer. Then all black). To get them to the positive (+) side of the wire does not have . Doing so may be sure to set the... speaker settings. En 13 No matter how many speakers you use, a powered subwoofer is 4 ohms or more, but less than 6 ohms, be activated. • Disconnect the power cord from your speakers: • (North American and Taiwan models) You can con- Doing so may be ...
... Surround back right, Zone 2 right Color White Red Green Blue Gray Brown Tan The supplied speaker cable labels are all you need seven speakers and a powered subwoofer. Then all black). To get them to the positive (+) side of the wire does not have . Doing so may be sure to set the... speaker settings. En 13 No matter how many speakers you use, a powered subwoofer is 4 ohms or more, but less than 6 ohms, be activated. • Disconnect the power cord from your speakers: • (North American and Taiwan models) You can con- Doing so may be ...
Owner Manual
Page 15
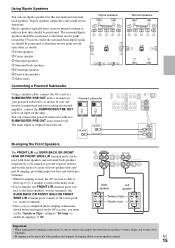
...high speakers G Front wide speakers H Subwoofers Dipole speakers F F H TV/screen H GBCBG Normal speakers F F H TV/screen H G BCBG D DD D E E E E Connecting a Powered Subwoofer Using a suitable cable, connect the AV receiver's SUBWOOFER PRE OUT jack to an input on your speaker manual. If your subwoofer is able to..."Bi-Amp" to enable bi-amping (➔ 41). The surround dipole speakers should be positioned. You can connect the powered subwoofer with speakers that their arrows point toward the TV/screen, while the surround back dipole speakers should be positioned so ...
...high speakers G Front wide speakers H Subwoofers Dipole speakers F F H TV/screen H GBCBG Normal speakers F F H TV/screen H G BCBG D DD D E E E E Connecting a Powered Subwoofer Using a suitable cable, connect the AV receiver's SUBWOOFER PRE OUT jack to an input on your speaker manual. If your subwoofer is able to..."Bi-Amp" to enable bi-amping (➔ 41). The surround dipole speakers should be positioned. You can connect the powered subwoofer with speakers that their arrows point toward the TV/screen, while the surround back dipole speakers should be positioned so ...
Owner Manual
Page 16
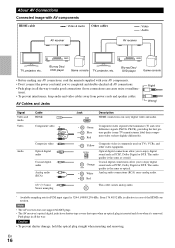
tions). • To prevent interference, keep audio and video cables away from power cords and speaker cables. L White Analog audio connections (RCA) carry analog audio. Even 176.4/192 kHz is the same as optical. Caution • To prevent ... covers that open when an optical plug is the same as coaxial. About AV Connections Connected image with your AV components. • Don't connect the power cord until you to enjoy digital sound such as PCM*, Dolby Digital or DTS. Push plugs in case of the HDMI connection. OPTICAL Optical digital...
tions). • To prevent interference, keep audio and video cables away from power cords and speaker cables. L White Analog audio connections (RCA) carry analog audio. Even 176.4/192 kHz is the same as optical. Caution • To prevent ... covers that open when an optical plug is the same as coaxial. About AV Connections Connected image with your AV components. • Don't connect the power cord until you to enjoy digital sound such as PCM*, Dolby Digital or DTS. Push plugs in case of the HDMI connection. OPTICAL Optical digital...

Owner Manual
Page 17
... can be seen on the TV screen (on the TV, select the input of the HDMI component connected to the AV receiver). If the TV power is off . • When the "Audio TV Out" setting is set to "On"(➔ 52). To use this may result in no sound from the...
... can be seen on the TV screen (on the TV, select the input of the HDMI component connected to the AV receiver). If the TV power is off . • When the "Audio TV Out" setting is set to "On"(➔ 52). To use this may result in no sound from the...

Owner Manual
Page 20
...malfunction. • Some components may not support all V functions. Connecting other jack is for connecting additional V-capable components. • Connect only Onkyo components to V jacks. North American and Taiwan models European, Australian and Asian models Caution • Be careful that component as the input ... with your AV receiver, TV, speaker cables, and power cords. Indoor FM antenna (supplied) AM loop antenna (supplied) Note • Once your other Onkyo components. • While Zone 2 is on, the System On/Auto Power On and Direct Change V functions do not work. ...
...malfunction. • Some components may not support all V functions. Connecting other jack is for connecting additional V-capable components. • Connect only Onkyo components to V jacks. North American and Taiwan models European, Australian and Asian models Caution • Be careful that component as the input ... with your AV receiver, TV, speaker cables, and power cords. Indoor FM antenna (supplied) AM loop antenna (supplied) Note • Once your other Onkyo components. • While Zone 2 is on, the System On/Auto Power On and Direct Change V functions do not work. ...
Owner Manual
Page 24
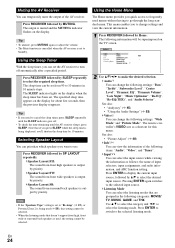
... can be selected. • When the listening mode that if you press SLEEP while the sleep time is set to "Bi-Amp" (➔ 41), or Powered Zone 2 is being displayed, you need to go through the long standard menu. Using the Sleep Timer With the sleep timer, you quick access to...
... can be selected. • When the listening mode that if you press SLEEP while the sleep time is set to "Bi-Amp" (➔ 41), or Powered Zone 2 is being displayed, you need to go through the long standard menu. Using the Sleep Timer With the sleep timer, you quick access to...
Owner Manual
Page 25
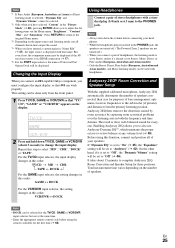
...listening position. The result is clear, well-balanced sound for the first time (➔ 62). Changing the Input Display When you connect an V-capable Onkyo component, you must configure the input display so that name. → → Note *1 If Pure Audio (European, Australian and Asian) or Direct...listening mode, not all of your headphones. • While the headphones plug is inserted in the PHONES jack, the speakers are turned off. (The Powered Zone 2 speakers are not turned off.) • When you to adjust the following items via HDMI connection (➔ 17). *5 For the PORT...
...listening position. The result is clear, well-balanced sound for the first time (➔ 62). Changing the Input Display When you connect an V-capable Onkyo component, you must configure the input display so that name. → → Note *1 If Pure Audio (European, Australian and Asian) or Direct...listening mode, not all of your headphones. • While the headphones plug is inserted in the PHONES jack, the speakers are turned off. (The Powered Zone 2 speakers are not turned off.) • When you to adjust the following items via HDMI connection (➔ 17). *5 For the PORT...

Owner Manual
Page 27
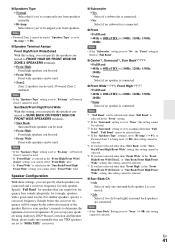
... from that no speaker was detected. If this message appears after Audyssey 2EQ Room Correction and Speaker Setup requires you set up your Onkyo dealer. • Speaker Detect Error This message appears if a speaker is too high. If you run Audyssey 2EQ Room Correction and...and then try again. • Speaker Matching Error! This message appears if saving fails. Tip • See "Speaker Configuration" for details. Using a Powered Subwoofer If you may appear. 2EQ: Auto Setup Ambient noise is complete, the "Equalizer" will be set it will light (➔ 9). • You...
... from that no speaker was detected. If this message appears after Audyssey 2EQ Room Correction and Speaker Setup requires you set up your Onkyo dealer. • Speaker Detect Error This message appears if a speaker is too high. If you run Audyssey 2EQ Room Correction and...and then try again. • Speaker Matching Error! This message appears if saving fails. Tip • See "Speaker Configuration" for details. Using a Powered Subwoofer If you may appear. 2EQ: Auto Setup Ambient noise is complete, the "Equalizer" will be set it will light (➔ 9). • You...

Owner Manual
Page 31
..., DVD recorder) connected to the VCR/DVR OUT jack. 1 Use the input selector buttons to overdub audio onto your recorder, start playback. vided because the power is selected, the video input source remains unchanged. If you can watch the source while recording. Video sources can be recorded. Recording Separate AV Sources...
..., DVD recorder) connected to the VCR/DVR OUT jack. 1 Use the input selector buttons to overdub audio onto your recorder, start playback. vided because the power is selected, the video input source remains unchanged. If you can watch the source while recording. Video sources can be recorded. Recording Separate AV Sources...

Owner Manual
Page 37
Onkyo-Original DSP Listening Modes Listening Mode Orchestra Or ches t r a Unplugged Unp l ugged Studio-Mix S t u d i o -M ... Setting the output setting on the input source, DTS is used. *9 If there are no surround back speakers, or Powered Zone 2 is being at a club or rock concert. In that you can enjoy a virtual surround sound even with little... of the stage. ) Speaker Layout $/*11 Suitable for background music, this mode fills the entire listening area with a powerful acoustic image, like being used, Dolby Pro Logic II is used. *4 Surround back and front wide speakers are not ...
Onkyo-Original DSP Listening Modes Listening Mode Orchestra Or ches t r a Unplugged Unp l ugged Studio-Mix S t u d i o -M ... Setting the output setting on the input source, DTS is used. *9 If there are no surround back speakers, or Powered Zone 2 is being at a club or rock concert. In that you can enjoy a virtual surround sound even with little... of the stage. ) Speaker Layout $/*11 Suitable for background music, this mode fills the entire listening area with a powerful acoustic image, like being used, Dolby Pro Logic II is used. *4 Surround back and front wide speakers are not ...
Owner Manual
Page 41
...be selected. ■ Surr Back Ch ` 1ch: Select if only one surround back speaker L is set to "Bi-Amp" (➔ 41), or Powered Zone 2 is being used . Note • If the "Speakers Type" setting is set to determine the optimum crossover frequencies. Speaker Configuration With these ... wide speakers can be selected. Sounds below the crossover frequency will be used . SurrBack/Front High/Front Wide With this setting cannot be used . (Powered Zone 2 enabled). Note • If the "Speakers Type" setting is selected in the "Front High/Front Wide/ Zone2" setting, you cannot select...
...be selected. ■ Surr Back Ch ` 1ch: Select if only one surround back speaker L is set to "Bi-Amp" (➔ 41), or Powered Zone 2 is being used . Note • If the "Speakers Type" setting is set to determine the optimum crossover frequencies. Speaker Configuration With these ... wide speakers can be selected. Sounds below the crossover frequency will be used . SurrBack/Front High/Front Wide With this setting cannot be used . (Powered Zone 2 enabled). Note • If the "Speakers Type" setting is selected in the "Front High/Front Wide/ Zone2" setting, you cannot select...

Owner Manual
Page 43
... 0 and 1 foot (0-30 cm) apart. `1 ft - 4 ft (0.3 m - 1.2 m): Select this if your surround back speakers. Note • You can also set to "None" (➔ 41), or Powered Zone 2 is fixed at any THX listening mode. THX Audio Setup With the "SurrBack Speaker Spacing" setting, you 're using a THX-certified subwoofer, set to...
... 0 and 1 foot (0-30 cm) apart. `1 ft - 4 ft (0.3 m - 1.2 m): Select this if your surround back speakers. Note • You can also set to "None" (➔ 41), or Powered Zone 2 is fixed at any THX listening mode. THX Audio Setup With the "SurrBack Speaker Spacing" setting, you 're using a THX-certified subwoofer, set to...
Owner Manual
Page 50
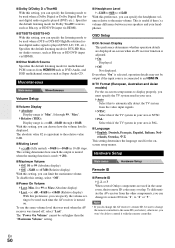
... Miscellaneous Volume Setup ■ Volume Display ` Absolute: Display range is "Min", 1 through +18dB. En 50 To disable this setting, select "Off". ■ Power On Volume ` Last, Min, 1 to 99 or Max (Absolute display) ` Last, -2 dB, -81dB to +18dB (Relative display) With this preference, you...this setting, you can limit the maximum volume. Hardware Setup Main menu Hardware Setup Remote ID ■ Remote ID ` 1, 2, or 3 When several Onkyo components are displayed on . With this setting, you can choose how the volume level is -2dB, -81dB through 99, "Max". ` Relative (THX):...
... Miscellaneous Volume Setup ■ Volume Display ` Absolute: Display range is "Min", 1 through +18dB. En 50 To disable this setting, select "Off". ■ Power On Volume ` Last, Min, 1 to 99 or Max (Absolute display) ` Last, -2 dB, -81dB to +18dB (Relative display) With this preference, you...this setting, you can limit the maximum volume. Hardware Setup Main menu Hardware Setup Remote ID ■ Remote ID ` 1, 2, or 3 When several Onkyo components are displayed on . With this setting, you can choose how the volume level is -2dB, -81dB through 99, "Max". ` Relative (THX):...


