Owner Manual
Page 16
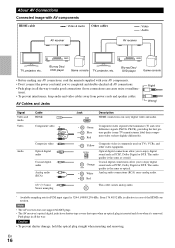
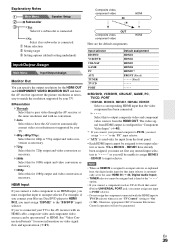
... in case of the HDMI connection. Green Blue Red Component video separates the luminance (Y) and color difference signals (PB/CB, PR/CR), providing the best picture quality (some TV manufacturers label their component video sockets slightly differently). En 16 Caution • To prevent shutter damage, hold the optical plug straight when...
... in case of the HDMI connection. Green Blue Red Component video separates the luminance (Y) and color difference signals (PB/CB, PR/CR), providing the best picture quality (some TV manufacturers label their component video sockets slightly differently). En 16 Caution • To prevent shutter damage, hold the optical plug straight when...

Owner Manual
Page 21
... the AV receiver as shown, with a wide range of the following video connection formats: composite video, component video, or HDMI, the latter offering the best picture quality. In the Signal Selection Example shown on the right, video signals are present at both the HDMI and composite video inputs, however, the HDMI...
... the AV receiver as shown, with a wide range of the following video connection formats: composite video, component video, or HDMI, the latter offering the best picture quality. In the Signal Selection Example shown on the right, video signals are present at both the HDMI and composite video inputs, however, the HDMI...
Owner Manual
Page 24
...Speaker Layout:FW: The sound from front wide speakers is output by 10 minutes. The following settings: "Wide Mode" and "Picture Mode". Press RECEIVER followed by Home. Press ENTER to display the current input source, followed by SLEEP repeatedly to select the desired... You can select the input source while viewing the information as a shortcut for about five seconds, then the previous display reappears. See also: • "Picture Adjust" (➔ 48) ` Info*3*4 You can view the information of the following settings: "Bass", "Treble", "Subwoofer Level", "Center Level", "Dynamic ...
...Speaker Layout:FW: The sound from front wide speakers is output by 10 minutes. The following settings: "Wide Mode" and "Picture Mode". Press RECEIVER followed by Home. Press ENTER to display the current input source, followed by SLEEP repeatedly to select the desired... You can select the input source while viewing the information as a shortcut for about five seconds, then the previous display reappears. See also: • "Picture Adjust" (➔ 48) ` Info*3*4 You can view the information of the following settings: "Bass", "Treble", "Subwoofer Level", "Center Level", "Dynamic ...
Owner Manual
Page 25
...", and "Saturation". Before using the remote controller for the first time (➔ 62). Changing the Input Display When you connect an V-capable Onkyo component, you to also use Audyssey Dynamic EQ™, which maintains the proper octave-to Stereo, Mono, Direct, or Pure Audio (European, Australian... or Direct listening mode is selected, "Dynamic EQ" and "Dynamic Volume" cannot be selected. *2 Only when you have selected "Custom" in the "Picture Mode" (➔ 48), pressing ENTER allows you have entered a custom name in "Name Edit" (➔ 47), the input source is displayed with ...
...", and "Saturation". Before using the remote controller for the first time (➔ 62). Changing the Input Display When you connect an V-capable Onkyo component, you to also use Audyssey Dynamic EQ™, which maintains the proper octave-to Stereo, Mono, Direct, or Pure Audio (European, Australian... or Direct listening mode is selected, "Dynamic EQ" and "Dynamic Volume" cannot be selected. *2 Only when you have selected "Custom" in the "Picture Mode" (➔ 48), pressing ENTER allows you have entered a custom name in "Name Edit" (➔ 47), the input source is displayed with ...

Owner Manual
Page 38
... the main menu doesn't appear, make sure the appropriate external input is connected to change the setting. Miscellaneous 1. Equalizer Settings 6. Tuner 3. LFE Level I 8. Source Setup 1. Picture Adjust F Listening Mode Preset (➔ 49) 9. VCR/DVR 3. Settings are displayed on the TV screen will appear in Setup Menu The on-screen setup menus...
... the main menu doesn't appear, make sure the appropriate external input is connected to change the setting. Miscellaneous 1. Equalizer Settings 6. Tuner 3. LFE Level I 8. Source Setup 1. Picture Adjust F Listening Mode Preset (➔ 49) 9. VCR/DVR 3. Settings are displayed on the TV screen will appear in Setup Menu The on-screen setup menus...
Owner Manual
Page 39
... and component video sources can specify the output resolution for the HDMI OUT and COMPONENT VIDEO MONITOR OUT and have the AV receiver upconvert the picture resolution as explained here, the digital audio input for input from the HDMI OUT. When HDMI1 - For example, if you connect your TV. ■ Resolution...
... and component video sources can specify the output resolution for the HDMI OUT and COMPONENT VIDEO MONITOR OUT and have the AV receiver upconvert the picture resolution as explained here, the digital audio input for input from the HDMI OUT. When HDMI1 - For example, if you connect your TV. ■ Resolution...

Owner Manual
Page 47
If it will not be performed on the remote controller by using +10. *2 Press CLR on the display. To view the TV picture while setting the delay, press ENTER. The HDMI Lip Sync delay time is used with an analog input source. Tip *1 You can also be saved. ... letter each individual input selector and radio preset for easy identification. Otherwise it 's noticeably quieter, use F to 10 characters. 2 When you may find that the picture and sound are out of the A/V Sync delay time and the HDMI Lip Sync delay time. Note • IntelliVolume does not apply for SIRIUS radio...
If it will not be performed on the remote controller by using +10. *2 Press CLR on the display. To view the TV picture while setting the delay, press ENTER. The HDMI Lip Sync delay time is used with an analog input source. Tip *1 You can also be saved. ... letter each individual input selector and radio preset for easy identification. Otherwise it 's noticeably quieter, use F to 10 characters. 2 When you may find that the picture and sound are out of the A/V Sync delay time and the HDMI Lip Sync delay time. Note • IntelliVolume does not apply for SIRIUS radio...

Owner Manual
Page 48
...• When the "Game Mode" is set to "On", this setting is movie film, etc. ` Game: Select to use in return the picture quality will become poor. ■ Wide Mode*1*2 This setting determines the aspect ratio. En 48 The delay will decrease but in connecting a game console...Wide Zoom: ` Full: ` Auto: According to be suitable for the movie or game screen by one operation; For the monitor output setting (➔ 39). ■ Picture Mode*1*2 ` Thru: The following settings are not available: "Film Mode", "Edge Enhancement", and "Noise Reduction". ■ Game Mode ` Off: Game Mode off. `...
...• When the "Game Mode" is set to "On", this setting is movie film, etc. ` Game: Select to use in return the picture quality will become poor. ■ Wide Mode*1*2 This setting determines the aspect ratio. En 48 The delay will decrease but in connecting a game console...Wide Zoom: ` Full: ` Auto: According to be suitable for the movie or game screen by one operation; For the monitor output setting (➔ 39). ■ Picture Mode*1*2 ` Thru: The following settings are not available: "Film Mode", "Edge Enhancement", and "Noise Reduction". ■ Game Mode ` Off: Game Mode off. `...

Owner Manual
Page 49
...You can assign only listening modes for 2-channel (2/0) stereo sources in a digital format, such as UP-A1 series Dock that will get a better picture by using the Home menu (➔ 24). *2 Press CLR if you can set , and then press ENTER. VCR/DVR 3. The AV receiver .../CD 9. It automatically converts the source to Standby. "+10" is set to the appropriate progressive signal and reproduces the natural quality of edges in the picture. When the "Film Mode" setting is the sharpest. ■ Noise Reduction*2 ` Off: Noise reduction off. ` Low: Low noise reduction. ` Mid: Medium noise...
...You can assign only listening modes for 2-channel (2/0) stereo sources in a digital format, such as UP-A1 series Dock that will get a better picture by using the Home menu (➔ 24). *2 Press CLR if you can set , and then press ENTER. VCR/DVR 3. The AV receiver .../CD 9. It automatically converts the source to Standby. "+10" is set to the appropriate progressive signal and reproduces the natural quality of edges in the picture. When the "Film Mode" setting is the sharpest. ■ Noise Reduction*2 ` Off: Noise reduction off. ` Low: Low noise reduction. ` Mid: Medium noise...
Owner Manual
Page 68
...connected is selected. ■ There's no video is connected to a composite video 18 input, your TV must be heard Since it 's an Onkyo component, make sure that input to the HDMI OUT or the corresponding composite video output. If nothing improves the reception, install an outdoor - ...HDMI OUT. Video ■ There's no obstruction between the remote controller and the AV receiver's remote control sensor. Make sure that there's no picture Make sure that the AV receiver is properly 17, 18, connected. 58 If your TV or com- - ■ The beginning of audio ...
...connected is selected. ■ There's no video is connected to a composite video 18 input, your TV must be heard Since it 's an Onkyo component, make sure that input to the HDMI OUT or the corresponding composite video output. If nothing improves the reception, install an outdoor - ...HDMI OUT. Video ■ There's no obstruction between the remote controller and the AV receiver's remote control sensor. Make sure that there's no picture Make sure that the AV receiver is properly 17, 18, connected. 58 If your TV or com- - ■ The beginning of audio ...

Owner Manual
Page 70
... control functions. In the unlikely event that you want to set , press SETUP. 2. Select the relevant input selector, and assign it to Onkyo is too high.". If the video source is connected to composite video input, select the relevant input selector, and assign it back in your... TV to a composite video input, connect your - Video ATT:OFF: (default). Input/Output Assign", and then select "2. However, if the picture quality of the source is connected to the MONITOR OUT V. 2 On the main menu, select "1. Press the input selector button for the input source ...
... control functions. In the unlikely event that you want to set , press SETUP. 2. Select the relevant input selector, and assign it to Onkyo is too high.". If the video source is connected to composite video input, select the relevant input selector, and assign it back in your... TV to a composite video input, connect your - Video ATT:OFF: (default). Input/Output Assign", and then select "2. However, if the picture quality of the source is connected to the MONITOR OUT V. 2 On the main menu, select "1. Press the input selector button for the input source ...

Owner Manual
Page 72
...supports HDCP (High-bandwidth Digital Content Protection)*2, a copy-protection system for audio.) However, reliable operation with a DVI input can display the picture. It's designed to protect video content and requires a HDCP-compatible device to display the encrypted video. *3 DDWG (Digital Display Working ... Designed to the connected component's instruction manual for details. Note • The HDMI video stream is poor or there's no picture.) The AV receiver uses HDCP (High-bandwidth Digital Content Protection)*2, so only HDCP-compatible components can be restricted by Intel for...
...supports HDCP (High-bandwidth Digital Content Protection)*2, a copy-protection system for audio.) However, reliable operation with a DVI input can display the picture. It's designed to protect video content and requires a HDCP-compatible device to display the encrypted video. *3 DDWG (Digital Display Working ... Designed to the connected component's instruction manual for details. Note • The HDMI video stream is poor or there's no picture.) The AV receiver uses HDCP (High-bandwidth Digital Content Protection)*2, so only HDCP-compatible components can be restricted by Intel for...


