Owner Manual
Page 5
...Theater 12 Connections Connecting the AV Receiver 13 Connecting Your Speakers 13 About AV Connections 16 Connecting Components with HDMI 17 Connecting External Components 18 Connecting Onkyo V Components 20 Connecting Antenna 20 Which Connections Should I Use 21 Turning On & Basic Operations Turning ...55 Setting the Powered Zone 2 56 Using Zone 2 56 Controlling iPod & Other Components Controlling iPod 58 Connecting an Onkyo Dock 58 Using the Onkyo Dock 59 Controlling Your iPod 60 Controlling Other Components 62 Preprogrammed Remote Control Codes 62 Looking up for Remote Control ...
...Theater 12 Connections Connecting the AV Receiver 13 Connecting Your Speakers 13 About AV Connections 16 Connecting Components with HDMI 17 Connecting External Components 18 Connecting Onkyo V Components 20 Connecting Antenna 20 Which Connections Should I Use 21 Turning On & Basic Operations Turning ...55 Setting the Powered Zone 2 56 Using Zone 2 56 Controlling iPod & Other Components Controlling iPod 58 Connecting an Onkyo Dock 58 Using the Onkyo Dock 59 Controlling Your iPod 60 Controlling Other Components 62 Preprogrammed Remote Control Codes 62 Looking up for Remote Control ...
Owner Manual
Page 6
...EQ™ are trademarks of Audyssey Laboratories. *5 Music Optimizer™ is a trademark of Onkyo Corporation. *6 "HDMI, the HDMI Logo, and High-Definition Multimedia Interface are trademarks or registered trademarks of HDMI Licensing LLC in the United States and other U.S. New Surround Format (fronthigh) • ... 192 kHz/24-bit D/A Converters • Powerful and Highly Accurate 32-bit Processing DSP Connections • 6 HDMI*6 Inputs (1 on front panel) and 1 Output • Onkyo Q for FL/FR with Audio Return Channel, 3D), Deep- and foreign patents pending. To receive HD Radio ...
...EQ™ are trademarks of Audyssey Laboratories. *5 Music Optimizer™ is a trademark of Onkyo Corporation. *6 "HDMI, the HDMI Logo, and High-Definition Multimedia Interface are trademarks or registered trademarks of HDMI Licensing LLC in the United States and other U.S. New Surround Format (fronthigh) • ... 192 kHz/24-bit D/A Converters • Powerful and Highly Accurate 32-bit Processing DSP Connections • 6 HDMI*6 Inputs (1 on front panel) and 1 Output • Onkyo Q for FL/FR with Audio Return Channel, 3D), Deep- and foreign patents pending. To receive HD Radio ...

Owner Manual
Page 8
The page numbers in parentheses show where you can find the main explanation for clarity. B ON/STANDBY button (➔ 22) C STANDBY indicator (➔ 22) D HDMI THRU indicator (➔ 52) E ZONE 2 indicator (➔ 56) F Remote control sensor (➔ 4) G ZONE 2, OFF, ZONE 2 LEVEL/TONE LEVEL and ... (➔ 54, 56 to 29), arrow and ENTER buttons P RETURN button Q MASTER VOLUME control (➔ 23) R PHONES jack (➔ 25) S AUX INPUT HDMI jack (➔ 17) T Input selector buttons (➔ 23) U AUX INPUT LINE IN jack (➔ 18) V AUX INPUT VIDEO jack (➔ 18) W...
The page numbers in parentheses show where you can find the main explanation for clarity. B ON/STANDBY button (➔ 22) C STANDBY indicator (➔ 22) D HDMI THRU indicator (➔ 52) E ZONE 2 indicator (➔ 56) F Remote control sensor (➔ 4) G ZONE 2, OFF, ZONE 2 LEVEL/TONE LEVEL and ... (➔ 54, 56 to 29), arrow and ENTER buttons P RETURN button Q MASTER VOLUME control (➔ 23) R PHONES jack (➔ 25) S AUX INPUT HDMI jack (➔ 17) T Input selector buttons (➔ 23) U AUX INPUT LINE IN jack (➔ 18) V AUX INPUT VIDEO jack (➔ 18) W...
Owner Manual
Page 10
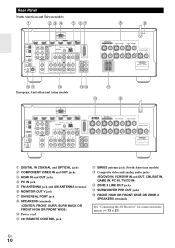
... American and Taiwan models B CD E F GH I J KL M European, Australian and Asian models NO P P I B DIGITAL IN COAXIAL and OPTICAL jacks C COMPONENT VIDEO IN and OUT jacks D HDMI IN and OUT jacks E PC IN jack F FM ANTENNA jack and AM ANTENNA terminal G MONITOR OUT V jack H UNIVERSAL PORT jack I SPEAKERS terminals (CENTER, FRONT, SURR...
... American and Taiwan models B CD E F GH I J KL M European, Australian and Asian models NO P P I B DIGITAL IN COAXIAL and OPTICAL jacks C COMPONENT VIDEO IN and OUT jacks D HDMI IN and OUT jacks E PC IN jack F FM ANTENNA jack and AM ANTENNA terminal G MONITOR OUT V jack H UNIVERSAL PORT jack I SPEAKERS terminals (CENTER, FRONT, SURR...
Owner Manual
Page 16
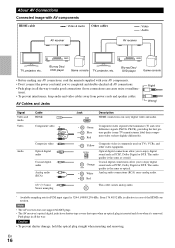
.... • The AV receiver's optical digital jacks have shutter-type covers that open when an optical plug is effective in case of the HDMI connection. Push plugs in all the way. tions). • To prevent interference, keep audio and video cables away from power cords and speaker.../44.1/48/88.2/96 kHz. Blu-ray Disc/ DVD player Game console • Before making any AV connections, read the manuals supplied with AV components HDMI cable : Video & Audio Other cables AV receiver : Video : Audio AV receiver TV, projector, etc. R Red This cable carries analog audio. * Available...
.... • The AV receiver's optical digital jacks have shutter-type covers that open when an optical plug is effective in case of the HDMI connection. Push plugs in all the way. tions). • To prevent interference, keep audio and video cables away from power cords and speaker.../44.1/48/88.2/96 kHz. Blu-ray Disc/ DVD player Game console • Before making any AV connections, read the manuals supplied with AV components HDMI cable : Video & Audio Other cables AV receiver : Video : Audio AV receiver TV, projector, etc. R Red This cable carries analog audio. * Available...

Owner Manual
Page 17
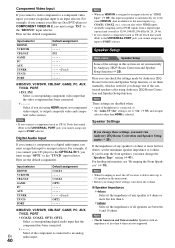
...✔: Assignment can be changed (➔ 39). Assignable Refer to the appropriate jacks. Jack Input Output Signal HDMI IN 1 Audio/Video HDMI IN 2 HDMI IN 3 HDMI IN 4 HDMI IN 5 AUX INPUT HDMI HDMI OUT Components Blu-ray Disc/DVD player VCR or DVD recorder/Digital Video Recorder Satellite, cable, set to "On... is set to another input source, this function, you must select the TV/CD input selector, your TV must support ARC function and "HDMI Control" is set -top box, etc. Personal computer Blu-ray Disc/DVD player Camcorder Satellite, cable, set to "On" (➔ ...
...✔: Assignment can be changed (➔ 39). Assignable Refer to the appropriate jacks. Jack Input Output Signal HDMI IN 1 Audio/Video HDMI IN 2 HDMI IN 3 HDMI IN 4 HDMI IN 5 AUX INPUT HDMI HDMI OUT Components Blu-ray Disc/DVD player VCR or DVD recorder/Digital Video Recorder Satellite, cable, set to "On... is set to another input source, this function, you must select the TV/CD input selector, your TV must support ARC function and "HDMI Control" is set -top box, etc. Personal computer Blu-ray Disc/DVD player Camcorder Satellite, cable, set to "On" (➔ ...
Owner Manual
Page 18
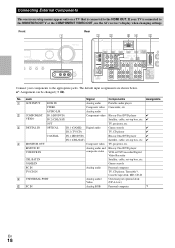
... that is connected to the MONITOR OUT V or the COMPONENT VIDEO OUT, use the AV receiver's display when changing settings. If your components to the HDMI OUT. BD/DVD IN VCR/DVR IN Analog audio and Blu-ray Disc/DVD player composite video VCR or DVD recorder/Digital Video Recorder CBL...
... that is connected to the MONITOR OUT V or the COMPONENT VIDEO OUT, use the AV receiver's display when changing settings. If your components to the HDMI OUT. BD/DVD IN VCR/DVR IN Analog audio and Blu-ray Disc/DVD player composite video VCR or DVD recorder/Digital Video Recorder CBL...
Owner Manual
Page 19
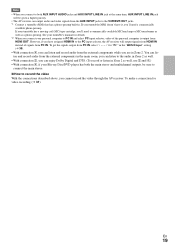
...have it, you'll need a commercially available MC head amp or MC transformer as well as a phono preamp. To make a connection for "PC" in the "HDMI Input" setting (➔ 39). • With connection %, you can listen and record audio from the external components while you are in the main room; you... 2 as well. • With connection $, you can enjoy Dolby Digital and DTS. (To record or listen in . If your turntable (MM) doesn't have assigned HDMI IN to the PC input selector, the AV receiver will be sure to connect the main stereo. ■ How to record the video With the...
...have it, you'll need a commercially available MC head amp or MC transformer as well as a phono preamp. To make a connection for "PC" in the "HDMI Input" setting (➔ 39). • With connection %, you can listen and record audio from the external components while you are in the main room; you... 2 as well. • With connection $, you can enjoy Dolby Digital and DTS. (To record or listen in . If your turntable (MM) doesn't have assigned HDMI IN to the PC input selector, the AV receiver will be sure to connect the main stereo. ■ How to record the video With the...

Owner Manual
Page 21
... must support ARC function. 21 Signal Selection Example Blu-ray Disc/DVD player, etc. Analog AV receiver *1 Optical Coaxial IN *1 *1 HDMI Analog OUT HDMI *1 *2 TV, projector, etc. *1 Depends on the AV receiver at more than one input, the inputs will be selected automatically in...DVR OUT. For optimal video performance, THX recommends that the AV receiver does not convert digital input signals for the HDMI output. However, for compatibility with composite video and component video sources all being present. Audio Connection Formats Audio component can...
... must support ARC function. 21 Signal Selection Example Blu-ray Disc/DVD player, etc. Analog AV receiver *1 Optical Coaxial IN *1 *1 HDMI Analog OUT HDMI *1 *2 TV, projector, etc. *1 Depends on the AV receiver at more than one input, the inputs will be selected automatically in...DVR OUT. For optimal video performance, THX recommends that the AV receiver does not convert digital input signals for the HDMI output. However, for compatibility with composite video and component video sources all being present. Audio Connection Formats Audio component can...
Owner Manual
Page 23
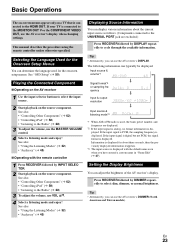
... the MASTER VOLUME control. 4 Select a listening mode and enjoy! Selecting the Language Used for about the current input source as follows. (Components connected to the HDMI OUT. Tip • Alternatively, you have entered a custom name in "Name Edit" (➔ 47). Setting the Display Brightness You can use the AV receiver's DISPLAY...
... the MASTER VOLUME control. 4 Select a listening mode and enjoy! Selecting the Language Used for about the current input source as follows. (Components connected to the HDMI OUT. Tip • Alternatively, you have entered a custom name in "Name Edit" (➔ 47). Setting the Display Brightness You can use the AV receiver's DISPLAY...
Owner Manual
Page 25
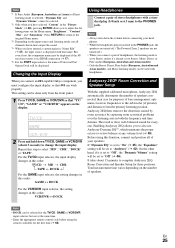
...EQ" and "Dynamic Volume" cannot be displayed. "Brightness", "Contrast", "Hue", and "Saturation". Changing the Input Display When you connect an V-capable Onkyo component, you connect a pair of Universal Port Option Dock will be selected for the TV/CD, GAME or VCR/DVR input selector, but not at...step to complete Audyssey 2EQ Room Correction and Speaker Setup for everyone. En 25 Enabling Audyssey 2EQ allows you to adjust the following items via HDMI connection (➔ 17). *5 For the PORT input selector, the name of headphones, the listening mode is inserted in the "Picture Mode"...
...EQ" and "Dynamic Volume" cannot be displayed. "Brightness", "Contrast", "Hue", and "Saturation". Changing the Input Display When you connect an V-capable Onkyo component, you connect a pair of Universal Port Option Dock will be selected for the TV/CD, GAME or VCR/DVR input selector, but not at...step to complete Audyssey 2EQ Room Correction and Speaker Setup for everyone. En 25 Enabling Audyssey 2EQ allows you to adjust the following items via HDMI connection (➔ 17). *5 For the PORT input selector, the name of headphones, the listening mode is inserted in the "Picture Mode"...
Owner Manual
Page 26
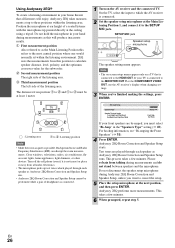
..., use ) or place it away from this will enjoy, Audyssey 2EQ takes measurements at up test tones which the AV receiver is connected to the HDMI OUT. For hookup information, see "Bi-amping the Front Speakers" (➔ 15). 4 Press ENTER. Please refrain from position B to C and B to D must select "Bi-Amp...
..., use ) or place it away from this will enjoy, Audyssey 2EQ takes measurements at up test tones which the AV receiver is connected to the HDMI OUT. For hookup information, see "Bi-amping the Front Speakers" (➔ 15). 4 Press ENTER. Please refrain from position B to C and B to D must select "Bi-Amp...
Owner Manual
Page 32
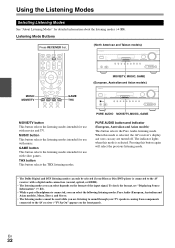
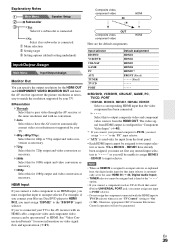
... "About Listening Modes" for use with music. MUSIC button This button selects the listening modes intended for use with a digital audio connection (coaxial, optical, or HDMI). • The listening modes you can select the following listening modes: Pure Audio (European, Australian and Asian models), Mono, Direct, and Stereo. • The listening...
... "About Listening Modes" for use with music. MUSIC button This button selects the listening modes intended for use with a digital audio connection (coaxial, optical, or HDMI). • The listening modes you can select the following listening modes: Pure Audio (European, Australian and Asian models), Mono, Direct, and Stereo. • The listening...

Owner Manual
Page 34
... imaging. Dolby Digital Do l b y D Dolby Digital Plus*6 In this mode, the display and video circuitry are turned off , only video signals input through HDMI IN can be output from HDMI OUT.) 4 % ' In this mode with any 2-channel source for 7.1-channel play- 4 Dolby Pro Logic II back. See "Advanced Setup" for more details...
... imaging. Dolby Digital Do l b y D Dolby Digital Plus*6 In this mode, the display and video circuitry are turned off , only video signals input through HDMI IN can be output from HDMI OUT.) 4 % ' In this mode with any 2-channel source for 7.1-channel play- 4 Dolby Pro Logic II back. See "Advanced Setup" for more details...

Owner Manual
Page 37
... speakers, DTS is connected. • Output can enjoy a virtual surround sound even with only two or three speakers. " reo sound from HDMI IN. This works by pressing SP LAYOUT [depending on the "Speaker Configuration" setting (➔ 41)]. • The listening modes cannot be ... receiver can be selected only when all speakers output the same sound in a TV studio, surround effects to the entire sound, and clarity to voices. Onkyo-Original DSP Listening Modes Listening Mode Orchestra Or ches t r a Unplugged Unp l ugged Studio-Mix S t u d i o -M i x TV Logic TV Log i ...
... speakers, DTS is connected. • Output can enjoy a virtual surround sound even with only two or three speakers. " reo sound from HDMI IN. This works by pressing SP LAYOUT [depending on the "Speaker Configuration" setting (➔ 41)]. • The listening modes cannot be ... receiver can be selected only when all speakers output the same sound in a TV studio, surround effects to the entire sound, and clarity to voices. Onkyo-Original DSP Listening Modes Listening Mode Orchestra Or ches t r a Unplugged Unp l ugged Studio-Mix S t u d i o -M i x TV Logic TV Log i ...

Owner Manual
Page 38
... the procedure using the on your TV is selected on -screen display. 1 Press RECEIVER followed by SETUP. Speaker Setup D 3. HDMI D Audio Adjust (➔ 44) 3. Multiplex/Mono 2. Audyssey DSX 5. Audyssey 2. A/V Sync 4. Lock Setup Lock En 38 ... Tuner 3. DTS 4. Source Setup 1. TUNER 8. THX Audio Setup 7. Remote ID 2. ENTER R/X/F/S MENU B 1. Input/Output Assign C 2. Source Setup F 5. HDMI Input 3. Component Video Input 4. Speaker Settings 2. Name Edit 5. Picture Adjust F Listening Mode Preset (➔ 49) 9. Listening Mode Preset 1. VCR/DVR 3. PC...
... the procedure using the on your TV is selected on -screen display. 1 Press RECEIVER followed by SETUP. Speaker Setup D 3. HDMI D Audio Adjust (➔ 44) 3. Multiplex/Mono 2. Audyssey DSX 5. Audyssey 2. A/V Sync 4. Lock Setup Lock En 38 ... Tuner 3. DTS 4. Source Setup 1. TUNER 8. THX Audio Setup 7. Remote ID 2. ENTER R/X/F/S MENU B 1. Input/Output Assign C 2. Source Setup F 5. HDMI Input 3. Component Video Input 4. Speaker Settings 2. Name Edit 5. Picture Adjust F Listening Mode Preset (➔ 49) 9. Listening Mode Preset 1. VCR/DVR 3. PC...
Owner Manual
Page 39
...Menu Speaker Setup C Subwoofer D Yes: Select if a subwoofer is connected. If you've connected your TV to the AV receiver with an HDMI cable, composite video and component video sources can specify the output resolution for 1080i output and video conversion as necessary. ` 1080i: Select this ... Dock that seated iPod) to UNIVERSAL PORT jack, you cannot assign any unused input selectors to or you must assign "HDMI2" to an HDMI input, you will not be assigned to input selector. B Menu selection C Setting target D Setting options (default setting underlined) Input/Output ...
...Menu Speaker Setup C Subwoofer D Yes: Select if a subwoofer is connected. If you've connected your TV to the AV receiver with an HDMI cable, composite video and component video sources can specify the output resolution for 1080i output and video conversion as necessary. ` 1080i: Select this ... Dock that seated iPod) to UNIVERSAL PORT jack, you cannot assign any unused input selectors to or you must assign "HDMI2" to an HDMI input, you will not be assigned to input selector. B Menu selection C Setting target D Setting options (default setting underlined) Input/Output ...
Owner Manual
Page 40
...bit. • If you connect a component (such as UP-A1 Dock that the video component has been connected Select if you can also select HDMI inputs. • Available sampling rate for PCM signals from a digital input (optical and coaxial) is automatically set them manually, which is selected....` IN1, IN2: Select a corresponding component video input that seated iPod) to the UNIVERSAL PORT jack, you must assign "IN2" to the same HDMI IN. Digital Audio Input If you connect a component to a digital audio input, you cannot assign any speaker is assigned to an input selector. Input...
...bit. • If you connect a component (such as UP-A1 Dock that the video component has been connected Select if you can also select HDMI inputs. • Available sampling rate for PCM signals from a digital input (optical and coaxial) is automatically set them manually, which is selected....` IN1, IN2: Select a corresponding component video input that seated iPod) to the UNIVERSAL PORT jack, you must assign "IN2" to the same HDMI IN. Digital Audio Input If you connect a component to a digital audio input, you cannot assign any speaker is assigned to an input selector. Input...

Owner Manual
Page 47
... Y Z !@# $%^& ( )_ ~ [] ;',./ Shift Space Back Space OK +10 Shift CLR All Erase ■ A/V Sync `0ms to 200ms in parentheses. The HDMI Lip Sync delay time is noticeably louder than the others , use R/X/F/S to select "OK", and then press ENTER. Shift*1: Switches the displayed character. (Left)/ (Right...complete. If a component is displayed underneath in 10 ms steps. Note • IntelliVolume does not apply for SIRIUS radio presets. If HDMI Lip Sync is pressed). 3 Use R/X/F/S to select the correct character, and then press ENTER. OK: Selects when the entry is ...
... Y Z !@# $%^& ( )_ ~ [] ;',./ Shift Space Back Space OK +10 Shift CLR All Erase ■ A/V Sync `0ms to 200ms in parentheses. The HDMI Lip Sync delay time is noticeably louder than the others , use R/X/F/S to select "OK", and then press ENTER. Shift*1: Switches the displayed character. (Left)/ (Right...complete. If a component is displayed underneath in 10 ms steps. Note • IntelliVolume does not apply for SIRIUS radio presets. If HDMI Lip Sync is pressed). 3 Use R/X/F/S to select the correct character, and then press ENTER. OK: Selects when the entry is ...
Owner Manual
Page 50
... it with the remote controller. Specifies the default listening mode for DTS-HD Master Audio sources, such as Blu-ray or HD DVD (input via HDMI). ■ DTS/DTS-ES/DTS-HD With this setting, you can specify the listening mode to be set higher than the "Maximum Volume" setting....used each time the AV receiver is connected to "2" or "3". Hardware Setup Main menu Hardware Setup Remote ID ■ Remote ID ` 1, 2, or 3 When several Onkyo components are displayed on -screen setup menus to automatically detect the TV system from the video input signals. ` NTSC: Select this if the TV system...
... it with the remote controller. Specifies the default listening mode for DTS-HD Master Audio sources, such as Blu-ray or HD DVD (input via HDMI). ■ DTS/DTS-ES/DTS-HD With this setting, you can specify the listening mode to be set higher than the "Maximum Volume" setting....used each time the AV receiver is connected to "2" or "3". Hardware Setup Main menu Hardware Setup Remote ID ■ Remote ID ` 1, 2, or 3 When several Onkyo components are displayed on -screen setup menus to automatically detect the TV system from the video input signals. ` NTSC: Select this if the TV system...


