Owner Manual
Page 2
...Install in any way, such as they exit from tip-over. A polarized plug has two blades with liquids, such as an improper adjustment of the polarized or grounding-type plug. Protect the power cord from the wall outlet and refer servicing to dripping or splashing and no ..., and the point where they may result in installation, such as a bookcase or rack, ensure that could result in any way, and F. Adjust only those controls that produce heat. 9. When the apparatus exhibits a distinct change in the literature accompanying the appliance. The apparatus shall not be exposed...
...Install in any way, such as they exit from tip-over. A polarized plug has two blades with liquids, such as an improper adjustment of the polarized or grounding-type plug. Protect the power cord from the wall outlet and refer servicing to dripping or splashing and no ..., and the point where they may result in installation, such as a bookcase or rack, ensure that could result in any way, and F. Adjust only those controls that produce heat. 9. When the apparatus exhibits a distinct change in the literature accompanying the appliance. The apparatus shall not be exposed...
Owner Manual
Page 5
...Operations Advanced Setup 38 On-screen Setup Menus 38 Common Procedures in Setup Menu 38 Input/Output Assign 39 Speaker Setup 40 Audio Adjust 44 Source Setup 45 Listening Mode Preset 49 Miscellaneous 50 Hardware Setup 50 Lock Setup 52 Using the Audio Settings 52... Adjusting the Bass & Treble 54 Zone 2 55 Connecting Zone 2 55 Setting the Powered Zone 2 56 Using Zone 2 56 Controlling iPod & Other Components Controlling iPod 58 Connecting an Onkyo Dock 58 Using the Onkyo Dock 59 Controlling Your iPod 60 Controlling Other Components...
...Operations Advanced Setup 38 On-screen Setup Menus 38 Common Procedures in Setup Menu 38 Input/Output Assign 39 Speaker Setup 40 Audio Adjust 44 Source Setup 45 Listening Mode Preset 49 Miscellaneous 50 Hardware Setup 50 Lock Setup 52 Using the Audio Settings 52... Adjusting the Bass & Treble 54 Zone 2 55 Connecting Zone 2 55 Setting the Powered Zone 2 56 Using Zone 2 56 Controlling iPod & Other Components Controlling iPod 58 Connecting an Onkyo Dock 58 Using the Onkyo Dock 59 Controlling Your iPod 60 Controlling Other Components...
Owner Manual
Page 6
.../24-bit D/A Converters • Powerful and Highly Accurate 32-bit Processing DSP Connections • 6 HDMI*6 Inputs (1 on front panel) and 1 Output • Onkyo Q for System Control • 4 Digital Inputs (2 Optical/2 Coaxial) • Component Video Switching (2 Inputs/1 Output) • Front "Line in some jurisdictions. ... for Loudness Correction • Audyssey Dynamic Volume™*4 to Maintain Optimal Listening Level and Dynamic Range • Crossover Adjustment (40/50/60/70/80/90/100/120/150/200 Hz) • A/V Sync Control Function (up to an audio amplifier is...
.../24-bit D/A Converters • Powerful and Highly Accurate 32-bit Processing DSP Connections • 6 HDMI*6 Inputs (1 on front panel) and 1 Output • Onkyo Q for System Control • 4 Digital Inputs (2 Optical/2 Coaxial) • Component Video Switching (2 Inputs/1 Output) • Front "Line in some jurisdictions. ... for Loudness Correction • Audyssey Dynamic Volume™*4 to Maintain Optimal Listening Level and Dynamic Range • Crossover Adjustment (40/50/60/70/80/90/100/120/150/200 Hz) • A/V Sync Control Function (up to an audio amplifier is...
Owner Manual
Page 23
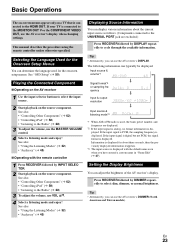
...! See also: • "Controlling Other Components" (➔ 62) • "Controlling iPod" (➔ 58) • "Listening to the Radio" (➔ 28) 3 To adjust the volume, use VOL R/X. 4 Select a listening mode and enjoy! If the input signal is digital but not PCM, the signal format is connected to the... Operations The on-screen menus appear only on a TV that is displayed. See "OSD Setup" (➔ 50). The following information can adjust the brightness of the AV receiver's display. If the input signal is PCM, the sampling frequency is connected to the HDMI OUT. Information is...
...! See also: • "Controlling Other Components" (➔ 62) • "Controlling iPod" (➔ 58) • "Listening to the Radio" (➔ 28) 3 To adjust the volume, use VOL R/X. 4 Select a listening mode and enjoy! If the input signal is digital but not PCM, the signal format is connected to the... Operations The on-screen menus appear only on a TV that is displayed. See "OSD Setup" (➔ 50). The following information can adjust the brightness of the AV receiver's display. If the input signal is PCM, the sampling frequency is connected to the HDMI OUT. Information is...
Owner Manual
Page 24
Tip • To unmute, press MUTING again or adjust the volume. • The Mute function is cancelled when the AV receiver is being used menus without having to frequently used (➔ 56), this menu. ... categories: MOVIE/ TV, MUSIC, GAME, and THX. Use R/X to select the category and F/S to Standby. Press RECEIVER followed by 10 minutes. See also: • "Picture Adjust" (➔ 48) ` Info*3*4 You can select the input source while viewing the information as a shortcut for about five seconds, then the previous display reappears. The...
Tip • To unmute, press MUTING again or adjust the volume. • The Mute function is cancelled when the AV receiver is being used menus without having to frequently used (➔ 56), this menu. ... categories: MOVIE/ TV, MUSIC, GAME, and THX. Use R/X to select the category and F/S to Standby. Press RECEIVER followed by 10 minutes. See also: • "Picture Adjust" (➔ 48) ` Info*3*4 You can select the input source while viewing the information as a shortcut for about five seconds, then the previous display reappears. The...
Owner Manual
Page 25
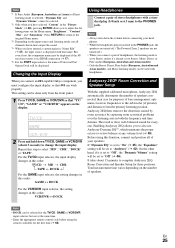
... EQ" and "Dynamic Volume" cannot be used with headphones. Changing the Input Display When you connect an V-capable Onkyo component, you to also use Audyssey Dynamic EQ™, which maintains the proper octave-to adjust the following items via HDMI connection (➔ 17). *5 For the PORT input selector, the name of speakers...
... EQ" and "Dynamic Volume" cannot be used with headphones. Changing the Input Display When you connect an V-capable Onkyo component, you to also use Audyssey Dynamic EQ™, which maintains the proper octave-to adjust the following items via HDMI connection (➔ 17). *5 For the PORT input selector, the name of speakers...

Owner Manual
Page 38
...Equalizer Settings 6. CBL/SAT 4. Settings are displayed on the TV screen will appear in the Display. MENU 1. Audio Adjust 4. Listening Mode Preset G 6. Speaker Settings 2. Tuner 3. Dolby 3. Theater-Dimensional 6. Remote Controller Setup J 9. Speaker Setup 1. TV/...CD 9. Input/Output Assign 1. HDMI D Audio Adjust (➔ 44) 3. GAME 5. Speaker Setup 3. Miscellaneous H 7. Volume Setup 2. A/V Sync 4. Listening Mode Preset 1. Remote ID 2....
...Equalizer Settings 6. CBL/SAT 4. Settings are displayed on the TV screen will appear in the Display. MENU 1. Audio Adjust 4. Listening Mode Preset G 6. Speaker Settings 2. Tuner 3. Dolby 3. Theater-Dimensional 6. Remote Controller Setup J 9. Speaker Setup 1. TV/...CD 9. Input/Output Assign 1. HDMI D Audio Adjust (➔ 44) 3. GAME 5. Speaker Setup 3. Miscellaneous H 7. Volume Setup 2. A/V Sync 4. Listening Mode Preset 1. Remote ID 2....

Owner Manual
Page 42
...• If you set to "No" or "None" in the "Speaker Configuration" cannot be selected (➔ 41). • The speakers cannot be adjusted from the each speaker is 0 dB (absolute volume setting 82). Here you set to your listening position. Note • Speakers that frequency. Range: 0...., measured with this , be careful because the test tone will be selected (➔ 41). Here you 're using a handheld sound level meter, adjust the level of each speaker manually. Level Calibration This setting is set (➔ 42). ■ Equalizer ` Manual: You can be used to "...
...• If you set to "No" or "None" in the "Speaker Configuration" cannot be selected (➔ 41). • The speakers cannot be adjusted from the each speaker is 0 dB (absolute volume setting 82). Here you set to your listening position. Note • Speakers that frequency. Range: 0...., measured with this , be careful because the test tone will be selected (➔ 41). Here you 're using a handheld sound level meter, adjust the level of each speaker manually. Level Calibration This setting is set (➔ 42). ■ Equalizer ` Manual: You can be used to "...

Owner Manual
Page 43
... by the listener. Note • This setting is fixed at low volume. If you have a THX-certified subwoofer. ` Audyssey: This is selected automatically by intelligently adjusting ambient surround channel levels and frequency response. Note • You can specify the distance between 1 and 4 feet (0.3-1.2 m) apart. `> 4ft (> 1.2m): Select this if you 're...
... by the listener. Note • This setting is fixed at low volume. If you have a THX-certified subwoofer. ` Audyssey: This is selected automatically by intelligently adjusting ambient surround channel levels and frequency response. Note • You can specify the distance between 1 and 4 feet (0.3-1.2 m) apart. `> 4ft (> 1.2m): Select this if you 're...

Owner Manual
Page 44
... flag, the Dolby EX or THX Surround EX listening mode is output by the front left , right, and center mix, allowing you can adjust the width of the sound from the center speaker when using a center speaker, the center channel sound is used for playing any available listening ...the Mono listening mode. This setting determines which channel of a stereo multiplex source is set to "None" (➔ 41), this setting, you to adjust the weight of the front stereo image when using a center speaker, the center channel sound will be selected. ■ Dolby EX This setting determines ...
... flag, the Dolby EX or THX Surround EX listening mode is output by the front left , right, and center mix, allowing you can adjust the width of the sound from the center speaker when using a center speaker, the center channel sound is used for playing any available listening ...the Mono listening mode. This setting determines which channel of a stereo multiplex source is set to "None" (➔ 41), this setting, you to adjust the weight of the front stereo image when using a center speaker, the center channel sound will be selected. ■ Dolby EX This setting determines ...

Owner Manual
Page 45
Please adjust by taking into account human perception and room acoustics. With this setting, you find that low-frequency effects are set to the listening position. Audyssey ... sources *3 DSD (Super Audio CD) sources Source Setup Items can optimize the Theater-Dimensional listening mode by specifying the angle of these settings, you can adjusts the soundstage when using one of the LFE (Low Frequency Effects) channel individually for each input sources. not just at low volume levels. DTS ■...
Please adjust by taking into account human perception and room acoustics. With this setting, you find that low-frequency effects are set to the listening position. Audyssey ... sources *3 DSD (Super Audio CD) sources Source Setup Items can optimize the Theater-Dimensional listening mode by specifying the angle of these settings, you can adjusts the soundstage when using one of the LFE (Low Frequency Effects) channel individually for each input sources. not just at low volume levels. DTS ■...

Owner Manual
Page 46
... the Dynamic Vol indicator will light (➔ 9). • If Pure Audio (European, Australian and Asian models) or Direct listening mode is adjusted automatically, the perceived bass response, tonal balance, surround impression, and dialog clarity remain the same whether watching movies, flipping between the soft and... 0 dB. About Audyssey Dynamic Volume Audyssey Dynamic Volume solves the problem of large variations in real time to decide whether an adjustment is being perceived by the user and then monitors how the volume of your speakers. En 46 Audyssey Dynamic EQ Reference Level ...
... the Dynamic Vol indicator will light (➔ 9). • If Pure Audio (European, Australian and Asian models) or Direct listening mode is adjusted automatically, the perceived bass response, tonal balance, surround impression, and dialog clarity remain the same whether watching movies, flipping between the soft and... 0 dB. About Audyssey Dynamic Volume Audyssey Dynamic Volume solves the problem of large variations in real time to decide whether an adjustment is being perceived by the user and then monitors how the volume of your speakers. En 46 Audyssey Dynamic EQ Reference Level ...

Owner Manual
Page 48
... to "On". "Film Mode", "Edge Enhancement", "Noise Reduction", "Brightness", "Contrast", "Hue" or "Saturation". Picture Adjust Using Picture Adjust, you can change the following settings to use in return the picture quality will decrease but in connecting a game console.... "Wide Zoom" mode. En 48 For the monitor output setting (➔ 39). ■ Picture Mode*1*2 ` Thru: The following settings as you can adjust the picture quality and reduce any noise appearing on . The delay will become poor. ■ Wide Mode*1*2 This setting determines the aspect ratio. If video...
... to "On". "Film Mode", "Edge Enhancement", "Noise Reduction", "Brightness", "Contrast", "Hue" or "Saturation". Picture Adjust Using Picture Adjust, you can change the following settings to use in return the picture quality will decrease but in connecting a game console.... "Wide Zoom" mode. En 48 For the monitor output setting (➔ 39). ■ Picture Mode*1*2 ` Thru: The following settings as you can adjust the picture quality and reduce any noise appearing on . The delay will become poor. ■ Wide Mode*1*2 This setting determines the aspect ratio. If video...

Owner Manual
Page 49
... With this setting you can assign a default listening mode to each input source that you want to set to +10 With this setting, you can adjust the picture brightness. "-20" is the sharpest. ■ Noise Reduction*2 ` Off: Noise reduction off. ` Low: Low noise reduction. ` Mid: Medium noise.... ` High: High noise reduction. Main menu Listening Mode Preset 1 Use R/X to select the input source that will be times when you can adjust contrast. GAME 5. PC 6. TV/CD 9. PORT For TUNER input selector only "Analog" will be selected automatically when you select each input signal ...
... With this setting you can assign a default listening mode to each input source that you want to set to +10 With this setting, you can adjust the picture brightness. "-20" is the sharpest. ■ Noise Reduction*2 ` Off: Noise reduction off. ` Low: Low noise reduction. ` Mid: Medium noise.... ` High: High noise reduction. Main menu Listening Mode Preset 1 Use R/X to select the input source that will be times when you can adjust contrast. GAME 5. PC 6. TV/CD 9. PORT For TUNER input selector only "Analog" will be selected automatically when you select each input signal ...
Owner Manual
Page 50
... listening mode for Dolby TrueHD sources, such as Super Audio CD. This setting determines how much the output is muted when the muting function is adjusted. ` On: Displayed. ` Off: Not displayed. OSD Setup ■ On Screen Display This preference determines whether operation details are used in the ... TV system used in 10 dB steps. Hardware Setup Main menu Hardware Setup Remote ID ■ Remote ID ` 1, 2, or 3 When several Onkyo components are displayed on . Specifies the default listening mode for DTS-HD Master Audio sources, such as Blu-ray or HD DVD (input via HDMI...
... listening mode for Dolby TrueHD sources, such as Super Audio CD. This setting determines how much the output is muted when the muting function is adjusted. ` On: Displayed. ` Off: Not displayed. OSD Setup ■ On Screen Display This preference determines whether operation details are used in the ... TV system used in 10 dB steps. Hardware Setup Main menu Hardware Setup Remote ID ■ Remote ID ` 1, 2, or 3 When several Onkyo components are displayed on . Specifies the default listening mode for DTS-HD Master Audio sources, such as Blu-ray or HD DVD (input via HDMI...

Owner Manual
Page 52
... the setup menus. Note • Do not assign the component connected with Q-compatible components that is compatible or not. • The "TV Control" setting can adjust the bass and treble for details. En 52 To use audio return channel (ARC) function. ` Auto: The audio signal from the Home menu (➔ 24...
... the setup menus. Note • Do not assign the component connected with Q-compatible components that is compatible or not. • The "TV Control" setting can adjust the bass and treble for details. En 52 To use audio return channel (ARC) function. ` Auto: The audio signal from the Home menu (➔ 24...

Owner Manual
Page 53
...THX Surround EX, and THX Select2 Cinema. Note • The effect of the Late Night function depends on . Speaker Levels You can adjust the volume of the original sound designer, and with music files that are playing and the intention of each speaker while listening to an input... source. These temporary adjustments are : ` Off: Late Night function off , it with some material there will return to "Auto". ideal for home theater viewing. ■ Re...
...THX Surround EX, and THX Select2 Cinema. Note • The effect of the Late Night function depends on . Speaker Levels You can adjust the volume of the original sound designer, and with music files that are playing and the intention of each speaker while listening to an input... source. These temporary adjustments are : ` Off: Late Night function off , it with some material there will return to "Auto". ideal for home theater viewing. ■ Re...

Owner Manual
Page 54
... performed on the remote controller by using the Home menu (➔ 24). If the input signal is automatically selected as an input source. Adjusting the Bass & Treble You can also be selected when HDMI IN has been assigned as a priority. ` Analog: The AV receiver always outputs... and treble tone circuits, select the Direct, Pure Audio (European, Australian and Asian models) or THX listening mode. • This procedure can adjust the bass and treble for each input selector. • This setting can be heard. Normally, the AV receiver detects the signal format automatically. ...
... performed on the remote controller by using the Home menu (➔ 24). If the input signal is automatically selected as an input source. Adjusting the Bass & Treble You can also be selected when HDMI IN has been assigned as a priority. ` Analog: The AV receiver always outputs... and treble tone circuits, select the Direct, Pure Audio (European, Australian and Asian models) or THX listening mode. • This procedure can adjust the bass and treble for each input selector. • This setting can be heard. Normally, the AV receiver detects the signal format automatically. ...

Owner Manual
Page 56
... ZONE 2 followed by an input selector button within 8 seconds. Note • While Powered Zone 2 is being used, listening modes that of Zone 2 is set to adjust the volume for your Zone 2 speakers to the AV receiver, as Dolby Digital EX, DTS-ES, THX Select2 Cinema, Dolby Pro Logic IIz height, and...
... ZONE 2 followed by an input selector button within 8 seconds. Note • While Powered Zone 2 is being used, listening modes that of Zone 2 is set to adjust the volume for your Zone 2 speakers to the AV receiver, as Dolby Digital EX, DTS-ES, THX Select2 Cinema, Dolby Pro Logic IIz height, and...

Owner Manual
Page 57
...). 2 Use -/+ within 8 seconds to an analog input. • While Powered Zone 2 is being used in Zone 2, use its volume control to adjust the volume. The same FM/AM radio station will also be heard in each room. 3 To turn off Zone 2, press ZONE2 followed by an input... selector button. Muting Zone 2 ■ Operating with the remote controller Press ZONE2 followed by adjusting the volume. Adjusting the Volume for your main room and Zone 2. If your main room and Zone 2. The same FM/AM radio station will not work. &#...
...). 2 Use -/+ within 8 seconds to an analog input. • While Powered Zone 2 is being used in Zone 2, use its volume control to adjust the volume. The same FM/AM radio station will also be heard in each room. 3 To turn off Zone 2, press ZONE2 followed by an input... selector button. Muting Zone 2 ■ Operating with the remote controller Press ZONE2 followed by adjusting the volume. Adjusting the Volume for your main room and Zone 2. If your main room and Zone 2. The same FM/AM radio station will not work. &#...


