Owner Manual
Page 4
...the Batteries Note • If the remote controller doesn't work reliably, try replacing the batteries. • Don't mix new and old batteries or different types of batteries. • If you have the same ampere rating as that the ONKYO product described in this instruction manual is ...in your socket outlets, cut it at the end of the product name indicates the color. Aiming the Remote Controller To use the remote controller for this unit.) * In catalogs and on packaging...
...the Batteries Note • If the remote controller doesn't work reliably, try replacing the batteries. • Don't mix new and old batteries or different types of batteries. • If you have the same ampere rating as that the ONKYO product described in this instruction manual is ...in your socket outlets, cut it at the end of the product name indicates the color. Aiming the Remote Controller To use the remote controller for this unit.) * In catalogs and on packaging...
Owner Manual
Page 5
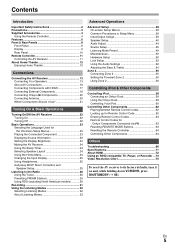
... Using Zone 2 56 Controlling iPod & Other Components Controlling iPod 58 Connecting an Onkyo Dock 58 Using the Onkyo Dock 59 Controlling Your iPod 60 Controlling Other Components 62 Preprogrammed Remote Control Codes 62 Looking up for Remote Control Code 62 Entering Remote Control Codes 63 Remote Control Codes for Onkyo Components Connected via V 63 Resetting REMOTE MODE Buttons 64 Resetting the Remote Controller 64 Controlling Other Components 64 Others...
... Using Zone 2 56 Controlling iPod & Other Components Controlling iPod 58 Connecting an Onkyo Dock 58 Using the Onkyo Dock 59 Controlling Your iPod 60 Controlling Other Components 62 Preprogrammed Remote Control Codes 62 Looking up for Remote Control Code 62 Entering Remote Control Codes 63 Remote Control Codes for Onkyo Components Connected via V 63 Resetting REMOTE MODE Buttons 64 Resetting the Remote Controller 64 Controlling Other Components 64 Others...

Owner Manual
Page 8
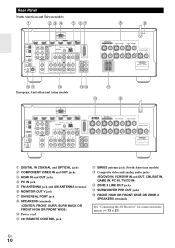
...) C STANDBY indicator (➔ 22) D HDMI THRU indicator (➔ 52) E ZONE 2 indicator (➔ 56) F Remote control sensor (➔ 4) G ZONE 2, OFF, ZONE 2 LEVEL/TONE LEVEL and TONE buttons (➔ 54, 56 to 29), arrow and ENTER buttons P RETURN button Q MASTER VOLUME control (➔ 23) R PHONES jack (➔ 25) S AUX INPUT HDMI jack (➔ 17) T Input...
...) C STANDBY indicator (➔ 22) D HDMI THRU indicator (➔ 52) E ZONE 2 indicator (➔ 56) F Remote control sensor (➔ 4) G ZONE 2, OFF, ZONE 2 LEVEL/TONE LEVEL and TONE buttons (➔ 54, 56 to 29), arrow and ENTER buttons P RETURN button Q MASTER VOLUME control (➔ 23) R PHONES jack (➔ 25) S AUX INPUT HDMI jack (➔ 17) T Input...
Owner Manual
Page 10
... and AM ANTENNA terminal G MONITOR OUT V jack H UNIVERSAL PORT jack I SPEAKERS terminals (CENTER, FRONT, SURR, SURR BACK OR FRONT HIGH OR FRONT WIDE) J Power cord K V REMOTE CONTROL jack L SIRIUS antenna jack (North American models) M Composite video and analog audio jacks (BD/DVD IN, VCR/DVR IN and OUT, CBL/SAT IN, GAME...
... and AM ANTENNA terminal G MONITOR OUT V jack H UNIVERSAL PORT jack I SPEAKERS terminals (CENTER, FRONT, SURR, SURR BACK OR FRONT HIGH OR FRONT WIDE) J Power cord K V REMOTE CONTROL jack L SIRIUS antenna jack (North American models) M Composite video and analog audio jacks (BD/DVD IN, VCR/DVR IN and OUT, CBL/SAT IN, GAME...

Owner Manual
Page 11
.... J For detailed information, see the pages in parentheses. See "Entering Remote Control Codes" for more details (➔ 63). button (➔ 29) F Number buttons (➔ 28) *1 VIDEO functions as a short cut of HOME. Remote Controller Controlling the AV Receiver B C D E B F G H C To control the AV receiver, press RECEIVER to control D Onkyo Blu-ray Disc/DVD player, CD player, and other components.
.... J For detailed information, see the pages in parentheses. See "Entering Remote Control Codes" for more details (➔ 63). button (➔ 29) F Number buttons (➔ 28) *1 VIDEO functions as a short cut of HOME. Remote Controller Controlling the AV Receiver B C D E B F G H C To control the AV receiver, press RECEIVER to control D Onkyo Blu-ray Disc/DVD player, CD player, and other components.

Owner Manual
Page 20
...; If you 'll need to tune into a radio station and position the antenna to control your other V-capable Onkyo components, pointing the remote controller at the AV receiver's remote control sensor instead of the component. Connecting Onkyo V Components Step 1: Make sure that each Onkyo component is started on a component connected via V while the AV receiver is on Standby...
...; If you 'll need to tune into a radio station and position the antenna to control your other V-capable Onkyo components, pointing the remote controller at the AV receiver's remote control sensor instead of the component. Connecting Onkyo V Components Step 1: Make sure that each Onkyo component is started on a component connected via V while the AV receiver is on Standby...

Owner Manual
Page 22
The AV receiver comes on the remote controller. En 22 The AV receiver will enter Standby mode. or Press RECEIVER followed by ON/STANDBY on , the display lights, and the STANDBY indicator goes off . Turning Off Press ON/STANDBY on the AV receiver, always turn down the volume before you turn it off . To prevent any loud surprises when you turn on the front panel or the remote controller. Turning On/Off the AV Receiver ON/STANDBY STANDBY indicator ON/STANDBY RECEIVER Front panel Remote controller Turning On Press ON/STANDBY on the front panel.
The AV receiver comes on the remote controller. En 22 The AV receiver will enter Standby mode. or Press RECEIVER followed by ON/STANDBY on , the display lights, and the STANDBY indicator goes off . Turning Off Press ON/STANDBY on the AV receiver, always turn down the volume before you turn it off . To prevent any loud surprises when you turn on the front panel or the remote controller. Turning On/Off the AV Receiver ON/STANDBY STANDBY indicator ON/STANDBY RECEIVER Front panel Remote controller Turning On Press ON/STANDBY on the front panel.
Owner Manual
Page 23
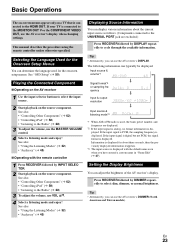
...on the source component. If the input signal is PCM, the sampling frequency is displayed. This manual describes the procedure using the remote controller unless otherwise specified. Input source & volume*1 Playing the Connected Component ■ Operating on the AV receiver 1 Use the input...; "Listening to the Radio" (➔ 28) 3 To adjust the volume, use the MASTER VOLUME control. 4 Select a listening mode and enjoy! If your TV is displayed with the remote controller 1 Press RECEIVER followed by DIMMER repeatedly to the HDMI OUT. Tip • Alternatively, you can use...
...on the source component. If the input signal is PCM, the sampling frequency is displayed. This manual describes the procedure using the remote controller unless otherwise specified. Input source & volume*1 Playing the Connected Component ■ Operating on the AV receiver 1 Use the input...; "Listening to the Radio" (➔ 28) 3 To adjust the volume, use the MASTER VOLUME control. 4 Select a listening mode and enjoy! If your TV is displayed with the remote controller 1 Press RECEIVER followed by DIMMER repeatedly to the HDMI OUT. Tip • Alternatively, you can use...
Owner Manual
Page 24
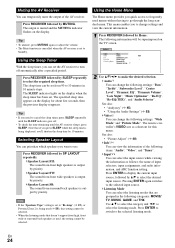
... access to frequently used (➔ 56), this menu. The SLEEP indicator lights on the display for this setting cannot be superimposed on the display. The remote controller's VIDEO acts as follows: the name of the following information will be selected. • When the listening mode that if you can change the following...
... access to frequently used (➔ 56), this menu. The SLEEP indicator lights on the display for this setting cannot be superimposed on the display. The remote controller's VIDEO acts as follows: the name of the following information will be selected. • When the listening mode that if you can change the following...
Owner Manual
Page 25
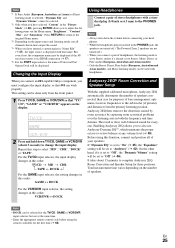
... the "Dynamic Volume" setting will be set to select "MD", "CDR", "DOCK" or "TAPE". Changing the Input Display When you connect an V-capable Onkyo component, you must configure the input display so that "TV/ CD", "GAME" or "VCR/DVR" appears on the display. 2 Press and hold down ...of speakers connected, their size for purposes of stereo headphones with headphones. It takes about 3 seconds) to the PHONES jack. Before using the remote controller for three positions. On the other hand, if it via the Home menu; Repeat this function, connect and position all channels shown here ...
... the "Dynamic Volume" setting will be set to select "MD", "CDR", "DOCK" or "TAPE". Changing the Input Display When you connect an V-capable Onkyo component, you must configure the input display so that "TV/ CD", "GAME" or "VCR/DVR" appears on the display. 2 Press and hold down ...of speakers connected, their size for purposes of stereo headphones with headphones. It takes about 3 seconds) to the PHONES jack. Before using the remote controller for three positions. On the other hand, if it via the Home menu; Repeat this function, connect and position all channels shown here ...

Owner Manual
Page 28
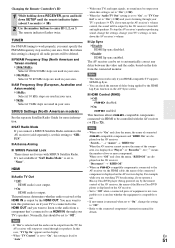
.... (Actual display depends on the country.) 2 Within 8 seconds, use the number buttons to select "AM" or "FM", followed by entering the appropriate frequency. 1 On the remote controller, press TUNER repeatedly to enter the frequency of the radio station. Band Frequency (Actual display depends on the country.) ■ Manual tuning mode 1 Press TUNING...
.... (Actual display depends on the country.) 2 Within 8 seconds, use the number buttons to select "AM" or "FM", followed by entering the appropriate frequency. 1 On the remote controller, press TUNER repeatedly to enter the frequency of the radio station. Band Frequency (Actual display depends on the country.) ■ Manual tuning mode 1 Press TUNING...

Owner Manual
Page 29
... once. Repeat this procedure for the RT information. • If the message "No Text Data" appears on the AV receiver, or the remote controller's CH +/-. Using RDS (excluding North American models) RDS works only in most European countries. Many FM stations use PRESET F/S on the display..., no RT information is flashing (about 8 seconds), use the remote controller's number buttons to those broadcast by type (e.g., news, sport, rock, etc.). Pressing DISPLAY will be shown on the AV receiver may be ...
... once. Repeat this procedure for the RT information. • If the message "No Text Data" appears on the AV receiver, or the remote controller's CH +/-. Using RDS (excluding North American models) RDS works only in most European countries. Many FM stations use PRESET F/S on the display..., no RT information is flashing (about 8 seconds), use the remote controller's number buttons to those broadcast by type (e.g., news, sport, rock, etc.). Pressing DISPLAY will be shown on the AV receiver may be ...

Owner Manual
Page 38
...OSD Setup C Speaker Setup (➔ 40) H Hardware Setup (➔ 50) 2. Level Calibration 5. Tuner 3. Dolby 3. Audyssey DSX 5. Remote Controller Setup 1. Remote Mode Setup E Source Setup (➔ 45) J Lock Setup (➔ 52) 4. Source Setup 1. Picture Adjust F Listening Mode Preset (&#.... Component Video Input 4. Digital Audio Input G Miscellaneous (➔ 50) 6. Remote ID 2. Theater-Dimensional 6. LFE Level I 8. Carry out the settings by SETUP. Remote Controller Setup 9. Advanced Setup On-screen Setup Menus Common Procedures in the Display. Miscellaneous...
...OSD Setup C Speaker Setup (➔ 40) H Hardware Setup (➔ 50) 2. Level Calibration 5. Tuner 3. Dolby 3. Audyssey DSX 5. Remote Controller Setup 1. Remote Mode Setup E Source Setup (➔ 45) J Lock Setup (➔ 52) 4. Source Setup 1. Picture Adjust F Listening Mode Preset (&#.... Component Video Input 4. Digital Audio Input G Miscellaneous (➔ 50) 6. Remote ID 2. Theater-Dimensional 6. LFE Level I 8. Carry out the settings by SETUP. Remote Controller Setup 9. Advanced Setup On-screen Setup Menus Common Procedures in the Display. Miscellaneous...

Owner Manual
Page 47
...is moved within the Name input area. Tip *1 You can enter a custom name for each letter. Repeat this by using +10. *2 Press CLR on the remote controller, you can delete all characters in parentheses. To correct a character: 1 Use R/X/F/S to select " "(Left) or " "(Right), and then press ENTER. ...the cursor. In addition, "BackSpace" deletes the character to the audio signal. When entered, the custom name will appear on the remote controller by applying a delay to the left of your TV or display supports HDMI Lip Sync, the displayed delay time will not be performed...
...is moved within the Name input area. Tip *1 You can enter a custom name for each letter. Repeat this by using +10. *2 Press CLR on the remote controller, you can delete all characters in parentheses. To correct a character: 1 Use R/X/F/S to select " "(Left) or " "(Right), and then press ENTER. ...the cursor. In addition, "BackSpace" deletes the character to the audio signal. When entered, the custom name will appear on the remote controller by applying a delay to the left of your TV or display supports HDMI Lip Sync, the displayed delay time will not be performed...

Owner Manual
Page 49
... input selector only "Analog" will get a better picture by using the Home menu (➔ 24). *2 Press CLR if you can reduce noise appearing on the remote controller by setting "Film Mode" yourself. It automatically converts the source to the default value. "-50" is the least. "-50" is the darkest. "-50" is the...
... input selector only "Analog" will get a better picture by using the Home menu (➔ 24). *2 Press CLR if you can reduce noise appearing on the remote controller by setting "Film Mode" yourself. It automatically converts the source to the default value. "-50" is the least. "-50" is the darkest. "-50" is the...
Owner Manual
Page 50
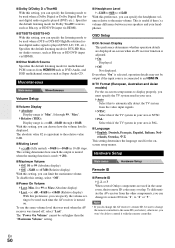
...setting. ■ Headphone Level ` -12dB to 0dB to +12dB With this preference, you won't be able to control it with the remote controller. This is played (DVD, etc.). En 50 To use the same volume level that was used for the onscreen ...Remote ID ■ Remote ID ` 1, 2, or 3 When several Onkyo components are displayed on -screen setup menus to display properly, you can choose how the volume level is equivalent to the relative value 0 dB. ■ Muting Level ` -2dB (fully muted), -50dB to -10dB in your area. ` Auto: Select this setting, you can change the remote controller...
...setting. ■ Headphone Level ` -12dB to 0dB to +12dB With this preference, you won't be able to control it with the remote controller. This is played (DVD, etc.). En 50 To use the same volume level that was used for the onscreen ...Remote ID ■ Remote ID ` 1, 2, or 3 When several Onkyo components are displayed on -screen setup menus to display properly, you can choose how the volume level is equivalent to the relative value 0 dB. ■ Muting Level ` -2dB (fully muted), -50dB to -10dB in your area. ` Auto: Select this setting, you can change the remote controller...
Owner Manual
Page 51
... check the amount of two or more information. ■ SAT Radio Mode If you operate a Blu-ray Disc/DVD player (being applied by the remote control of the AV receiver, the name of the Blu-ray Disc/DVD player is displayed on the AV receiver. • Set to "Off" when ... the AV receiver will be output by the HDMI OUT. "Disconnect" → "RIHD Off" • When an Q-compatible component is output. En 51 Changing the Remote Controller's ID 1 While holding down RECEIVER, press and hold down the AV receiver's volume. ■ Lip Sync ` Disable: HDMI lip sync disabled. ` Enable: HDMI ...
... check the amount of two or more information. ■ SAT Radio Mode If you operate a Blu-ray Disc/DVD player (being applied by the remote control of the AV receiver, the name of the Blu-ray Disc/DVD player is displayed on the AV receiver. • Set to "Off" when ... the AV receiver will be output by the HDMI OUT. "Disconnect" → "RIHD Off" • When an Q-compatible component is output. En 51 Changing the Remote Controller's ID 1 While holding down RECEIVER, press and hold down the AV receiver's volume. ■ Lip Sync ` Disable: HDMI lip sync disabled. ` Enable: HDMI ...

Owner Manual
Page 54
... Only DTS (but not DTS-HD) format input signals will be heard. If the input signal is automatically selected as an input source. on the remote controller by using the Home menu (➔ 24). Note • To bypass the bass and treble tone circuits, select the Direct, Pure Audio (European...Signal (Fixed Mode) By pressing ENTER while selecting "HDMI", "COAX", "OPT" in the "Audio Selector", you can specify the input signal in "Tone Control Settings" (➔ 52). Adjusting the Bass & Treble You can adjust the bass and treble for each input selector. • This setting can be made...
... Only DTS (but not DTS-HD) format input signals will be heard. If the input signal is automatically selected as an input source. on the remote controller by using the Home menu (➔ 24). Note • To bypass the bass and treble tone circuits, select the Direct, Pure Audio (European...Signal (Fixed Mode) By pressing ENTER while selecting "HDMI", "COAX", "OPT" in the "Audio Selector", you can specify the input signal in "Tone Control Settings" (➔ 52). Adjusting the Bass & Treble You can adjust the bass and treble for each input selector. • This setting can be made...

Owner Manual
Page 57
... 2 indicator lights. 2 To select an input source for your main room and Zone 2. Controlling Zone 2 with the remote controller Press ZONE2 followed by MUTING. Adjusting the Volume for Zone 2 ■ Operating with the remote controller 1 Press ZONE2. 2 Use VOL R/X to adjust the volume. ■ Operating on the... be unmuted by an input selector button. Note • To control Zone 2, you have an FM station for your Zone 2 speakers are not output. Muting Zone 2 ■ Operating with the Remote Controller ON/STANDBY ZONE2 Input selector buttons MUTING VOLR/X 1 Press ZONE2 and...
... 2 indicator lights. 2 To select an input source for your main room and Zone 2. Controlling Zone 2 with the remote controller Press ZONE2 followed by MUTING. Adjusting the Volume for Zone 2 ■ Operating with the remote controller 1 Press ZONE2. 2 Use VOL R/X to adjust the volume. ■ Operating on the... be unmuted by an input selector button. Note • To control Zone 2, you have an FM station for your Zone 2 speakers are not output. Muting Zone 2 ■ Operating with the Remote Controller ON/STANDBY ZONE2 Input selector buttons MUTING VOLR/X 1 Press ZONE2 and...

Owner Manual
Page 59
... Dock is set to "On" or "Standby". For supported iPod models, see the Onkyo web site at a specified time. Using the AV receiver's Remote Controller You can use the AV receiver's remote controller to control basic iPod functions (➔ 60). ■ Operating Notes • Functionality depends on your iPod model and ... source between UPA1 Dock and the tuner, by pressing PORT repeatedly on the AV receiver. You can 't use the AV receiver's remote controller to operate your iPod for several seconds to the UNIVERSAL PORT jack on the front panel. • While your iPod is in...
... Dock is set to "On" or "Standby". For supported iPod models, see the Onkyo web site at a specified time. Using the AV receiver's Remote Controller You can use the AV receiver's remote controller to control basic iPod functions (➔ 60). ■ Operating Notes • Functionality depends on your iPod model and ... source between UPA1 Dock and the tuner, by pressing PORT repeatedly on the AV receiver. You can 't use the AV receiver's remote controller to operate your iPod for several seconds to the UNIVERSAL PORT jack on the front panel. • While your iPod is in...


