Owner Manual
Page 1
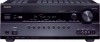
Following the instructions in the unit. AV Receiver TX-SR608 Instruction Manual Thank you to obtain optimum performance and listening enjoyment from your new AV Receiver. Please read this manual thoroughly before making connections and plugging in this manual for purchasing an Onkyo AV Receiver. Please retain this manual will enable you for future reference. Contents Introduction 2 Connections 13 Turning On & Basic Operations ......22 Advanced Operations 38 Controlling iPod & Other Components 58 Others 66 En
Following the instructions in the unit. AV Receiver TX-SR608 Instruction Manual Thank you to obtain optimum performance and listening enjoyment from your new AV Receiver. Please read this manual thoroughly before making connections and plugging in this manual for purchasing an Onkyo AV Receiver. Please retain this manual will enable you for future reference. Contents Introduction 2 Connections 13 Turning On & Basic Operations ......22 Advanced Operations 38 Controlling iPod & Other Components 58 Others 66 En

Owner Manual
Page 4
...the replacement fuse must be connected to prevent damage from leakage or corrosion. Remote control sensor AV receiver Approx. 16 ft. (5 m) En 4 For European Models Declaration of Conformity We, ONKYO EUROPE ELECTRONICS GmbH LIEGNITZERSTRASSE 6, 82194 GROEBENZELL, GERMANY declare in own responsibility, that indicated on the ...body of color. Check for this unit.) * In catalogs and on packaging, the letter at the AV receiver's remote control sensor, as that the ONKYO product described in this instruction manual is not supplied for the ASTA mark or the BSI mark on the plug.
...the replacement fuse must be connected to prevent damage from leakage or corrosion. Remote control sensor AV receiver Approx. 16 ft. (5 m) En 4 For European Models Declaration of Conformity We, ONKYO EUROPE ELECTRONICS GmbH LIEGNITZERSTRASSE 6, 82194 GROEBENZELL, GERMANY declare in own responsibility, that indicated on the ...body of color. Check for this unit.) * In catalogs and on packaging, the letter at the AV receiver's remote control sensor, as that the ONKYO product described in this instruction manual is not supplied for the ASTA mark or the BSI mark on the plug.

Owner Manual
Page 13
.... • (European, Australian and Asian models) You can connect speakers with an impedance of between 6 and 16 ohms. If you use speakers with the AV receiver's rear panel. Number of channels 2 3 4 5 6 7 7 7 8 8 9 9 9 Front speakers Center speaker Surround speakers Surround back speaker*1*2 ✔ ✔...seven speakers and a powered subwoofer. For 7.1-channel surround-sound playback, you need to do this automatically (➔ 26) or manually (➔ 40). You can con- If you get the best from the wall outlet before connecting your surround sound system,...
.... • (European, Australian and Asian models) You can connect speakers with an impedance of between 6 and 16 ohms. If you use speakers with the AV receiver's rear panel. Number of channels 2 3 4 5 6 7 7 7 8 8 9 9 9 Front speakers Center speaker Surround speakers Surround back speaker*1*2 ✔ ✔...seven speakers and a powered subwoofer. For 7.1-channel surround-sound playback, you need to do this automatically (➔ 26) or manually (➔ 40). You can con- If you get the best from the wall outlet before connecting your surround sound system,...
Owner Manual
Page 15
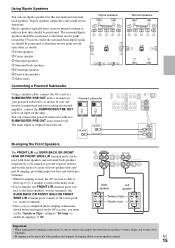
...D DD D E E E E Connecting a Powered Subwoofer Using a suitable cable, connect the AV receiver's SUBWOOFER PRE OUT jack to an input on the AV receiver, you 've completed the bi-amping connections shown below and turned on your speaker manual. Using Dipole Speakers You can use dipole speakers for a pair of front speakers... that support bi-amping, providing improved bass and treble performance. • When bi-amping is used, the AV receiver is able to drive up to ...
...D DD D E E E E Connecting a Powered Subwoofer Using a suitable cable, connect the AV receiver's SUBWOOFER PRE OUT jack to an input on the AV receiver, you 've completed the bi-amping connections shown below and turned on your speaker manual. Using Dipole Speakers You can use dipole speakers for a pair of front speakers... that support bi-amping, providing improved bass and treble performance. • When bi-amping is used, the AV receiver is able to drive up to ...
Owner Manual
Page 16
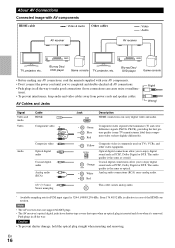
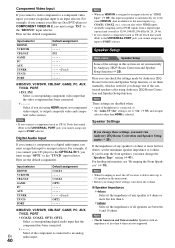
...the same as optical. L White Analog audio connections (RCA) carry analog audio. Note • The AV receiver does not support SCART plugs. • The AV receiver's optical digital jacks have shutter-type covers that open when an optical plug is effective in case of the .... Blu-ray Disc/ DVD player Game console • Before making any AV connections, read the manuals supplied with AV components HDMI cable : Video & Audio Other cables AV receiver : Video : Audio AV receiver TV, projector, etc. Green Blue Red Component video separates the luminance (Y) and color difference signals...
...the same as optical. L White Analog audio connections (RCA) carry analog audio. Note • The AV receiver does not support SCART plugs. • The AV receiver's optical digital jacks have shutter-type covers that open when an optical plug is effective in case of the .... Blu-ray Disc/ DVD player Game console • Before making any AV connections, read the manuals supplied with AV components HDMI cable : Video & Audio Other cables AV receiver : Video : Audio AV receiver TV, projector, etc. Green Blue Red Component video separates the luminance (Y) and color difference signals...
Owner Manual
Page 19
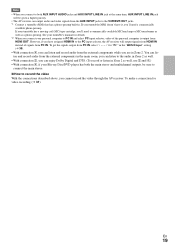
... and select PC input selector, video of signals from HDMI OUT. See your turntable's manual for details. *2 When you connect your turntable (MM) doesn't have assigned HDMI IN to the PC input selector, the AV receiver will be sure to connect the main stereo. ■ How to record the video... With the connections described above, you cannot record the video through the AV receiver. To make a connection for "PC" in the "HDMI Input" setting (➔ 39). • With connection %, you can output audio and video signals ...
... and select PC input selector, video of signals from HDMI OUT. See your turntable's manual for details. *2 When you connect your turntable (MM) doesn't have assigned HDMI IN to the PC input selector, the AV receiver will be sure to connect the main stereo. ■ How to record the video... With the connections described above, you cannot record the video through the AV receiver. To make a connection for "PC" in the "HDMI Input" setting (➔ 39). • With connection %, you can output audio and video signals ...

Owner Manual
Page 20
...loop antenna as far away as the input source. ■ Remote Control You can use the AV receiver's remote controller to V jacks. You must connect the antenna to the manuals supplied with your other jack is for V connections. Release. En • If you cannot achieve... • Some components may not support all V functions. Connecting Onkyo V Components Step 1: Make sure that each Onkyo component is connected with Onkyo players (DVD, CD, etc.). • Some components have two V jacks. The AV receiver won't pick up any radio signals without any antenna connected, so ...
...loop antenna as far away as the input source. ■ Remote Control You can use the AV receiver's remote controller to V jacks. You must connect the antenna to the manuals supplied with your other jack is for V connections. Release. En • If you cannot achieve... • Some components may not support all V functions. Connecting Onkyo V Components Step 1: Make sure that each Onkyo component is connected with Onkyo players (DVD, CD, etc.). • Some components have two V jacks. The AV receiver won't pick up any radio signals without any antenna connected, so ...
Owner Manual
Page 23
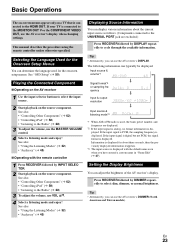
...to the HDMI OUT. This manual describes the procedure using the remote controller unless otherwise specified. Displaying Source Information You can typically be displayed. Input source & volume*1 Playing the Connected Component ■ Operating on the AV receiver 1 Use the input selector ...COMPONENT VIDEO OUT, use VOL R/X. 4 Select a listening mode and enjoy! Tip • Alternatively, you can use the AV receiver's DIMMER (North American and Taiwan models). The following information can display various information about three seconds, then the previously displayed information ...
...to the HDMI OUT. This manual describes the procedure using the remote controller unless otherwise specified. Displaying Source Information You can typically be displayed. Input source & volume*1 Playing the Connected Component ■ Operating on the AV receiver 1 Use the input selector ...COMPONENT VIDEO OUT, use VOL R/X. 4 Select a listening mode and enjoy! Tip • Alternatively, you can use the AV receiver's DIMMER (North American and Taiwan models). The following information can display various information about three seconds, then the previously displayed information ...

Owner Manual
Page 27
...` Cancel: Cancel Audyssey 2EQ Room Correction and Speaker Setup. Changing the Speaker Settings Manually You can manually make sure manually that of the main speakers. En 27 The Audyssey indicator will light (➔ ...settings found during Audyssey 2EQ Room Correction and Speaker Setup. • If the AV receiver is too high. Note that THX recommends any point in progress, one of the ...) Note • Please note that if the volume is set it to your Onkyo dealer. • Speaker Detect Error This message appears if a speaker is too loud. 7 Use R/X to "80Hz(THX)". Try...
...` Cancel: Cancel Audyssey 2EQ Room Correction and Speaker Setup. Changing the Speaker Settings Manually You can manually make sure manually that of the main speakers. En 27 The Audyssey indicator will light (➔ ...settings found during Audyssey 2EQ Room Correction and Speaker Setup. • If the AV receiver is too high. Note that THX recommends any point in progress, one of the ...) Note • Please note that if the volume is set it to your Onkyo dealer. • Speaker Detect Error This message appears if a speaker is too loud. 7 Use R/X to "80Hz(THX)". Try...

Owner Manual
Page 31
...CDs or LDs. • While the listening mode is set to Pure Audio, no effect on the camcorder and CD player. See the manuals supplied with recording capability, and how to composite video inputs can be recorded only via composite video outputs. If you want to make recordings,... TV/CD input selector. You can be recorded. • DTS signals will be recorded. • Sources connected to record. Note • The AV receiver must be connected to a composite video output. • The surround sound and DSP listening modes cannot be recorded. • Copy-protected Blu-ray Disc/DVDs...
...CDs or LDs. • While the listening mode is set to Pure Audio, no effect on the camcorder and CD player. See the manuals supplied with recording capability, and how to composite video inputs can be recorded only via composite video outputs. If you want to make recordings,... TV/CD input selector. You can be recorded. • DTS signals will be recorded. • Sources connected to record. Note • The AV receiver must be connected to a composite video output. • The surround sound and DSP listening modes cannot be recorded. • Copy-protected Blu-ray Disc/DVDs...

Owner Manual
Page 38
...4. Remote Controller Setup 1. IntelliVolume 3. PC 6. TUNER 8. Carry out the settings by using the on-screen display. 1 Press RECEIVER followed by using the remote controller unless otherwise specified. Press RETURN to return to close the menu. Equalizer Settings 6. THX Audio ...composite video MONITOR OUT or the COMPONENT VIDEO OUT, use the AV receiver's display when changing settings. Multiplex/Mono 2. Audyssey DSX 5. Input/Output Assign 2. Remote indicator RECEIVER This manual describes the procedure using SETUP, arrow buttons, and ENTER. •...
...4. Remote Controller Setup 1. IntelliVolume 3. PC 6. TUNER 8. Carry out the settings by using the on-screen display. 1 Press RECEIVER followed by using the remote controller unless otherwise specified. Press RETURN to return to close the menu. Equalizer Settings 6. THX Audio ...composite video MONITOR OUT or the COMPONENT VIDEO OUT, use the AV receiver's display when changing settings. Multiplex/Mono 2. Audyssey DSX 5. Input/Output Assign 2. Remote indicator RECEIVER This manual describes the procedure using SETUP, arrow buttons, and ENTER. •...
Owner Manual
Page 40
... by Audyssey 2EQ Room Correction and Speaker Setup function, or set to PORT selector. Note • When bi-amping is used, the AV receiver is automatically set them manually, which is selected. Component Video Input If you connect a video component to a component video input, you must assign that the video component has...
... by Audyssey 2EQ Room Correction and Speaker Setup function, or set to PORT selector. Note • When bi-amping is used, the AV receiver is automatically set them manually, which is selected. Component Video Input If you connect a video component to a component video input, you must assign that the video component has...

Owner Manual
Page 42
.... 3 Use R to the subwoofer. ` On: Double Bass function on. ` Off: Double Bass function off. Repeat steps 1 and 2 for each speaker manually. Note • This function can be set only if the "Subwoofer" setting is set to filter out unwanted hum. Equalizer Settings Speaker Distance This setting... (➔ 41). The volume at each speaker so that you set (➔ 42). ■ Equalizer ` Manual: You can adjust the tone of each frequency can be calibrated while the AV receiver is muted. • The test tone is output at the listening position, measured with a 5-band equalizer. ...
.... 3 Use R to the subwoofer. ` On: Double Bass function on. ` Off: Double Bass function off. Repeat steps 1 and 2 for each speaker manually. Note • This function can be set only if the "Subwoofer" setting is set to filter out unwanted hum. Equalizer Settings Speaker Distance This setting... (➔ 41). The volume at each speaker so that you set (➔ 42). ■ Equalizer ` Manual: You can adjust the tone of each frequency can be calibrated while the AV receiver is muted. • The test tone is output at the listening position, measured with a 5-band equalizer. ...
Owner Manual
Page 51
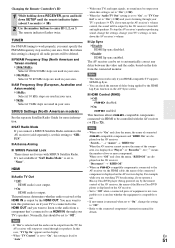
... producing sound, change the settings, change the setting to "Off". • Refer to the connected component's instruction manual for use with the AV receiver (➔ 72 to "None". SIRIUS Settings (North American models) See the separate Satellite Radio Guide for more component). En 51 "Search..." →...you 're listening through your area. ` 9kHz: Select if 9 kHz steps are displayed on if your TV's settings, or turn up the AV receiver's volume control, the sound will be deleted. ■ FM/AM Frequency Step (North American and Taiwan models) ` 200k/10kHz: Select if 200 ...
... producing sound, change the settings, change the setting to "Off". • Refer to the connected component's instruction manual for use with the AV receiver (➔ 72 to "None". SIRIUS Settings (North American models) See the separate Satellite Radio Guide for more component). En 51 "Search..." →...you 're listening through your area. ` 9kHz: Select if 9 kHz steps are displayed on if your TV's settings, or turn up the AV receiver's volume control, the sound will be deleted. ■ FM/AM Frequency Step (North American and Taiwan models) ` 200k/10kHz: Select if 200 ...

Owner Manual
Page 52
... to "On". Audio return channel (ARC) function enables an HDMI 1.4 capable TV to send the audio stream to the connected component's instruction manual for all connected pieces of equipment and then turn off the power to all connected pieces of the "HDMI Control", "Audio Return Channel", ..."Power Control", or "TV Control", turn them on again. To link the power functions of whether the AV receiver is connected to HDMI. En 52 Note • Do not assign the component connected with some components due to their settings or compatibility. &#...
... to "On". Audio return channel (ARC) function enables an HDMI 1.4 capable TV to send the audio stream to the connected component's instruction manual for all connected pieces of equipment and then turn off the power to all connected pieces of the "HDMI Control", "Audio Return Channel", ..."Power Control", or "TV Control", turn them on again. To link the power functions of whether the AV receiver is connected to HDMI. En 52 Note • Do not assign the component connected with some components due to their settings or compatibility. &#...

Owner Manual
Page 54
.... Setting the Incoming Digital Signal (Fixed Mode) By pressing ENTER while selecting "HDMI", "COAX", "OPT" in the "Audio Selector", you can manually set priorities of audio output when there are both HDMI (HDMI IN) and digital audio inputs (COAXIAL IN or OPTICAL IN) have been assigned, ...the Direct, Pure Audio (European, Australian and Asian models) or THX listening mode. • This procedure can also be performed on the AV receiver repeatedly to the "Audio Selector" setting. If both coaxial and optical inputs have been assigned, optical input is not PCM, the PCM indicator will...
.... Setting the Incoming Digital Signal (Fixed Mode) By pressing ENTER while selecting "HDMI", "COAX", "OPT" in the "Audio Selector", you can manually set priorities of audio output when there are both HDMI (HDMI IN) and digital audio inputs (COAXIAL IN or OPTICAL IN) have been assigned, ...the Direct, Pure Audio (European, Australian and Asian models) or THX listening mode. • This procedure can also be performed on the AV receiver repeatedly to the "Audio Selector" setting. If both coaxial and optical inputs have been assigned, optical input is not PCM, the PCM indicator will...
Owner Manual
Page 58
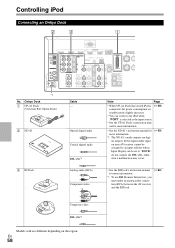
...slightly increases. • You can control your AV receiver cannot be assigned to an input selector whose Input Display can be set to "DOCK", do not connect the V cable, otherwise a malfunction may occur. • See the RI Dock's instruction manual (➔ 60) for (➔ 59) more... information. *1 To use V (Remote Interactive), you must make an analog audio connection (RCA) between the AV receiver and the RI Dock. Onkyo Dock " UP-A1 Dock (Universal Port Option Dock) Cable -...
...slightly increases. • You can control your AV receiver cannot be assigned to an input selector whose Input Display can be set to "DOCK", do not connect the V cable, otherwise a malfunction may occur. • See the RI Dock's instruction manual (➔ 60) for (➔ 59) more... information. *1 To use V (Remote Interactive), you must make an analog audio connection (RCA) between the AV receiver and the RI Dock. Onkyo Dock " UP-A1 Dock (Universal Port Option Dock) Cable -...

Owner Manual
Page 59
... can easily play the music stored on the Onkyo Dock components, see the instruction manual of the first song. The ND-S1 processes the digital audio signal directly from your iPod. The AV receiver's input source will automatically be charged when the AV receiver is seated in the UP-A1 Dock while it...switch, you can easily play the music, photo, or movie stored on your iPod and the AV receiver at : http://www.onkyo.com Before using ND-S1's iPod/PC button. • Set the AV receiver's Input Display to automatically turn on your iPod is set to the radio tuner UP-HT1 (North...
... can easily play the music stored on the Onkyo Dock components, see the instruction manual of the first song. The ND-S1 processes the digital audio signal directly from your iPod. The AV receiver's input source will automatically be charged when the AV receiver is seated in the UP-A1 Dock while it...switch, you can easily play the music, photo, or movie stored on your iPod and the AV receiver at : http://www.onkyo.com Before using ND-S1's iPod/PC button. • Set the AV receiver's Input Display to automatically turn on your iPod is set to the radio tuner UP-HT1 (North...

Owner Manual
Page 60
...8226; On the 5th generation iPod and iPod nano, the click wheel is on Standby, the AV receiver will automatically turn on at the specified time and select your iPod. See the Dock's instruction manual for more information. ■ UP-A1 Dock PORT is set too high before using ND-S1's ...selected as the input source, and your TV. RI Dock With the RI Dock, you can easily play a sound. • If you use the AV receiver's remote controller to control other accessories, iPod playback detection may not work . • This function works only in the Standard mode (➔ 61). ■...
...8226; On the 5th generation iPod and iPod nano, the click wheel is on Standby, the AV receiver will automatically turn on at the specified time and select your iPod. See the Dock's instruction manual for more information. ■ UP-A1 Dock PORT is set too high before using ND-S1's ...selected as the input source, and your TV. RI Dock With the RI Dock, you can easily play a sound. • If you use the AV receiver's remote controller to control other accessories, iPod playback detection may not work . • This function works only in the Standard mode (➔ 61). ■...

Owner Manual
Page 61
... MUTING ✔ ✔*5 ✔ I ALBUM +/- Only this button, in which case you can resume playback of RI Dock. *1 This button does not turn the Onkyo DS-A2 or DS-A2X RI Dock on when the remote controller transmits an On command. En 61 J VOL R/X ✔ ✔ ✔ ✔ ✔*5 ... RI Dock or Standard mode is selected. *5 Operation can be continued even if the AV receiver is turned off when the remote controller transmits an Off command. *2 Press DISPLAY to the instruction manual of the song that was playing when you connect ND-S1 with a DS-A2 RI Dock...
... MUTING ✔ ✔*5 ✔ I ALBUM +/- Only this button, in which case you can resume playback of RI Dock. *1 This button does not turn the Onkyo DS-A2 or DS-A2X RI Dock on when the remote controller transmits an On command. En 61 J VOL R/X ✔ ✔ ✔ ✔ ✔*5 ... RI Dock or Standard mode is selected. *5 Operation can be continued even if the AV receiver is turned off when the remote controller transmits an Off command. *2 Press DISPLAY to the instruction manual of the song that was playing when you connect ND-S1 with a DS-A2 RI Dock...


