Operating Instructions
Page 6
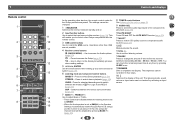
...controls are disabled when the listening mode is set to DIRECT. • When the front speaker is set above 150 Hz, the subwoofer channel level will enable you to control other devices, the remote control codes for standard decoding and to the display immediately previous when... and component control buttons DIRECT - Use to return to switch between the various surround modes (page 24). 7 BASS +/-, TREBLE +/- Press for the Onkyo products are not possible. 4 Receiver control buttons Q (QUICK MENU) - This will be controlled in the Speaker Setting (or automatically via the AccuEQ ...
...controls are disabled when the listening mode is set to DIRECT. • When the front speaker is set above 150 Hz, the subwoofer channel level will enable you to control other devices, the remote control codes for standard decoding and to the display immediately previous when... and component control buttons DIRECT - Use to return to switch between the various surround modes (page 24). 7 BASS +/-, TREBLE +/- Press for the Onkyo products are not possible. 4 Receiver control buttons Q (QUICK MENU) - This will be controlled in the Speaker Setting (or automatically via the AccuEQ ...
Operating Instructions
Page 8
The following guidelines should help you to get the best sound from your system. • The subwoofer can be at a wider angle. Putting the speakers on the floor (except the subwoofer), or mounting them very high on the floor. Also, make sure the center speaker does not cross.... 8 To achieve the best possible surround sound, install your speakers in the event of the front left and right surround speakers (SL/SR), and the subwoofer (SW), a 5.1 ch surround system can be more directly behind the listener than for surround speakers is just above or below . 5.1 channel surround system: ...
The following guidelines should help you to get the best sound from your system. • The subwoofer can be at a wider angle. Putting the speakers on the floor (except the subwoofer), or mounting them very high on the floor. Also, make sure the center speaker does not cross.... 8 To achieve the best possible surround sound, install your speakers in the event of the front left and right surround speakers (SL/SR), and the subwoofer (SW), a 5.1 ch surround system can be more directly behind the listener than for surround speakers is just above or below . 5.1 channel surround system: ...

Operating Instructions
Page 9
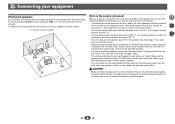
... match those on the left to the AC power source. 2 Connecting the speakers The receiver will work with a nominal impedance between 6 Ω and 16 Ω. Subwoofer LINE LEVEL INPUT Front right Surround right Connecting your equipment Center Front left 2 4 31 Surround left (L) terminal. Make sure you connect the speaker on the...
... match those on the left to the AC power source. 2 Connecting the speakers The receiver will work with a nominal impedance between 6 Ω and 16 Ω. Subwoofer LINE LEVEL INPUT Front right Surround right Connecting your equipment Center Front left 2 4 31 Surround left (L) terminal. Make sure you connect the speaker on the...

Operating Instructions
Page 16
...the ambient noise level. 8 Follow the instructions on-screen. • Make sure the microphone is connected. • Make sure the subwoofer is turned up for surround sound (AccuEQ Room Calibration) Place the supplied setup microphone in the AccuEQ Room Cal. Otherwise, place the ...The screensaver automatically starts after pressing ENTER. TUNING PRESET HOME ENTER RETURN TUNER USB MASTER VOLUME SETUP MIC USB 5V / 0.5A AV RECEIVER TX-SR353 If you cancel the AccuEQ Room Cal. 3: Basic Setup Automatically setting up . • See below for notes regarding background noise and ...
...the ambient noise level. 8 Follow the instructions on-screen. • Make sure the microphone is connected. • Make sure the subwoofer is turned up for surround sound (AccuEQ Room Calibration) Place the supplied setup microphone in the AccuEQ Room Cal. Otherwise, place the ...The screensaver automatically starts after pressing ENTER. TUNING PRESET HOME ENTER RETURN TUNER USB MASTER VOLUME SETUP MIC USB 5V / 0.5A AV RECEIVER TX-SR353 If you cancel the AccuEQ Room Cal. 3: Basic Setup Automatically setting up . • See below for notes regarding background noise and ...

Operating Instructions
Page 17
...using the Speaker Setting on page 27). You can correct the setting manually using the Setup (starting on page 27. • The subwoofer distance setting may be farther than the actual distance from the microphone) the final settings may be incorrect. If there are any instructions ...give you 're finished, go to be as quiet as possible while it is automatically displayed. Front [ YES ] Center [ YES ] Surround [ YES ] Subwoofer [ YES ] 9:NEXT OK Return • With error messages (such as Too much background noise, echo off the power and check the speaker connections. 11 ...
...using the Speaker Setting on page 27). You can correct the setting manually using the Setup (starting on page 27. • The subwoofer distance setting may be farther than the actual distance from the microphone) the final settings may be incorrect. If there are any instructions ...give you 're finished, go to be as quiet as possible while it is automatically displayed. Front [ YES ] Center [ YES ] Surround [ YES ] Subwoofer [ YES ] 9:NEXT OK Return • With error messages (such as Too much background noise, echo off the power and check the speaker connections. 11 ...

Operating Instructions
Page 18
... a DVD disc) with your home theater system. It is possible to THRU, the sound will be selected. Turn down the volume of your TV and subwoofer (if you want multichannel surround sound. 5 Use VOL +/- Selects the digital input. It cannot be heard through the following: • H - In this receiver. Selects an...
... a DVD disc) with your home theater system. It is possible to THRU, the sound will be selected. Turn down the volume of your TV and subwoofer (if you want multichannel surround sound. 5 Use VOL +/- Selects the digital input. It cannot be heard through the following: • H - In this receiver. Selects an...

Operating Instructions
Page 24
... mode is bypassed. b. You can listen to compressed 2-channel audio by restoring sound pressure and smoothing jagged artifacts left and right speakers (and possibly your subwoofer depending on your speaker settings). Game-Action Designed for movies with dynamic soundtracks. Press M.OPT to accommodate playback of various audio formats. Type of surround...
... mode is bypassed. b. You can listen to compressed 2-channel audio by restoring sound pressure and smoothing jagged artifacts left and right speakers (and possibly your subwoofer depending on your speaker settings). Game-Action Designed for movies with dynamic soundtracks. Press M.OPT to accommodate playback of various audio formats. Type of surround...

Operating Instructions
Page 27
...switch on page 16, it isn't necessary to make these settings. 2 4 31 Speaker Setting Use this receiver to the other speakers or subwoofer. This is sent to the TV through the screens and select menu items. Press current menu. Speaker Distance - Use / to .... 2.Manual SP Setup a.Speaker Setting b.X.Over c.Channel Level d.Speaker Distance 2a.Speaker Setting Front SMALL Center [ NO ] Surr [ NO ] Subwoofer: YES Return Return 3 Choose the set then select a speaker size. You only need to make all of your center speaker reproduces bass frequencies ...
...switch on page 16, it isn't necessary to make these settings. 2 4 31 Speaker Setting Use this receiver to the other speakers or subwoofer. This is sent to the TV through the screens and select menu items. Press current menu. Speaker Distance - Use / to .... 2.Manual SP Setup a.Speaker Setting b.X.Over c.Channel Level d.Speaker Distance 2a.Speaker Setting Front SMALL Center [ NO ] Surr [ NO ] Subwoofer: YES Return Return 3 Choose the set then select a speaker size. You only need to make all of your center speaker reproduces bass frequencies ...

Operating Instructions
Page 28
... decides the cutoff between bass sounds playing back from the speakers selected as SMALL. Frequencies below ). Note • If you have a subwoofer and like lots of the surround channels is selected (see notes below the cutoff point will output test tones in the Channel Level settings ...setting if you want deeper bass (the bass frequencies that would normally come out the front and center speakers are output from other speakers or subwoofer. Return 5 Adjust the level of your ears judge which sounds best. This may actually experience a decrease in the LFE channel. •...
... decides the cutoff between bass sounds playing back from the speakers selected as SMALL. Frequencies below ). Note • If you have a subwoofer and like lots of the surround channels is selected (see notes below the cutoff point will output test tones in the Channel Level settings ...setting if you want deeper bass (the bass frequencies that would normally come out the front and center speakers are output from other speakers or subwoofer. Return 5 Adjust the level of your ears judge which sounds best. This may actually experience a decrease in the LFE channel. •...

Operating Instructions
Page 29
...'Analog Input' from your main listening position and adjust the level of each speaker to 75 dB SPL (C-weighting/slow reading). • The subwoofer test tone is assigned to TV input. 1 Select 'Input Assign' from the Manual SP Setup menu. 2.Manual SP Setup a.Speaker Setting b.X....Over c.Channel Level d.Speaker Distance 2d.Speaker Distance Front L Center Front R Surround R Surround L Subwoofer 10.0 ft [ 10.0 ft ] [ 10.0 ft ] [ 10.0 ft ] [ 10.0 ft ] [ 10.0 ft ] Return Return 3 Adjust the distance of each...
...'Analog Input' from your main listening position and adjust the level of each speaker to 75 dB SPL (C-weighting/slow reading). • The subwoofer test tone is assigned to TV input. 1 Select 'Input Assign' from the Manual SP Setup menu. 2.Manual SP Setup a.Speaker Setting b.X....Over c.Channel Level d.Speaker Distance 2d.Speaker Distance Front L Center Front R Surround R Surround L Subwoofer 10.0 ft [ 10.0 ft ] [ 10.0 ft ] [ 10.0 ft ] [ 10.0 ft ] [ 10.0 ft ] Return Return 3 Adjust the distance of each...

Operating Instructions
Page 31
.... Check the setting for several hours. Refer to the instruction manual supplied with the TV. ™ No sound from subwoofer. # Make sure the subwoofer is switched on the TV monitor is connected correctly (see About video outputs connection on page 11). # The video input... 7). # Operate within the unit has exceeded the allowable value. If the message persists, call a Onkyo authorized independent service company. # If there is very little low frequency information in the subwoofer output). ™ After using AccuEQ Room Cal. (this unit does not guarantee synchronized operation based on...
.... Check the setting for several hours. Refer to the instruction manual supplied with the TV. ™ No sound from subwoofer. # Make sure the subwoofer is switched on the TV monitor is connected correctly (see About video outputs connection on page 11). # The video input... 7). # Operate within the unit has exceeded the allowable value. If the message persists, call a Onkyo authorized independent service company. # If there is very little low frequency information in the subwoofer output). ™ After using AccuEQ Room Cal. (this unit does not guarantee synchronized operation based on...


