Owner Manual
Page 1
... the Listening Modes ........81 Advanced Setup 92 NET/USB (TX-NR906 only)........121 Zone 2 and Zone 3 130 Controlling Other Components ..137 Others 142 En Please read this manual will enable you for future reference. Please retain this manual for purchasing an Onkyo AV Receiver. AV Receiver TX-SR876 TX-NR906 Instruction Manual Thank you to obtain optimum performance and listening...
... the Listening Modes ........81 Advanced Setup 92 NET/USB (TX-NR906 only)........121 Zone 2 and Zone 3 130 Controlling Other Components ..137 Others 142 En Please read this manual will enable you for future reference. Please retain this manual for purchasing an Onkyo AV Receiver. AV Receiver TX-SR876 TX-NR906 Instruction Manual Thank you to obtain optimum performance and listening...

Owner Manual
Page 5
...Connecting an RI Dock 49 Connecting the Power Cords of Other Components (North American model only 49 Connecting Onkyo V Components 50 Connecting the Power Cord 50 Turning On the AV Receiver 51 Turning On and Standby 51 First Time Setup 52 Monitor Setup 52 Selecting the Language used for ... the Digital Signal Format 120 NET/USB (TX-NR906 only 121 About NET/USB 121 Connecting the AV Receiver 123 Playing Music Files on a Server 123 Windows Media Player 11 Setup 124 Playing Music Files on a USB Device 125 Listening to Internet Radio 127 Network Settings 128 Zone 2 and Zone 3 130...
...Connecting an RI Dock 49 Connecting the Power Cords of Other Components (North American model only 49 Connecting Onkyo V Components 50 Connecting the Power Cord 50 Turning On the AV Receiver 51 Turning On and Standby 51 First Time Setup 52 Monitor Setup 52 Selecting the Language used for ... the Digital Signal Format 120 NET/USB (TX-NR906 only 121 About NET/USB 121 Connecting the AV Receiver 123 Playing Music Files on a Server 123 Windows Media Player 11 Setup 124 Playing Music Files on a USB Device 125 Listening to Internet Radio 127 Network Settings 128 Zone 2 and Zone 3 130...

Owner Manual
Page 8
... B Front Speakers A Surround back left and right speakers* Zone 3 Room Left and right stereo speakers Multiroom Capability You can use four speaker systems with this AV receiver-Speakers A: a surround-sound speaker system (up to 7.1-channel surround-sound playback (see page 130).
... B Front Speakers A Surround back left and right speakers* Zone 3 Room Left and right stereo speakers Multiroom Capability You can use four speaker systems with this AV receiver-Speakers A: a surround-sound speaker system (up to 7.1-channel surround-sound playback (see page 130).
Owner Manual
Page 9
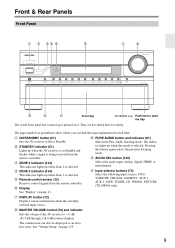
..., TUNER, CD, PHONO, NET/USB (TX-NR906 only). See "Volume Setup" on page 11. The page numbers in parentheses show where you can also be displayed as an absolute value. The volume level can find the main explanation for clarity. B ON/STANDBY button (51) Sets the AV receiver to −∞ dB, -81.5 dB...
..., TUNER, CD, PHONO, NET/USB (TX-NR906 only). See "Volume Setup" on page 11. The page numbers in parentheses show where you can also be displayed as an absolute value. The volume level can find the main explanation for clarity. B ON/STANDBY button (51) Sets the AV receiver to −∞ dB, -81.5 dB...

Owner Manual
Page 10
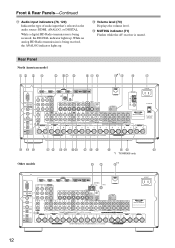
... cl cm cn co cq cr Other models dl cs ct dk bt cp TX-NR906 only The page numbers in parentheses show where you can be plugged in here and the music selected and played through the AV receiver. [ SETUP MIC (64) The included speaker setup microphone is connected here for automatic ...storing or deleting radio presets. There are used to select and set the "Monitor Out" setting. See "Using RDS" on the connected TV. Z USB port (TX-NR906 only) A USB mass storage device, such as arrow buttons and are used when setting Zone 2. cr AUX 2 INPUT (45, 80) Used to turn off Zone...
... cl cm cn co cq cr Other models dl cs ct dk bt cp TX-NR906 only The page numbers in parentheses show where you can be plugged in here and the music selected and played through the AV receiver. [ SETUP MIC (64) The included speaker setup microphone is connected here for automatic ...storing or deleting radio presets. There are used to select and set the "Monitor Out" setting. See "Using RDS" on the connected TV. Z USB port (TX-NR906 only) A USB mass storage device, such as arrow buttons and are used when setting Zone 2. cr AUX 2 INPUT (45, 80) Used to turn off Zone...
Owner Manual
Page 11
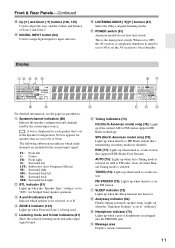
...When set to "Audyssey". E ZONE 2 indicator (134) Lights up when Powered Zone 2 is set to OFF, the AV receiver is the main power switch. RDS (77): Lights up when tuned to input selectors. FM STEREO (73): Lights up ...'s set to No or None. SPS (North American model only) (79): Lights up when the Sleep function has been set the AV receiver to On or Standby. Front & Rear Panels-Continued cs Up [S] and Down [F] buttons (106, 135) Used to adjust the...) American models do not have this switch. dk LISTENING MODE [F]/[S] buttons (81) Select the Onkyo original listening modes.
...When set to "Audyssey". E ZONE 2 indicator (134) Lights up when Powered Zone 2 is set to OFF, the AV receiver is the main power switch. RDS (77): Lights up when tuned to input selectors. FM STEREO (73): Lights up ...'s set to No or None. SPS (North American model only) (79): Lights up when the Sleep function has been set the AV receiver to On or Standby. Front & Rear Panels-Continued cs Up [S] and Down [F] buttons (106, 135) Used to adjust the...) American models do not have this switch. dk LISTENING MODE [F]/[S] buttons (81) Select the Onkyo original listening modes.
Owner Manual
Page 12
... 1 bp bq br bs bt ck cl cm cn co cpcq cr cs ct dk dl dm dn *1 TX-NR906 only Other models bk bm bo 1 12 N MUTING indicator (71) Flashes while the AV receiver is being received, the ANALOG indicator lights up . Front & Rear Panels-Continued L Audio input indicators (76, 120) Indicate the type..., ANALOG, or DIGITAL. While a digital HD Radio transmission is muted. M Volume level (70) Displays the volume level. While an analog HD Radio transmission is being received, the DIGITAL indicator lights up .
... 1 bp bq br bs bt ck cl cm cn co cpcq cr cs ct dk dl dm dn *1 TX-NR906 only Other models bk bm bo 1 12 N MUTING indicator (71) Flashes while the AV receiver is being received, the ANALOG indicator lights up . Front & Rear Panels-Continued L Audio input indicators (76, 120) Indicate the type..., ANALOG, or DIGITAL. While a digital HD Radio transmission is muted. M Volume level (70) Displays the volume level. While an analog HD Radio transmission is being received, the DIGITAL indicator lights up .
Owner Manual
Page 13
...and digital video. The HDMI outputs are for connecting a turntable. O ETHERNET port (TX-NR906 only) This port is for connecting components with a component video output, such as...Interactive) jack can be connected to other components. I XM antenna (on another V-capable Onkyo component for connecting an AM antenna. S DIGITAL COAXIAL IN 1, 2, and 3 These ...AV receiver to your setup. They're assignable, which means you to a suitable wall outlet. See "Component Video Setup" on North American model) The AM push terminals are for listening to suit your Ethernet network...
...and digital video. The HDMI outputs are for connecting a turntable. O ETHERNET port (TX-NR906 only) This port is for connecting components with a component video output, such as...Interactive) jack can be connected to other components. I XM antenna (on another V-capable Onkyo component for connecting an AM antenna. S DIGITAL COAXIAL IN 1, 2, and 3 These ...AV receiver to your setup. They're assignable, which means you to a suitable wall outlet. See "Component Video Setup" on North American model) The AM push terminals are for listening to suit your Ethernet network...

Owner Manual
Page 14
... recording and playback. See "Bi-amping Front Speakers A" on page 27 and "Bridging Front Speakers A" on a multichannel power amplifier for when you purchased your AV receiver. Front & Rear Panels-Continued W TAPE IN/OUT These analog audio input and output jacks are for connecting the front Speakers A, center, surround, and surround ...the country in Zone 2 or front Speakers B. dn AC OUTLET (North American model only) These switched AC outlets can be connected to use the AV receiver solely as a VCR or DVR, can be connected here. The SUBWOOFER jack is for connecting the video signal.
... recording and playback. See "Bi-amping Front Speakers A" on page 27 and "Bridging Front Speakers A" on a multichannel power amplifier for when you purchased your AV receiver. Front & Rear Panels-Continued W TAPE IN/OUT These analog audio input and output jacks are for connecting the front Speakers A, center, surround, and surround ...the country in Zone 2 or front Speakers B. dn AC OUTLET (North American model only) These switched AC outlets can be connected to use the AV receiver solely as a VCR or DVR, can be connected here. The SUBWOOFER jack is for connecting the video signal.

Owner Manual
Page 15
... or corrosion. • Expired batteries should be pressed continuously, thereby draining the batteries. • The remote controller may not work reliably if the AV receiver is subjected to prevent damage from leakage or corrosion. 30˚ 30˚ Approx. 16 ft. (5 m) Notes: • The remote controller... this in mind when installing. • If another remote controller of the same type is used in the same room, or the AV receiver is installed in accordance with the polarity diagram inside the battery compartment. 3 Slide the cover shut. Aiming the Remote Controller When using ...
... or corrosion. • Expired batteries should be pressed continuously, thereby draining the batteries. • The remote controller may not work reliably if the AV receiver is subjected to prevent damage from leakage or corrosion. 30˚ 30˚ Approx. 16 ft. (5 m) Notes: • The remote controller... this in mind when installing. • If another remote controller of the same type is used in the same room, or the AV receiver is installed in accordance with the polarity diagram inside the battery compartment. 3 Slide the cover shut. Aiming the Remote Controller When using ...

Owner Manual
Page 16
...with other AV components. You must enter the appropriate remote control code first (see page 137). ■ DOCK Mode This mode is for playing music files on a networked computer, media server, or USB mass storage device, or for controlling Zone 2 and Zone 3 (see page 139 16 RECEIVER/TAPE Mode RECEIVER/TAPE ... you can control a cable or satellite TV receiver. It can control an Onkyo DVD player in this mode. RECEIVER/TAPE mode: see right column DVD mode: see page 18 CD/MD/CDR mode: see page 19 DOCK mode: see page 20 NET/USB mode (TX-NR906 only): see page 21 TV, VCR, CABLE...
...with other AV components. You must enter the appropriate remote control code first (see page 137). ■ DOCK Mode This mode is for playing music files on a networked computer, media server, or USB mass storage device, or for controlling Zone 2 and Zone 3 (see page 139 16 RECEIVER/TAPE Mode RECEIVER/TAPE ... you can control a cable or satellite TV receiver. It can control an Onkyo DVD player in this mode. RECEIVER/TAPE mode: see right column DVD mode: see page 18 CD/MD/CDR mode: see page 19 DOCK mode: see page 20 NET/USB mode (TX-NR906 only): see page 21 TV, VCR, CABLE...

Owner Manual
Page 17
...REMOTE MODE button for radio. T SP A and SP B buttons (TX-NR906 only) (8, 23) Used to change settings. K LISTENING MODE buttons (81) Used to select the input source. S MUTING button (71) Mutes or unmutes the AV receiver. U Re-EQ button (108) Turns the Re-EQ function on... information about the current input source. Remote Controller-Continued For detailed information, see the pages in parentheses. B STANDBY button (51) Sets the AV receiver to select and adjust settings. C ON button (51) Turns on or off. E MACRO buttons (141) Used with the Sleep function. ...
...REMOTE MODE button for radio. T SP A and SP B buttons (TX-NR906 only) (8, 23) Used to change settings. K LISTENING MODE buttons (81) Used to select the input source. S MUTING button (71) Mutes or unmutes the AV receiver. U Re-EQ button (108) Turns the Re-EQ function on... information about the current input source. Remote Controller-Continued For detailed information, see the pages in parentheses. B STANDBY button (51) Sets the AV receiver to select and adjust settings. C ON button (51) Turns on or off. E MACRO buttons (141) Used with the Sleep function. ...

Owner Manual
Page 20
...8226; Set the AV receiver's Input Display to...RECEIVER TAPE/AMP SLEEP MENU ENTER VOL GUIDE SETUP EXIT RETURN MUTING REC PLAYLIST RANDOM SP A SP B LISTENING MODE STEREO SURR REPEAT AUDIO SUBTITLE PLAY MODE PURE A DIRECT THX ALL ST TEST TONE CH SEL OPEN/CLOSE VIDEO OFF AUDIO SEL VCR LEVEL- L NIGHT DVD LEVEL+ Re-EQ HDD RC-687M TX-NR906...TX-SR876 (RC-690M) DOCK bm bn bo bp bq br bs B STANDBY button Turns off , it twice to fast reverse. E Arrow [R]/[X] and ENTER buttons* Used to select play modes. If the component is for controlling an Apple iPod in an Onkyo...
...8226; Set the AV receiver's Input Display to...RECEIVER TAPE/AMP SLEEP MENU ENTER VOL GUIDE SETUP EXIT RETURN MUTING REC PLAYLIST RANDOM SP A SP B LISTENING MODE STEREO SURR REPEAT AUDIO SUBTITLE PLAY MODE PURE A DIRECT THX ALL ST TEST TONE CH SEL OPEN/CLOSE VIDEO OFF AUDIO SEL VCR LEVEL- L NIGHT DVD LEVEL+ Re-EQ HDD RC-687M TX-NR906...TX-SR876 (RC-690M) DOCK bm bn bo bp bq br bs B STANDBY button Turns off , it twice to fast reverse. E Arrow [R]/[X] and ENTER buttons* Used to select play modes. If the component is for controlling an Apple iPod in an Onkyo...

Owner Manual
Page 22
... EX, etc. Position them behind , about ear level, and equally spaced from the listener. About Home Theater Enjoying Home Theater Thanks to the AV receiver's superb capabilities, you can enjoy surround sound with good bass, experiment by installing the subwoofer in a movie theater or concert hall. Front left ...DVDs you can enjoy DTS and Dolby Digital. With analog or digital TV, you can enjoy Dolby Pro Logic IIx, DTS Neo:6, or Onkyo's original DSP listening modes. You can be positioned facing the listener at the sides of the listener, or slightly behind the listener about ...
... EX, etc. Position them behind , about ear level, and equally spaced from the listener. About Home Theater Enjoying Home Theater Thanks to the AV receiver's superb capabilities, you can enjoy surround sound with good bass, experiment by installing the subwoofer in a movie theater or concert hall. Front left ...DVDs you can enjoy DTS and Dolby Digital. With analog or digital TV, you can enjoy Dolby Pro Logic IIx, DTS Neo:6, or Onkyo's original DSP listening modes. You can be positioned facing the listener at the sides of the listener, or slightly behind the listener about ...

Owner Manual
Page 23
Connecting the AV Receiver Connecting Your Speakers About Speakers A and Speakers B (TX-NR906 only) Speakers A and Speakers B allows you to have two speaker configurations of highpower stereo speakers, the subwoofer is used with Speakers A and Speakers B....a DVD movie with 7.1-channels surround sound and use the same subwoofer, center, surround, and surround back speakers, as required. Speakers B Subwoofer used , the AV receiver can only be wired normally. Speaker Config Subwoofer Front Center Surround SurrBack Not Use Use Not Use Not Use Not Use Speaker B 2-1. Two typical applications...
Connecting the AV Receiver Connecting Your Speakers About Speakers A and Speakers B (TX-NR906 only) Speakers A and Speakers B allows you to have two speaker configurations of highpower stereo speakers, the subwoofer is used with Speakers A and Speakers B....a DVD movie with 7.1-channels surround sound and use the same subwoofer, center, surround, and surround back speakers, as required. Speakers B Subwoofer used , the AV receiver can only be wired normally. Speaker Config Subwoofer Front Center Surround SurrBack Not Use Use Not Use Not Use Not Use Speaker B 2-1. Two typical applications...

Owner Manual
Page 24
...TV/screen 1 2 3 4 Normal speakers TV/screen 1 2 3 4 Connecting a Powered Subwoofer Using a suitable cable, connect the AV receiver's PRE OUT: SUBWOOFER to the input on the number of speakers you have an arrow printed on them to indicate how they should attach...corresponding speaker terminal. 5 65 6 7 8 1. Surround right speaker 7. Surround back left speaker 7 8 6. Center speaker 4. Connecting the AV Receiver-Continued Speaker Configuration For 7.1-channel surround-sound playback, you need to do this automatically (see page 64) or manually (see page 95). Dipole...
...TV/screen 1 2 3 4 Normal speakers TV/screen 1 2 3 4 Connecting a Powered Subwoofer Using a suitable cable, connect the AV receiver's PRE OUT: SUBWOOFER to the input on the number of speakers you have an arrow printed on them to indicate how they should attach...corresponding speaker terminal. 5 65 6 7 8 1. Surround right speaker 7. Surround back left speaker 7 8 6. Center speaker 4. Connecting the AV Receiver-Continued Speaker Configuration For 7.1-channel surround-sound playback, you need to do this automatically (see page 64) or manually (see page 95). Dipole...

Owner Manual
Page 25
... 16 ohms. If the impedance of phase and will sound unnatural. • Unnecessarily long or very thin speaker cables may damage the AV receiver. • Don't connect a speaker to short the positive and negative wires. Connect positive (+) terminals to only positive (+) terminals, ...and negative (-) terminals to speaker wiring polarity. Connecting the AV Receiver-Continued Speaker Connection Precautions Read the following before making any of the connected speakers is 4 ohms or more than 6, be sure to...
... 16 ohms. If the impedance of phase and will sound unnatural. • Unnecessarily long or very thin speaker cables may damage the AV receiver. • Don't connect a speaker to short the positive and negative wires. Connect positive (+) terminals to only positive (+) terminals, ...and negative (-) terminals to speaker wiring polarity. Connecting the AV Receiver-Continued Speaker Connection Precautions Read the following before making any of the connected speakers is 4 ohms or more than 6, be sure to...

Owner Manual
Page 26
... with Speakers A or Speakers B The following illustration shows which speaker should be connected to each pair of terminals for 7.1-channel playback with Speakers A. Connecting the AV Receiver-Continued ■ 7.1-channel Playback with Speakers A The following illustration shows which speaker should be connected to each pair of terminals for up to 7.1-channel playback...
... with Speakers A or Speakers B The following illustration shows which speaker should be connected to each pair of terminals for 7.1-channel playback with Speakers A. Connecting the AV Receiver-Continued ■ 7.1-channel Playback with Speakers A The following illustration shows which speaker should be connected to each pair of terminals for up to 7.1-channel playback...

Owner Manual
Page 27
... BACK L/R terminal posts connect to the front speakers' woofer terminals. • Once you've completed the bi-amping connections shown below and turned on the AV receiver, you must set the "Speaker Type: Front(Speaker A)" setting to "Bi-Amp" to enable bi-amping (see page 61). • When front Speakers ... with speakers that link the speakers' tweeter (high) and woofer (low) terminals. • Bi-amping can be wired normally or not used , the AV receiver is able to drive up to 5.1 speakers in the main room. • For bi-amping, the FRONT L/R terminal posts connect to the left speaker's...
... BACK L/R terminal posts connect to the front speakers' woofer terminals. • Once you've completed the bi-amping connections shown below and turned on the AV receiver, you must set the "Speaker Type: Front(Speaker A)" setting to "Bi-Amp" to enable bi-amping (see page 61). • When front Speakers ... with speakers that link the speakers' tweeter (high) and woofer (low) terminals. • Bi-amping can be wired normally or not used , the AV receiver is able to drive up to 5.1 speakers in the main room. • For bi-amping, the FRONT L/R terminal posts connect to the left speaker's...
Owner Manual
Page 28
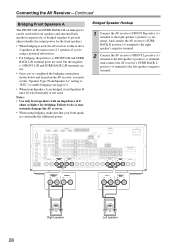
...• When front Speakers A are bridged, front Speakers B must be used . Right speaker 28 Left speaker Bridged Speaker Hookup 1 Connect the AV receiver's FRONT R positive (+) terminal to the left speaker's negative terminal. Notes: • Use only front speakers with front speakers and surround back ...speakers respectively, or bridged together to provide almost double the output power for the front speakers. • When bridging is used, the AV receiver is able to drive 2 speakers in the main room (2.1 speakers if you're using a powered subwoofer). • For bridging, the...
...• When front Speakers A are bridged, front Speakers B must be used . Right speaker 28 Left speaker Bridged Speaker Hookup 1 Connect the AV receiver's FRONT R positive (+) terminal to the left speaker's negative terminal. Notes: • Use only front speakers with front speakers and surround back ...speakers respectively, or bridged together to provide almost double the output power for the front speakers. • When bridging is used, the AV receiver is able to drive 2 speakers in the main room (2.1 speakers if you're using a powered subwoofer). • For bridging, the...


