Owner Manual
Page 52
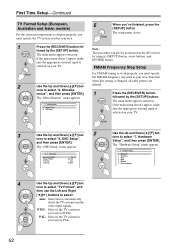
... Select this setting is selected on the AV receiver by the [SETUP] button. tons to automatically detect the TV system from the video input signals. FM/AM Frequency Step Setup For FM/AM tuning to work properly, you 've finished, press the [SETUP] button. Firmware Update 4 Use the Up and Down [R]/[X]... on your area is NTSC. lowed by using its [SETUP] button, arrow buttons, and [ENTER] button. neous", and then press [ENTER]. Network 6. PAL: Select if the TV system in your area. If the main menu doesn't appear, make sure the appropriate external input is changed, ...
... Select this setting is selected on the AV receiver by the [SETUP] button. tons to automatically detect the TV system from the video input signals. FM/AM Frequency Step Setup For FM/AM tuning to work properly, you 've finished, press the [SETUP] button. Firmware Update 4 Use the Up and Down [R]/[X]... on your area is NTSC. lowed by using its [SETUP] button, arrow buttons, and [ENTER] button. neous", and then press [ENTER]. Network 6. PAL: Select if the TV system in your area. If the main menu doesn't appear, make sure the appropriate external input is changed, ...
Owner Manual
Page 84
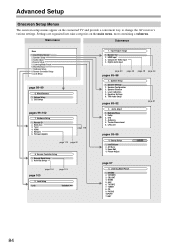
.../Output Assign 2. Audio Adjust 4. Listening Mode Preset 6. OSD Setup pages 99-102 7. Firmware Update page 119 page 113 page 52 8. Remote Controller Setup 1. HDMI Input 3. Speaker Settings ...88 page 49 page 48 page 46 2. Source Setup 1. VCR/DVR 3. TUNER 8. PHONO 10. Miscellaneous 7. PORT 11. Network 6. Speaker Distance 4. Picture Adjust DVD/BD page 97 5. NET 84 Hardware Setup 1. Lock Setup Lock page 123 Unlocked 1....organized into nine categories on the connected TV and provide a convenient way to change the AV receiver's various settings.
.../Output Assign 2. Audio Adjust 4. Listening Mode Preset 6. OSD Setup pages 99-102 7. Firmware Update page 119 page 113 page 52 8. Remote Controller Setup 1. HDMI Input 3. Speaker Settings ...88 page 49 page 48 page 46 2. Source Setup 1. VCR/DVR 3. TUNER 8. PHONO 10. Miscellaneous 7. PORT 11. Network 6. Speaker Distance 4. Picture Adjust DVD/BD page 97 5. NET 84 Hardware Setup 1. Lock Setup Lock page 123 Unlocked 1....organized into nine categories on the connected TV and provide a convenient way to change the AV receiver's various settings.
Owner Manual
Page 99
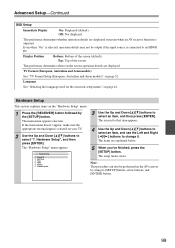
...item, and use the Left and Right [F]/[S] buttons to select "7. The "Hardware Setup" menu appears. 7. The items are displayed. Off: Not displayed. Firmware Update 3 Use the Up and Down [R]/[X] buttons to an HDMI IN. The setup menu closes. Hardware Setup This section explains items on page 44. . ...'ve finished, press the [SETUP] button. If the main menu doesn't appear, make sure the appropriate external input is selected on the AV receiver by the [SETUP] button. Hardware Setup 1. Network 6. Note: This procedure can also be output if the input source is adjusted.
...item, and use the Left and Right [F]/[S] buttons to select "7. The "Hardware Setup" menu appears. 7. The items are displayed. Off: Not displayed. Firmware Update 3 Use the Up and Down [R]/[X] buttons to an HDMI IN. The setup menu closes. Hardware Setup This section explains items on page 44. . ...'ve finished, press the [SETUP] button. If the main menu doesn't appear, make sure the appropriate external input is selected on the AV receiver by the [SETUP] button. Hardware Setup 1. Network 6. Note: This procedure can also be output if the input source is adjusted.
Owner Manual
Page 102
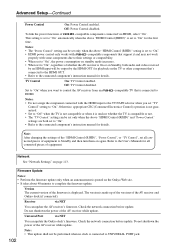
...AV receiver while update. Advanced Setup-Continued Power Control On: Power Control enabled. Note: After changing the settings of the "HDMI Control (RIHD)", "Power Control", or "TV Control", set to the connected component's instruction manual for details. Network See "Network Settings" on again. Firmware Update Notes: • Perform the firmware update... only when an announcement is displayed. The version is made up of the versions of the firmware is posted on the Onkyo Web ...
...AV receiver while update. Advanced Setup-Continued Power Control On: Power Control enabled. Note: After changing the settings of the "HDMI Control (RIHD)", "Power Control", or "TV Control", set to the connected component's instruction manual for details. Network See "Network Settings" on again. Firmware Update Notes: • Perform the firmware update... only when an announcement is displayed. The version is made up of the versions of the firmware is posted on the Onkyo Web ...
Owner Manual
Page 113
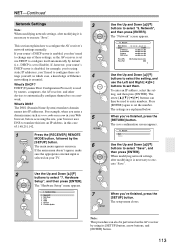
... MODE button, followed by default (i.e., DHCP is used to configure itself automatically by the [SETUP] button. Firmware Update Use the Up and Down [R]/[X] buttons to configure the AV receiver's network settings manually. What's DHCP? The main menu appears onscreen. 6 If the main menu doesn't appear, make sure the appropriate external input is selected on your...
... MODE button, followed by default (i.e., DHCP is used to configure itself automatically by the [SETUP] button. Firmware Update Use the Up and Down [R]/[X] buttons to configure the AV receiver's network settings manually. What's DHCP? The main menu appears onscreen. 6 If the main menu doesn't appear, make sure the appropriate external input is selected on your...
Owner Manual
Page 119
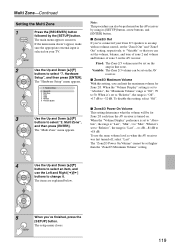
...setup menu closes. 119 Tuner 4. Multi Zone", and then press [ENTER]. HDMI 5. Firmware Update 3 Use the Up and Down [R]/[X] buttons to -32 dB. Variable: The Zone 2/3 volume can be set on the AV receiver. ■ Zone2/3 Maximum Volume With this setting, select "Off". ■ Zone2/3... appears. 7. To disable this setting, you can limit the maximum volume for Zone 2/3 each time the AV receiver is "Last", "Min", 1 to +18 dB. Hardware Setup", and then press [ENTER]. Network 6. When the "Volume Display" preference is set to "Relative", the range is "Last", -2 dB...
...setup menu closes. 119 Tuner 4. Multi Zone", and then press [ENTER]. HDMI 5. Firmware Update 3 Use the Up and Down [R]/[X] buttons to -32 dB. Variable: The Zone 2/3 volume can be set on the AV receiver. ■ Zone2/3 Maximum Volume With this setting, select "Off". ■ Zone2/3... appears. 7. To disable this setting, you can limit the maximum volume for Zone 2/3 each time the AV receiver is "Last", "Min", 1 to +18 dB. Hardware Setup", and then press [ENTER]. Network 6. When the "Volume Display" preference is set to "Relative", the range is "Last", -2 dB...


