Owner Manual
Page 5
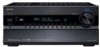
...a Dock with the Universal Port Connector....... 40 Connecting Onkyo V Components 41 Connecting the Power Cord 41 Turning On & First Time Setup Turning On the AV receiver 42 Turning On and Standby 42 First Time Setup 43 Monitor Setup (TX-NR807 43 Selecting the Language used for the onscreen setup ... Signal Formats 103 Using the Audio Settings 104 NET NET 107 About NET 107 Connecting the AV Receiver 107 Listening to Internet Radio 108 Playing Music Files on a Server 109 Network Settings 113 Multi Zone Multi Zone 115 Multiroom Capability 115 Connecting Zone 2 116 Connecting Zone ...
...a Dock with the Universal Port Connector....... 40 Connecting Onkyo V Components 41 Connecting the Power Cord 41 Turning On & First Time Setup Turning On the AV receiver 42 Turning On and Standby 42 First Time Setup 43 Monitor Setup (TX-NR807 43 Selecting the Language used for the onscreen setup ... Signal Formats 103 Using the Audio Settings 104 NET NET 107 About NET 107 Connecting the AV Receiver 107 Listening to Internet Radio 108 Playing Music Files on a Server 109 Network Settings 113 Multi Zone Multi Zone 115 Multiroom Capability 115 Connecting Zone 2 116 Connecting Zone ...
Owner Manual
Page 6
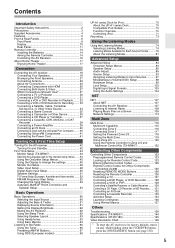
...or registered trademarks of iBiquity Digital Corporation. To receive HD Radio broadcasts, you must install an Onkyo UP-HT1 HD Radio tuner module (sold separately). *7. els) • Dual Subwoofer Pre Out • SIRIUS*8 Satellite Radio Connectivity (TX-NR807: North American models) • Banana Plug-...of Onkyo Corporation. *5. which may vary depending on the region. • Network Capability for Streaming Audio Files • Bi-Amping Capability for FL/FR with SBL/SBR Miscellaneous • 40 SIRIUS*8/AM/FM Presets (TX-NR807: North American models) • 40 AM/FM Presets (TX-NR807:...
...or registered trademarks of iBiquity Digital Corporation. To receive HD Radio broadcasts, you must install an Onkyo UP-HT1 HD Radio tuner module (sold separately). *7. els) • Dual Subwoofer Pre Out • SIRIUS*8 Satellite Radio Connectivity (TX-NR807: North American models) • Banana Plug-...of Onkyo Corporation. *5. which may vary depending on the region. • Network Capability for Streaming Audio Files • Bi-Amping Capability for FL/FR with SBL/SBR Miscellaneous • 40 SIRIUS*8/AM/FM Presets (TX-NR807: North American models) • 40 AM/FM Presets (TX-NR807:...
Owner Manual
Page 7
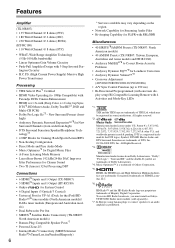
...otherwise authorized by U.S. Manufactured under license from Audyssey Laboratories. THX Select2 Plus Before any technology or software incorporated in receivers compatible with the SIRIUS or XM Satellite Radio Systems. Service not available in the U.S. Reverse engineering or disassembly is... Surround Expansion™, Audyssey Dynamic Volume™ and Audyssey Dynamic EQ™ are trademarks of the Digital Living Network Alliance." (TX-NR807) This product incorporates copyright protection technology that the Home Theater products you purchase will give you superb performance for ...
...otherwise authorized by U.S. Manufactured under license from Audyssey Laboratories. THX Select2 Plus Before any technology or software incorporated in receivers compatible with the SIRIUS or XM Satellite Radio Systems. Service not available in the U.S. Reverse engineering or disassembly is... Surround Expansion™, Audyssey Dynamic Volume™ and Audyssey Dynamic EQ™ are trademarks of the Digital Living Network Alliance." (TX-NR807) This product incorporates copyright protection technology that the Home Theater products you purchase will give you superb performance for ...
Owner Manual
Page 10
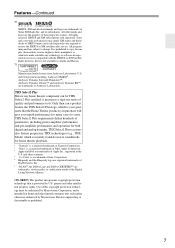
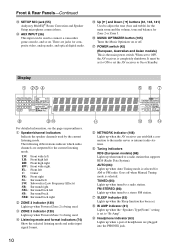
...or Standby. B Speaker/channel indicators Indicate the speaker channels used . D ZONE 3 indicator (120) Lights up when the AV receiver can be set to ON to set to "Bi-Amp". L M NO F NETWORK indicator (108) Lights up when Powered Zone 3 is being used by the current listening mode. TUNED (66): Lights up... when the Sleep function has been set to OFF, the AV receiver is the main power switch. H SLEEP indicator (62) Lights ...
...or Standby. B Speaker/channel indicators Indicate the speaker channels used . D ZONE 3 indicator (120) Lights up when the AV receiver can be set to ON to set to "Bi-Amp". L M NO F NETWORK indicator (108) Lights up when Powered Zone 3 is being used by the current listening mode. TUNED (66): Lights up... when the Sleep function has been set to OFF, the AV receiver is the main power switch. H SLEEP indicator (62) Lights ...
Owner Manual
Page 11
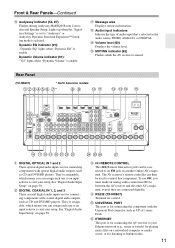
... type of audio input that component. They're assignable, which means you can then be connected to suit your setup. The AV receiver's remote controller can assign each one to an input selector to control that 's selected as UP-A1 series Dock. F UNIVERSAL... See "Digital Audio Input Setup" on a networked computer or media server, or for listening to your setup. G ETHERNET This port is muted. See "Digital Audio Input Setup" on another Onkyo AV component. N Volume level (60) Displays the volume level. E RS232 (TX-NR807) Terminal for playing music files on page 50...
... type of audio input that component. They're assignable, which means you can then be connected to suit your setup. The AV receiver's remote controller can assign each one to an input selector to control that 's selected as UP-A1 series Dock. F UNIVERSAL... See "Digital Audio Input Setup" on a networked computer or media server, or for listening to your setup. G ETHERNET This port is muted. See "Digital Audio Input Setup" on another Onkyo AV component. N Volume level (60) Displays the volume level. E RS232 (TX-NR807) Terminal for playing music files on page 50...
Owner Manual
Page 52
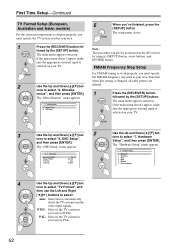
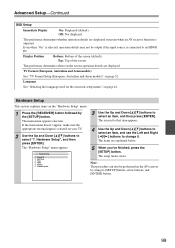
...tons to select "TV Format", and then use the Left and Right [F]/[S] buttons to select: Auto: Select this setting is selected on the AV receiver by the [SETUP] button. tons to select "2. The setup menu closes. Note: This procedure can also be performed on your TV. ... is changed, all radio presets are deleted. 1 Press the [RECEIVER] button, followed by using its [SETUP] button, arrow buttons, and [ENTER] button. Hardware Setup 1. Multi Zone 3. Miscellaneous 1. and then press [ENTER]. Network 6. Volume Setup 2. OSD Setup Immediate Display Display Position TV Format...
...tons to select "TV Format", and then use the Left and Right [F]/[S] buttons to select: Auto: Select this setting is selected on the AV receiver by the [SETUP] button. tons to select "2. The setup menu closes. Note: This procedure can also be performed on your TV. ... is changed, all radio presets are deleted. 1 Press the [RECEIVER] button, followed by using its [SETUP] button, arrow buttons, and [ENTER] button. Hardware Setup 1. Multi Zone 3. Miscellaneous 1. and then press [ENTER]. Network 6. Volume Setup 2. OSD Setup Immediate Display Display Position TV Format...
Owner Manual
Page 84
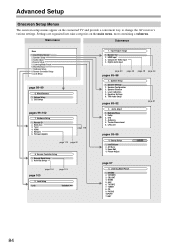
Speaker Setup 3. Source Setup 5. Miscellaneous 7. Hardware Setup 8. Miscellaneous 1. Network 6. Remote Mode Setup 2. Lock Setup Lock page 123 Unlocked 1. Digital Audio Input page 50 pages 85-88 page 49 page 48 page 46 2. ... 3. Audio Adjust 1. Picture Adjust DVD/BD page 97 5. Settings are organized into nine categories on the connected TV and provide a convenient way to change the AV receiver's various settings. Volume Setup 2. Monitor Out 2. Speaker Setup 1. Multiplex/Mono 2. Theater-Dimensional 6. LFE Level pages 93-95 4. TUNER 8. OSD Setup pages 99-102 ...
Speaker Setup 3. Source Setup 5. Miscellaneous 7. Hardware Setup 8. Miscellaneous 1. Network 6. Remote Mode Setup 2. Lock Setup Lock page 123 Unlocked 1. Digital Audio Input page 50 pages 85-88 page 49 page 48 page 46 2. ... 3. Audio Adjust 1. Picture Adjust DVD/BD page 97 5. Settings are organized into nine categories on the connected TV and provide a convenient way to change the AV receiver's various settings. Volume Setup 2. Monitor Out 2. Speaker Setup 1. Multiplex/Mono 2. Theater-Dimensional 6. LFE Level pages 93-95 4. TUNER 8. OSD Setup pages 99-102 ...
Owner Manual
Page 99
... [R]/[X] buttons to select an item, and use the Left and Right [F]/[S] buttons to select "7. Hardware Setup This section explains items on the AV receiver by the [SETUP] button. Remote ID 2. Network 6. Note: This procedure can also be output if the input source is selected on the screen operation details are displayed. This preference...
... [R]/[X] buttons to select an item, and use the Left and Right [F]/[S] buttons to select "7. Hardware Setup This section explains items on the AV receiver by the [SETUP] button. Remote ID 2. Network 6. Note: This procedure can also be output if the input source is selected on the screen operation details are displayed. This preference...
Owner Manual
Page 102
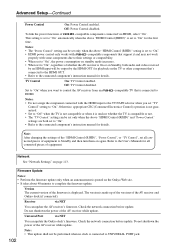
... other component that support it is unclear whether the TV is displayed. Check the network connection before update. Network See "Network Settings" on again. Universal Port via NET You can update the AV receiver's firmware. This setting is set to "On" automatically when the above "HDMI ...with the HDMI input to the TV/TAPE selector when you set to control the AV receiver from an HDMI. -compatible TV that is made up of the versions of the AV receiver and Onkyo dock (if connected). Otherwise, appropriate CEC (Consumer Electronics Control) operation is not ...
... other component that support it is unclear whether the TV is displayed. Check the network connection before update. Network See "Network Settings" on again. Universal Port via NET You can update the AV receiver's firmware. This setting is set to "On" automatically when the above "HDMI ...with the HDMI input to the TV/TAPE selector when you set to control the AV receiver from an HDMI. -compatible TV that is made up of the versions of the AV receiver and Onkyo dock (if connected). Otherwise, appropriate CEC (Consumer Electronics Control) operation is not ...
Owner Manual
Page 107
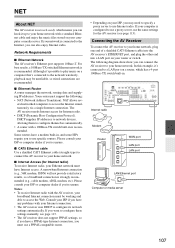
... to configure these settings manually, see page 113). NET About NET The AV receiver is network-ready, which has a 4-port 100Base-TX switch built-in. NAT allows sev- Consult your Ethernet network must be unreliable, so wired connections are recommended. ■ Ethernet Router ... recommended. For best results, a 100Base-TX switched Ethernet network is recommended. DHCP supplies IP addresses to network devices, allowing them to configure themselves automatically. • A router with your Internet connection. • The AV receiver uses DHCP to your ISP or computer dealer...
... to configure these settings manually, see page 113). NET About NET The AV receiver is network-ready, which has a 4-port 100Base-TX switch built-in. NAT allows sev- Consult your Ethernet network must be unreliable, so wired connections are recommended. ■ Ethernet Router ... recommended. For best results, a 100Base-TX switched Ethernet network is recommended. DHCP supplies IP addresses to network devices, allowing them to configure themselves automatically. • A router with your Internet connection. • The AV receiver uses DHCP to your ISP or computer dealer...

Owner Manual
Page 108
...AV receiver, recheck the AV receiver's IP address on the http://onkyo.vtuner.com/ portal. Notes: • The AV receiver's IP address is shown on the "Network" screen (see Network Settings (page 113). 3 NET RXFS ENTER The NETWORK indicator lights up if the AV receiver is able to establish a connection to the network... formats are sup- Pandora Internet Radio 3. Rhapsody 4. NET-Continued Listening to Internet Radio To receive Internet radio, you must connect the AV receiver to a network with your MAC Address, please see page 113). • If you're using a narrowband...
...AV receiver, recheck the AV receiver's IP address on the http://onkyo.vtuner.com/ portal. Notes: • The AV receiver's IP address is shown on the "Network" screen (see Network Settings (page 113). 3 NET RXFS ENTER The NETWORK indicator lights up if the AV receiver is able to establish a connection to the network... formats are sup- Pandora Internet Radio 3. Rhapsody 4. NET-Continued Listening to Internet Radio To receive Internet radio, you must connect the AV receiver to a network with your MAC Address, please see page 113). • If you're using a narrowband...

Owner Manual
Page 109
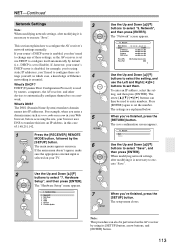
...11, see "Windows Media Player 11 Setup" on the display if the AV receiver is able to establish a connection to the server. Server Server1 Server2 Server3 Server4 Server5 Server6 Server7 Server8 Server9 Server10 1 / 10 The NETWORK indicator lights up on page 110. 1 Start your computer or media ...playback. Server1 Search Recently Added Artists Album Songs Genre Year Rating 1 / 8 Search You can search for details on a computer or media server through the AV receiver. All Music Song 1 Song 2 Song 3 My favorite song 1 My favorite song 2 My favorite song 3 My favorite song 4 My favorite song ...
...11, see "Windows Media Player 11 Setup" on the display if the AV receiver is able to establish a connection to the server. Server Server1 Server2 Server3 Server4 Server5 Server6 Server7 Server8 Server9 Server10 1 / 10 The NETWORK indicator lights up on page 110. 1 Start your computer or media ...playback. Server1 Search Recently Added Artists Album Songs Genre Year Rating 1 / 8 Search You can search for details on a computer or media server through the AV receiver. All Music Song 1 Song 2 Song 3 My favorite song 1 My favorite song 2 My favorite song 3 My favorite song 4 My favorite song ...

Owner Manual
Page 110
...Repeat All, or Off. The Media Sharing dialog box appears. 3 Select the Share my media check box, and then click OK. 4 Select the AV receiver in the current folder are played repeatedly. In this , songs over 9,999 are played repeatedly. This completes the Windows Media Player 11 configuration. NET-... Start Windows Media Player 11. 2 On the Library menu, select Media Sharing. In Repeat All mode, all of the songs on your server, network, and AV receiver connections. Note: Windows Media Player 11 can play songs repeatedly, during playback (or while playback is displayed.
...Repeat All, or Off. The Media Sharing dialog box appears. 3 Select the Share my media check box, and then click OK. 4 Select the AV receiver in the current folder are played repeatedly. In this , songs over 9,999 are played repeatedly. This completes the Windows Media Player 11 configuration. NET-... Start Windows Media Player 11. 2 On the Library menu, select Media Sharing. In Repeat All mode, all of the songs on your server, network, and AV receiver connections. Note: Windows Media Player 11 can play songs repeatedly, during playback (or while playback is displayed.

Owner Manual
Page 112
...PC or smartphone) Web browser: Microsoft Internet Explorer 6 or Netscape 7.1 About DLNA The Digital Living Network Alliance is already installed. NET-Continued Server Requirements The AV receiver can be shared through consumer electronics, personal computers, and mobile devices in and beyond the home. Windows... Pentium II, Advanced Micro Devices (AMD), etc. Members of DLNA develop a concept of wired and wireless interoperable networks where digital content such as the AV receiver. • Each folder may contain up to play digital music files stored on a computer or media server and...
...PC or smartphone) Web browser: Microsoft Internet Explorer 6 or Netscape 7.1 About DLNA The Digital Living Network Alliance is already installed. NET-Continued Server Requirements The AV receiver can be shared through consumer electronics, personal computers, and mobile devices in and beyond the home. Windows... Pentium II, Advanced Micro Devices (AMD), etc. Members of DLNA develop a concept of wired and wireless interoperable networks where digital content such as the AV receiver. • Each folder may contain up to play digital music files stored on a computer or media server and...
Owner Manual
Page 113
...DHCP to configure itself automatically by the [SETUP] button. When modifying network settings, after modifying it is necessary to execute "Save". For example, when you enter a domain name such as the AV receiver is set - Hardware Setup", and then press [ENTER]. HDMI 5....[SETUP] button, arrow buttons, and [ENTER] button. 113 Note: This procedure can then be performed on the AV receiver by routers, computers, the AV receiver, and other devices to Enable). Network 6. When you 've finished, press the [SETUP] button. Tuner 4. The settings are explained below. The "...
...DHCP to configure itself automatically by the [SETUP] button. When modifying network settings, after modifying it is necessary to execute "Save". For example, when you enter a domain name such as the AV receiver is set - Hardware Setup", and then press [ENTER]. HDMI 5....[SETUP] button, arrow buttons, and [ENTER] button. 113 Note: This procedure can then be performed on the AV receiver by routers, computers, the AV receiver, and other devices to Enable). Network 6. When you 've finished, press the [SETUP] button. Tuner 4. The settings are explained below. The "...

Owner Manual
Page 114
...your ISP. The IP address must specify a gateway address. Gateway If you must be changed. Enable: Control over the network. DHCP This setting determines whether or not the AV receiver uses DHCP to "Disable", you set the "DHCP" setting to "Enable", power consumption on standby mode slightly increases.... ■ Port Number This is the AV receiver's MAC (Media Access Control) address. Enter the subnet mask address provided by your ISP (typically: 255.255.255.0). Enter the DNS ...
...your ISP. The IP address must specify a gateway address. Gateway If you must be changed. Enable: Control over the network. DHCP This setting determines whether or not the AV receiver uses DHCP to "Disable", you set the "DHCP" setting to "Enable", power consumption on standby mode slightly increases.... ■ Port Number This is the AV receiver's MAC (Media Access Control) address. Enter the subnet mask address provided by your ISP (typically: 255.255.255.0). Enter the DNS ...
Owner Manual
Page 119
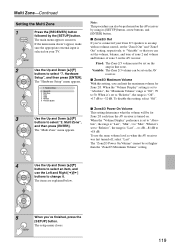
Network 6. The "Multi Zone" menu appears. When the "Volume Display" setting is set the "Zone2 ... Zone 2/3 volume must be performed on the amp in that you can limit the maximum volume for Zone 2/3 each time the AV receiver is "Off", +17 dB to select "2. The "Hardware Setup" menu appears. 7. To use the Left and Right [F]/[S] ...Absolute", the range is "Last", "Min", 1 to change it 's set to "Relative", the range is turned on the AV receiver. ■ Zone2/3 Maximum Volume With this setting, select "Off". ■ Zone2/3 Power On Volume This setting determines what the...
Network 6. The "Multi Zone" menu appears. When the "Volume Display" setting is set the "Zone2 ... Zone 2/3 volume must be performed on the amp in that you can limit the maximum volume for Zone 2/3 each time the AV receiver is "Off", +17 dB to select "2. The "Hardware Setup" menu appears. 7. To use the Left and Right [F]/[S] ...Absolute", the range is "Last", "Min", 1 to change it 's set to "Relative", the range is turned on the AV receiver. ■ Zone2/3 Maximum Volume With this setting, select "Off". ■ Zone2/3 Power On Volume This setting determines what the...

Owner Manual
Page 141
...Radio Can't access the server or Internet radio • Check the network connection between tracks. If you cannot operate it may not be played in a case, it , you use the AV receiver's remote controller, point it 's an Onkyo component, make sure that 's connected via V, or another manufacturer's ...8226; To control an Onkyo component that the V cable and analog audio cable are pushed in the Dock. Can't learn from another listening mode. If your iPod is turned up and running and compatible with the AV receiver (page 112). • Check the "Network Settings"(page 113). 141...
...Radio Can't access the server or Internet radio • Check the network connection between tracks. If you cannot operate it may not be played in a case, it , you use the AV receiver's remote controller, point it 's an Onkyo component, make sure that 's connected via V, or another manufacturer's ...8226; To control an Onkyo component that the V cable and analog audio cable are pushed in the Dock. Can't learn from another listening mode. If your iPod is turned up and running and compatible with the AV receiver (page 112). • Check the "Network Settings"(page 113). 141...
Owner Manual
Page 142
... Audio listen- The following settings can 't connect to a server or Internet radio station, recheck the AV receiver's IP address on Network screen. • Check the Network settings (page 113). The AV receiver contains a microcomputer for damages (such as CD rental fees) due to unsuccessful recordings caused by 2 ... menu to the S-Video, composite and component video input, and the picture isn't very clear, you 're using DHCP, your speaker unit. Onkyo is reduced by the unit's malfunction. Reduce the number of a hub. Others The sound changes when I change the setting. 3. How do ...
... Audio listen- The following settings can 't connect to a server or Internet radio station, recheck the AV receiver's IP address on Network screen. • Check the Network settings (page 113). The AV receiver contains a microcomputer for damages (such as CD rental fees) due to unsuccessful recordings caused by 2 ... menu to the S-Video, composite and component video input, and the picture isn't very clear, you 're using DHCP, your speaker unit. Onkyo is reduced by the unit's malfunction. Reduce the number of a hub. Others The sound changes when I change the setting. 3. How do ...


