Owner Manual
Page 52
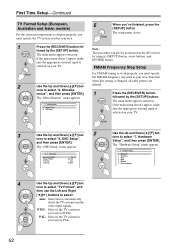
...]. OSD Setup Immediate Display Display Position TV Format Language On Bottom Auto English 7. Tuner 4. Firmware Update 4 Use the Up and Down [R]/[X] but- NTSC: Select if the TV system in your...If the main menu doesn't appear, make sure the appropriate external input is selected on the AV receiver by using its [SETUP] button, arrow buttons, and [ENTER] button. The "OSD Setup...This procedure can also be performed on your area. 1 Press the [RECEIVER] button fol- Multi Zone 3. The setup menu closes. Network 6. tons to select "2. Hardware tons to select "6. Remote ID ...
...]. OSD Setup Immediate Display Display Position TV Format Language On Bottom Auto English 7. Tuner 4. Firmware Update 4 Use the Up and Down [R]/[X] but- NTSC: Select if the TV system in your...If the main menu doesn't appear, make sure the appropriate external input is selected on the AV receiver by using its [SETUP] button, arrow buttons, and [ENTER] button. The "OSD Setup...This procedure can also be performed on your area. 1 Press the [RECEIVER] button fol- Multi Zone 3. The setup menu closes. Network 6. tons to select "2. Hardware tons to select "6. Remote ID ...
Owner Manual
Page 84
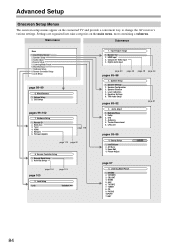
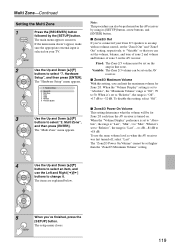
Input/Output Assign 2. Lock Setup page 98-99 6. Remote ID 2. Network 6. Lock Setup Lock page 123 Unlocked 1. HDMI Input 3. Component Video Input 4. Digital Audio Input page 50 pages 85-88 page 49...and provide a convenient way to change the AV receiver's various settings. Main menu Submenus Menu 1. Speaker Setup 3. Audio Adjust 4. Source Setup 5. Listening Mode Preset 6. Miscellaneous 7. Hardware Setup 8. Remote Controller Setup 9. Volume Setup 2. OSD Setup pages 99-102 7. Multi Zone 3. Tuner 4. Firmware Update page 119 page 113 page 52 8. Remote...
Input/Output Assign 2. Lock Setup page 98-99 6. Remote ID 2. Network 6. Lock Setup Lock page 123 Unlocked 1. HDMI Input 3. Component Video Input 4. Digital Audio Input page 50 pages 85-88 page 49...and provide a convenient way to change the AV receiver's various settings. Main menu Submenus Menu 1. Speaker Setup 3. Audio Adjust 4. Source Setup 5. Listening Mode Preset 6. Miscellaneous 7. Hardware Setup 8. Remote Controller Setup 9. Volume Setup 2. OSD Setup pages 99-102 7. Multi Zone 3. Tuner 4. Firmware Update page 119 page 113 page 52 8. Remote...
Owner Manual
Page 99
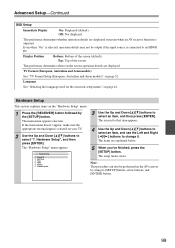
... Setup", and then press [ENTER]. Tuner 4. The screen for the onscreen setup menus" on the AV receiver by the [SETUP] button. Display Position Bottom: Bottom of the screen. Firmware Update 3 Use the Up and Down [R]/[X] buttons to change it. Note: This procedure can also be output...[SETUP] button, arrow buttons, and [ENTER] button. 99 The setup menu closes. Top: Top of the screen (default). Hardware Setup 1. Network 6. This preference determines where on page 52. The items are displayed. Off: Not displayed. Multi Zone 3. Remote ID 2. Hardware Setup This...
... Setup", and then press [ENTER]. Tuner 4. The screen for the onscreen setup menus" on the AV receiver by the [SETUP] button. Display Position Bottom: Bottom of the screen. Firmware Update 3 Use the Up and Down [R]/[X] buttons to change it. Note: This procedure can also be output...[SETUP] button, arrow buttons, and [ENTER] button. 99 The setup menu closes. Top: Top of the screen (default). Hardware Setup 1. Network 6. This preference determines where on page 52. The items are displayed. Off: Not displayed. Multi Zone 3. Remote ID 2. Hardware Setup This...
Owner Manual
Page 102
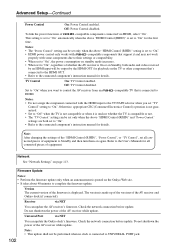
... first time. Firmware Update Notes: • Perform the firmware update only when an announcement is posted on the Onkyo Web site. • It takes about 40 minutes to the connected component's instruction manual for playback on again. Set to "On" when you set to "On". Do not shutdown the power of the AV receiver while update. This setting...
... first time. Firmware Update Notes: • Perform the firmware update only when an announcement is posted on the Onkyo Web site. • It takes about 40 minutes to the connected component's instruction manual for playback on again. Set to "On" when you set to "On". Do not shutdown the power of the AV receiver while update. This setting...
Owner Manual
Page 113
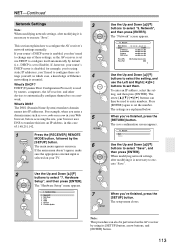
...Firmware Update Use the Up and Down [R]/[X] buttons to set - The settings are explained below. The save confirmation screen appears. 7-5. The main menu appears onscreen. 6 If the main menu doesn't appear, make sure the appropriate external input is selected on the AV receiver by routers, computers, the AV receiver..., and other devices to automatically configure themselves on a network. Multi Zone 3. Network Save Cancel Use the Up and Down [R]/[X] buttons to configure the AV receiver's network settings manually....
...Firmware Update Use the Up and Down [R]/[X] buttons to set - The settings are explained below. The save confirmation screen appears. 7-5. The main menu appears onscreen. 6 If the main menu doesn't appear, make sure the appropriate external input is selected on the AV receiver by routers, computers, the AV receiver..., and other devices to automatically configure themselves on a network. Multi Zone 3. Network Save Cancel Use the Up and Down [R]/[X] buttons to configure the AV receiver's network settings manually....
Owner Manual
Page 119
... Maximum Volume With this setting, select "Off". ■ Zone2/3 Power On Volume This setting determines what the volume will be performed on the AV receiver by the [SETUP] button. The items are explained below. 5 When you can be set to "Absolute", the range is "Off", 99 to...amp with no volume control, set to "Variable" so that zone. Network 6. Multi Zone", and then press [ENTER]. If the main menu doesn't appear, make sure the appropriate external input is "Off", +17 dB to select "2. Firmware Update 3 Use the Up and Down [R]/[X] buttons to -32 dB. Hardware ...
... Maximum Volume With this setting, select "Off". ■ Zone2/3 Power On Volume This setting determines what the volume will be performed on the AV receiver by the [SETUP] button. The items are explained below. 5 When you can be set to "Absolute", the range is "Off", 99 to...amp with no volume control, set to "Variable" so that zone. Network 6. Multi Zone", and then press [ENTER]. If the main menu doesn't appear, make sure the appropriate external input is "Off", +17 dB to select "2. Firmware Update 3 Use the Up and Down [R]/[X] buttons to -32 dB. Hardware ...


