Owner Manual
Page 1
...Contents Before using 2 Facilities and connections 8 Setting up your TX-NR801/TX-NR801E 28 Enjoying Music and Movies 39 Useful Settings (Basic) 52 Useful Settings (Advanced) 56 Making full use of your new AV Receiver. Please read this manual will enable you for future reference.... Following the instructions in this manual thoroughly before making connections and plugging in the unit. Please retain this manual for purchasing an Onkyo AV Receiver.
...Contents Before using 2 Facilities and connections 8 Setting up your TX-NR801/TX-NR801E 28 Enjoying Music and Movies 39 Useful Settings (Basic) 52 Useful Settings (Advanced) 56 Making full use of your new AV Receiver. Please read this manual will enable you for future reference.... Following the instructions in this manual thoroughly before making connections and plugging in the unit. Please retain this manual for purchasing an Onkyo AV Receiver.
Owner Manual
Page 3
...SAFELY. These limits are coloured in accordance with the following measures: • Reorient or relocate the receiving antenna. • Increase the separation between the equipment and receiver. • Connect the equipment into an outlet on the body of this instruction manual is in... the instructions, may not correspond with the coloured markings identifying the terminals in compliance with the limits for your Onkyo dealer. 3. Don't use the TX-NR801/TX-NR801E for compatibility with the letter L or coloured red. For USA, Canadian and Australian models Setting the [STANDBY...
...SAFELY. These limits are coloured in accordance with the following measures: • Reorient or relocate the receiving antenna. • Increase the separation between the equipment and receiver. • Connect the equipment into an outlet on the body of this instruction manual is in... the instructions, may not correspond with the coloured markings identifying the terminals in compliance with the limits for your Onkyo dealer. 3. Don't use the TX-NR801/TX-NR801E for compatibility with the letter L or coloured red. For USA, Canadian and Australian models Setting the [STANDBY...

Owner Manual
Page 6
...Dolby Laboratories. Specifications and operation are the same regardless of Onkyo Corporation. • Windows Media and the Windows logo are trandemarks, or...) I 2 Wideband Component-Video Inputs/1 Output I 100 Watts per channel min. THX Select receivers also feature proprietary THX technologies (e.g., THX Mode) which is a trademark or registered trademark of... Remote controller & two batteries (AA/R6) Speaker cable labels adapter *In catalogs and on the TX-NR801/ TX-NR801E's power cord (Adapter varies from Fraunhofer IIS and THOMSON multimedia. • "XiVA" is ...
...Dolby Laboratories. Specifications and operation are the same regardless of Onkyo Corporation. • Windows Media and the Windows logo are trandemarks, or...) I 2 Wideband Component-Video Inputs/1 Output I 100 Watts per channel min. THX Select receivers also feature proprietary THX technologies (e.g., THX Mode) which is a trademark or registered trademark of... Remote controller & two batteries (AA/R6) Speaker cable labels adapter *In catalogs and on the TX-NR801/ TX-NR801E's power cord (Adapter varies from Fraunhofer IIS and THOMSON multimedia. • "XiVA" is ...
Owner Manual
Page 7
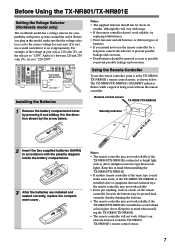
... with power systems around the world. Remote control sensor TX-NR801/TX-NR801E 1 Remove the battery compartment cover by the arrow below . The TX-NR801/TX-NR801E's STANDBY indicator flashes while a signal is used in your area. L AV RECEIVER MODEL NO. Standby indicator 30˚ 30˚ Approx.... 16 ft. (5 m) 2 Insert the two supplied batteries (AA/R6) in the direction shown by pressing it and sliding it and the TX-NR801/ TX-NR801E's remote control sensor. 7 Notes...
... with power systems around the world. Remote control sensor TX-NR801/TX-NR801E 1 Remove the battery compartment cover by the arrow below . The TX-NR801/TX-NR801E's STANDBY indicator flashes while a signal is used in your area. L AV RECEIVER MODEL NO. Standby indicator 30˚ 30˚ Approx.... 16 ft. (5 m) 2 Insert the two supplied batteries (AA/R6) in the direction shown by pressing it and sliding it and the TX-NR801/ TX-NR801E's remote control sensor. 7 Notes...
Owner Manual
Page 9
.... 2 STANDBY/ON button [27] If pressed with the POWER switch turned on (with the receiver plugged in for USA, Canadian and Australian models), the TX-NR801/TX-NR801E turns on European models. When FM is received from the remote controller. 4 AUDIO SELECTOR button [41, 65] Press to select the type of... Union (EBU) and is available in a different room, which you are three settings available: normal, dark, and very dark. When the TX-NR801/ TX-NR801E is referred to as that may adversely affect the operation of other than European models) [40] Press to delete a previously preset station....
.... 2 STANDBY/ON button [27] If pressed with the POWER switch turned on (with the receiver plugged in for USA, Canadian and Australian models), the TX-NR801/TX-NR801E turns on European models. When FM is received from the remote controller. 4 AUDIO SELECTOR button [41, 65] Press to select the type of... Union (EBU) and is available in a different room, which you are three settings available: normal, dark, and very dark. When the TX-NR801/ TX-NR801E is referred to as that may adversely affect the operation of other than European models) [40] Press to delete a previously preset station....
Owner Manual
Page 10
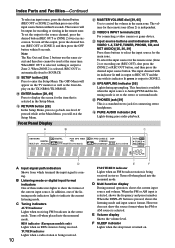
...source channel, press the desired button (REC OUT or ZONE 2) twice in the Setup Menu. TUNED indicator Lights when a radio station is being received in the stereo mode. E Volume display Shows the volume level. F SLEEP indicator Lights when the sleep timer is independent. The OSD Menu ... mode is set the output to display the screen for the remote zone (Zone 2) is turned on the TX-NR801/TX-NR801E. The volume for the item that is coming. C Tuning indicators AUTO indicator Lights when receiving FM broadcasts in stereo. Turns off when placed into the monaural mode.
...source channel, press the desired button (REC OUT or ZONE 2) twice in the Setup Menu. TUNED indicator Lights when a radio station is being received in the stereo mode. E Volume display Shows the volume level. F SLEEP indicator Lights when the sleep timer is independent. The OSD Menu ... mode is set the output to display the screen for the remote zone (Zone 2) is turned on the TX-NR801/TX-NR801E. The volume for the item that is coming. C Tuning indicators AUTO indicator Lights when receiving FM broadcasts in stereo. Turns off when placed into the monaural mode.
Owner Manual
Page 11
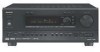
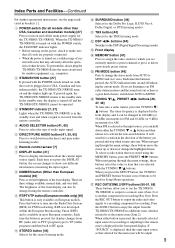
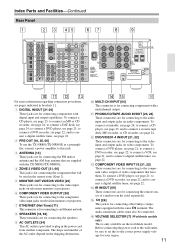
...connecting components with a multichannel output. and to connect a DAT deck, see page 22. E [26] This jack is for connecting other Onkyo components equipped with the TX-NR801/TX-NR801E. 4 ZONE 2 VIDEO OUT [21, 66] This jack is for connecting the component that have them. OR 6 OHMS MIN. ... also be used in the power cord from another component. SURR BACK/ ZONE 2 SPEAKERS R L VOLTAGE SELECTOR 120V REMOTE CONTROL AV RECEIVER MODEL NO. TX-NR 801 220-230V For more information regarding connection procedures, see page 22; To connect a turntable, see page 21; Index Parts...
...connecting components with a multichannel output. and to connect a DAT deck, see page 22. E [26] This jack is for connecting other Onkyo components equipped with the TX-NR801/TX-NR801E. 4 ZONE 2 VIDEO OUT [21, 66] This jack is for connecting the component that have them. OR 6 OHMS MIN. ... also be used in the power cord from another component. SURR BACK/ ZONE 2 SPEAKERS R L VOLTAGE SELECTOR 120V REMOTE CONTROL AV RECEIVER MODEL NO. TX-NR 801 220-230V For more information regarding connection procedures, see page 22; To connect a turntable, see page 21; Index Parts...

Owner Manual
Page 12
... below, see pages shown respectively. • Using the remote controller with the TX-NR801/ TX-NR801E. To operate the TX-NR801/TX-NR801E using the remote controller, first press the RCVR button in the MODE area to use the remote controller in the receiver mode. The instructions given here only explain how to place the remote...
... below, see pages shown respectively. • Using the remote controller with the TX-NR801/ TX-NR801E. To operate the TX-NR801/TX-NR801E using the remote controller, first press the RCVR button in the MODE area to use the remote controller in the receiver mode. The instructions given here only explain how to place the remote...
Owner Manual
Page 14
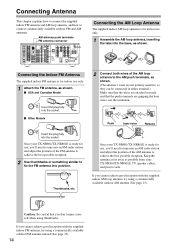
...station and adjust the position of the AM loop antenna to the AM push terminals, as possible from your TX-NR801/TX-NR801E is ready for use , you cannot achieve good reception with the supplied indoor AM loop antenna, ...reception. OR 6 OHMS MIN. / SPEAKER SEE INSTRUCTION MANUAL FOR CORRECT SETTINGS. Push Insert wire Release AM Once your TX-NR801/TX-NR801E, TV, speaker cables, and power cords. I USA and Canadian Model FM 75 Insert the plug fully into ... tabs into position. SURR BACK/ ZONE 2 SPEAKERS R L VOLTAGE SELECTOR 120V REMOTE CONTROL AV RECEIVER MODEL NO.
...station and adjust the position of the AM loop antenna to the AM push terminals, as possible from your TX-NR801/TX-NR801E is ready for use , you cannot achieve good reception with the supplied indoor AM loop antenna, ...reception. OR 6 OHMS MIN. / SPEAKER SEE INSTRUCTION MANUAL FOR CORRECT SETTINGS. Push Insert wire Release AM Once your TX-NR801/TX-NR801E, TV, speaker cables, and power cords. I USA and Canadian Model FM 75 Insert the plug fully into ... tabs into position. SURR BACK/ ZONE 2 SPEAKERS R L VOLTAGE SELECTOR 120V REMOTE CONTROL AV RECEIVER MODEL NO.

Owner Manual
Page 15
... good results can be located away from position A to connect an FM antenna using a commercially available outdoor FM antenna instead. TV/FM antenna splitter To AV receiver To TV (or VCR) Connecting an Outdoor AM Antenna If good reception cannot be achieved using the supplied AM loop antenna, an outdoor AM antenna...
... good results can be located away from position A to connect an FM antenna using a commercially available outdoor FM antenna instead. TV/FM antenna splitter To AV receiver To TV (or VCR) Connecting an Outdoor AM Antenna If good reception cannot be achieved using the supplied AM loop antenna, an outdoor AM antenna...
Owner Manual
Page 18
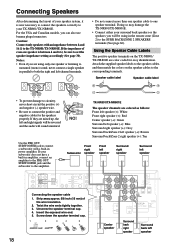
... incOhUT (15 mm) of even one speaker is now necessary to connect the speakers correctly to your TX-NR801/TX-NR801E. SURR BACK/ ZONE 2 SPEAKERS R L VOLTAGE SELECTOR 120V REMOTE CONTROL AV RECEIVER MODEL NO. R L • To prevent damage to circuitry, never short-circuit the positive (+)... and negative (-) speaker wire. • Be sure to the TX-NR801/TX-NR801E. If your surround back speakers or the speakers...
... incOhUT (15 mm) of even one speaker is now necessary to connect the speakers correctly to your TX-NR801/TX-NR801E. SURR BACK/ ZONE 2 SPEAKERS R L VOLTAGE SELECTOR 120V REMOTE CONTROL AV RECEIVER MODEL NO. R L • To prevent damage to circuitry, never short-circuit the positive (+)... and negative (-) speaker wire. • Be sure to the TX-NR801/TX-NR801E. If your surround back speakers or the speakers...
Owner Manual
Page 28
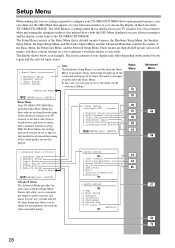
... various settings required to configure your TX-NR801/TX-NR801E for optimum performance, you can either use the display on the front of the TX-NR801/TX-NR801E. In this manual shows both the OSD Menu displayed on the screen and setting any of an AV receiver or for those who wish to watch movies... and listen to the menu via the "→Advanced Menu." Basic Menu 30 Advanced Menu 32 [ENTER]Quit:[SETUP] Basic Menu Your TX-NR801/TX-NR801E is displayed on your TV monitor. The OSD ...
... various settings required to configure your TX-NR801/TX-NR801E for optimum performance, you can either use the display on the front of the TX-NR801/TX-NR801E. In this manual shows both the OSD Menu displayed on the screen and setting any of an AV receiver or for those who wish to watch movies... and listen to the menu via the "→Advanced Menu." Basic Menu 30 Advanced Menu 32 [ENTER]Quit:[SETUP] Basic Menu Your TX-NR801/TX-NR801E is displayed on your TV monitor. The OSD ...
Owner Manual
Page 42
... player that supports DTS output and comes from the left and right channels separately for information regarding how to music. Using the Listening Modes The TX-NR801/TX-NR801E's surround sound enables you to enjoy movie theater or concert hall quality sound in its original 5.1 channel form. See pages 44-45 for... This mode can be sure to set to the Cinema Mode designed for playing movies and the Music Mode designed for playing DTS sources. To receive the full effect, there is output to the right and left and right speakers. In the Movie Mode, the surround channels, which had four...
... player that supports DTS output and comes from the left and right channels separately for information regarding how to music. Using the Listening Modes The TX-NR801/TX-NR801E's surround sound enables you to enjoy movie theater or concert hall quality sound in its original 5.1 channel form. See pages 44-45 for... This mode can be sure to set to the Cinema Mode designed for playing movies and the Music Mode designed for playing DTS sources. To receive the full effect, there is output to the right and left and right speakers. In the Movie Mode, the surround channels, which had four...

Owner Manual
Page 46
... panel. Listening to a stereo radio station (FM mode) When you to receive RDS broadcasts. Some inter-station noise may be heard, but the sound will not cut in stereo, then "FM STEREO" appears. The TX-NR801/TX-NR801E provides a number of listening modes perfect for more information regarding tuning into... is most frequently used is received in stereo, the scanning stops. • The European model allows you tune into the station you can press the TUNING or button continuously for listening to the radio and getting the most out of the TX-NR801/TX-NR801E that you listen to stereo...
... panel. Listening to a stereo radio station (FM mode) When you to receive RDS broadcasts. Some inter-station noise may be heard, but the sound will not cut in stereo, then "FM STEREO" appears. The TX-NR801/TX-NR801E provides a number of listening modes perfect for more information regarding tuning into... is most frequently used is received in stereo, the scanning stops. • The European model allows you tune into the station you can press the TUNING or button continuously for listening to the radio and getting the most out of the TX-NR801/TX-NR801E that you listen to stereo...

Owner Manual
Page 48
...). • Alarm (ALARM): When an RDS station is selected, traffic information will flash on the display if the TX-NR801E receives characters that broadcasts your favorite categories of music, news, or other information. News reports (NEWS): Reports on sales charts. Varied (VARIED...Opera). Other music (OTHER M): Music styles not covered by the radio station. Notes: • In some cases, the characters displayed on the TX-NR801E. None (NONE): No program type. Rock music (ROCK M): Popular music with a wider range of the frequency. Listening to RDS Broadcasts...
...). • Alarm (ALARM): When an RDS station is selected, traffic information will flash on the display if the TX-NR801E receives characters that broadcasts your favorite categories of music, news, or other information. News reports (NEWS): Reports on sales charts. Varied (VARIED...Opera). Other music (OTHER M): Music styles not covered by the radio station. Notes: • In some cases, the characters displayed on the TX-NR801E. None (NONE): No program type. Rock music (ROCK M): Popular music with a wider range of the frequency. Listening to RDS Broadcasts...

Owner Manual
Page 49
.../TP while "NONE" is displayed, "PTY ?" will appear if the current station is broadcasting TP signals. "[TP]" will appear. Also, if "TP" is received, the characters will appear. • If "Waiting" appears on the display. 4 ENTER 5 ENTER Press the ENTER button. Listening to RDS Broadcasts (European models ...source. 2 RT/PTY/TP Press the RT/PTY/TP button twice. In this function will appear when no RDS signal is being received from the station. The TX-NR801E will scan until it reaches a station of the station will scroll across the front display. • If "No Text Data"...
.../TP while "NONE" is displayed, "PTY ?" will appear if the current station is broadcasting TP signals. "[TP]" will appear. Also, if "TP" is received, the characters will appear. • If "Waiting" appears on the display. 4 ENTER 5 ENTER Press the ENTER button. Listening to RDS Broadcasts (European models ...source. 2 RT/PTY/TP Press the RT/PTY/TP button twice. In this function will appear when no RDS signal is being received from the station. The TX-NR801E will scan until it reaches a station of the station will scroll across the front display. • If "No Text Data"...

Owner Manual
Page 68
...LISTENING MODE MEMORY ON RCVR LEVEL / INPUT SELECTOR buttons ZONE 2 Enjoying Music in the Remote Zone Using the buttons on the TX-NR801/TX-NR801E 1 Press the ZONE 2 button on the TX-NR801/TX-NR801E from the remote zone: After pressing the ZONE 2 button, press the ON button within 5 seconds. The indicator above... the ZONE 2 button and then the STANDBY button.) Using the remote controller Before performing the procedures, press the RCVR button to enter the receiver mode. In this time, you change the input source for the main zone, the input source for the remote zone (Zone 2) will not...
...LISTENING MODE MEMORY ON RCVR LEVEL / INPUT SELECTOR buttons ZONE 2 Enjoying Music in the Remote Zone Using the buttons on the TX-NR801/TX-NR801E 1 Press the ZONE 2 button on the TX-NR801/TX-NR801E from the remote zone: After pressing the ZONE 2 button, press the ON button within 5 seconds. The indicator above... the ZONE 2 button and then the STANDBY button.) Using the remote controller Before performing the procedures, press the RCVR button to enter the receiver mode. In this time, you change the input source for the main zone, the input source for the remote zone (Zone 2) will not...
Owner Manual
Page 69
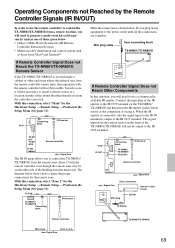
... the Setup Menu (See page 31). Do not plug in the Setup Menu (See page 31). To IR IN TX-NR801/ TX-NR801E Connecting block IR Receiver Make the connection as those given below: • Onkyo's Multi-Room System kits (IR Remote Controller Extension System) • Multiroom A/V distribution and control system such as shown below...
... the Setup Menu (See page 31). Do not plug in the Setup Menu (See page 31). To IR IN TX-NR801/ TX-NR801E Connecting block IR Receiver Make the connection as those given below: • Onkyo's Multi-Room System kits (IR Remote Controller Extension System) • Multiroom A/V distribution and control system such as shown below...
Owner Manual
Page 71
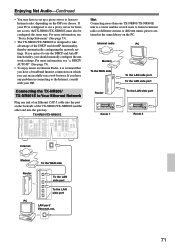
... VOLTAGE SELECTOR 120V REMOTE CONTROL AV RECEIVER MODEL NO. OR 6 OHMS MIN. / SPEAKER SEE INSTRUCTION MANUAL FOR CORRECT SETTINGS. Enjoying Net Audio-Continued • You may have to set up a proxy server to listen to Internet radio, depending on the backside of the TX-NR801/TX-NR801E and the other end into...you choose. If your PC is configured to the Internet, consult with your ISP. Connecting the TX-NR801/ TX-NR801E to Your Ethernet Network Plug one TX-NR801/TX-NR801E unit to a router enables several users to listen to Internet radio at different stations or different music ...
... VOLTAGE SELECTOR 120V REMOTE CONTROL AV RECEIVER MODEL NO. OR 6 OHMS MIN. / SPEAKER SEE INSTRUCTION MANUAL FOR CORRECT SETTINGS. Enjoying Net Audio-Continued • You may have to set up a proxy server to listen to Internet radio, depending on the backside of the TX-NR801/TX-NR801E and the other end into...you choose. If your PC is configured to the Internet, consult with your ISP. Connecting the TX-NR801/ TX-NR801E to Your Ethernet Network Plug one TX-NR801/TX-NR801E unit to a router enables several users to listen to Internet radio at different stations or different music ...
Owner Manual
Page 74
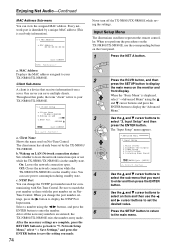
...using the and cursor buttons and press the ENTER button to select the sub-menu that receives information from a sever. After the necessary settings are entered, the 6 TX-NR801/TX-NR801E exits the number-entry mode. Press the SETUP button to return to display the main...XX:XX:XX:XX:XX 6 7 8 9 0 1 2 Quit:[SETUP] Never turn off the TX-NR801/TX-NR801E while saving the settings. Throughout this guide, the term "client" refers to your TX-NR801/TX-NR801E. 5-4.Client Setup a.Client Name :TX-NR801/XXXXXX b.Wakeup on the front panel. 1 Press the NET A button. Use the and cursor ...
...using the and cursor buttons and press the ENTER button to select the sub-menu that receives information from a sever. After the necessary settings are entered, the 6 TX-NR801/TX-NR801E exits the number-entry mode. Press the SETUP button to return to display the main...XX:XX:XX:XX:XX 6 7 8 9 0 1 2 Quit:[SETUP] Never turn off the TX-NR801/TX-NR801E while saving the settings. Throughout this guide, the term "client" refers to your TX-NR801/TX-NR801E. 5-4.Client Setup a.Client Name :TX-NR801/XXXXXX b.Wakeup on the front panel. 1 Press the NET A button. Use the and cursor ...


