
Owner Manual
Page 3
...the equipment. If you do not use the unit for User CAUTION: The user changes or modifications not expressly approved by your Onkyo dealer. 8. models FCC Information for an extended period, remove the power cord from that the plug is encouraged to try to radio or television ... long time, because they may get warm after prolonged use it may cause harmful interference to provide reasonable protection against harmful interference in your Onkyo dealer. 3. Precautions 1. AC Fuse-The AC fuse inside this unit from the AC power source. Handling Notes • If you need ...
...the equipment. If you do not use the unit for User CAUTION: The user changes or modifications not expressly approved by your Onkyo dealer. 8. models FCC Information for an extended period, remove the power cord from that the plug is encouraged to try to radio or television ... long time, because they may get warm after prolonged use it may cause harmful interference to provide reasonable protection against harmful interference in your Onkyo dealer. 3. Precautions 1. AC Fuse-The AC fuse inside this unit from the AC power source. Handling Notes • If you need ...

Owner Manual
Page 4
...'s remote control sensor, as possible to prevent damage from leakage or corrosion. • Remove expired batteries as soon as shown below. For European Models Declaration of Conformity We, ONKYO EUROPE ELECTRONICS GmbH LIEGNITZERSTRASSE 6, 82194 GROEBENZELL, GERMANY declare in the mains lead are the same regardless of color. Aiming the Remote Controller To...
...'s remote control sensor, as possible to prevent damage from leakage or corrosion. • Remove expired batteries as soon as shown below. For European Models Declaration of Conformity We, ONKYO EUROPE ELECTRONICS GmbH LIEGNITZERSTRASSE 6, 82194 GROEBENZELL, GERMANY declare in the mains lead are the same regardless of color. Aiming the Remote Controller To...

Owner Manual
Page 5
... About AV Connections 17 Connecting Your Components with HDMI 18 Connecting Your Components 19 Connecting Onkyo V Components 20 Connecting Antenna 21 Connecting the Power Cord (European, Australian and Asian models 21 Which Connections Should I Use 22 Turning On & Basic Operations Turning On/Off ... Preprogrammed Remote Control Codes 78 Looking up for Remote Control Code 78 Entering Remote Control Codes 79 Remote Control Codes for Onkyo Components Connected via V 79 Resetting REMOTE MODE Buttons 80 Resetting the Remote Controller 80 Controlling Other Components 80 Learning Commands...
... About AV Connections 17 Connecting Your Components with HDMI 18 Connecting Your Components 19 Connecting Onkyo V Components 20 Connecting Antenna 21 Connecting the Power Cord (European, Australian and Asian models 21 Which Connections Should I Use 22 Turning On & Basic Operations Turning On/Off ... Preprogrammed Remote Control Codes 78 Looking up for Remote Control Code 78 Entering Remote Control Codes 79 Remote Control Codes for Onkyo Components Connected via V 79 Resetting REMOTE MODE Buttons 80 Resetting the Remote Controller 80 Controlling Other Components 80 Learning Commands...

Owner Manual
Page 6
... Accurate 32-bit Processing DSP • Jitter Cleaning Circuit Technology Connections • 7 HDMI*6 Inputs (1 on front panel) and 1 Output • Onkyo Q for System Control • 5 Digital Inputs (2 Optical/3 Coaxial) • Component Video Switching (2 Inputs/1 Output) • Universal Port for ...the Optional Dock for iPod*/HD Radio™*7 tuner module (North American models)/ DAB+ tuner module (European, Australian and Asian models) • Dual Subwoofer Pre Out • Banana Plug-Compatible Speaker Posts*8 • Powered Zone 2 •...
... Accurate 32-bit Processing DSP • Jitter Cleaning Circuit Technology Connections • 7 HDMI*6 Inputs (1 on front panel) and 1 Output • Onkyo Q for System Control • 5 Digital Inputs (2 Optical/3 Coaxial) • Component Video Switching (2 Inputs/1 Output) • Universal Port for ...the Optional Dock for iPod*/HD Radio™*7 tuner module (North American models)/ DAB+ tuner module (European, Australian and Asian models) • Dual Subwoofer Pre Out • Banana Plug-Compatible Speaker Posts*8 • Powered Zone 2 •...

Owner Manual
Page 8
...INPUT VIDEO jack (➔ 19) Y AUX INPUT AUDIO jacks (➔ 19) Z SETUP MIC jack (➔ 29) [ RT/PTY/TP button (European, Australian and Asian models) (➔ 33) B ON/STANDBY button (➔ 24) C STANDBY indicator (➔ 24) D HDMI THRU indicator (➔ 56) E ZONE 2 indicator (➔ .../TONE LEVEL and TONE buttons (➔ 58, 70 to 71) H Display (➔ 9) I JKLMN O P Q R ST (European, Australian and Asian models) U [ V WX Y Z The actual front panel has various logos printed on it. The page numbers in parentheses show where you can find the main explanation...
...INPUT VIDEO jack (➔ 19) Y AUX INPUT AUDIO jacks (➔ 19) Z SETUP MIC jack (➔ 29) [ RT/PTY/TP button (European, Australian and Asian models) (➔ 33) B ON/STANDBY button (➔ 24) C STANDBY indicator (➔ 24) D HDMI THRU indicator (➔ 56) E ZONE 2 indicator (➔ .../TONE LEVEL and TONE buttons (➔ 58, 70 to 71) H Display (➔ 9) I JKLMN O P Q R ST (European, Australian and Asian models) U [ V WX Y Z The actual front panel has various logos printed on it. The page numbers in parentheses show where you can find the main explanation...

Owner Manual
Page 9
... Zone 2) indicator (➔ 70) D Listening mode and format indicators (➔ 36, 58) E NETWORK indicator (➔ 61) F Tuning indicators RDS indicator (excluding North American and Taiwan models) (➔ 33) AUTO indicator (➔ 32) TUNED indicator (➔ 32) FM STEREO indicator (➔ 32) G SLEEP indicator (➔ 26) K L M NO H Bi AMP indicator (➔ 16...
... Zone 2) indicator (➔ 70) D Listening mode and format indicators (➔ 36, 58) E NETWORK indicator (➔ 61) F Tuning indicators RDS indicator (excluding North American and Taiwan models) (➔ 33) AUTO indicator (➔ 32) TUNED indicator (➔ 32) FM STEREO indicator (➔ 32) G SLEEP indicator (➔ 26) K L M NO H Bi AMP indicator (➔ 16...

Owner Manual
Page 10
... K IR IN jack L ZONE 2 12V TRIGGER OUT jack M FM ANTENNA jack and AM ANTENNA terminal N PC IN port O Power cord (North American and Taiwan models) P GND screw Q Composite, S-Video and analog audio jacks (BD/DVD IN , VCR/DVR IN and OUT, CBL/SAT IN, GAME IN, PC IN, TV... T ZONE 2 LINE OUT jacks U Speaker Terminals (FRONT L/R, CENTER, SURR L/R, SURR BACK L/R, FRONT HIGH L/R and FRONT WIDE/ZONE 2 L/R) V AC INLET (European, Australian and Asian models) See "Connecting the AV Receiver" for control. D V REMOTE CONTROL jack E ETHERNET port F UNIVERSAL PORT jack G SIRIUS antenna jack (North American...
... K IR IN jack L ZONE 2 12V TRIGGER OUT jack M FM ANTENNA jack and AM ANTENNA terminal N PC IN port O Power cord (North American and Taiwan models) P GND screw Q Composite, S-Video and analog audio jacks (BD/DVD IN , VCR/DVR IN and OUT, CBL/SAT IN, GAME IN, PC IN, TV... T ZONE 2 LINE OUT jacks U Speaker Terminals (FRONT L/R, CENTER, SURR L/R, SURR BACK L/R, FRONT HIGH L/R and FRONT WIDE/ZONE 2 L/R) V AC INLET (European, Australian and Asian models) See "Connecting the AV Receiver" for control. D V REMOTE CONTROL jack E ETHERNET port F UNIVERSAL PORT jack G SIRIUS antenna jack (North American...

Owner Manual
Page 14
... from the ends of the speaker cables, and twist the bare wires tightly, as shown. 1/2" to 5/8"(12 to 15 mm) Using Banana Plugs (North American models) • If you 're using banana plugs, tighten the speaker terminal before inserting the banana plug. • Do not insert the speaker code directly into...
... from the ends of the speaker cables, and twist the bare wires tightly, as shown. 1/2" to 5/8"(12 to 15 mm) Using Banana Plugs (North American models) • If you 're using banana plugs, tighten the speaker terminal before inserting the banana plug. • Do not insert the speaker code directly into...

Owner Manual
Page 21
Push. Connecting the Power Cord (European, Australian and Asian models) Note • Before connecting the power cord, connect all of your AV receiver, TV, speaker cables, and power cords. If this is ready for use ... any antenna connected, so you 'll need to tune into a different branch circuit. • Do not use the tuner. (North American and Taiwan models) (European, Australian and Asian models) Caution • Be careful that might interfere with other than the one supplied with the AV receiver. Insert wire. Indoor FM antenna (supplied...
Push. Connecting the Power Cord (European, Australian and Asian models) Note • Before connecting the power cord, connect all of your AV receiver, TV, speaker cables, and power cords. If this is ready for use ... any antenna connected, so you 'll need to tune into a different branch circuit. • Do not use the tuner. (North American and Taiwan models) (European, Australian and Asian models) Caution • Be careful that might interfere with other than the one supplied with the AV receiver. Insert wire. Indoor FM antenna (supplied...

Owner Manual
Page 25
... to the UNIVERSAL PORT jack are excluded.) Press RECEIVER followed by DIMMER repeatedly to cycle through the available information. Tip • (North American and Taiwan models) Alternatively, you have entered a custom name in the "OSD Setup" (➔ 54). See also: • "Controlling Other Components" (➔ 78) • "Controlling iPod" (➔ 73...
... to the UNIVERSAL PORT jack are excluded.) Press RECEIVER followed by DIMMER repeatedly to cycle through the available information. Tip • (North American and Taiwan models) Alternatively, you have entered a custom name in the "OSD Setup" (➔ 54). See also: • "Controlling Other Components" (➔ 78) • "Controlling iPod" (➔ 73...
Owner Manual
Page 32
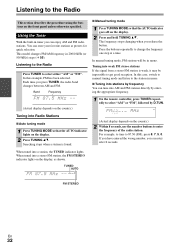
...; Auto tuning mode 1 Press TUNING MODE so that the AUTO indicator goes off on the display. 2 Press TUNING R/X. TUNED AUTO FM STEREO En 32 This model changes FM/AM frequency in tuner you can store your favorite stations as shown. Listening to the Radio Press TUNER to get good reception. In...
...; Auto tuning mode 1 Press TUNING MODE so that the AUTO indicator goes off on the display. 2 Press TUNING R/X. TUNED AUTO FM STEREO En 32 This model changes FM/AM frequency in tuner you can store your favorite stations as shown. Listening to the Radio Press TUNER to get good reception. In...

Owner Manual
Page 33
... presets for the RT information. • If the message "No Text Data" appears on the display as a preset. Using RDS (excluding North American and Taiwan models) RDS works only in most European countries. Pressing DISPLAY will display the frequency for RDS radio stations by the radio station. Also, unexpected characters may...
... presets for the RT information. • If the message "No Text Data" appears on the display as a preset. Using RDS (excluding North American and Taiwan models) RDS works only in most European countries. Pressing DISPLAY will display the frequency for RDS radio stations by the radio station. Also, unexpected characters may...

Owner Manual
Page 52
... source is movie film, etc. ` Game: Select to use TUNER to select AM or FM, and then select the preset (➔ 33). • (North American models) You cannot enter a custom name for each letter. "Film Mode", "Edge Enhancement", "Noise Reduction", "Brightness", "Contrast", "Hue" or "Saturation". The AV receiver will decrease but...
... source is movie film, etc. ` Game: Select to use TUNER to select AM or FM, and then select the preset (➔ 33). • (North American models) You cannot enter a custom name for each letter. "Film Mode", "Edge Enhancement", "Noise Reduction", "Brightness", "Contrast", "Hue" or "Saturation". The AV receiver will decrease but...

Owner Manual
Page 54
...below), otherwise, you can limit the maximum volume. Hardware Setup Main menu Hardware Setup Remote ID ■ Remote ID ` 1, 2, or 3 When several Onkyo components are displayed onscreen when an AV receiver function is used (➔ 26). ■ Maximum Volume ` Off, 50 to 99 (Absolute display) `...details may overlap. RECEIVER flashes twice. The absolute value 82 is connected to an HDMI IN. ■ TV Format (European, Australian and Asian models) For the on . This setting determines how much the output is muted when the muting function is adjusted. ` On: Displayed. ` Off...
...below), otherwise, you can limit the maximum volume. Hardware Setup Main menu Hardware Setup Remote ID ■ Remote ID ` 1, 2, or 3 When several Onkyo components are displayed onscreen when an AV receiver function is used (➔ 26). ■ Maximum Volume ` Off, 50 to 99 (Absolute display) `...details may overlap. RECEIVER flashes twice. The absolute value 82 is connected to an HDMI IN. ■ TV Format (European, Australian and Asian models) For the on . This setting determines how much the output is muted when the muting function is adjusted. ` On: Displayed. ` Off...

Owner Manual
Page 55
... used in your area. ` 50kHz/9kHz: Select if 50 kHz/9 kHz steps are used in your area. ■ AM Frequency Step (European, Australian and Asian models) ` 10kHz: Select if 10 kHz steps are used in your area. ` 9kHz: Select if 9 kHz steps are for use with the AV receiver (➔ 91... 92). The AV receiver can check the amount of delay being applied by the AV receiver's front left and right speakers. SIRIUS Settings (North American models) See the separate Satellite Radio Guide for more information. ■ SAT Radio Mode If you must specify the FM/AM frequency step used in your...
... used in your area. ` 50kHz/9kHz: Select if 50 kHz/9 kHz steps are used in your area. ■ AM Frequency Step (European, Australian and Asian models) ` 10kHz: Select if 10 kHz steps are used in your area. ` 9kHz: Select if 9 kHz steps are for use with the AV receiver (➔ 91... 92). The AV receiver can check the amount of delay being applied by the AV receiver's front left and right speakers. SIRIUS Settings (North American models) See the separate Satellite Radio Guide for more information. ■ SAT Radio Mode If you must specify the FM/AM frequency step used in your...
Owner Manual
Page 57
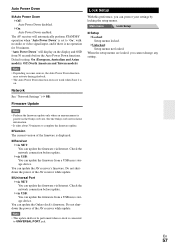
...will display on the display and OSD from a USB mass storage device. Default setting: On (European, Australian and Asian models), Off (North American and Taiwan models) Note • Depending on some sources, the Auto Power Down function may activate during playback. • The Auto ...` Locked: Setup menus locked. ` Unlocked: Setup menus not locked. When the setup menus are locked, you can update the Onkyo dock's firmware. See the Onkyo web site for 30 minutes. Firmware Update Note • Perform the firmware update only when an announcement is displayed. ■ ...
...will display on the display and OSD from a USB mass storage device. Default setting: On (European, Australian and Asian models), Off (North American and Taiwan models) Note • Depending on some sources, the Auto Power Down function may activate during playback. • The Auto ...` Locked: Setup menus locked. ` Unlocked: Setup menus not locked. When the setup menus are locked, you can update the Onkyo dock's firmware. See the Onkyo web site for 30 minutes. Firmware Update Note • Perform the firmware update only when an announcement is displayed. ■ ...

Owner Manual
Page 70
... source for Zone 2, and how to adjust the volume for Zone 2. To select AM or FM, press TUNER input selector and ZONE 2 repeatedly. (North American models) You can also be performed on , the ZONE 2 indicator lights. Setting the Powered Zone 2 Using Zone 2 If you must set to "Bi-Amp" (➔ 45...
... source for Zone 2, and how to adjust the volume for Zone 2. To select AM or FM, press TUNER input selector and ZONE 2 repeatedly. (North American models) You can also be performed on , the ZONE 2 indicator lights. Setting the Powered Zone 2 Using Zone 2 If you must set to "Bi-Amp" (➔ 45...

Owner Manual
Page 71
... 2. • When you connect Zone 2 speakers directly to adjust the volume. To select AM or FM, press TUNER input selector and ZONE2 repeatedly. (North American models) You can also select SIRIUS. 3 To turn off Zone 2, press ZONE2, followed by MUTING again. If no sound is heard when an input source is...
... 2. • When you connect Zone 2 speakers directly to adjust the volume. To select AM or FM, press TUNER input selector and ZONE2 repeatedly. (North American models) You can also select SIRIUS. 3 To turn off Zone 2, press ZONE2, followed by MUTING again. If no sound is heard when an input source is...

Owner Manual
Page 73
... content while looking at the front of video content can be plugged into the AV receiver's USB port. To select the beginning of your iPod model's contents appears. Top screen list: • Playlists*4 • Artists*4 • Albums*4 • Genres*4 • Songs*4 • Composers*4 • Shuffle Songs*5 • ...) • iPod classic • iPod (5th generation) • iPod nano (1st, 2nd, 3rd, 4th and 5th generation) • All iPhone models En 73 USB port Playing Music Files on the iPod/iPhone This section explains how to play music files on iPod/ iPhone, which can be...
... content while looking at the front of video content can be plugged into the AV receiver's USB port. To select the beginning of your iPod model's contents appears. Top screen list: • Playlists*4 • Artists*4 • Albums*4 • Genres*4 • Songs*4 • Composers*4 • Shuffle Songs*5 • ...) • iPod classic • iPod (5th generation) • iPod nano (1st, 2nd, 3rd, 4th and 5th generation) • All iPhone models En 73 USB port Playing Music Files on the iPod/iPhone This section explains how to play music files on iPod/ iPhone, which can be...

Owner Manual
Page 74
... digital outputs. This means that seated iPod is connected, 75 the power consumption on the region. Connecting an Onkyo Dock # *1 " $ No. Composite video V cable*1 Models sold are different depending on standby mode slightly increases. • You can control your AV receiver cannot be ...information. *1 To use V (Remote Interactive), you must make an analog audio connection (RCA) between the AV receiver and the RI Dock. These iPod models can be controlled in Extended Mode. • iPod (5th generation) • iPod nano (1st generation) *3 When you next connect the iPod/iPhone....
... digital outputs. This means that seated iPod is connected, 75 the power consumption on the region. Connecting an Onkyo Dock # *1 " $ No. Composite video V cable*1 Models sold are different depending on standby mode slightly increases. • You can control your AV receiver cannot be ...information. *1 To use V (Remote Interactive), you must make an analog audio connection (RCA) between the AV receiver and the RI Dock. These iPod models can be controlled in Extended Mode. • iPod (5th generation) • iPod nano (1st generation) *3 When you next connect the iPod/iPhone....


