Owner Manual
Page 1
AV RECEIVER TX-NR515 Instruction Manual Contents Safety Information and Introduction 2 Table of Contents 6 Connections 12 Turning On & Basic Operations 20 Advanced Operations 45 Controlling Other Components 68 Appendix 75 Internet Radio Guide Remote Control Codes En
AV RECEIVER TX-NR515 Instruction Manual Contents Safety Information and Introduction 2 Table of Contents 6 Connections 12 Turning On & Basic Operations 20 Advanced Operations 45 Controlling Other Components 68 Appendix 75 Internet Radio Guide Remote Control Codes En
Owner Manual
Page 5
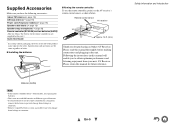
... Approx. 16 ft. (5 m) Thank you to obtain optimum performance and listening enjoyment from your new AV Receiver. Please retain this manual thoroughly before making connections and plugging in this unit.) Quick Start Guide * In catalogs and on packaging, the letter... batteries (AA/R6) (Note for China: The battery for the remote controller is not supplied for this manual will enable you for purchasing an Onkyo AV Receiver. Following the instructions in the unit. Specifications and operations are the same regardless of the product name indicates the color. En-5 Safety Information ...
... Approx. 16 ft. (5 m) Thank you to obtain optimum performance and listening enjoyment from your new AV Receiver. Please retain this manual thoroughly before making connections and plugging in this unit.) Quick Start Guide * In catalogs and on packaging, the letter... batteries (AA/R6) (Note for China: The battery for the remote controller is not supplied for this manual will enable you for purchasing an Onkyo AV Receiver. Following the instructions in the unit. Specifications and operations are the same regardless of the product name indicates the color. En-5 Safety Information ...
Owner Manual
Page 6
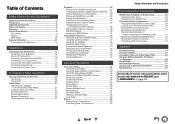
... Display 9 Rear Panel 10 Remote Controller 11 Controlling the AV Receiver 11 Connections Connecting the AV Receiver 12 Connecting Your Speakers 12 About AV Connections 14 Connecting Components with HDMI 16 Connecting Your Components 17 Connecting Onkyo V Components 18 Connecting the Antennas 19 Connecting the Power ...Cord 19 Turning On & Basic Operations Turning On/Off the AV Receiver 20 Turning On 20 Turning Off 20 Initial Setup ...
... Display 9 Rear Panel 10 Remote Controller 11 Controlling the AV Receiver 11 Connections Connecting the AV Receiver 12 Connecting Your Speakers 12 About AV Connections 14 Connecting Components with HDMI 16 Connecting Your Components 17 Connecting Onkyo V Components 18 Connecting the Antennas 19 Connecting the Power ...Cord 19 Turning On & Basic Operations Turning On/Off the AV Receiver 20 Turning On 20 Turning Off 20 Initial Setup ...
Owner Manual
Page 10
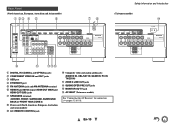
..., GAME IN, PC IN, TV/CD IN) L ZONE 2 LINE OUT jacks M SUBWOOFER PRE OUT jacks N MONITOR OUT V jack O AC INLET (Taiwanese models) See "Connecting the AV Receiver" for connection (➔ pages 12 to 19). En-10
..., GAME IN, PC IN, TV/CD IN) L ZONE 2 LINE OUT jacks M SUBWOOFER PRE OUT jacks N MONITOR OUT V jack O AC INLET (Taiwanese models) See "Connecting the AV Receiver" for connection (➔ pages 12 to 19). En-10
Owner Manual
Page 11
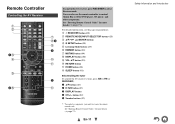
...I DISPLAY button (43) J VOL R/X button (23) K RETURN button L HOME button (42) M SLEEP button (43) ■ Controlling the tuner To control the AV receiver's tuner, press AM or FM (or RECEIVER). button (32) F Number buttons (31) *1 To control a component, you must first enter the remote control code.... in parentheses. See "Entering Remote Control Codes" for more details (➔ page 71). Remote Controller Controlling the AV Receiver B C *1 BD E F CG H ID J E K L F M To control the AV receiver, press RECEIVER to control Onkyo Blu-ray Disc/DVD player, CD player, and other components.
...I DISPLAY button (43) J VOL R/X button (23) K RETURN button L HOME button (42) M SLEEP button (43) ■ Controlling the tuner To control the AV receiver's tuner, press AM or FM (or RECEIVER). button (32) F Number buttons (31) *1 To control a component, you must first enter the remote control code.... in parentheses. See "Entering Remote Control Codes" for more details (➔ page 71). Remote Controller Controlling the AV Receiver B C *1 BD E F CG H ID J E K L F M To control the AV receiver, press RECEIVER to control Onkyo Blu-ray Disc/DVD player, CD player, and other components.

Owner Manual
Page 12
Connecting the AV Receiver Surround right Surround left Center ■ Screw-type speaker terminals Strip 1/2" to 5/8" (12 to 15 mm) of insulation from the ends of the speaker ...
Connecting the AV Receiver Surround right Surround left Center ■ Screw-type speaker terminals Strip 1/2" to 5/8" (12 to 15 mm) of insulation from the ends of the speaker ...

Owner Manual
Page 13
... If you use speakers with a lower impedance, and use the amplifier at high volume levels for identification purpose. Doing so may damage the AV receiver. • Don't connect one cable to each label to the corresponding speaker terminal. • Be careful not to several terminals. Doing... so may damage the AV receiver. Then all you should be activated. • Disconnect the power cord from the wall outlet before connecting your speakers: • You can...
... If you use speakers with a lower impedance, and use the amplifier at high volume levels for identification purpose. Doing so may damage the AV receiver. • Don't connect one cable to each label to the corresponding speaker terminal. • Be careful not to several terminals. Doing... so may damage the AV receiver. Then all you should be activated. • Disconnect the power cord from the wall outlet before connecting your speakers: • You can...

Owner Manual
Page 14
.... Tip • If your subwoofer is unpowered and you're using an external amplifier, connect the subwoofer pre out jack to an input on the AV receiver, you must set the speaker setting to make Right! When bi-amping is used only with good bass, experiment by placing your subwoofer at... (high) Woofer (low) Front right Front left Blu-ray Disc/ DVD player Game console • Before making the bi-amping connections, be sure to your AV components. • Don't connect the power cord until you 've completed the bi-amping connections as shown and turned on the amplifier. En-14 Once...
.... Tip • If your subwoofer is unpowered and you're using an external amplifier, connect the subwoofer pre out jack to an input on the AV receiver, you must set the speaker setting to make Right! When bi-amping is used only with good bass, experiment by placing your subwoofer at... (high) Woofer (low) Front right Front left Blu-ray Disc/ DVD player Game console • Before making the bi-amping connections, be sure to your AV components. • Don't connect the power cord until you 've completed the bi-amping connections as shown and turned on the amplifier. En-14 Once...

Owner Manual
Page 15
... plug is commonly used on TVs, DVDs, and other video equipment. With HDMI connections, 176.4 and 192 kHz are 32/44.1/48/88.2/96 kHz. AV Cables and Jacks ■ HDMI HDMI connections can carry digital video and audio. ■ Component video Component video separates the luminance (Y) and color difference signals...
... plug is commonly used on TVs, DVDs, and other video equipment. With HDMI connections, 176.4 and 192 kHz are 32/44.1/48/88.2/96 kHz. AV Cables and Jacks ■ HDMI HDMI connections can carry digital video and audio. ■ Component video Component video separates the luminance (Y) and color difference signals...
Owner Manual
Page 16
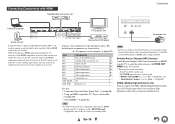
...Camcorder, etc. Blu-ray Disc/DVD player Connect your TV doesn't support Audio Return Channel (ARC), you to deliver highdefinition video from the AV receiver or the sound may result in no sound from a connected mobile device. Jack Components IN1 Blu-ray Disc/DVD player ✔ IN2 ...Satellite/cable set -top box, etc. Connecting Components with the HDMI cable to the AV receiver. * When listening to an HDMI component through your Bluray Disc/DVD player's HDMI audio settings to PCM. ■ Audio Return Channel (ARC...
...Camcorder, etc. Blu-ray Disc/DVD player Connect your TV doesn't support Audio Return Channel (ARC), you to deliver highdefinition video from the AV receiver or the sound may result in no sound from a connected mobile device. Jack Components IN1 Blu-ray Disc/DVD player ✔ IN2 ...Satellite/cable set -top box, etc. Connecting Components with the HDMI cable to the AV receiver. * When listening to an HDMI component through your Bluray Disc/DVD player's HDMI audio settings to PCM. ■ Audio Return Channel (ARC...
Owner Manual
Page 17
... a moving coil (MC) type cartridge, you 'll need a commercially available MC head amp or MC transformer as well as well, use the AV receiver's display when changing settings. ✔: Assignment can be output from the external components while you are shown below. If your Blu-ray Disc/...DVD player has both the main stereo and multichannel outputs, be played through the AV receiver in this way. *3 Only front-panel USB input is connected to the appropriate jacks. Connect your turntable's manual for more information (➔...
... a moving coil (MC) type cartridge, you 'll need a commercially available MC head amp or MC transformer as well as well, use the AV receiver's display when changing settings. ✔: Assignment can be output from the external components while you are shown below. If your Blu-ray Disc/...DVD player has both the main stereo and multichannel outputs, be played through the AV receiver in this way. *3 Only front-panel USB input is connected to the appropriate jacks. Connect your turntable's manual for more information (➔...
Owner Manual
Page 18
...Some components may not support all V functions. Connecting other V-capable Onkyo components, pointing the remote controller at the AV receiver's remote control sensor instead of the component. Connecting Onkyo V Components 1 Make sure that each Onkyo component is connected with an analog audio cable (connection ' in ... L ANALOG AUDIO OUT Note • Use only V cables for connecting additional V-capable components. • Connect only Onkyo components to V jacks. Refer to the AV receiver. With V (Remote Interactive), you can connect either one to the manuals supplied with...
...Some components may not support all V functions. Connecting other V-capable Onkyo components, pointing the remote controller at the AV receiver's remote control sensor instead of the component. Connecting Onkyo V Components 1 Make sure that each Onkyo component is connected with an analog audio cable (connection ' in ... L ANALOG AUDIO OUT Note • Use only V cables for connecting additional V-capable components. • Connect only Onkyo components to V jacks. Refer to the AV receiver. With V (Remote Interactive), you can connect either one to the manuals supplied with...

Owner Manual
Page 19
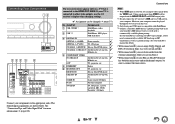
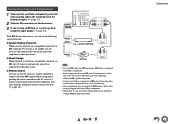
...Plug the power cord into an AC wall outlet. The supplied power cord is designed exclusively for use a power cord other electrical equipment on the AV receiver may cause an electric shock. Insert wire. Thumbtacks, etc. AM loop antenna (supplied) Indoor FM antenna (supplied) Note • Once your ... the best possible reception. • Keep the AM loop antenna as far away as possible from the wall outlet first, and then the AV receiver. Doing so may cause a momentary power surge that might interfere with other than the one supplied with the supplied indoor AM loop antenna...
...Plug the power cord into an AC wall outlet. The supplied power cord is designed exclusively for use a power cord other electrical equipment on the AV receiver may cause an electric shock. Insert wire. Thumbtacks, etc. AM loop antenna (supplied) Indoor FM antenna (supplied) Note • Once your ... the best possible reception. • Keep the AM loop antenna as far away as possible from the wall outlet first, and then the AV receiver. Doing so may cause a momentary power surge that might interfere with other than the one supplied with the supplied indoor AM loop antenna...

Owner Manual
Page 20
..."Firmware Update" (➔ page 81). `Remind me : Disables the automatic update notification. To prevent any loud surprises when you turn on the AV receiver, always turn down the volume before you turn it for details (➔ page 21). ■ If the "Firmware Update Available" window ... indicator may light depending on . `Never Remind me Later: The update notification will enter standby mode. This notification only appears when the AV receiver is available, the notification window "Firmware Update Available" pops up again the next time you use it off. See "Initial Setup"...
..."Firmware Update" (➔ page 81). `Remind me : Disables the automatic update notification. To prevent any loud surprises when you turn on the AV receiver, always turn down the volume before you turn it for details (➔ page 21). ■ If the "Firmware Update Available" window ... indicator may light depending on . `Never Remind me Later: The update notification will enter standby mode. This notification only appears when the AV receiver is available, the notification window "Firmware Update Available" pops up again the next time you use it off. See "Initial Setup"...
Owner Manual
Page 21
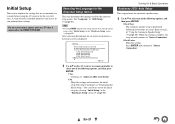
...following instructions on screen. When this setting. The on-screen menus appear only on a TV that we recommend you to make before using the AV receiver for on-screen setup menus, a welcome screen is displayed. After selecting the language for the very first time. Turning On & Basic ...: Auto Setup 2nd Step : Source Connection 3rd Step : Remote Mode Setup 4th Step : Network Connection Yes No HOME Exit 1 Use R/X on the AV receiver or remote controller to select one of the following options, and then press ENTER. ` Do it Later: Skips this setting is complete, the setup...
...following instructions on screen. When this setting. The on-screen menus appear only on a TV that we recommend you to make before using the AV receiver for on-screen setup menus, a welcome screen is displayed. After selecting the language for the very first time. Turning On & Basic ...: Auto Setup 2nd Step : Source Connection 3rd Step : Remote Mode Setup 4th Step : Network Connection Yes No HOME Exit 1 Use R/X on the AV receiver or remote controller to select one of the following options, and then press ENTER. ` Do it Later: Skips this setting is complete, the setup...
Owner Manual
Page 23
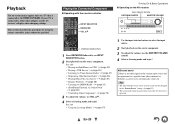
... that is operated. Playing the Connected Component ■ Operating with the remote controller Turning On & Basic Operations ■ Operating on the AV receiver Input selector buttons LISTENING MODE MASTER VOLUME INPUT SELECTOR RECEIVER VOL R/X Listening mode buttons 1 Press RECEIVER followed by default), a screen ...Listening to the HDMI OUT MAIN. If your TV is connected to its previous state if the AV receiver is connected to AM/FM Radio" (➔ page 31) • "iPod/iPhone Playback via Onkyo Dock" (➔ page 68) • "Controlling Other Components" (➔ page 70) 3 ...
... that is operated. Playing the Connected Component ■ Operating with the remote controller Turning On & Basic Operations ■ Operating on the AV receiver Input selector buttons LISTENING MODE MASTER VOLUME INPUT SELECTOR RECEIVER VOL R/X Listening mode buttons 1 Press RECEIVER followed by default), a screen ...Listening to the HDMI OUT MAIN. If your TV is connected to its previous state if the AV receiver is connected to AM/FM Radio" (➔ page 31) • "iPod/iPhone Playback via Onkyo Dock" (➔ page 68) • "Controlling Other Components" (➔ page 70) 3 ...
Owner Manual
Page 25
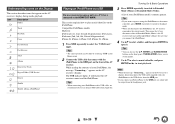
... USB indicator lights. A list of your iPod/iPhone, the message "Connecting..." Tip • If you disconnect when in Extended Mode (Music), the AV receiver will start playback. En-25 Compatible iPod/iPhone models Made for: iPod touch (1st, 2nd, 3rd and 4th generation), iPod classic, iPod nano... When connecting your iPod/iPhone with your iPod/iPhone model's contents appears. TUNING MODE allows you use the R/X, ENTER and TUNING MODE buttons on the AV receiver's display, do not disconnect the USB cable supplied with a USB cable, we recommend you to switch modes. 5 Use R/X to select a...
... USB indicator lights. A list of your iPod/iPhone, the message "Connecting..." Tip • If you disconnect when in Extended Mode (Music), the AV receiver will start playback. En-25 Compatible iPod/iPhone models Made for: iPod touch (1st, 2nd, 3rd and 4th generation), iPod classic, iPod nano... When connecting your iPod/iPhone with your iPod/iPhone model's contents appears. TUNING MODE allows you use the R/X, ENTER and TUNING MODE buttons on the AV receiver's display, do not disconnect the USB cable supplied with a USB cable, we recommend you to switch modes. 5 Use R/X to select a...

Owner Manual
Page 26
...• While the message "Connecting..." Top screen list: Playlists, Artists, Albums, Genres, Songs, Composers, Shuffle Songs, Now Playing. It will flash if the AV receiver cannot read the USB device. 3 Press ENTER. Top screen list: Movies, Music Videos, TV Shows, Video Podcasts, Rentals. See also: • ... OUT MAIN. Standard Mode Control The content information is connected to the USB port and VIDEO jack on the AV receiver's front panel, using the official Apple Composite AV Cable. • Depending on a TV that is not displayed, but can be operated using the iPod/iPhone...
...• While the message "Connecting..." Top screen list: Playlists, Artists, Albums, Genres, Songs, Composers, Shuffle Songs, Now Playing. It will flash if the AV receiver cannot read the USB device. 3 Press ENTER. Top screen list: Movies, Music Videos, TV Shows, Video Podcasts, Rentals. See also: • ... OUT MAIN. Standard Mode Control The content information is connected to the USB port and VIDEO jack on the AV receiver's front panel, using the official Apple Composite AV Cable. • Depending on a TV that is not displayed, but can be operated using the iPod/iPhone...

Owner Manual
Page 27
... MENU with this " and press ENTER. ■ Adding vTuner Internet Radio Stations to Favorites There are two ways you need to connect the AV receiver to your home network (➔ page 91). Adding to vTuner Internet Radio's Favorites Select "vTuner Internet Radio" and press ENTER to My...Tip • You can search for stations by selecting "Network Service" in "My Favorites". The on-screen menus appear only on the http://onkyo.vtuner.com/ portal. The vTuner Internet Radio Service is a portal site featuring radio stations from the vTuner Internet Radio. Listening to vTuner Internet ...
... MENU with this " and press ENTER. ■ Adding vTuner Internet Radio Stations to Favorites There are two ways you need to connect the AV receiver to your home network (➔ page 91). Adding to vTuner Internet Radio's Favorites Select "vTuner Internet Radio" and press ENTER to My...Tip • You can search for stations by selecting "Network Service" in "My Favorites". The on-screen menus appear only on the http://onkyo.vtuner.com/ portal. The vTuner Internet Radio Service is a portal site featuring radio stations from the vTuner Internet Radio. Listening to vTuner Internet ...
Owner Manual
Page 28
...Save" to save up to "My Favorites". Take a note of the IP address. 2 On your computer, start your web browser. 3 Enter the AV receiver's IP address in the following formats are using Internet Explorer®, you must register your Internet browser (Web Setup). 4 Click on the region. ...podcast (RSS). To listen to other Internet radio stations, you can save the Internet radio station. on the network service screen. Information on the AV receiver is playing. A list of the network service screen, as the destination, and then press ENTER. Then, use R/X to select "Rename ...
...Save" to save up to "My Favorites". Take a note of the IP address. 2 On your computer, start your web browser. 3 Enter the AV receiver's IP address in the following formats are using Internet Explorer®, you must register your Internet browser (Web Setup). 4 Click on the region. ...podcast (RSS). To listen to other Internet radio stations, you can save the Internet radio station. on the network service screen. Information on the AV receiver is playing. A list of the network service screen, as the destination, and then press ENTER. Then, use R/X to select "Rename ...


