
Owner Manual
Page 1
... Turning On & First Time Setup .....48 Basic Operations 67 Using the Listening Modes ........81 Advanced Setup 92 NET/USB 120 Multi Zone 130 Controlling Other Components....139 Others 154 En AV Receiver TX-NR3007 TX-NR5007 Instruction Manual Thank you to... obtain optimum performance and listening enjoyment from your new AV Receiver. Please retain this manual will enable you for future reference. Please read this manual thoroughly before making connections and plugging in this manual for purchasing an Onkyo AV Receiver...
... Turning On & First Time Setup .....48 Basic Operations 67 Using the Listening Modes ........81 Advanced Setup 92 NET/USB 120 Multi Zone 130 Controlling Other Components....139 Others 154 En AV Receiver TX-NR3007 TX-NR5007 Instruction Manual Thank you to... obtain optimum performance and listening enjoyment from your new AV Receiver. Please retain this manual will enable you for future reference. Please read this manual thoroughly before making connections and plugging in this manual for purchasing an Onkyo AV Receiver...
Owner Manual
Page 4
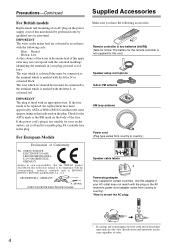
.... For European Models Declaration of Conformity We, ONKYO EUROPE ELECTRONICS GmbH LIEGNITZERSTRASSE 6, 82194 GROEBENZELL, GERMANY declare in own responsibility, that the ONKYO product described in this instruction manual is marked ... connected to the terminal which is in certain countries. Check for this unit.) Speaker setup microphone Indoor FM antenna AM loop antenna Power cord (Plug type varies from country to... the terminal which is marked with the plug on the AV receiver's power cord (adapter varies from country to country). *How to BS1362 and have the...
.... For European Models Declaration of Conformity We, ONKYO EUROPE ELECTRONICS GmbH LIEGNITZERSTRASSE 6, 82194 GROEBENZELL, GERMANY declare in own responsibility, that the ONKYO product described in this instruction manual is marked ... connected to the terminal which is in certain countries. Check for this unit.) Speaker setup microphone Indoor FM antenna AM loop antenna Power cord (Plug type varies from country to... the terminal which is marked with the plug on the AV receiver's power cord (adapter varies from country to country). *How to BS1362 and have the...
Owner Manual
Page 5
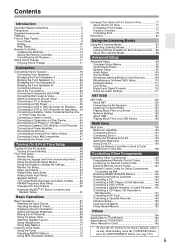
...139 Preprogrammed Remote Control Codes 139 Looking up for Remote Control Code 139 Entering Remote Control Codes 141 Remote Control Codes for Onkyo Components Connected via V 142 Resetting REMOTE MODE Buttons 142 Resetting the Remote Controller 142 Controlling a TV 143 Controlling a ... RI Dock 148 Controlling a Cassette Recorder 149 Activities Setup 150 Learning Commands 152 Using Normal Macros 153 Others Troubleshooting 154 Specifications (TX-NR3007 160 Specifications (TX-NR5007 161 Video Resolution Chart 162 * To reset the AV receiver to its factory defaults, turn it on and, ...
...139 Preprogrammed Remote Control Codes 139 Looking up for Remote Control Code 139 Entering Remote Control Codes 141 Remote Control Codes for Onkyo Components Connected via V 142 Resetting REMOTE MODE Buttons 142 Resetting the Remote Controller 142 Controlling a TV 143 Controlling a ... RI Dock 148 Controlling a Cassette Recorder 149 Activities Setup 150 Learning Commands 152 Using Normal Macros 153 Others Troubleshooting 154 Specifications (TX-NR3007 160 Specifications (TX-NR5007 161 Video Resolution Chart 162 * To reset the AV receiver to its factory defaults, turn it on and, ...
Owner Manual
Page 8
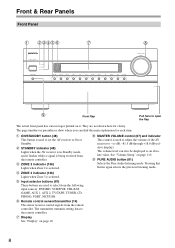
...8 The page numbers in Standby mode, and it . B ON/STANDBY button (48) This button is used to select from the remote controller. See "Volume Setup" on page 10. Front & Rear Panels Front Panel B CDEFG H I MASTER VOLUME control (67) and indicator This control is used to adjust the volume ... transmits setting data to On or Standby. D ZONE 2 indicator (136) Lights when Zone 2 is selected. They are used to set the AV receiver to the remote controller. J PURE AUDIO button (81) Selects the Pure Audio listening mode. E ZONE 3 indicator (136) Lights when Zone 3 is selected.
...8 The page numbers in Standby mode, and it . B ON/STANDBY button (48) This button is used to select from the remote controller. See "Volume Setup" on page 10. Front & Rear Panels Front Panel B CDEFG H I MASTER VOLUME control (67) and indicator This control is used to adjust the volume ... transmits setting data to On or Standby. D ZONE 2 indicator (136) Lights when Zone 2 is selected. They are used to set the AV receiver to the remote controller. J PURE AUDIO button (81) Selects the Pure Audio listening mode. E ZONE 3 indicator (136) Lights when Zone 3 is selected.

Owner Manual
Page 10
... "Dolby Volume" is selected. 10 G NETWORK indicator (121) Lights when the Net input selector is enabled. AUX 1 INPUT HDMI (31) Used to OFF, the AV receiver is being used. Display Z Up [S] and Down [F] buttons (68, 137) Used to connect a camcorder, game console, and so on. Lights when the "Equalizer Settings... Indicate which audio channels are jacks for the current listening mode. Audyssey (61, 98): Flashes during Audyssey MultEQ® XT Room Correction and Speaker Setup. Front & Rear Panels-Continued W SETUP MIC jack (62) Audyssey MultEQ® XT Room Correction and Speaker...
... "Dolby Volume" is selected. 10 G NETWORK indicator (121) Lights when the Net input selector is enabled. AUX 1 INPUT HDMI (31) Used to OFF, the AV receiver is being used. Display Z Up [S] and Down [F] buttons (68, 137) Used to connect a camcorder, game console, and so on. Lights when the "Equalizer Settings... Indicate which audio channels are jacks for the current listening mode. Audyssey (61, 98): Flashes during Audyssey MultEQ® XT Room Correction and Speaker Setup. Front & Rear Panels-Continued W SETUP MIC jack (62) Audyssey MultEQ® XT Room Correction and Speaker...

Owner Manual
Page 11
... a USB mass storage device is selected. D DIGITAL OPTICAL IN 1 and 2 (TX-NR3007) DIGITAL OPTICAL IN 1, 2, and 3 (TX-NR5007) These optical digital audio inputs are plugged into the PHONES jack. K BTL ...73): Lights when tuned to a stereo FM station. M Message area Displays various information. See "Digital Audio Input Setup" on page 56. 11 Rear Panel (TX-NR5007) * North American models BCDE F G HI JK L M NO P Q R S T U V .../OUT A commercially available IR receiver can be connected to the IR IN jack, allowing you to control the AV receiver while you can be connected ...
... a USB mass storage device is selected. D DIGITAL OPTICAL IN 1 and 2 (TX-NR3007) DIGITAL OPTICAL IN 1, 2, and 3 (TX-NR5007) These optical digital audio inputs are plugged into the PHONES jack. K BTL ...73): Lights when tuned to a stereo FM station. M Message area Displays various information. See "Digital Audio Input Setup" on page 56. 11 Rear Panel (TX-NR5007) * North American models BCDE F G HI JK L M NO P Q R S T U V .../OUT A commercially available IR receiver can be connected to the IR IN jack, allowing you to control the AV receiver while you can be connected ...

Owner Manual
Page 12
...to a video input on another Onkyo AV component. H V REMOTE CONTROL This V (Remote Interactive) jack can assign each one to an input selector to suit your setup. I RS232 Terminal for connecting...Zone 3. Y VCR/DVR IN/OUT Here you can be played through the AV receiver. See "Component Video Input Setup" on , a 12-volt trigger signal is for connecting components with a component ... an AM antenna. J HDMI IN 1-6, OUT MAIN, and OUT SUB (TX-NR3007) HDMI IN 1-7, OUT MAIN, and OUT SUB (TX-NR5007) HDMI (High Definition Multimedia Interface) connections carry digital audio and digital ...
...to a video input on another Onkyo AV component. H V REMOTE CONTROL This V (Remote Interactive) jack can assign each one to an input selector to suit your setup. I RS232 Terminal for connecting...Zone 3. Y VCR/DVR IN/OUT Here you can be played through the AV receiver. See "Component Video Input Setup" on , a 12-volt trigger signal is for connecting components with a component ... an AM antenna. J HDMI IN 1-6, OUT MAIN, and OUT SUB (TX-NR3007) HDMI IN 1-7, OUT MAIN, and OUT SUB (TX-NR5007) HDMI (High Definition Multimedia Interface) connections carry digital audio and digital ...
Owner Manual
Page 15
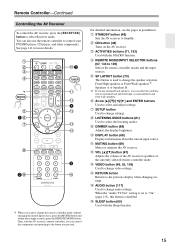
... the combination of the currently selected remote controller mode. For detailed information, see the pages in parentheses. B STANDBY button (48) Sets the AV receiver to the previous display when changing settings. See page 141 for more details. J DIMMER button (69) Adjusts the display brightness. K DISPLAY button .... E REMOTE MODE/INPUT SELECTOR buttons (67, 143 to change the speaker selection: Front High speakers or Front Wide speakers*2. H SETUP button Used to 149) Selects the remote controller modes and the input sources. I 5 2J Q *1 When you want to change settings.
... the combination of the currently selected remote controller mode. For detailed information, see the pages in parentheses. B STANDBY button (48) Sets the AV receiver to the previous display when changing settings. See page 141 for more details. J DIMMER button (69) Adjusts the display brightness. K DISPLAY button .... E REMOTE MODE/INPUT SELECTOR buttons (67, 143 to change the speaker selection: Front High speakers or Front Wide speakers*2. H SETUP button Used to 149) Selects the remote controller modes and the input sources. I 5 2J Q *1 When you want to change settings.

Owner Manual
Page 18
... of stereo speakers (2-channels). Similarly, if front Speakers B are selected by using the "Speaker Settings" on page 57 and "Speaker Setup" on the remote controller. Two typical applications are configured by the Speakers A and Speakers B configurations means you to have two speaker... SR 2-1. The speakers are shown below. See pages 22 to 5.2 speakers in the main room. Speakers B Subwoofer used , the AV receiver can drive up to suit your exact requirements and application. Speaker Configuration Subwoofer Front Center Surround Surr Back Use Use Speaker A Use Use Use...
... of stereo speakers (2-channels). Similarly, if front Speakers B are selected by using the "Speaker Settings" on page 57 and "Speaker Setup" on the remote controller. Two typical applications are configured by the Speakers A and Speakers B configurations means you to have two speaker... SR 2-1. The speakers are shown below. See pages 22 to 5.2 speakers in the main room. Speakers B Subwoofer used , the AV receiver can drive up to suit your exact requirements and application. Speaker Configuration Subwoofer Front Center Surround Surr Back Use Use Speaker A Use Use Use...
Owner Manual
Page 22
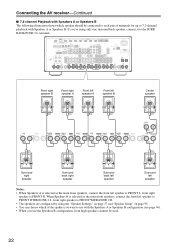
If you're using the "Speaker Settings" on page 57 and "Speaker Setup" on page 95. • You can choose which speaker should be connected to each pair of the spakers you use with Speakers A or Speakers B. When ... WIDE/ZONE 2 R. • The speakers are configured by using only one surround back speaker, connect it to the SURR BACK/ZONE 3 L terminal. Connecting the AV receiver-Continued ■ 7.2-channel Playback with Speakers A or Speakers B The following illustration shows which of terminals for up to 7.2-channel playback with the Speakers A or Speakers...
If you're using the "Speaker Settings" on page 57 and "Speaker Setup" on page 95. • You can choose which speaker should be connected to each pair of the spakers you use with Speakers A or Speakers B. When ... WIDE/ZONE 2 R. • The speakers are configured by using only one surround back speaker, connect it to the SURR BACK/ZONE 3 L terminal. Connecting the AV receiver-Continued ■ 7.2-channel Playback with Speakers A or Speakers B The following illustration shows which of terminals for up to 7.2-channel playback with the Speakers A or Speakers...
Owner Manual
Page 31
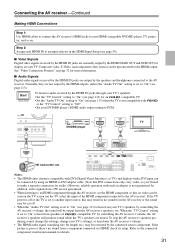
...source component. If the TV power is off or the TV is set to another input source, this may result in the HDMI Input Setup (see page 54). ■ Video Signals Digital video signals received by the HDMI IN jacks are not output by the speakers and headphones connected to the AV...using an HDMI-to-DVI adapter cable. (Note that its setup. Composite video, S-Video, and component video sources can be seen on the TV screen (on . Connecting the AV receiver-Continued Making HDMI Connections Step 1: Use HDMI cables to connect the AV receiver's HDMI jacks to your TV's settings, or turn down ...
...source component. If the TV power is off or the TV is set to another input source, this may result in the HDMI Input Setup (see page 54). ■ Video Signals Digital video signals received by the HDMI IN jacks are not output by the speakers and headphones connected to the AV...using an HDMI-to-DVI adapter cable. (Note that its setup. Composite video, S-Video, and component video sources can be seen on the TV screen (on . Connecting the AV receiver-Continued Making HDMI Connections Step 1: Use HDMI cables to connect the AV receiver's HDMI jacks to your TV's settings, or turn down ...

Owner Manual
Page 37
...the AV receiver-Continued Hooking Up the Multichannel Input If your DVD player supports multichannel audio formats such as DVD-Audio and Super Audio CD, and it has a multichannel analog audio output, you must assign it to an input selector. See "Analog Audio Input Setup" on page... player. Use a multichannel analog audio cable, or several normal audio cables, to connect the AV receiver's MULTI CH: FRONT L/R, CENTER, SURR L/R, SURR BACK L/R, and SUBWOOFER jacks to the AV receiver's SURR BACK L/R jacks. To select the multichannel input, see "Subwoofer Input Sensitivity" on page ...
...the AV receiver-Continued Hooking Up the Multichannel Input If your DVD player supports multichannel audio formats such as DVD-Audio and Super Audio CD, and it has a multichannel analog audio output, you must assign it to an input selector. See "Analog Audio Input Setup" on page... player. Use a multichannel analog audio cable, or several normal audio cables, to connect the AV receiver's MULTI CH: FRONT L/R, CENTER, SURR L/R, SURR BACK L/R, and SUBWOOFER jacks to the AV receiver's SURR BACK L/R jacks. To select the multichannel input, see "Subwoofer Input Sensitivity" on page ...
Owner Manual
Page 48
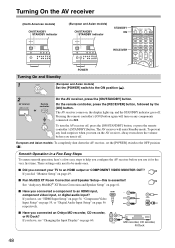
...you turn on the AV receiver, always turn down the AV receiver, set the [POWER] switch to an HDMI input, HDMI component video input, or digital audio input? See "Audyssey MultEQ® XT Room Correction and Speaker Setup" on page 61. ■ Have you connected an Onkyo MD recorder, CD recorder,... or RI Dock? The AV receiver comes on, the display lights up, and the STANDBY indicator goes off , press the [ON...
...you turn on the AV receiver, always turn down the AV receiver, set the [POWER] switch to an HDMI input, HDMI component video input, or digital audio input? See "Audyssey MultEQ® XT Room Correction and Speaker Setup" on page 61. ■ Have you connected an Onkyo MD recorder, CD recorder,... or RI Dock? The AV receiver comes on, the display lights up, and the STANDBY indicator goes off , press the [ON...

Owner Manual
Page 49
... • This setting can specify the output resolution for the very first time. The current setting is automatically set so that the onscreen setup menus are displayed and composite video, SVideo, and component video sources are upconverted* and output. ton. Composite video, S-Video Component video ...Monitor Out" settings, you can select whether or not to have the onscreen setup menu output through the HDMI output or through the AV receiver. • You can also be set so that the onscreen setup menus are displayed and composite video and S-Video sources are upconverted* and output...
... • This setting can specify the output resolution for the very first time. The current setting is automatically set so that the onscreen setup menus are displayed and composite video, SVideo, and component video sources are upconverted* and output. ton. Composite video, S-Video Component video ...Monitor Out" settings, you can select whether or not to have the onscreen setup menu output through the HDMI output or through the AV receiver. • You can also be set so that the onscreen setup menus are displayed and composite video and S-Video sources are upconverted* and output...

Owner Manual
Page 50
...onscreen menu is English. Menu 5 Press the [SETUP] button. Listening Mode Preset 6. If your Instruction Manual is selected on the AV receiver by the [SETUP] button. Remote Controller Setup 9. Volume Setup 2. OSD Setup 50 The "OSD Setup" menu appears. 6-2. If the main menu doesn...appears. 6. The main menu appears onscreen. The default Language setting for the onscreen setup menus. OSD Setup Immediate Display Display Position TV Format Language On Bottom Auto English ENTER SETUP RECEIVER 4 RXFS (European and Asian models) Use the Up and Down [R]/[X] buttons ...
...onscreen menu is English. Menu 5 Press the [SETUP] button. Listening Mode Preset 6. If your Instruction Manual is selected on the AV receiver by the [SETUP] button. Remote Controller Setup 9. Volume Setup 2. OSD Setup 50 The "OSD Setup" menu appears. 6-2. If the main menu doesn...appears. 6. The main menu appears onscreen. The default Language setting for the onscreen setup menus. OSD Setup Immediate Display Display Position TV Format Language On Bottom Auto English ENTER SETUP RECEIVER 4 RXFS (European and Asian models) Use the Up and Down [R]/[X] buttons ...
Owner Manual
Page 51
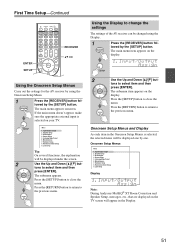
.... Using the Display to change the settings The settings of the AV receiver can be changed using the Onscreen Setup Menu. 1 Press the [RECEIVER] button fol- Onscreen Setup Menus Menu 1. Audio Adjust 4. Hardware Setup 8. Hardware Setup 8. Press the [SETUP] button to the previous menu. Source Setup 5. Lock Setup Tip: On several functions, the explanation will be displayed one by...
.... Using the Display to change the settings The settings of the AV receiver can be changed using the Onscreen Setup Menu. 1 Press the [RECEIVER] button fol- Onscreen Setup Menus Menu 1. Audio Adjust 4. Hardware Setup 8. Hardware Setup 8. Press the [SETUP] button to the previous menu. Source Setup 5. Lock Setup Tip: On several functions, the explanation will be displayed one by...

Owner Manual
Page 52
...Monitor Out" menu appears. 1-1. Video signals are output from both HDMI outputs at the resolution supported by the [SETUP] button. Both (Sub): Select this if your TV. 1 Press the [RECEIVER] button, followed by both HDMI outputs but HDMI OUT SUB will be limited due to the capability of bit ...: • If not connected to the same output you have the AV receiver upconvert the picture resolution as necessary to the COMPONENT VIDEO MONITOR OUT, set the "Monitor Out" setting so that the onscreen setup menus are displayed and composite video, S-Video, and component video sources are ...
...Monitor Out" menu appears. 1-1. Video signals are output from both HDMI outputs at the resolution supported by the [SETUP] button. Both (Sub): Select this if your TV. 1 Press the [RECEIVER] button, followed by both HDMI outputs but HDMI OUT SUB will be limited due to the capability of bit ...: • If not connected to the same output you have the AV receiver upconvert the picture resolution as necessary to the COMPONENT VIDEO MONITOR OUT, set the "Monitor Out" setting so that the onscreen setup menus are displayed and composite video, S-Video, and component video sources are ...
Owner Manual
Page 53
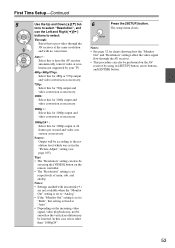
...to "Both", this for charts showing how the "Monitor Out" and "Resolution" settings affect the video signal flow through the AV receiver at "Auto". • Depending on the AV receiver by your TV. 480p (480p/576p): Select this setting is set in the "Picture Adjust" setting (see page 105). Notes:...See page 32 for 480p or 576p output and video conversion as necessary. In this to pass video through the AV receiver. • This procedure can also be set using its [SETUP] button, arrow buttons, and [ENTER] button. 720p: Select this for 720p output and video conversion as necessary. ...
...to "Both", this for charts showing how the "Monitor Out" and "Resolution" settings affect the video signal flow through the AV receiver at "Auto". • Depending on the AV receiver by your TV. 480p (480p/576p): Select this setting is set in the "Picture Adjust" setting (see page 105). Notes:...See page 32 for 480p or 576p output and video conversion as necessary. In this to pass video through the AV receiver. • This procedure can also be set using its [SETUP] button, arrow buttons, and [ENTER] button. 720p: Select this for 720p output and video conversion as necessary. ...

Owner Manual
Page 54
... as a priority. Otherwise, appropriate CEC (Consumer Electronics Control) operation is selected on the AV receiver by the [SETUP] button. Input/Output Assign 1. First Time Setup-Continued Video Input Setup 4 HDMI Input Setup If you connect a video component to HDMI IN, you must assign HDMI IN 1 to the...select "2. lowed by using its [SETUP] button, arrow buttons, and [ENTER] button. Use the Up and Down [R]/[X] buttons to select an input selector, and use the Left and Right [F]/ [S] buttons to select: HDMI1, HDMI2, HDMI3, HDMI4, HDMI5, HDMI6, HDMI7 (TX-NR5007): Select the HDMI IN to ...
... as a priority. Otherwise, appropriate CEC (Consumer Electronics Control) operation is selected on the AV receiver by the [SETUP] button. Input/Output Assign 1. First Time Setup-Continued Video Input Setup 4 HDMI Input Setup If you connect a video component to HDMI IN, you must assign HDMI IN 1 to the...select "2. lowed by using its [SETUP] button, arrow buttons, and [ENTER] button. Use the Up and Down [R]/[X] buttons to select an input selector, and use the Left and Right [F]/ [S] buttons to select: HDMI1, HDMI2, HDMI3, HDMI4, HDMI5, HDMI6, HDMI7 (TX-NR5007): Select the HDMI IN to ...
Owner Manual
Page 55
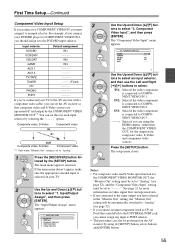
...to select: IN1: Select if the video component is selected on the AV receiver by the [SETUP] button. Input/Output Assign 1. Component Video Input 4. tons to an input selector. First Time Setup-Continued Component Video Input Setup If you connect to a COMPONENT VIDEO IN, you must be automatically switched ... (such as UP-A1 Dock that composite video and S-Video sources are using its [SETUP] button, arrow buttons, and [ENTER] button. 55 The setup menu closes. tons to the AV receiver with a component video cable, you can also be performed on your DVD/BD player ...
...to select: IN1: Select if the video component is selected on the AV receiver by the [SETUP] button. Input/Output Assign 1. Component Video Input 4. tons to an input selector. First Time Setup-Continued Component Video Input Setup If you connect to a COMPONENT VIDEO IN, you must be automatically switched ... (such as UP-A1 Dock that composite video and S-Video sources are using its [SETUP] button, arrow buttons, and [ENTER] button. 55 The setup menu closes. tons to the AV receiver with a component video cable, you can also be performed on your DVD/BD player ...


