Owner Manual
Page 4
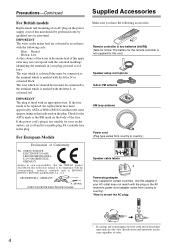
...RIGHT SP-B/ZONE2 RIGHT * In catalogs and on packaging, the letter at the end of the product name indicates the color. MIYAGI ONKYO EUROPE ELECTRONICS GmbH 1 Speaker Cable 2 FRONT LEFT FRONT LEFT FRONT RIGHT FRONT RIGHT SURROUND LEFT SURROUND LEFT SURROUND RIGHT SURROUND RIGHT ...coloured in the plug. GROEBENZELL, GERMANY K. Fit a suitable fuse in accordance with the following accessories: Remote controller & two batteries (AA/R6) (Note for China: The battery for the remote controller is not suitable for the ASTA mark or the BSI mark on the body of the fuse. Precautions-...
...RIGHT SP-B/ZONE2 RIGHT * In catalogs and on packaging, the letter at the end of the product name indicates the color. MIYAGI ONKYO EUROPE ELECTRONICS GmbH 1 Speaker Cable 2 FRONT LEFT FRONT LEFT FRONT RIGHT FRONT RIGHT SURROUND LEFT SURROUND LEFT SURROUND RIGHT SURROUND RIGHT ...coloured in the plug. GROEBENZELL, GERMANY K. Fit a suitable fuse in accordance with the following accessories: Remote controller & two batteries (AA/R6) (Note for China: The battery for the remote controller is not suitable for the ASTA mark or the BSI mark on the body of the fuse. Precautions-...
Owner Manual
Page 5
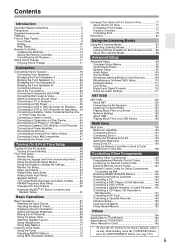
... Remote Controller 142 Controlling a TV 143 Controlling a DVD Player or DVD Recorder 144 Controlling a VCR or PVR 145 Controlling a Satellite Receiver or Cable Receiver... 146 Controlling a CD Player, CD Recorder or MD Recorder 147 Controlling an RI Dock 148 Controlling a Cassette Recorder 149 Activities Setup 150 Learning Commands 152 Using Normal Macros 153 Others Troubleshooting 154 Specifications (TX-NR3007 160 Specifications (TX...
... Remote Controller 142 Controlling a TV 143 Controlling a DVD Player or DVD Recorder 144 Controlling a VCR or PVR 145 Controlling a Satellite Receiver or Cable Receiver... 146 Controlling a CD Player, CD Recorder or MD Recorder 147 Controlling an RI Dock 148 Controlling a Cassette Recorder 149 Activities Setup 150 Learning Commands 152 Using Normal Macros 153 Others Troubleshooting 154 Specifications (TX-NR3007 160 Specifications (TX...
Owner Manual
Page 8
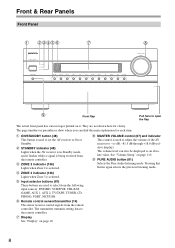
... B ON/STANDBY button (48) This button is selected. Pressing this button again selects the previous listening mode. 8 G Remote control sensor/transmitter (14) The sensor receives control signals from the remote controller. E ZONE 3 indicator (136) Lights when Zone 3 is used to set the AV receiver to On or Standby. H... Display See "Display" on it flashes while a signal is being received from the remote controller. C STANDBY indicator (48) Lights when the AV receiver is in parentheses show where you can also be displayed as an absolute value...
... B ON/STANDBY button (48) This button is selected. Pressing this button again selects the previous listening mode. 8 G Remote control sensor/transmitter (14) The sensor receives control signals from the remote controller. E ZONE 3 indicator (136) Lights when Zone 3 is used to set the AV receiver to On or Standby. H... Display See "Display" on it flashes while a signal is being received from the remote controller. C STANDBY indicator (48) Lights when the AV receiver is in parentheses show where you can also be displayed as an absolute value...

Owner Manual
Page 11
...Speakers Type(FrontA)" or "Speakers Type(FrontB)" setting is set . D DIGITAL OPTICAL IN 1 and 2 (TX-NR3007) DIGITAL OPTICAL IN 1, 2, and 3 (TX-NR5007) These optical digital audio inputs are plugged into the PHONES jack. M Message area Displays various information. ...TX-NR5007) * North American models BCDE F G HI JK L M NO P Q R S T U V W X Y Z [ " # $ %* B UNIVERSAL PORT This port is selected. O Volume level (67) Displays the volume level. C IR IN/OUT A commercially available IR receiver can be connected to the IR OUT jack to pass IR (infrared) remote control...
...Speakers Type(FrontA)" or "Speakers Type(FrontB)" setting is set . D DIGITAL OPTICAL IN 1 and 2 (TX-NR3007) DIGITAL OPTICAL IN 1, 2, and 3 (TX-NR5007) These optical digital audio inputs are plugged into the PHONES jack. M Message area Displays various information. ...TX-NR5007) * North American models BCDE F G HI JK L M NO P Q R S T U V W X Y Z [ " # $ %* B UNIVERSAL PORT This port is selected. O Volume level (67) Displays the volume level. C IR IN/OUT A commercially available IR receiver can be connected to the IR OUT jack to pass IR (infrared) remote control...

Owner Manual
Page 12
...analog audio. 12 See "Digital Audio Input Setup" on page 55. J HDMI IN 1-6, OUT MAIN, and OUT SUB (TX-NR3007) HDMI IN 1-7, OUT MAIN, and OUT SUB (TX-NR5007) HDMI (High Definition Multimedia Interface) connections carry digital audio and digital video. The HDMI outputs are for connecting an ... OUT ZONE 3 This output can connect a VCR or DVR (digital video recorder). The AV receiver's remote controller can then be connected to suit your setup. See "HDMI Input Setup" on another Onkyo AV component. U TV/TAPE IN/OUT These analog audio inputs and outputs are connected digitally. X CBL...
...analog audio. 12 See "Digital Audio Input Setup" on page 55. J HDMI IN 1-6, OUT MAIN, and OUT SUB (TX-NR3007) HDMI IN 1-7, OUT MAIN, and OUT SUB (TX-NR5007) HDMI (High Definition Multimedia Interface) connections carry digital audio and digital video. The HDMI outputs are for connecting an ... OUT ZONE 3 This output can connect a VCR or DVR (digital video recorder). The AV receiver's remote controller can then be connected to suit your setup. See "HDMI Input Setup" on another Onkyo AV component. U TV/TAPE IN/OUT These analog audio inputs and outputs are connected digitally. X CBL...

Owner Manual
Page 14
... lights. trol sensor. • When the remote control codes have been registered and you want to operate another remote controller of batteries. • If you want to operate an Onkyo component without V connection, point the remote controller at the other component to use the remote controller, point it and the AV receiver's remote con- Keep this in mind when installing...
... lights. trol sensor. • When the remote control codes have been registered and you want to operate another remote controller of batteries. • If you want to operate an Onkyo component without V connection, point the remote controller at the other component to use the remote controller, point it and the AV receiver's remote con- Keep this in mind when installing...
Owner Manual
Page 15
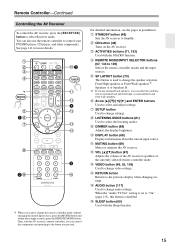
... input source, press the [MODE] button and within about the current input source. Then, with the AV receiver's remote controller, you use the remote controller to change audio settings. J DIMMER button (69) Adjusts the display brightness. O RETURN button Returns to select the listening...to "On" (page 113), this button is used to change video settings. Remote Controller-Continued Controlling the AV Receiver To control the AV receiver, press the [RECEIVER] button to 149) Selects the remote controller modes and the input sources. See page 141 for more details. N VIDEO ...
... input source, press the [MODE] button and within about the current input source. Then, with the AV receiver's remote controller, you use the remote controller to change audio settings. J DIMMER button (69) Adjusts the display brightness. O RETURN button Returns to select the listening...to "On" (page 113), this button is used to change video settings. Remote Controller-Continued Controlling the AV Receiver To control the AV receiver, press the [RECEIVER] button to 149) Selects the remote controller modes and the input sources. See page 141 for more details. N VIDEO ...

Owner Manual
Page 16
...radio stations directly in Receiver mode (see page 149). 16 You can select a preset directly. Note: An Onkyo cassette recorder connected via V can also be controlled in the Direct tuning mode. button (74) Used to select radio presets. 5 Number buttons (73, 74)... tune into radio stations. 2 D.TUN button (73) (TUNER remote mode only) Selects the Direct tuning mode. 3 DISPLAY button Displays information about the band, frequency, preset number, and so on. 4 CH +/- Remote Controller-Continued ■ Controlling the tuner To control the AV receiver's tuner, press the [TUNER] (or [RECEIVER...
...radio stations directly in Receiver mode (see page 149). 16 You can select a preset directly. Note: An Onkyo cassette recorder connected via V can also be controlled in the Direct tuning mode. button (74) Used to select radio presets. 5 Number buttons (73, 74)... tune into radio stations. 2 D.TUN button (73) (TUNER remote mode only) Selects the Direct tuning mode. 3 DISPLAY button Displays information about the band, frequency, preset number, and so on. 4 CH +/- Remote Controller-Continued ■ Controlling the tuner To control the AV receiver's tuner, press the [TUNER] (or [RECEIVER...

Owner Manual
Page 18
... Speakers A and Speakers B configurations are shown below. Two typical applications are selected by using the "Speaker Settings" on page 57 and "Speaker Setup" on the remote controller. Connecting the AV receiver Connecting Your Speakers About Speakers A and Speakers B Speakers A and Speakers B allows you can configure the AV receiver to suit your exact...
... Speakers A and Speakers B configurations are shown below. Two typical applications are selected by using the "Speaker Settings" on page 57 and "Speaker Setup" on the remote controller. Connecting the AV receiver Connecting Your Speakers About Speakers A and Speakers B Speakers A and Speakers B allows you can configure the AV receiver to suit your exact...

Owner Manual
Page 46
...L/R jacks, and connect its video output jack to the AV receiver's GAME IN V or VCR/DVR IN V jack. (Onkyo DSA2 hookup shown below.) ■ If you have an Onkyo DS-A1 RI Dock Connect its video output jack to the AV receiver's GAME IN S or VCR/DVR IN S jack....the AV receiver's TV/TAPE IN L/R jacks. (Onkyo DSA2 hookup shown below.) IN L R TV/TAPE GAME V IN IN L R GAME VCR/DVR V IN IN L R VCR/DVR Make either connection. Notes: • Enter the appropriate remote control code before using the AV receiver's remote controller for more information. Connecting the AV receiver-Continued ...
...L/R jacks, and connect its video output jack to the AV receiver's GAME IN V or VCR/DVR IN V jack. (Onkyo DSA2 hookup shown below.) ■ If you have an Onkyo DS-A1 RI Dock Connect its video output jack to the AV receiver's GAME IN S or VCR/DVR IN S jack....the AV receiver's TV/TAPE IN L/R jacks. (Onkyo DSA2 hookup shown below.) IN L R TV/TAPE GAME V IN IN L R GAME VCR/DVR V IN IN L R VCR/DVR Make either connection. Notes: • Enter the appropriate remote control code before using the AV receiver's remote controller for more information. Connecting the AV receiver-Continued ...

Owner Manual
Page 47
...or RI Dock, change the Input Display (see pages 35 to the AV receiver with other V-capable Onkyo components, pointing the remote controller at the AV receiver's remote control sensor instead of your other electrical equipment on a component connected via V will automatically turn on and ...), you can con- Notes: • Use only V cables for connecting additional V-capable components. • Connect only Onkyo components to the AV receiver's AC INLET. REMOTE CONTROL IN L R CD IN L R DVD/BD e.g., CD player e.g., DVD player R L ANALOG AUDIO OUT R L ANALOG AUDIO OUT ...
...or RI Dock, change the Input Display (see pages 35 to the AV receiver with other V-capable Onkyo components, pointing the remote controller at the AV receiver's remote control sensor instead of your other electrical equipment on a component connected via V will automatically turn on and ...), you can con- Notes: • Use only V cables for connecting additional V-capable components. • Connect only Onkyo components to the AV receiver's AC INLET. REMOTE CONTROL IN L R CD IN L R DVD/BD e.g., CD player e.g., DVD player R L ANALOG AUDIO OUT R L ANALOG AUDIO OUT ...
Owner Manual
Page 48
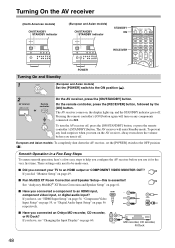
...OUT? OUT IN TV/TAPE MD recorder, CD recorder, RI Dock 48 If you connected a component to the ON position ( ). 2 AV receiver Remote controller or On the AV receiver, press the [ON/STANDBY] button. If you have , see "HDMI Input Setup" on page 54, "Component Video ...by the [ON] button. To prevent any components connected via V. Pressing the remote controller's [ON] button again will enter Standby mode. European and Asian models: To completely shut down the volume before you connected an Onkyo MD recorder, CD recorder, or RI Dock? Turning On the AV receiver (...
...OUT? OUT IN TV/TAPE MD recorder, CD recorder, RI Dock 48 If you connected a component to the ON position ( ). 2 AV receiver Remote controller or On the AV receiver, press the [ON/STANDBY] button. If you have , see "HDMI Input Setup" on page 54, "Component Video ...by the [ON] button. To prevent any components connected via V. Pressing the remote controller's [ON] button again will enter Standby mode. European and Asian models: To completely shut down the volume before you connected an Onkyo MD recorder, CD recorder, or RI Dock? Turning On the AV receiver (...

Owner Manual
Page 49
... is displayed. 2 Press the [MONITOR OUT] button repeatedly to select: Analog, HDMI Main, HDMI Sub, Both, Both(Main) or Both(Sub) For details on the remote controller. • This setting can specify the output resolution for the very first time. Composite video, S-Video Component video IN OUT Composite video, S-Video Component video...
... is displayed. 2 Press the [MONITOR OUT] button repeatedly to select: Analog, HDMI Main, HDMI Sub, Both, Both(Main) or Both(Sub) For details on the remote controller. • This setting can specify the output resolution for the very first time. Composite video, S-Video Component video IN OUT Composite video, S-Video Component video...

Owner Manual
Page 50
...] button. The main menu appears onscreen. If the main menu doesn't appear, make sure the appropriate external input is English. Input/Output Assign 2. Hardware Setup 8. Remote Controller Setup 9. Miscella- You can also be in a language other than English, first follow the instructions below to select "6. OSD Setup", and then press [ENTER]. Audio...
...] button. The main menu appears onscreen. If the main menu doesn't appear, make sure the appropriate external input is English. Input/Output Assign 2. Hardware Setup 8. Remote Controller Setup 9. Miscella- You can also be in a language other than English, first follow the instructions below to select "6. OSD Setup", and then press [ENTER]. Audio...
Owner Manual
Page 51
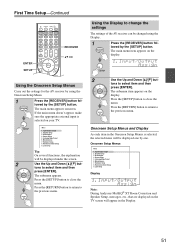
... 8. First Time Setup-Continued ENTER SETUP RECEIVER RXFS Using the Onscreen Setup Menus Carry out the settings for the AV receiver by the [SETUP] button. Remote Controller Setup 9. Speaker Setup 3. Source Setup 5. The submenu appears. Listening Mode Preset 6. Press the [SETUP] button to change the settings The settings of the AV receiver... under the screen. 2 Use the Up and Down [R]/[X] but - Lock Setup Tip: On several functions, the explanation will be displayed one by the [SETUP] button. Remote Controller Setup 9.
... 8. First Time Setup-Continued ENTER SETUP RECEIVER RXFS Using the Onscreen Setup Menus Carry out the settings for the AV receiver by the [SETUP] button. Remote Controller Setup 9. Speaker Setup 3. Source Setup 5. The submenu appears. Listening Mode Preset 6. Press the [SETUP] button to change the settings The settings of the AV receiver... under the screen. 2 Use the Up and Down [R]/[X] but - Lock Setup Tip: On several functions, the explanation will be displayed one by the [SETUP] button. Remote Controller Setup 9.
Owner Manual
Page 53
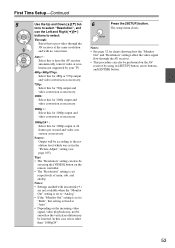
... necessary. 1080p* : Select this for 1080p output and video conversion as necessary. 1080p/24* : Select this for 1080p output at "Auto". • Depending on the remote controller. • The "Resolution" setting is fixed at 24 frames per second and video conversion as necessary. Tips: • The "Resolution" setting can also be set...
... necessary. 1080p* : Select this for 1080p output and video conversion as necessary. 1080p/24* : Select this for 1080p output at "Auto". • Depending on the remote controller. • The "Resolution" setting is fixed at 24 frames per second and video conversion as necessary. Tips: • The "Resolution" setting can also be set...

Owner Manual
Page 60
... If you must change the setting. First Time Setup-Continued 3 Use the Up and Down [R]/[X] but not at the same time. • Enter the appropriate remote control code before using its [SETUP] button, arrow buttons, and [ENTER] button. Tuner", and then press [ENTER]. The "Tuner" menu appears. (North American ...that "TV/TAPE", "GAME" or "VCR/DVR" appears on the AV receiver by using the AV receiver's remote controller for V to select "3. tons to work properly, you connect an V-capable Onkyo MiniDisc recorder, CD recorder, or RI Dock to the TV/TAPE IN/ OUT jacks, or connect an RI Dock...
... If you must change the setting. First Time Setup-Continued 3 Use the Up and Down [R]/[X] but not at the same time. • Enter the appropriate remote control code before using its [SETUP] button, arrow buttons, and [ENTER] button. Tuner", and then press [ENTER]. The "Tuner" menu appears. (North American ...that "TV/TAPE", "GAME" or "VCR/DVR" appears on the AV receiver by using the AV receiver's remote controller for V to select "3. tons to work properly, you connect an V-capable Onkyo MiniDisc recorder, CD recorder, or RI Dock to the TV/TAPE IN/ OUT jacks, or connect an RI Dock...
Owner Manual
Page 67
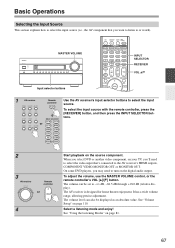
...It has a wide volume range, allowing precise adjustment. MASTER VOLUME INPUT SELECTOR RECEIVER VOL R/X Input selector buttons 1 AV receiver Remote controller or Use the AV receiver's input selector buttons to or watch). The AV receiver is designed for home theater enjoyment. To ...select the input source with the remote controller, press the [RECEIVER] button, and then press the INPUT SELECTOR buttons. 2 3 AV receiver Remote controller or 4 Start playback on the digital audio output. Select a listening mode and enjoy!...
...It has a wide volume range, allowing precise adjustment. MASTER VOLUME INPUT SELECTOR RECEIVER VOL R/X Input selector buttons 1 AV receiver Remote controller or Use the AV receiver's input selector buttons to or watch). The AV receiver is designed for home theater enjoyment. To ...select the input source with the remote controller, press the [RECEIVER] button, and then press the INPUT SELECTOR buttons. 2 3 AV receiver Remote controller or 4 Start playback on the digital audio output. Select a listening mode and enjoy!...

Owner Manual
Page 68
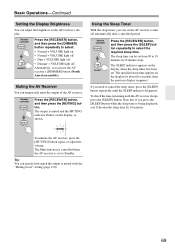
Remote controller Press the [RECEIVER] button, and then press the [DISPLAY] button repeatedly to adjust. The following information can display various information about three seconds, then the ... displayed. DISPLAY MUTING Notes: • This setting is not available when the multichannel Analog input is selected. • The tone can be performed on the remote controller by using [AUDIO] button (see page 117). ■ Bass You can boost or cut low-frequency sounds output by the front speakers from -10 dB...
Remote controller Press the [RECEIVER] button, and then press the [DISPLAY] button repeatedly to adjust. The following information can display various information about three seconds, then the ... displayed. DISPLAY MUTING Notes: • This setting is not available when the multichannel Analog input is selected. • The tone can be performed on the remote controller by using [AUDIO] button (see page 117). ■ Bass You can boost or cut low-frequency sounds output by the front speakers from -10 dB...
Owner Manual
Page 69
... time can be set to select: • Normal + VOLUME light on the display for about five seconds, then the previous display reappears. Remote controller Press the [RECEIVER] button, and then press the [DIMMER] button repeatedly to Standby. The specified sleep time appears on . • Normal... + VOLUME light off. • Dim + VOLUME light off. • Dimmer + VOLUME light off automatically after a specified period. Remote controller Press the [RECEIVER] button, and then press the [MUTING] button. Note that if you 'll shorten the sleep time by 10 minutes. Basic ...
... time can be set to select: • Normal + VOLUME light on the display for about five seconds, then the previous display reappears. Remote controller Press the [RECEIVER] button, and then press the [DIMMER] button repeatedly to Standby. The specified sleep time appears on . • Normal... + VOLUME light off. • Dim + VOLUME light off. • Dimmer + VOLUME light off automatically after a specified period. Remote controller Press the [RECEIVER] button, and then press the [MUTING] button. Note that if you 'll shorten the sleep time by 10 minutes. Basic ...


