Owner Manual
Page 3
...void the user's authority to time you should be determined by turning the equipment off the dirt. NOTE: This equipment has been tested and found to comply with a voltage selector to conform to the terminal which the receiver is marked with a soft cloth. ...NOISE EMISSION FROM DIGITAL APPARATUS SET OUT IN THE RADIO INTERFERENCE REGULATIONS OF THE CANADIAN DEPARTMENT OF COMMUNICATIONS. Declaration of Conformity We, ONKYO EUROPE ELECTRONICS GmbH INDUSTRIESTRASSE 20 82110 GERMERING, GERMANY declare in own responsibility, that the power supply voltage of this unit will not...
...void the user's authority to time you should be determined by turning the equipment off the dirt. NOTE: This equipment has been tested and found to comply with a voltage selector to conform to the terminal which the receiver is marked with a soft cloth. ...NOISE EMISSION FROM DIGITAL APPARATUS SET OUT IN THE RADIO INTERFERENCE REGULATIONS OF THE CANADIAN DEPARTMENT OF COMMUNICATIONS. Declaration of Conformity We, ONKYO EUROPE ELECTRONICS GmbH INDUSTRIESTRASSE 20 82110 GERMERING, GERMANY declare in own responsibility, that the power supply voltage of this unit will not...
Owner Manual
Page 4
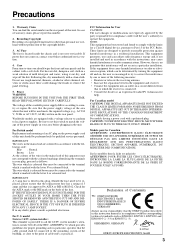
... outs for all channels s Banana-plug posts for all channels s High-quality extruded heat sink s Oversized power transformer s (TX-DS777) 105 W x 5 (8 Ω 20 Hz-20 kHz 0.08% THD FTC) 135 W x 5 (6 Ω 1 kHz 0.1% THD FTC) s (TX-DS676) 85 W x 5 (8 Ω 20 Hz-20 kHz 0.08% THD FTC) 110 W x 5 (6 Ω... and pre-amplifier performance and operation for many years to off. All rights reserved. ** Manufactured under license of quality and performance tests. Confidential Unpublished Works. ©1992-1997 Dolby Laboratories, Inc. US Pat. THX Mode, see page 34) which is your ...
... outs for all channels s Banana-plug posts for all channels s High-quality extruded heat sink s Oversized power transformer s (TX-DS777) 105 W x 5 (8 Ω 20 Hz-20 kHz 0.08% THD FTC) 135 W x 5 (6 Ω 1 kHz 0.1% THD FTC) s (TX-DS676) 85 W x 5 (8 Ω 20 Hz-20 kHz 0.08% THD FTC) 110 W x 5 (6 Ω... and pre-amplifier performance and operation for many years to off. All rights reserved. ** Manufactured under license of quality and performance tests. Confidential Unpublished Works. ©1992-1997 Dolby Laboratories, Inc. US Pat. THX Mode, see page 34) which is your ...
Owner Manual
Page 21
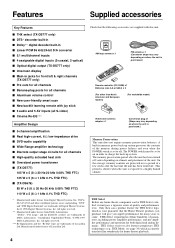
...press the CH SEL, but- Press the SMART SCAN CONTROLLER. Press the OSD MENU button. 2. buttons to adjust the speaker output level. Press rhe TEST button to adjust the speaker output levels 1. Setting the speaker Level 1 SP/SYS SETUP SPEAKERS DSP A PRESET/MODE ADJ PUSH TO ENTER 2 PRESET/..., or press the EXIT button, to select a speaker and press the LEVEL +/- Press the MODE AUDIO button. 2. The Level Setup screen appears and a test tone (pink noise) is on -screen display 1. The display shows "Left." 2. Press the center of the ENTER/Cursor button to "No" in the ...
...press the CH SEL, but- Press the SMART SCAN CONTROLLER. Press the OSD MENU button. 2. buttons to adjust the speaker output level. Press rhe TEST button to adjust the speaker output levels 1. Setting the speaker Level 1 SP/SYS SETUP SPEAKERS DSP A PRESET/MODE ADJ PUSH TO ENTER 2 PRESET/..., or press the EXIT button, to select a speaker and press the LEVEL +/- Press the MODE AUDIO button. 2. The Level Setup screen appears and a test tone (pink noise) is on -screen display 1. The display shows "Left." 2. Press the center of the ENTER/Cursor button to "No" in the ...

Owner Manual
Page 22
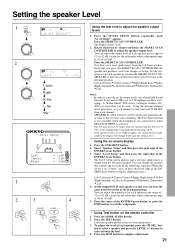
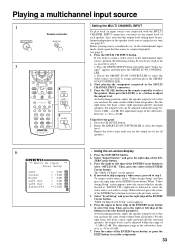
...CONTROLLER. Note: • Allowing the speakers to produce distorted sound for a long time may cause damage to select "Yes" or "No." lowed by "Test Tone ON?." 3. Setting the Speaker level 1 SP/SYS SETUP SPEAKERS DSP A PRESET/MODE ADJ PUSH TO ENTER 2 PRESET/MODE ADJ PUSH TO ENTER PRESET...ADJ PUSH TO ENTER PRESET/MODE ADJ PUSH TO ENTER SPEAKERS A SPEAKERS A SPEAKERS A Setting the bass peak level (Bass Peak Level Manager* TX-DS777 only) To prevent damage to your Front speakers can reproduce. If your system does not include any subwoofer, this will show the current ...
...CONTROLLER. Note: • Allowing the speakers to produce distorted sound for a long time may cause damage to select "Yes" or "No." lowed by "Test Tone ON?." 3. Setting the Speaker level 1 SP/SYS SETUP SPEAKERS DSP A PRESET/MODE ADJ PUSH TO ENTER 2 PRESET/MODE ADJ PUSH TO ENTER PRESET...ADJ PUSH TO ENTER PRESET/MODE ADJ PUSH TO ENTER SPEAKERS A SPEAKERS A SPEAKERS A Setting the bass peak level (Bass Peak Level Manager* TX-DS777 only) To prevent damage to your Front speakers can reproduce. If your system does not include any subwoofer, this will show the current ...
Owner Manual
Page 23
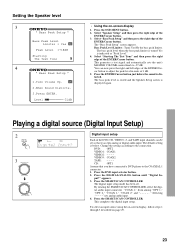
... can be set . VIDEO3: COAX2 TAPE: - - - - appears. 3. By rotating the SMART SCAN CONTROLLER, select the digi- Select "Starting The Test Tone" and then press the right edge of 1 dB. 5. CD: OPT1 Assume that it accepts analog or digital audio input. Press the SMART SCAN...button. 2. This completes the digital input setup. The bass peak level when the bass peak limiter is turned Yes is below. This generates a test signal and automatically sets the unit's MASTER VOLUME control knob to the COAXIAL 1 connector. 1. Playing a digital source (Digital Input Setup) 2...
... can be set . VIDEO3: COAX2 TAPE: - - - - appears. 3. By rotating the SMART SCAN CONTROLLER, select the digi- Select "Starting The Test Tone" and then press the right edge of 1 dB. 5. CD: OPT1 Assume that it accepts analog or digital audio input. Press the SMART SCAN...button. 2. This completes the digital input setup. The bass peak level when the bass peak limiter is turned Yes is below. This generates a test signal and automatically sets the unit's MASTER VOLUME control knob to the COAXIAL 1 connector. 1. Playing a digital source (Digital Input Setup) 2...
Owner Manual
Page 33
.... 33 At the listening position, adjust the speaker output level so that you can be performed independent of the speaker levels you set using the test tone (see page 9). 1. Press the CH LEVEL button. 2. At the listening position, adjust the speaker output level so that you can be adjusted within the...
.... 33 At the listening position, adjust the speaker output level so that you can be performed independent of the speaker levels you set using the test tone (see page 9). 1. Press the CH LEVEL button. 2. At the listening position, adjust the speaker output level so that you can be adjusted within the...
Owner Manual
Page 42
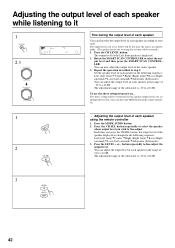
... 3 42 To use the above setting will be overwritten by mode. (The speaker levels you set through the test tone, once you press the CH SEL button, the output level of the Left front speaker is -30 to ...Subwoofer) You can adjust the output level of each speaker in the range of each speaker using the test tone will be restored.) db 1. You can fine-tune the output level of - 12 to +12 dB. Each... time you press the TEST button on ... The output levels you set as below will be lost once the unit is in ...
... 3 42 To use the above setting will be overwritten by mode. (The speaker levels you set through the test tone, once you press the CH SEL button, the output level of the Left front speaker is -30 to ...Subwoofer) You can adjust the output level of each speaker in the range of each speaker using the test tone will be restored.) db 1. You can fine-tune the output level of - 12 to +12 dB. Each... time you press the TEST button on ... The output levels you set as below will be lost once the unit is in ...

Owner Manual
Page 48
... Surround Yes Small Small Small Distance Setup Left Center Right R-Sur L-Sur Subwoofer 3.6m/12ft 3.6m/12ft 3.6m/12ft 2.1m/7ft 2.1m/7ft 3.6m/12ft Test Tone Left 0dB Center 0dB Right 0dB R-Sur 0dB L-Sur 0dB Subwoofer 0dB Listning mode Listning mode stereo Listning mode parameter Re-EQ LATE NIGHT...
... Surround Yes Small Small Small Distance Setup Left Center Right R-Sur L-Sur Subwoofer 3.6m/12ft 3.6m/12ft 3.6m/12ft 2.1m/7ft 2.1m/7ft 3.6m/12ft Test Tone Left 0dB Center 0dB Right 0dB R-Sur 0dB L-Sur 0dB Subwoofer 0dB Listning mode Listning mode stereo Listning mode parameter Re-EQ LATE NIGHT...
Owner Manual
Page 49
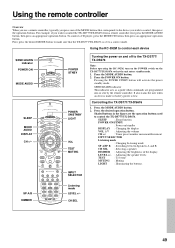
... correct mode. POWER STNBY POWER ON/STNBY LIGHT VOL TEST MUTING Turning the power on and off to control the TX-DS777/TX-DS676. Controlling the TX-DS777/TX-DS676 1. SLEEP : Sleep function POWER ON/STNBY : Power on the TX-DS777/TX-DS676 so that the unit enters standby mode. 1. First,..., typically you press one of the display LEVEL +/- : Adjusting the speaker levels TEST : Test tone MUTING : Muting LIGHT : Illuminating the buttons. For example, if you wish to control the TX-DS777/TX-DS676 from a remote controller, first press the MODE AUDIO button, then press an appropriate...
... correct mode. POWER STNBY POWER ON/STNBY LIGHT VOL TEST MUTING Turning the power on and off to control the TX-DS777/TX-DS676. Controlling the TX-DS777/TX-DS676 1. SLEEP : Sleep function POWER ON/STNBY : Power on the TX-DS777/TX-DS676 so that the unit enters standby mode. 1. First,..., typically you press one of the display LEVEL +/- : Adjusting the speaker levels TEST : Test tone MUTING : Muting LIGHT : Illuminating the buttons. For example, if you wish to control the TX-DS777/TX-DS676 from a remote controller, first press the MODE AUDIO button, then press an appropriate...
Owner Manual
Page 58
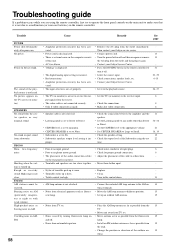
...low-frequency noise. Trouble POWER Power shut off . • Select the correct input. • Check connections, speaker leads, etc. • Contact your Onkyo Service Center. • Press the MUTING button on but no phono motor ground. • Check for proper ground connection. 6 • The placement of... the audio connection cables • Adjust the placement of the playback source is incorrect. • Turntable and speakers are using the test tone. 11 34~38 21 18, 19 12 22 • Poor or no input ground. • Check outer conductor of input plugs. 6 ...
...low-frequency noise. Trouble POWER Power shut off . • Select the correct input. • Check connections, speaker leads, etc. • Contact your Onkyo Service Center. • Press the MUTING button on but no phono motor ground. • Check for proper ground connection. 6 • The placement of... the audio connection cables • Adjust the placement of the playback source is incorrect. • Turntable and speakers are using the test tone. 11 34~38 21 18, 19 12 22 • Poor or no input ground. • Check outer conductor of input plugs. 6 ...

Owner Manual
Page 63
..., 50] 17. OSD/MENU button [16, 17, 50] 21. SEND/LEARN indicator [49, 52, 53] 2. ENT button [50~53, 57] 15. DISC button [50] 16. TEST/TV/VCR button [49] 18. ENTER/cursor buttons [16, 17, 50] 19. VOL ∆/∆ button [27, 35, 49, 50] Volume adjustment 20. POWER ON... 12 Remote controller Using the remote controller, you can control a CD player or cassette tape deck connected to the connector of the TX-DS777/676. (See page 7 for the TX-DS676.] 14. SLEEP button [27, 31, 49] Sleep function button 4. MODE buttons [13, 27, 49~56] 6. EXIT/RETURN button [16, 17, 50] 9. buttons...
..., 50] 17. OSD/MENU button [16, 17, 50] 21. SEND/LEARN indicator [49, 52, 53] 2. ENT button [50~53, 57] 15. DISC button [50] 16. TEST/TV/VCR button [49] 18. ENTER/cursor buttons [16, 17, 50] 19. VOL ∆/∆ button [27, 35, 49, 50] Volume adjustment 20. POWER ON... 12 Remote controller Using the remote controller, you can control a CD player or cassette tape deck connected to the connector of the TX-DS777/676. (See page 7 for the TX-DS676.] 14. SLEEP button [27, 31, 49] Sleep function button 4. MODE buttons [13, 27, 49~56] 6. EXIT/RETURN button [16, 17, 50] 9. buttons...