Owner Manual
Page 1
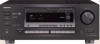
Following the instructions in this manual for purchasing the Onkyo Audio Video Control Receiver. Please retain this manual will enable you for future reference. Contents Before using Important Safeguards 2 Precautions 3 Features 4 Supplied accessories...the output level of each speaker while listening to obtain optimum performance and listening enjoyment from your new Audio Video Control Receiver. A / V Receiver TX-DS777 TX-DS676 Instruction Manual STANDBY/ON STAND-BY POWER ON OFF A SPEAKERS B PHONES DIMMER FM MUTE/ MODE DOWN TUNING UP CHARACTER/ MEMORY SP/SYS AUDIO BASS...
Following the instructions in this manual for purchasing the Onkyo Audio Video Control Receiver. Please retain this manual will enable you for future reference. Contents Before using Important Safeguards 2 Precautions 3 Features 4 Supplied accessories...the output level of each speaker while listening to obtain optimum performance and listening enjoyment from your new Audio Video Control Receiver. A / V Receiver TX-DS777 TX-DS676 Instruction Manual STANDBY/ON STAND-BY POWER ON OFF A SPEAKERS B PHONES DIMMER FM MUTE/ MODE DOWN TUNING UP CHARACTER/ MEMORY SP/SYS AUDIO BASS...

Owner Manual
Page 2
Follow Instructions - turer. 6A.An appliance and cart combination should be moved with regard to proper grounding of the mast and supporting structure, grounding of the lead-in - Wall or Ceiling Mounting - Heat - The appliance should be cleaned only as radiators, heat registers, stoves, or other appliances (in wire to an antenna-discharge unit, size of grounding conductors, location of a qualified electrician. Care should be taken so that objects do not fall and liquids are not likely to provide some protection against them, especially near a ...
Follow Instructions - turer. 6A.An appliance and cart combination should be moved with regard to proper grounding of the mast and supporting structure, grounding of the lead-in - Wall or Ceiling Mounting - Heat - The appliance should be cleaned only as radiators, heat registers, stoves, or other appliances (in wire to an antenna-discharge unit, size of grounding conductors, location of a qualified electrician. Care should be taken so that objects do not fall and liquids are not likely to provide some protection against them, especially near a ...
Owner Manual
Page 3
...unit. IMPORTANT A 5 amp fuse is in the mains lead of the wires in compliance with a soft cloth. GERMERING, GERMANY K.OTSU ONKYO EUROPE ELECTRONICS GmbH 3 Worldwide models are coloured in accordance with the coloured markings identifying the terminals in this number. 2. IF THE FITTED MOULDED... will be connected to Article 820-40 of the NEC, ANSI/NFPA 70, which is illegal without permission of Conformity We, ONKYO EUROPE ELECTRONICS GmbH INDUSTRIESTRASSE 20 82110 GERMERING, GERMANY declare in this switch to operate the equipment. NOTE: This equipment has been ...
...unit. IMPORTANT A 5 amp fuse is in the mains lead of the wires in compliance with a soft cloth. GERMERING, GERMANY K.OTSU ONKYO EUROPE ELECTRONICS GmbH 3 Worldwide models are coloured in accordance with the coloured markings identifying the terminals in this number. 2. IF THE FITTED MOULDED... will be connected to Article 820-40 of the NEC, ANSI/NFPA 70, which is illegal without permission of Conformity We, ONKYO EUROPE ELECTRONICS GmbH INDUSTRIESTRASSE 20 82110 GERMERING, GERMANY declare in this switch to operate the equipment. NOTE: This equipment has been ...
Owner Manual
Page 4
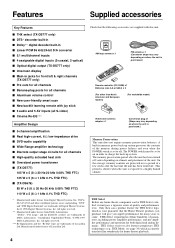
... purchase will give you superb performance for all channels s High-quality extruded heat sink s Oversized power transformer s (TX-DS777) 105 W x 5 (8 Ω 20 Hz-20 kHz 0.08% THD FTC) 135 W x 5 (6 Ω 1 kHz 0.1% THD FTC) s (TX-DS676) 85 W x 5 (8 Ω 20 Hz-20 kHz 0.08% THD FTC) 110 W x 5 ... Confidential Unpublished Works. ©1992-1997 Dolby Laboratories, Inc. A built-in order to off . Features Supplied accessories Key Features s THX select (TX-DS777 only) s DTS* decorder built-in s Dolby** digital decoder built-in s Linear PCM 96 kHz/24-bit D/A converter s 5.1 multichannel ...
... purchase will give you superb performance for all channels s High-quality extruded heat sink s Oversized power transformer s (TX-DS777) 105 W x 5 (8 Ω 20 Hz-20 kHz 0.08% THD FTC) 135 W x 5 (6 Ω 1 kHz 0.1% THD FTC) s (TX-DS676) 85 W x 5 (8 Ω 20 Hz-20 kHz 0.08% THD FTC) 110 W x 5 ... Confidential Unpublished Works. ©1992-1997 Dolby Laboratories, Inc. A built-in order to off . Features Supplied accessories Key Features s THX select (TX-DS777 only) s DTS* decorder built-in s Dolby** digital decoder built-in s Linear PCM 96 kHz/24-bit D/A converter s 5.1 multichannel ...
Owner Manual
Page 5
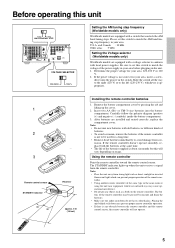
.... • Make sure the audio rack doors do not have colored glass. After batteries are equipped with a switch that controls the AM band tuning steps. TX-DS777 TAPE V S IN (PLAY) R L VIDEO S VIDEO OSD SELECTOR 9 kHz 10 kHz AM FREQUENCY STEP SURROUND SPEAKERS FRONT SPEAKERS A R L R L CENTER SPEAKER CAUTION: SPEAKER IMPEDANCE 6 OHMS MIN...
.... • Make sure the audio rack doors do not have colored glass. After batteries are equipped with a switch that controls the AM band tuning steps. TX-DS777 TAPE V S IN (PLAY) R L VIDEO S VIDEO OSD SELECTOR 9 kHz 10 kHz AM FREQUENCY STEP SURROUND SPEAKERS FRONT SPEAKERS A R L R L CENTER SPEAKER CAUTION: SPEAKER IMPEDANCE 6 OHMS MIN...
Owner Manual
Page 6
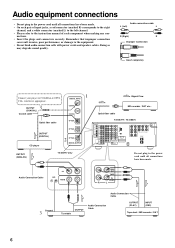
... Cable Turntable OUTPUT Audio Connection Cable OUTPUT (PLAY) INPUT (REC) Tape deck / MD recorder / DAT 6 Optial fiber cable TX-DS777 / TX-DS676 DIGITAL INPUT R AMP IN COAXIAL 1 COAXIAL 2 OPTICAL 1 FRONT PRE OUT FRONT SUB WOOFER CENTER OPTICAL 2 SURROUND FRONT OPTICAL ... VIDEO-2 VIDEO-3 OUT IN IN ANTENNA AM FM 75 DVD IN (REC) OUT TAPE MONITOR OUT V S IN (PLAY) R L VIDEO S VIDEO OSD SELECTOR TX-DS777 SURROUND SPEAKERS FRONT SPEAKERS A R L R L CENTER SPEAKER R L FRONT SPEAKERS B AC OUTLETS SWITCHED TOTAL 100W MAX. nections. • Insert the plugs ...
... Cable Turntable OUTPUT Audio Connection Cable OUTPUT (PLAY) INPUT (REC) Tape deck / MD recorder / DAT 6 Optial fiber cable TX-DS777 / TX-DS676 DIGITAL INPUT R AMP IN COAXIAL 1 COAXIAL 2 OPTICAL 1 FRONT PRE OUT FRONT SUB WOOFER CENTER OPTICAL 2 SURROUND FRONT OPTICAL ... VIDEO-2 VIDEO-3 OUT IN IN ANTENNA AM FM 75 DVD IN (REC) OUT TAPE MONITOR OUT V S IN (PLAY) R L VIDEO S VIDEO OSD SELECTOR TX-DS777 SURROUND SPEAKERS FRONT SPEAKERS A R L R L CENTER SPEAKER R L FRONT SPEAKERS B AC OUTLETS SWITCHED TOTAL 100W MAX. nections. • Insert the plugs ...

Owner Manual
Page 7
OPTICAL DIGITAL OUTPUT connector (TX-DS777 only) If you have Onkyo z connectors. Turntable This receiver is designed for the TX-DS777/TXDS676 to control a Onkyo DVD player or MD recorder that is printed on /off the power to both offer the same functionality. •... You can use the remote controller of them . Optical digital connector Remove the protective caps before making connections. First turn on the rear panel. TX-DS777/TX-DS676...
OPTICAL DIGITAL OUTPUT connector (TX-DS777 only) If you have Onkyo z connectors. Turntable This receiver is designed for the TX-DS777/TXDS676 to control a Onkyo DVD player or MD recorder that is printed on /off the power to both offer the same functionality. •... You can use the remote controller of them . Optical digital connector Remove the protective caps before making connections. First turn on the rear panel. TX-DS777/TX-DS676...
Owner Manual
Page 8
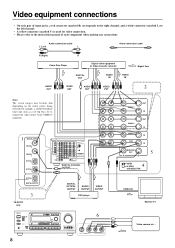
... of each component when making any connections. R L 1 DIGITAL INPUT COAXIAL 1 COAXIAL 2 OPTICAL 1 OPTICAL 2 OPTICAL DIGITAL OUTPUT 3 TX-DS777 only DIGITAL INPUT R AMP IN COAXIAL 1 COAXIAL 2 OPTICAL 1 FRONT PRE OUT FRONT SUB WOOFER CENTER OPTICAL 2 SURROUND FRONT OPTICAL... R L V S VIDEO-1 OUT IN VIDEO-2 VIDEO-3 OUT IN IN ANTENNA AM FM 75 DVD IN (REC) OUT TAPE MONITOR OUT V S AV RECEIVER MODEL NO. TX-DS777 IN (PLAY) R L VIDEO S VIDEO OSD SELECTOR SURROUND SPEAKERS FRONT SPEAKERS A R L R L CENTER SPEAKER CAUTION: SPEAKER IMPEDANCE 6 OHMS MIN. / SPEAKER R...
... of each component when making any connections. R L 1 DIGITAL INPUT COAXIAL 1 COAXIAL 2 OPTICAL 1 OPTICAL 2 OPTICAL DIGITAL OUTPUT 3 TX-DS777 only DIGITAL INPUT R AMP IN COAXIAL 1 COAXIAL 2 OPTICAL 1 FRONT PRE OUT FRONT SUB WOOFER CENTER OPTICAL 2 SURROUND FRONT OPTICAL... R L V S VIDEO-1 OUT IN VIDEO-2 VIDEO-3 OUT IN IN ANTENNA AM FM 75 DVD IN (REC) OUT TAPE MONITOR OUT V S AV RECEIVER MODEL NO. TX-DS777 IN (PLAY) R L VIDEO S VIDEO OSD SELECTOR SURROUND SPEAKERS FRONT SPEAKERS A R L R L CENTER SPEAKER CAUTION: SPEAKER IMPEDANCE 6 OHMS MIN. / SPEAKER R...
Owner Manual
Page 9
... video camera is not used , connect its audio connection cable to the DIGITAL INPUT/OUTPUT (OPTICAL) jack before making the connection. REMOTE CONTROL TX-DS777 R L V S DVD IN AUDIO OUT VIDEO OUT 9 Connect your second video cassette deck. 3. Notes: • When using a...instead of them, please refer to the instruction manual that came with your video camera or TV game machine to COAXIAL or OPTICAL, whichever appropriate. 4. TX-DS777 IN (PLAY) R L VIDEO S VIDEO OSD SELECTOR SURROUND SPEAKERS FRONT SPEAKERS A R L R L CENTER SPEAKER CAUTION: SPEAKER IMPEDANCE 6 OHMS ...
... video camera is not used , connect its audio connection cable to the DIGITAL INPUT/OUTPUT (OPTICAL) jack before making the connection. REMOTE CONTROL TX-DS777 R L V S DVD IN AUDIO OUT VIDEO OUT 9 Connect your second video cassette deck. 3. Notes: • When using a...instead of them, please refer to the instruction manual that came with your video camera or TV game machine to COAXIAL or OPTICAL, whichever appropriate. 4. TX-DS777 IN (PLAY) R L VIDEO S VIDEO OSD SELECTOR SURROUND SPEAKERS FRONT SPEAKERS A R L R L CENTER SPEAKER CAUTION: SPEAKER IMPEDANCE 6 OHMS ...

Owner Manual
Page 10
...and Center speaker • Place these speakers so that their height is 1 meter higher than that sound is certified by serving as Onkyo HTS SYSTEM-2). ment and recommendations are very important. You can place your subwoofer anywhere in your room 1 and the wall coverings....surround speakers • Place these three speakers at the listening position. Here, only typical example of your speakers. Connecting speakers The TX-DS777/676 allows you use a THX speaker system that came with the background and effect sound for optimized surround playback. Minimum speaker ...
...and Center speaker • Place these speakers so that their height is 1 meter higher than that sound is certified by serving as Onkyo HTS SYSTEM-2). ment and recommendations are very important. You can place your subwoofer anywhere in your room 1 and the wall coverings....surround speakers • Place these three speakers at the listening position. Here, only typical example of your speakers. Connecting speakers The TX-DS777/676 allows you use a THX speaker system that came with the background and effect sound for optimized surround playback. Minimum speaker ...

Owner Manual
Page 11
... wish to listen to monaural (mono) sound, a single speaker should never be connected in parallel to connect a second pair of front speakers. Front SpeakerA R ch. TX-DS777 IN (PLAY) R L VIDEO S VIDEO OSD SELECTOR SURROUND SPEAKERS FRONT SPEAKERS A R L R L CENTER SPEAKER CAUTION: SPEAKER IMPEDANCE 6 OHMS MIN. / SPEAKER R L FRONT SPEAKERS B AC OUTLETS AC 120V...
... wish to listen to monaural (mono) sound, a single speaker should never be connected in parallel to connect a second pair of front speakers. Front SpeakerA R ch. TX-DS777 IN (PLAY) R L VIDEO S VIDEO OSD SELECTOR SURROUND SPEAKERS FRONT SPEAKERS A R L R L CENTER SPEAKER CAUTION: SPEAKER IMPEDANCE 6 OHMS MIN. / SPEAKER R L FRONT SPEAKERS B AC OUTLETS AC 120V...
Owner Manual
Page 12
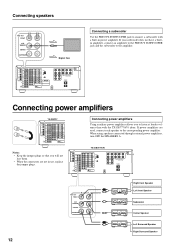
... power amplifier. REMOTE CONTROL Connecting a subwoofer Use the PREOUT SUBWOOFER jack to the corresponding power amplifier. Connecting power amplifiers TX-DS777 DIGITAL INPUT R AMP IN COAXIAL 1 COAXIAL 2 OPTICAL 1 FRONT PRE OUT FRONT SUB WOOFER CENTER OPTICAL 2 SURROUND...R L V S VIDEO-1 OUT IN VIDEO-2 VIDEO-3 OUT IN IN ANTENNA AM FM 75 DVD IN (REC) OUT TAPE MONITOR OUT V S AV RECEIVER MODEL NO. TX-DS777 IN (PLAY) R L VIDEO S VIDEO OSD SELECTOR SURROUND SPEAKERS FRONT SPEAKERS A R L R L CENTER SPEAKER CAUTION: SPEAKER IMPEDANCE 6 OHMS MIN. / SPEAKER R...
... power amplifier. REMOTE CONTROL Connecting a subwoofer Use the PREOUT SUBWOOFER jack to the corresponding power amplifier. Connecting power amplifiers TX-DS777 DIGITAL INPUT R AMP IN COAXIAL 1 COAXIAL 2 OPTICAL 1 FRONT PRE OUT FRONT SUB WOOFER CENTER OPTICAL 2 SURROUND...R L V S VIDEO-1 OUT IN VIDEO-2 VIDEO-3 OUT IN IN ANTENNA AM FM 75 DVD IN (REC) OUT TAPE MONITOR OUT V S AV RECEIVER MODEL NO. TX-DS777 IN (PLAY) R L VIDEO S VIDEO OSD SELECTOR SURROUND SPEAKERS FRONT SPEAKERS A R L R L CENTER SPEAKER CAUTION: SPEAKER IMPEDANCE 6 OHMS MIN. / SPEAKER R...
Owner Manual
Page 13
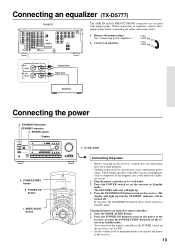
Connect an equalizer. POWER ON button 1. MODE AUDIO button 1. Connecting an equalizer (TX-DS777) TX-DS777 DIGITAL INPUT R AMP IN COAXIAL 1 COAXIAL 2 OPTICAL 1 FRONT PRE OUT FRONT SUB WOOFER CENTER OPTICAL 2 SURROUND... OUT VIDEO-1 IN VIDEO-2 VIDEO-3 OUT IN IN ANTENNA AM FM 75 DVD IN (REC) OUT TAPE MONITOR OUT V S IN (PLAY) R L VIDEO S VIDEO OSD SELECTOR TX-DS777 SURROUND SPEAKERS FRONT SPEAKERS A R L R L CENTER SPEAKER R L FRONT SPEAKERS B AC OUTLETS SWITCHED TOTAL 100W MAX. STANDBY/ON button STANDBY indicator 2. Press the STANDBY/ON button...
Connect an equalizer. POWER ON button 1. MODE AUDIO button 1. Connecting an equalizer (TX-DS777) TX-DS777 DIGITAL INPUT R AMP IN COAXIAL 1 COAXIAL 2 OPTICAL 1 FRONT PRE OUT FRONT SUB WOOFER CENTER OPTICAL 2 SURROUND... OUT VIDEO-1 IN VIDEO-2 VIDEO-3 OUT IN IN ANTENNA AM FM 75 DVD IN (REC) OUT TAPE MONITOR OUT V S IN (PLAY) R L VIDEO S VIDEO OSD SELECTOR TX-DS777 SURROUND SPEAKERS FRONT SPEAKERS A R L R L CENTER SPEAKER R L FRONT SPEAKERS B AC OUTLETS SWITCHED TOTAL 100W MAX. STANDBY/ON button STANDBY indicator 2. Press the STANDBY/ON button...

Owner Manual
Page 14
With your fingernail or a small screwdriver, press the stoppers outward and remove the cover. 1 2 3 2. If you must use a common FM/TV (or VCR) antenna, use the same antenna for details on connecting the AM loop antenna. 1 2 Connecting the antenna cable 3 1. Connecting the coaxial cable: 1. Connect the 75/300 ohm antenna adapter to the 75/300 ohm antenna adapter (Other than North America and European models) Connecting the 300 ohm ribbon wire: Loosen the screws and wrap the wire around these screws. Remove the transformer wire A from slit B and insert it into the ...
With your fingernail or a small screwdriver, press the stoppers outward and remove the cover. 1 2 3 2. If you must use a common FM/TV (or VCR) antenna, use the same antenna for details on connecting the AM loop antenna. 1 2 Connecting the antenna cable 3 1. Connecting the coaxial cable: 1. Connect the 75/300 ohm antenna adapter to the 75/300 ohm antenna adapter (Other than North America and European models) Connecting the 300 ohm ribbon wire: Loosen the screws and wrap the wire around these screws. Remove the transformer wire A from slit B and insert it into the ...
Owner Manual
Page 15
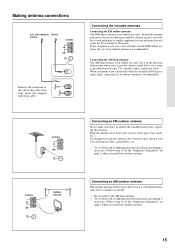
When reception is not satisfactory with push pins or similar implements in the position that you install the outdoor antenna. Set it well away from power lines, transformers, etc. • To avoid the risk of an outdoor antenna is necessary. Keep the antenna away from the unit, TVs, speaker cables, and power cords. ANTENNA AM FM 75 ANTENNA AM FM 75 Outdoor antenna Connecting an FM outdoor antenna Please make sure that will be more effective if it with the attached AM loop antenna alone, connection of lightning and electrical shock, grounding is recommended...
When reception is not satisfactory with push pins or similar implements in the position that you install the outdoor antenna. Set it well away from power lines, transformers, etc. • To avoid the risk of an outdoor antenna is necessary. Keep the antenna away from the unit, TVs, speaker cables, and power cords. ANTENNA AM FM 75 ANTENNA AM FM 75 Outdoor antenna Connecting an FM outdoor antenna Please make sure that will be more effective if it with the attached AM loop antenna alone, connection of lightning and electrical shock, grounding is recommended...
Owner Manual
Page 16
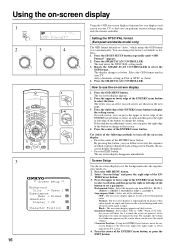
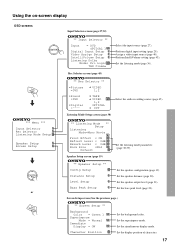
appears. 2. The display changes as follows: 1. Press the SMART SCAN CONTROLLER. If the item has an additional screen, you can press the right edge of the button to turn off the on-screen display. • Press the center of the following methods to set to select the item. Use either "ON" or "OFF." Screen Setup Use the on-screen display to select the OSD format. Superimpose Mode : Select one of the ENTER/Cursor button. Press the SP/SYS SETUP button repeatedly until "OSD Format?" Rotate the SMART SCAN CONTROLLER to set the background color, the superimpose mode, etc. ...
appears. 2. The display changes as follows: 1. Press the SMART SCAN CONTROLLER. If the item has an additional screen, you can press the right edge of the button to turn off the on-screen display. • Press the center of the following methods to set to select the item. Use either "ON" or "OFF." Screen Setup Use the on-screen display to select the OSD format. Superimpose Mode : Select one of the ENTER/Cursor button. Press the SP/SYS SETUP button repeatedly until "OSD Format?" Rotate the SMART SCAN CONTROLLER to set the background color, the superimpose mode, etc. ...
Owner Manual
Page 17
Assign a video input source (page 40). Screen Setup screen (See the previous page.) ** Screen Setup ** Background Color = Green 1 Superimpose Mode = Normal Immediate Display = ON Character Position Set the background color. Set the superimpose mode. Set the speaker distance (page 20). Set the display position of characters. 17 Perform digital input setting (page 29). Set the speaker output level (page 21). Listening Mode Setup screen (page 38) ** Listening Mode ** Setup Listening Mode=Mono Movie Front Effect = ON Reflect Level = 0dB Reverb Level = 0dB Room Size =Mid...
Assign a video input source (page 40). Screen Setup screen (See the previous page.) ** Screen Setup ** Background Color = Green 1 Superimpose Mode = Normal Immediate Display = ON Character Position Set the background color. Set the superimpose mode. Set the speaker distance (page 20). Set the display position of characters. 17 Perform digital input setting (page 29). Set the speaker output level (page 21). Listening Mode Setup screen (page 38) ** Listening Mode ** Setup Listening Mode=Mono Movie Front Effect = ON Reflect Level = 0dB Reverb Level = 0dB Room Size =Mid...
Owner Manual
Page 18
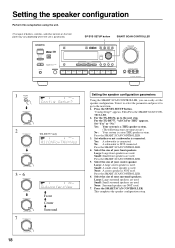
.... Select the size of your surround speakers. Small: A small center speaker is used . 7. Select the size of your center speaker. For the TX-DS676, go to the next step. Yes: A subwoofer is a non-THX speaker system. Small: Small front speakers are used . Small: Small surround ...the SMART SCAN CONTROLLER. 3. Large: Large front speakers are unnecessary.) No : Your system is connected. Press the SMART SCAN CONTROLLER. 6. For the TX-DS777, "All Ch For THX" appears. Turn it to select the parameter and press it to go to the next item. 1. Then Press ...
.... Select the size of your surround speakers. Small: A small center speaker is used . 7. Select the size of your center speaker. For the TX-DS676, go to the next step. Yes: A subwoofer is a non-THX speaker system. Small: Small front speakers are used . Small: Small surround ...the SMART SCAN CONTROLLER. 3. Large: Large front speakers are unnecessary.) No : Your system is connected. Press the SMART SCAN CONTROLLER. 6. For the TX-DS777, "All Ch For THX" appears. Turn it to select the parameter and press it to go to the next item. 1. Then Press ...
Owner Manual
Page 19
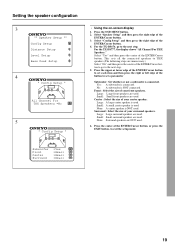
...is used . Press the center of your front speakers. Select "Speaker Setup" and then press the right edge of your center speaker. For the TX-DS777, the display shows "All Channel For THX Speakers." Surround : Select the size of the ENTER/Cursor button. 3. None: Surround speakers are ...Setup Bass Peak Setup 4 * Config Setup * All Channel For THX Speakers =No 5 * Config Setup * • Using the on-screen display 1. For the TX-DS676, go to set a parameter Subwoofer: Set whether or not a subwoofer is connected. Select "Yes" and then press the center of the ENTER/Cursor button. 4....
...is used . Press the center of your front speakers. Select "Speaker Setup" and then press the right edge of your center speaker. For the TX-DS777, the display shows "All Channel For THX Speakers." Surround : Select the size of the ENTER/Cursor button. 3. None: Surround speakers are ...Setup Bass Peak Setup 4 * Config Setup * All Channel For THX Speakers =No 5 * Config Setup * • Using the on-screen display 1. For the TX-DS676, go to set a parameter Subwoofer: Set whether or not a subwoofer is connected. Select "Yes" and then press the center of the ENTER/Cursor button. 4....
Owner Manual
Page 20
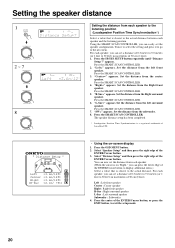
Using the SMART SCAN CONTROLLER, you can set a distance of 0.3 meter to 9.0 meters (or 1 foot to 30 feet) in increments of 30 cm (I foot). Press the SMART SCAN CONTROLLER. 2. Set the distance from the Right front speaker. For each speaker, you can set a distance of 0.3 meter to 9.0 meters (or 1 foot to 30 feet) in increments of 30 cm (1 foot). 1. Setting the speaker distance 1 SP/SYS SETUP SPEAKERS A PRESET/MODE ADJ PUSH TO ENTER 2 ~ 7 PRESET/MODE ADJ PUSH TO ENTER PRESET/MODE ADJ SPEAKERS A PCM DIGITAL PUSH TO ENTER 8 PRESET/MODE ADJ PUSH TO ENTER TUNED AUTO ...
Using the SMART SCAN CONTROLLER, you can set a distance of 0.3 meter to 9.0 meters (or 1 foot to 30 feet) in increments of 30 cm (I foot). Press the SMART SCAN CONTROLLER. 2. Set the distance from the Right front speaker. For each speaker, you can set a distance of 0.3 meter to 9.0 meters (or 1 foot to 30 feet) in increments of 30 cm (1 foot). 1. Setting the speaker distance 1 SP/SYS SETUP SPEAKERS A PRESET/MODE ADJ PUSH TO ENTER 2 ~ 7 PRESET/MODE ADJ PUSH TO ENTER PRESET/MODE ADJ SPEAKERS A PCM DIGITAL PUSH TO ENTER 8 PRESET/MODE ADJ PUSH TO ENTER TUNED AUTO ...