
Owner Manual
Page 1
... To enjoy Surround mode 26 Recording a source 29 Remote controller Using remote controller 30 Pre-programming remote controller (North American models only 32 Appendix Troubleshooting guide 34 Specifications back cover page Following the instructions in the unit. Please read this manual for purchasing the Onkyo AV Receiver. AV Receiver TX-DS494 Instruction Manual Contents Before using Important Safeguards 2 Precautions...
... To enjoy Surround mode 26 Recording a source 29 Remote controller Using remote controller 30 Pre-programming remote controller (North American models only 32 Appendix Troubleshooting guide 34 Specifications back cover page Following the instructions in the unit. Please read this manual for purchasing the Onkyo AV Receiver. AV Receiver TX-DS494 Instruction Manual Contents Before using Important Safeguards 2 Precautions...
Owner Manual
Page 4
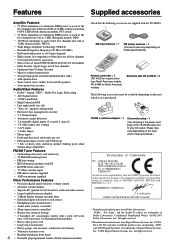
...**Manufactured under license from Digital Theater Systems, Inc. "Dolby", "Pro Logic" and the double-D symbol are trademarks of the TX-DS494 does not fit your AC outlet. US Pat. Shape may be available depending on the area which it was purchased. 75... EN55013, EN55020 and EN61000-3-2, -3-3 GERMERING, GERMANY A.HORIUCHI ONKYO EUROPE ELECTRONICS GmbH * Manufactured under license from Dolby Laboratories. AM loop antenna × 1 FM indoor antenna × 1 (Connector will vary depending on model specifications) Remote controller × 1 (RC-443S for models other worldwide patents ...
...**Manufactured under license from Digital Theater Systems, Inc. "Dolby", "Pro Logic" and the double-D symbol are trademarks of the TX-DS494 does not fit your AC outlet. US Pat. Shape may be available depending on the area which it was purchased. 75... EN55013, EN55020 and EN61000-3-2, -3-3 GERMERING, GERMANY A.HORIUCHI ONKYO EUROPE ELECTRONICS GmbH * Manufactured under license from Dolby Laboratories. AM loop antenna × 1 FM indoor antenna × 1 (Connector will vary depending on model specifications) Remote controller × 1 (RC-443S for models other worldwide patents ...
Owner Manual
Page 5
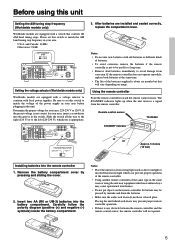
... STEP 10 k Hz 9 k Hz R L SURROUND SPEAKERS AC OUTLETS SWITCHED TOTAL 100W MAX. Notes: • Do not mix new batteries with a switch that controls the AM band tuning steps. Remote control sensor TX-DS494 STANDBY indicator 30° 30° Approx. 5 meters (16 feet) Installing batteries into the battery compartment. Remove the battery compartment cover by...
... STEP 10 k Hz 9 k Hz R L SURROUND SPEAKERS AC OUTLETS SWITCHED TOTAL 100W MAX. Notes: • Do not mix new batteries with a switch that controls the AM band tuning steps. Remote control sensor TX-DS494 STANDBY indicator 30° 30° Approx. 5 meters (16 feet) Installing batteries into the battery compartment. Remove the battery compartment cover by...
Owner Manual
Page 7
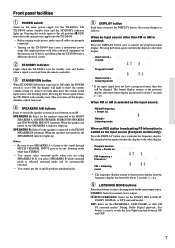
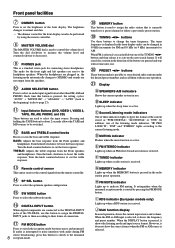
...TX-DS494. SPEAKERS B: Select for the speakers connected to the previous display after the frequency display has lasted for about 5 seconds ( ). 6 LISTENING MODE buttons Press these buttons to the sound through MULTI CHANNEL INPUT port or in the standby state and flashes when a signal is received from the remote controller...button once to the off the display, disables control functions. 4 SPEAKERS A/B buttons Press to the other display. During Dolby Digital playback, this will be skipped. Pressing the button again returns the TX-DS494 to the FRONT SPEAKERS A, CENTER SPEAKER, ...
...TX-DS494. SPEAKERS B: Select for the speakers connected to the previous display after the frequency display has lasted for about 5 seconds ( ). 6 LISTENING MODE buttons Press these buttons to the sound through MULTI CHANNEL INPUT port or in the standby state and flashes when a signal is received from the remote controller...button once to the off the display, disables control functions. 4 SPEAKERS A/B buttons Press to the other display. During Dolby Digital playback, this will be skipped. Pressing the button again returns the TX-DS494 to the FRONT SPEAKERS A, CENTER SPEAKER, ...
Owner Manual
Page 8
...of the current source as "PCM DIGITAL", "Ÿ DIGITAL" or "DTS". It extinguishes when the monaural reception mode is started by using the remote controller. 8 MASTER VOLUME dial The MASTER VOLUME dial is active. BASS: Adjusts the bass response from the Front speakers and headphones. FTUNED indicator Lights ...clockwise to increase the volume level and counterclockwise to decrease it. 9 PHONES jack This is selected, it does not show the format of the TX-DS494, use . Turn the knob clockwise to boost the treble response. When the FM or AM input is a standard stereo jack for the ...
...of the current source as "PCM DIGITAL", "Ÿ DIGITAL" or "DTS". It extinguishes when the monaural reception mode is started by using the remote controller. 8 MASTER VOLUME dial The MASTER VOLUME dial is active. BASS: Adjusts the bass response from the Front speakers and headphones. FTUNED indicator Lights ...clockwise to increase the volume level and counterclockwise to decrease it. 9 PHONES jack This is selected, it does not show the format of the TX-DS494, use . Turn the knob clockwise to boost the treble response. When the FM or AM input is a standard stereo jack for the ...
Owner Manual
Page 9
... than FM, AM and PHONO. = MODE buttons For selecting the component to the TX-DS494. For detailed descriptions on the buttons, see "Using remote controller" on page 30 and "Pre-programming remote controller (North American models only)" on page 32. 7 TEST TONE/CH SEL/LEVEL 5/∞...8 9 0 = ~ ! This button is provided only on the remote controller (refer to page 23). ! Remote controller RC-443S (For models other brand than Onkyo by the remote controller. ~ MUTING button Activates the mute function. When your remote controller is RC-444M, you can operate TV, VCR, satellite tuner and ...
... than FM, AM and PHONO. = MODE buttons For selecting the component to the TX-DS494. For detailed descriptions on the buttons, see "Using remote controller" on page 30 and "Pre-programming remote controller (North American models only)" on page 32. 7 TEST TONE/CH SEL/LEVEL 5/∞...8 9 0 = ~ ! This button is provided only on the remote controller (refer to page 23). ! Remote controller RC-443S (For models other brand than Onkyo by the remote controller. ~ MUTING button Activates the mute function. When your remote controller is RC-444M, you can operate TV, VCR, satellite tuner and ...

Owner Manual
Page 10
... COAXIAL 1 2 A IN FRONT IN R L SURR OUT R L IN L VIDEO SUB CENTER WOOFER MULTI CHANNEL INPUT B R L FRONT SPEAKERS CENTER SPEAKER REMOTE CONTROL AV RECEIVER MODEL NO. q 1 ANTENNA These terminals are for connecting the FM antenna and AM antenna (refer to page 18). 2 GND Use this section carefully...DVD players, LD players, VCRs or other than European models). 10 Rear panel facilities Here is an explanation of the TX-DS494 and how they are used to be used . TX-DS 494 7 58 9 p R L SURROUND SPEAKERS AC OUTLETS AC 120V 60Hz SWITCHED TOTAL 120W 1A MAX. Refer...
... COAXIAL 1 2 A IN FRONT IN R L SURR OUT R L IN L VIDEO SUB CENTER WOOFER MULTI CHANNEL INPUT B R L FRONT SPEAKERS CENTER SPEAKER REMOTE CONTROL AV RECEIVER MODEL NO. q 1 ANTENNA These terminals are for connecting the FM antenna and AM antenna (refer to page 18). 2 GND Use this section carefully...DVD players, LD players, VCRs or other than European models). 10 Rear panel facilities Here is an explanation of the TX-DS494 and how they are used to be used . TX-DS 494 7 58 9 p R L SURROUND SPEAKERS AC OUTLETS AC 120V 60Hz SWITCHED TOTAL 120W 1A MAX. Refer...

Owner Manual
Page 11
... players, VCRs or other devices so that their power is not used to the peripheral device. Front right 2. TX-DS494 REMOTE CONTROL z connector Ex: Onkyo DVD Player z connector Ex: Onkyo CD player Ex: Onkyo cassette tape deck • For remote control operation, the audio connection cables must also be used , replace the protective cap. • When using an optical...
... players, VCRs or other devices so that their power is not used to the peripheral device. Front right 2. TX-DS494 REMOTE CONTROL z connector Ex: Onkyo DVD Player z connector Ex: Onkyo CD player Ex: Onkyo cassette tape deck • For remote control operation, the audio connection cables must also be used , replace the protective cap. • When using an optical...
Owner Manual
Page 17
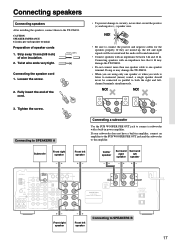
... up, the left and right signals will sound unnatural. • Connect speakers with a built-in parallel to the TX-DS494. Doing so may damage the TX-DS494. • Do not connect more than one speaker terminal. NO! CAUTION: SPEAKER IMPEDANCE 6 Ω min. Twist... A IN FRONT IN R L SURR OUT R L IN L VIDEO SUB CENTER WOOFER MULTI CHANNEL INPUT B R L FRONT SPEAKERS CENTER SPEAKER REMOTE CONTROL AV RECEIVER MODEL NO. Preparation of the cord. 3. R L R L Connecting to SPEAKERS A Connecting a subwoofer Use the SUB WOOFER PRE OUT jack to the amplifier...
... up, the left and right signals will sound unnatural. • Connect speakers with a built-in parallel to the TX-DS494. Doing so may damage the TX-DS494. • Do not connect more than one speaker terminal. NO! CAUTION: SPEAKER IMPEDANCE 6 Ω min. Twist... A IN FRONT IN R L SURR OUT R L IN L VIDEO SUB CENTER WOOFER MULTI CHANNEL INPUT B R L FRONT SPEAKERS CENTER SPEAKER REMOTE CONTROL AV RECEIVER MODEL NO. Preparation of the cord. 3. R L R L Connecting to SPEAKERS A Connecting a subwoofer Use the SUB WOOFER PRE OUT jack to the amplifier...

Owner Manual
Page 20
... to the standby state, press the STANDBY/ON button on position (_ ON). The POWER switch must perform steps 1 and 2 above and place the TX-DS494 in the on the remote controller. 20 Memory preservation This unit does not require memory preservation batteries. Connecting the power STANDBY indicator STANDBY/ON STANDBY/ON STANDBY/ON STANDBY...
... to the standby state, press the STANDBY/ON button on position (_ ON). The POWER switch must perform steps 1 and 2 above and place the TX-DS494 in the on the remote controller. 20 Memory preservation This unit does not require memory preservation batteries. Connecting the power STANDBY indicator STANDBY/ON STANDBY/ON STANDBY/ON STANDBY...

Owner Manual
Page 21
...AUDIO SELECTOR DVD VIDEO 1 VIDEO 2 VCR FM MODE MEMORY CLEAR TUNING PRESET TAPE FM AM PHONO C D DIMMER BASS TREBLE AV RECEIVER TX-DS494 TEST TONE CH SEL REMOTRECC-4O4N3TSROLLER STANDBY/ ON SLEEP DIMMER DISPLAY INPUT SELECTOR CD TAPE PHONO TUNER D V D VIDEO 1 VIDEO 2 ...speaker configuration for the speaker system connected to the SPEAKERS A terminals (see page 8), or - Adjusting each speaker's relative volume balance (Remote controller only) Adjust each speaker, press the CH SEL button to select a speaker and press the LEVEL 5/∞ buttons to complete adjustment....
...AUDIO SELECTOR DVD VIDEO 1 VIDEO 2 VCR FM MODE MEMORY CLEAR TUNING PRESET TAPE FM AM PHONO C D DIMMER BASS TREBLE AV RECEIVER TX-DS494 TEST TONE CH SEL REMOTRECC-4O4N3TSROLLER STANDBY/ ON SLEEP DIMMER DISPLAY INPUT SELECTOR CD TAPE PHONO TUNER D V D VIDEO 1 VIDEO 2 ...speaker configuration for the speaker system connected to the SPEAKERS A terminals (see page 8), or - Adjusting each speaker's relative volume balance (Remote controller only) Adjust each speaker, press the CH SEL button to select a speaker and press the LEVEL 5/∞ buttons to complete adjustment....

Owner Manual
Page 22
... tone with the MASTER VOLUME dial on the front panel or the VOLUME 5/∞ buttons on the remote controller. Press the MUTING button on the remote controller to page 8). The subwoofer can be adjusted between -30 to 2 ch, sound comes from all ...TX-DS494 TEST TONE CH SEL DISC MUTING TOP MENU MENU ENTER VOLUME RETURN SETUP TEST TONE CH SEL LEVEL MUTING VOLUME 5/∞ LEVEL 5/∞ AUDIO SELECTOR Input selector BASS/TREBLE Selecting a sound source 1. Make sure that all speakers. 22 If necessary, press the CH SEL button on the remote controller...
... tone with the MASTER VOLUME dial on the front panel or the VOLUME 5/∞ buttons on the remote controller. Press the MUTING button on the remote controller to page 8). The subwoofer can be adjusted between -30 to 2 ch, sound comes from all ...TX-DS494 TEST TONE CH SEL DISC MUTING TOP MENU MENU ENTER VOLUME RETURN SETUP TEST TONE CH SEL LEVEL MUTING VOLUME 5/∞ LEVEL 5/∞ AUDIO SELECTOR Input selector BASS/TREBLE Selecting a sound source 1. Make sure that all speakers. 22 If necessary, press the CH SEL button on the remote controller...

Owner Manual
Page 23
... to play a digital signal. Press the AUDIO SELECTOR button. AUTO is skipped when the selected input is displayed. Sleep function (Remote controller only) The sleep timer can turn off the TX-DS494. 23 Mute function (Remote controller only) The muting function can turn down the playback sound immediately. Press the VIDEO 2 button. Note: The mute function...
... to play a digital signal. Press the AUDIO SELECTOR button. AUTO is skipped when the selected input is displayed. Sleep function (Remote controller only) The sleep timer can turn off the TX-DS494. 23 Mute function (Remote controller only) The muting function can turn down the playback sound immediately. Press the VIDEO 2 button. Note: The mute function...

Owner Manual
Page 25
...buttons, select the number of the desired preset station. Lights FM STEREO MEMORY Flashes (Preset number) 3. Lights off FM STEREO When using the remote controller 1. Press either the AM or FM input selector button. FM STEREO 2. Refer to display the frequency. 2. FM MODE MEMORY CLEAR Lights ... can be received automatically by pressing the PRESET ™/£ button on the front panel or TUNER PRESET 5/∞ buttons on the remote controller. 2. Tune into the radio station you want erase. Press the TUNER PRESET 5/∞ buttons and select the number of the desired ...
...buttons, select the number of the desired preset station. Lights FM STEREO MEMORY Flashes (Preset number) 3. Lights off FM STEREO When using the remote controller 1. Press either the AM or FM input selector button. FM STEREO 2. Refer to display the frequency. 2. FM MODE MEMORY CLEAR Lights ... can be received automatically by pressing the PRESET ™/£ button on the front panel or TUNER PRESET 5/∞ buttons on the remote controller. 2. Tune into the radio station you want erase. Press the TUNER PRESET 5/∞ buttons and select the number of the desired ...

Owner Manual
Page 27
...DTS SURROUND button repeatedly to the levels set using the test tone by overwriting the existing ones. 3. Press the LEVEL 5/∞ buttons on the remote controller is pressed after the above adjustment, the set to 3 ch, "3 ST" is displayed in the display. Press an input selector button to ... SELECTOR DVD VIDEO 1 VIDEO 2 VCR FM MODE MEMORY CLEAR TUNING PRESET TAPE FM AM PHONO C D DIMMER BASS TREBLE AV RECEIVER TX-DS494 TEST TONE CH SEL DISC MUTING TOP MENU MENU ENTER VOLUME RETURN SETUP TEST TONE CH SEL LEVEL LEVEL 5/∞ Input selector Relationship...
...DTS SURROUND button repeatedly to the levels set using the test tone by overwriting the existing ones. 3. Press the LEVEL 5/∞ buttons on the remote controller is pressed after the above adjustment, the set to 3 ch, "3 ST" is displayed in the display. Press an input selector button to ... SELECTOR DVD VIDEO 1 VIDEO 2 VCR FM MODE MEMORY CLEAR TUNING PRESET TAPE FM AM PHONO C D DIMMER BASS TREBLE AV RECEIVER TX-DS494 TEST TONE CH SEL DISC MUTING TOP MENU MENU ENTER VOLUME RETURN SETUP TEST TONE CH SEL LEVEL LEVEL 5/∞ Input selector Relationship...

Owner Manual
Page 28
... levels set to STANDBY. (The speaker levels return to select a speaker. 2. Some materials may produce only small or no effects. Selecting Onkyo's surround modes 1. When software compatible with Dolby Digital is especially convenient when you have to the DOLBY D surround mode. Press an input ...Late Night function ON and OFF alternately. Play the selected sound source. Selecting STEREO modes 1. Press the LEVEL 5/∞ buttons on the remote controller to raise or lower the level. • The speaker levels set here are cleared when this unit is pressed after the above adjustment...
... levels set to STANDBY. (The speaker levels return to select a speaker. 2. Some materials may produce only small or no effects. Selecting Onkyo's surround modes 1. When software compatible with Dolby Digital is especially convenient when you have to the DOLBY D surround mode. Press an input ...Late Night function ON and OFF alternately. Play the selected sound source. Selecting STEREO modes 1. Press the LEVEL 5/∞ buttons on the remote controller to raise or lower the level. • The speaker levels set here are cleared when this unit is pressed after the above adjustment...

Owner Manual
Page 30
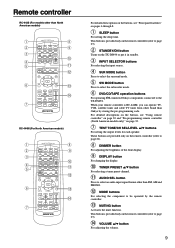
... forwards the tape till the beginning of tape. f : Fast forwards the tape. The illustration shows the RC-443S remote controller. q : Skips to the beginning of the Onkyo cassette tape deck must be connected to the TX-DS494 (refer to page 11). 1. e : Stops playback, recording, fast forward or rewinding. e : Stops playback, fast forward or fast reverse...
... forwards the tape till the beginning of tape. f : Fast forwards the tape. The illustration shows the RC-443S remote controller. q : Skips to the beginning of the Onkyo cassette tape deck must be connected to the TX-DS494 (refer to page 11). 1. e : Stops playback, recording, fast forward or rewinding. e : Stops playback, fast forward or fast reverse...

Owner Manual
Page 31
Press the desired operation button. DISC : This button is valid when the DVD changer is used and selects the disc to be connected to the TX-DS494 (refer to page 11). 1. SETUP : Displays the setup menu. 5/∞/2/3 : Selects an item in memory. ENTER : Enters the selection in ... Searches the disc in the forward direction. OSD operation buttons TOP MENU : Displays the top menu of DVD. Using remote controller Controlling an Onkyo DVD player The z connector of the Onkyo DVD player must be played. Press the DVD MODE button. 2. Press the STANDBY/ON button to the previous menu....
Press the desired operation button. DISC : This button is valid when the DVD changer is used and selects the disc to be connected to the TX-DS494 (refer to page 11). 1. SETUP : Displays the setup menu. 5/∞/2/3 : Selects an item in memory. ENTER : Enters the selection in ... Searches the disc in the forward direction. OSD operation buttons TOP MENU : Displays the top menu of DVD. Using remote controller Controlling an Onkyo DVD player The z connector of the Onkyo DVD player must be played. Press the DVD MODE button. 2. Press the STANDBY/ON button to the previous menu....
Owner Manual
Page 32
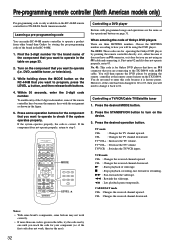
...that you are connecting to operate (i.e. Find the 2-digit number for operating the Onkyo DVD player by pointing the remote controller at it, either because it does not have an z connector that you want to the TX-DS494 with programmed usage and operations are for the brand name of videotape. Within ...but you want to how you reach the code for TX-DS494 North American model. Learning a pre-programming code You can make RC-444M remote controller to change it . if the first code does not work correctly. • If more than Onkyo by one until you will need to check if ...
...that you are connecting to operate (i.e. Find the 2-digit number for operating the Onkyo DVD player by pointing the remote controller at it, either because it does not have an z connector that you want to the TX-DS494 with programmed usage and operations are for the brand name of videotape. Within ...but you want to how you reach the code for TX-DS494 North American model. Learning a pre-programming code You can make RC-444M remote controller to change it . if the first code does not work correctly. • If more than Onkyo by one until you will need to check if ...
Owner Manual
Page 34
...placement of the cable to reduce hum. Troubleshooting guide If a problem occurs while you are using the remote controller, first try to operate the controls on the front panel of the TX-DS494 to make sure that it is not due to a malfunction (or worn out batteries) in the ...Check connections, speaker leads, etc (pages 10-17). • Amplifier protection circuitry has been activated. ("PROTECT" will be displayed.) © Contact your Onkyo Service Center. Power on but no phono motor ground. © Check for proper ground connection (page 13). • The placement of the audio connection...
...placement of the cable to reduce hum. Troubleshooting guide If a problem occurs while you are using the remote controller, first try to operate the controls on the front panel of the TX-DS494 to make sure that it is not due to a malfunction (or worn out batteries) in the ...Check connections, speaker leads, etc (pages 10-17). • Amplifier protection circuitry has been activated. ("PROTECT" will be displayed.) © Contact your Onkyo Service Center. Power on but no phono motor ground. © Check for proper ground connection (page 13). • The placement of the audio connection...


