
Owner Manual
Page 3
... should be connected to be replaced, the replacement fuse must be performed only by your hands are coloured in accordance with the letter L or coloured red. IMPORTANT The plug is marked with the following code: Blue: Neutral Brown: Live As the colours of the wires in the mains lead of an AC plug on the unit's rear panel (e.g., AC 230...
... should be connected to be replaced, the replacement fuse must be performed only by your hands are coloured in accordance with the letter L or coloured red. IMPORTANT The plug is marked with the following code: Blue: Neutral Brown: Live As the colours of the wires in the mains lead of an AC plug on the unit's rear panel (e.g., AC 230...

Owner Manual
Page 4
... Turning On and Standby 20 Changing the Input Display 20 Enjoying Audio Sources 21 Muting the receiver (remote controller only) ........ 22 Using Headphones 22 Setting the Display Brightness 22 Using the Sleep Timer (remote controller only) ... 22 Using the Tone and Balance Controls 23 Setting the DIRECT Function (TX-8522 only) ..... 23 Enjoying the Pure Audio Sound (TX-8522 only) .... 23 Recording 24 Recording the Input Source 24 Recording Audio and Video from Separate Sources (TX-8522 only 25 Listening to the Radio 26 AM Frequency...
... Turning On and Standby 20 Changing the Input Display 20 Enjoying Audio Sources 21 Muting the receiver (remote controller only) ........ 22 Using Headphones 22 Setting the Display Brightness 22 Using the Sleep Timer (remote controller only) ... 22 Using the Tone and Balance Controls 23 Setting the DIRECT Function (TX-8522 only) ..... 23 Enjoying the Pure Audio Sound (TX-8522 only) .... 23 Recording 24 Recording the Input Source 24 Recording Audio and Video from Separate Sources (TX-8522 only 25 Listening to the Radio 26 AM Frequency...

Owner Manual
Page 7
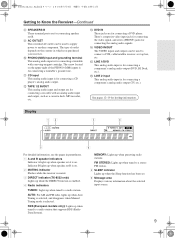
... the sound level balance between the left and right channel for Satellite Radio stations. When SAT RADIO is for connecting a standard pair of treble sounds. J Number buttons (26, 27, 30) Used to select a station by entering the frequency directly using this mode is being received from ones you preset. SCAN button (29) Used to monitor the recorded sound. M DIMMER button (22) Adjusts the display brightness. N MASTER VOLUME control (21) Sets the volume of bass sounds. The TAPE 2 button is for radio tuning. E Remote-control sensor (10) Receives control signals from...
... the sound level balance between the left and right channel for Satellite Radio stations. When SAT RADIO is for connecting a standard pair of treble sounds. J Number buttons (26, 27, 30) Used to select a station by entering the frequency directly using this mode is being received from ones you preset. SCAN button (29) Used to monitor the recorded sound. M DIMMER button (22) Adjusts the display brightness. N MASTER VOLUME control (21) Sets the volume of bass sounds. The TAPE 2 button is for radio tuning. E Remote-control sensor (10) Receives control signals from...
Owner Manual
Page 8
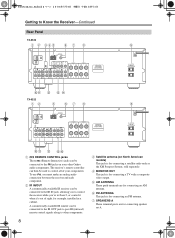
... connecting a TV with a composite video output. The receiver's remote controller can be connected to the IR OUT jack to pass IR (infrared) remote control signals along to other Onkyo audio components. Getting to Know the Receiver-Continued Rear Panel TX-8522 1 B 345 67 8 9 JK L M N TX-8222 1B 5 67 8 9 JK L OP A REMOTE CONTROL jacks These (Remote Interactive) jacks can be connected to the IR IN jack, allowing you to control the receiver while you must make an analog audio connection between the receiver and each component. To use...
... connecting a TV with a composite video output. The receiver's remote controller can be connected to the IR OUT jack to pass IR (infrared) remote control signals along to other Onkyo audio components. Getting to Know the Receiver-Continued Rear Panel TX-8522 1 B 345 67 8 9 JK L M N TX-8222 1B 5 67 8 9 JK L OP A REMOTE CONTROL jacks These (Remote Interactive) jacks can be connected to the IR IN jack, allowing you to control the receiver while you must make an analog audio connection between the receiver and each component. To use...
Owner Manual
Page 9
... a radio station that supports RDS (Radio Data System). There's composite video input jack for connecting the video signal, and stereo (FRONT) jacks for connecting a component's analog audio output (TV, etc.). The screw located on . 2 MUTING indicator Flashes while the receiver is muted. 3 DIRECT indicator (TX-8522 only) Lights up while the DIRECT function is on the country in parentheses. 1 A and B speaker indicators Indicator A lights up when speaker set B is for connecting the analog audio signals. M DVD IN These jacks are for connecting a turntable with an analog audio...
... a radio station that supports RDS (Radio Data System). There's composite video input jack for connecting the video signal, and stereo (FRONT) jacks for connecting a component's analog audio output (TV, etc.). The screw located on . 2 MUTING indicator Flashes while the receiver is muted. 3 DIRECT indicator (TX-8522 only) Lights up while the DIRECT function is on the country in parentheses. 1 A and B speaker indicators Indicator A lights up when speaker set B is for connecting the analog audio signals. M DVD IN These jacks are for connecting a turntable with an analog audio...

Owner Manual
Page 11
... not work as number button for reverse and fast forward on an HDD component. U VOL [ ]/[ ] buttons (21) Adjusts the volume of the receiver regardless of these buttons work for radio tuning. DISC SKIP: Switches the disc loaded when the CD changer is used for input source selection. starts reverse playback on an HDD component. S SETUP button (13) Used to select radio presets. F RETURN button Selects the previously displayed setup menu. For XM, the Up and Down [ ]/[ ] buttons are used to select channels, and...
... not work as number button for reverse and fast forward on an HDD component. U VOL [ ]/[ ] buttons (21) Adjusts the volume of the receiver regardless of these buttons work for radio tuning. DISC SKIP: Switches the disc loaded when the CD changer is used for input source selection. starts reverse playback on an HDD component. S SETUP button (13) Used to select radio presets. F RETURN button Selects the previously displayed setup menu. For XM, the Up and Down [ ]/[ ] buttons are used to select channels, and...
Owner Manual
Page 12
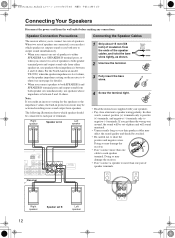
... negative wires. Connecting Your Speakers Disconnect the power cord from speakers. Doing so may damage the receiver. • Don't connect a speaker to more than one pair of speakers. When two sets of terminals. Doing so may damage the receiver. • Don't connect more than one set of speakers to either speaker set, use speakers whose impedance is between 4 and 16 ohms. For the North American model TX-8522, when the speaker impedance is 4 or 6 ohms, set...
... negative wires. Connecting Your Speakers Disconnect the power cord from speakers. Doing so may damage the receiver. • Don't connect a speaker to more than one pair of speakers. When two sets of terminals. Doing so may damage the receiver. • Don't connect more than one set of speakers to either speaker set, use speakers whose impedance is between 4 and 16 ohms. For the North American model TX-8522, when the speaker impedance is 4 or 6 ohms, set...

Owner Manual
Page 16
Use red plugs to connect left-channel audio inputs and outputs (typically labeled "L"). Use white plugs to connect rightchannel audio inputs and outputs (typically labeled "R"). Connecting a Turntable The receiver's PHONO input jacks are for use yellow plugs to connect composite video inputs and outputs. (TX-8522) Left (white) Analog audio Left (white) Right (red) Right (red) (Yellow) Composite video (Yellow) • Push each plug in all connections have been properly made. • Do not bind audio cables with power cords and speaker cables. AUDIO OUT Ground wire Notes: •...
Use red plugs to connect left-channel audio inputs and outputs (typically labeled "L"). Use white plugs to connect rightchannel audio inputs and outputs (typically labeled "R"). Connecting a Turntable The receiver's PHONO input jacks are for use yellow plugs to connect composite video inputs and outputs. (TX-8522) Left (white) Analog audio Left (white) Right (red) Right (red) (Yellow) Composite video (Yellow) • Push each plug in all connections have been properly made. • Do not bind audio cables with power cords and speaker cables. AUDIO OUT Ground wire Notes: •...
Owner Manual
Page 17
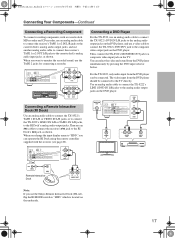
... use the Onkyo Remote Interactive Dock (DS-A1), flip the RI MODE switch to "HDD" which is located on the DVD player. L AUDIO OUT Note: If you can operate the RI Dock using the remote controller supplied with the receiver (see page 20). Then, connect the TX-8522's MONITOR OUT jack to a composite video input jack on the DVD player. Connecting a DVD Player For the TX-8522, use an analog audio cable to connect the TX-8522's DVD IN L/R jacks to the analog audio output jacks on the DVD player, and use a video cable to connect...
... use the Onkyo Remote Interactive Dock (DS-A1), flip the RI MODE switch to "HDD" which is located on the DVD player. L AUDIO OUT Note: If you can operate the RI Dock using the remote controller supplied with the receiver (see page 20). Then, connect the TX-8522's MONITOR OUT jack to a composite video input jack on the DVD player. Connecting a DVD Player For the TX-8522, use an analog audio cable to connect the TX-8522's DVD IN L/R jacks to the analog audio output jacks on the DVD player, and use a video cable to connect...
Owner Manual
Page 18
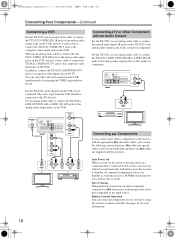
... work). Remote Control Operation You can control all connected components will turn on the power or start playback on a component that component as well (the receiver's POWER switch must be set the receiver to Standby, all components in your system by pressing the VIDEO input selector button. You can select the video and sound from the VCR can use an analog audio cable to connect the TX-8222's LINE 1/DVD IN L/R or LINE 2 IN L/R jacks to the analog audio output jacks on the VCR. For the TX-8222, audio input...
... work). Remote Control Operation You can control all connected components will turn on the power or start playback on a component that component as well (the receiver's POWER switch must be set the receiver to Standby, all components in your system by pressing the VIDEO input selector button. You can select the video and sound from the VCR can use an analog audio cable to connect the TX-8222's LINE 1/DVD IN L/R or LINE 2 IN L/R jacks to the analog audio output jacks on the VCR. For the TX-8222, audio input...
Owner Manual
Page 19
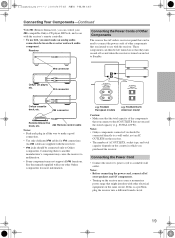
... W). connector Remote Interactive Dock, etc. Remote control cable Notes: • Push each plug in which you must make a good connection. • Use only dedicated cables for connections (no cables are supplied with the receiver). • jacks should be connected directly to Onkyo components. TX-8222 European models e.g. Notes: • Before connecting the power cord, connect all of AC OUTLETS, socket type, and total capacity depends on the country in all functions. See the manuals supplied...
... W). connector Remote Interactive Dock, etc. Remote control cable Notes: • Push each plug in which you must make a good connection. • Use only dedicated cables for connections (no cables are supplied with the receiver). • jacks should be connected directly to Onkyo components. TX-8222 European models e.g. Notes: • Before connecting the power cord, connect all of AC OUTLETS, socket type, and total capacity depends on the country in all functions. See the manuals supplied...
Owner Manual
Page 21
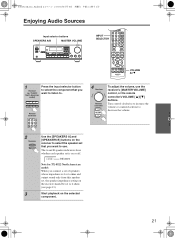
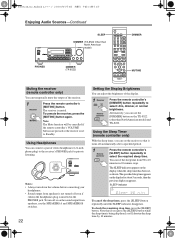
... each speaker set to use the receiver's [MASTER VOLUME] control, or the remote controller's VOLUME [ ]/[ ] buttons. TX-8522 North American model) Press the input selector button to select the component that you want to listen to select the speaker set that you connect a set of speakers whose impedance is 4 or 6 ohms and output sound only from this speaker set, the speaker impedance setting on the receiver should be set is on or off. Enjoying Audio Sources Input selector buttons SPEAKERS A/B MASTER VOLUME INPUT SELECTOR VOLUME / 1 Receiver (ex. Turn control clockwise...
... each speaker set to use the receiver's [MASTER VOLUME] control, or the remote controller's VOLUME [ ]/[ ] buttons. TX-8522 North American model) Press the input selector button to select the component that you want to listen to select the speaker set that you connect a set of speakers whose impedance is 4 or 6 ohms and output sound only from this speaker set, the speaker impedance setting on the receiver should be set is on or off. Enjoying Audio Sources Input selector buttons SPEAKERS A/B MASTER VOLUME INPUT SELECTOR VOLUME / 1 Receiver (ex. Turn control clockwise...
Owner Manual
Page 22
... remote controller's [SLEEP] button repeatedly to 10 minutes in the PHONES jack. The receiver is being displayed, you can use the SPEAKERS A and SPEAKERS B switches. 22 Setting the Display Brightness You can set , as shown. Using Headphones You can temporarily mute the output of stereo headphones (1/4-inch phone plug) to select: dim, dimmer, or normal brightness. The SLEEP indicator appears on the sound output from 90 to select the required sleep time. To turn...
... remote controller's [SLEEP] button repeatedly to 10 minutes in the PHONES jack. The receiver is being displayed, you can use the SPEAKERS A and SPEAKERS B switches. 22 Setting the Display Brightness You can set , as shown. Using Headphones You can temporarily mute the output of stereo headphones (1/4-inch phone plug) to select: dim, dimmer, or normal brightness. The SLEEP indicator appears on the sound output from 90 to select the required sleep time. To turn...

Owner Manual
Page 23
... used to control the relative volume level of the left and right speaker systems or headphones. You can configure whether the DIRECT function is applied or not for input sources individually. Adjusting the Treble The TREBLE control adjusts treble sounds. Turn it up to make them quieter. Normally, it down to enjoy purer sound by disabling the video signal output and turning off . You can configure whether the Pure Audio listening mode...
... used to control the relative volume level of the left and right speaker systems or headphones. You can configure whether the DIRECT function is applied or not for input sources individually. Adjusting the Treble The TREBLE control adjusts treble sounds. Turn it up to make them quieter. Normally, it down to enjoy purer sound by disabling the video signal output and turning off . You can configure whether the Pure Audio listening mode...
Owner Manual
Page 24
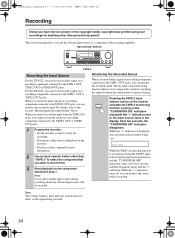
... 1. Pressing the TAPE 2 input selector button on the receiver activates the TAPE 2 monitoring function, turning on the recorder. • See the recorder's manual for few seconds, the "T2 MONITOR ON" indication disappears. This section explains how to record the selected input source to compare the sounds by switching the output between the sound before recording. Monitoring the Recorded Sound When you record audio signal on a recording component connected to the TAPE 2 OUT jacks, you have...
... 1. Pressing the TAPE 2 input selector button on the receiver activates the TAPE 2 monitoring function, turning on the recorder. • See the recorder's manual for few seconds, the "T2 MONITOR ON" indication disappears. This section explains how to record the selected input source to compare the sounds by switching the output between the sound before recording. Monitoring the Recorded Sound When you record audio signal on a recording component connected to the TAPE 2 OUT jacks, you have...

Owner Manual
Page 26
... stereo sound. Manual Tuning To activate this example, FM has been selected. / 2 Receiver 3 Receiver Press the [TUNING MODE] button so that when this mode, you will receive the broadcast in your area. Note that the AUTO indicator appears or disappears from the display. Band Frequency (Actual display depends on the "AUTO" indicator. In this setting is changed, all radio presets are deleted. Listening to turn on country.) 26 Use the receiver to the Radio DIRECT...
... stereo sound. Manual Tuning To activate this example, FM has been selected. / 2 Receiver 3 Receiver Press the [TUNING MODE] button so that when this mode, you will receive the broadcast in your area. Note that the AUTO indicator appears or disappears from the display. Band Frequency (Actual display depends on the "AUTO" indicator. In this setting is changed, all radio presets are deleted. Listening to turn on country.) 26 Use the receiver to the Radio DIRECT...
Owner Manual
Page 30
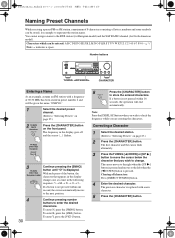
...;ash alternately. 3 Press the TUNING [ DOWN] or [UP ] button to change. If a button is displayed. Correcting a Character 1 Select the desired station. (Refer to the RDS station (for European model) and the SAT RADIO channel (for example to "Selecting Presets" on page 27.) 2 TX-8522 North American Press the [CHARACTER] button on page 27.) 2 Press the [CHARACTER] button. Number buttons TUNING DOWN/UP CHARACTER Entering a Name As an...
...;ash alternately. 3 Press the TUNING [ DOWN] or [UP ] button to change. If a button is displayed. Correcting a Character 1 Select the desired station. (Refer to the RDS station (for European model) and the SAT RADIO channel (for example to "Selecting Presets" on page 27.) 2 TX-8522 North American Press the [CHARACTER] button on page 27.) 2 Press the [CHARACTER] button. Number buttons TUNING DOWN/UP CHARACTER Entering a Name As an...

Owner Manual
Page 31
... separately) such as one listed below: • Onkyo's Multi-Room System kits (IR Remote Controller Extension System) • Multiroom A/V distribution and control system such as shown below shows how to make the proper connections for the main room If the receiver is output to the IR OUT terminal. When the IR emitter is connected, only the signal input to the IR IN...
... separately) such as one listed below: • Onkyo's Multi-Room System kits (IR Remote Controller Extension System) • Multiroom A/V distribution and control system such as shown below shows how to make the proper connections for the main room If the receiver is output to the IR OUT terminal. When the IR emitter is connected, only the signal input to the IR IN...
Owner Manual
Page 32
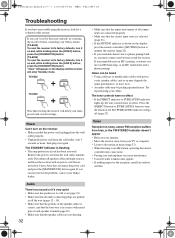
... Standby mode. Remove the power cord from the wall outlet, wait 5 seconds or more, then plug it and the receiver. If your turntable uses an MC cartridge, you must connect one between it in this section. Noise can 't resolve the issue yourself, try resetting the receiver before contacting your Onkyo dealer. [TX-8522] To reset the receiver to its factory defaults, turn on the display, press the remote controller's [MUTING] button...
... Standby mode. Remove the power cord from the wall outlet, wait 5 seconds or more, then plug it and the receiver. If your turntable uses an MC cartridge, you must connect one between it in this section. Noise can 't resolve the issue yourself, try resetting the receiver before contacting your Onkyo dealer. [TX-8522] To reset the receiver to its factory defaults, turn on the display, press the remote controller's [MUTING] button...
Owner Manual
Page 33
... analog audio cable are connected properly. In the unlikely event that this depends on the environment and will retain the settings for the remote controller to work properly, you 've connected an -capable Onkyo DS-A1 Remote Interactive Dock to the TAPE 1 or VIDEO jacks on the TX-8522 (or TAPE 1 or LINE 2 jacks on the TX-8222), for several weeks, although this happens, unplug the power cord from an external source...
... analog audio cable are connected properly. In the unlikely event that this depends on the environment and will retain the settings for the remote controller to work properly, you 've connected an -capable Onkyo DS-A1 Remote Interactive Dock to the TAPE 1 or VIDEO jacks on the TX-8522 (or TAPE 1 or LINE 2 jacks on the TX-8222), for several weeks, although this happens, unplug the power cord from an external source...


