
Owner Manual
Page 2
... produce heat. 9. WARNING: TO REDUCE THE RISK OF FIRE OR ELECTRIC SHOCK, DO NOT EXPOSE THIS APPARATUS TO RAIN OR MOISTURE. ified by the manufacturer. 12. Don't put candles or other . NO USER-SERVICEABLE PARTS INSIDE. Do not install near water. 6. A polarized plug has two blades with the apparatus. Protect the...
... produce heat. 9. WARNING: TO REDUCE THE RISK OF FIRE OR ELECTRIC SHOCK, DO NOT EXPOSE THIS APPARATUS TO RAIN OR MOISTURE. ified by the manufacturer. 12. Don't put candles or other . NO USER-SERVICEABLE PARTS INSIDE. Do not install near water. 6. A polarized plug has two blades with the apparatus. Protect the...

Owner Manual
Page 5
... Features 6 Multiroom Capability 7 Front & Rear Panels 8 Front Panel 8 Display 9 Rear Panel 10 Remote Controller 12 Installing the Batteries 12 Aiming the Remote Controller 12 Controlling the AV Receiver 13 About Home Theater 14 Enjoying Home Theater 14 Connection Connecting the AV Receiver 15 Connecting ...Preprogrammed Remote Control Codes 86 Looking up for Remote Control Code 86 Entering Remote Control Codes 88 Remote Control Codes for Onkyo Components Connected via V 89 Resetting REMOTE MODE Buttons 89 Resetting the Remote Controller 89 Controlling a TV 90 Controlling a ...
... Features 6 Multiroom Capability 7 Front & Rear Panels 8 Front Panel 8 Display 9 Rear Panel 10 Remote Controller 12 Installing the Batteries 12 Aiming the Remote Controller 12 Controlling the AV Receiver 13 About Home Theater 14 Enjoying Home Theater 14 Connection Connecting the AV Receiver 15 Connecting ...Preprogrammed Remote Control Codes 86 Looking up for Remote Control Code 86 Entering Remote Control Codes 88 Remote Control Codes for Onkyo Components Connected via V 89 Resetting REMOTE MODE Buttons 89 Resetting the Remote Controller 89 Controlling a TV 90 Controlling a ...
Owner Manual
Page 8
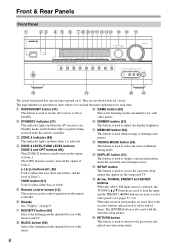
... appear on page 9. E ZONE 2 LEVEL/TONE LEVEL buttons ZONE 2 and OFF buttons (84) The [ZONE 2] button is used with movies and TV. F Remote control sensor (12) This sensor receives control signals from the remote controller. K DIMMER button (51) This button is used to adjust the display brightness. O SETUP button This button...
... appear on page 9. E ZONE 2 LEVEL/TONE LEVEL buttons ZONE 2 and OFF buttons (84) The [ZONE 2] button is used with movies and TV. F Remote control sensor (12) This sensor receives control signals from the remote controller. K DIMMER button (51) This button is used to adjust the display brightness. O SETUP button This button...

Owner Manual
Page 12
... batteries should be pressed inadvert- trol sensor. • When the remote control codes have been registered and you want to operate an Onkyo component without V connection, point the remote controller at the other component to use the remote controller for a long time, remove the batteries...Controller To use the remote controller, point it . • When you intend not to use it at the AV receiver's remote control sensor. 12 Remote Controller Installing the Batteries 1 To open the battery compartment, press the small lever and remove the cover. Approx. 16 ft. (5 m) ...
... batteries should be pressed inadvert- trol sensor. • When the remote control codes have been registered and you want to operate an Onkyo component without V connection, point the remote controller at the other component to use the remote controller for a long time, remove the batteries...Controller To use the remote controller, point it . • When you intend not to use it at the AV receiver's remote control sensor. 12 Remote Controller Installing the Batteries 1 To open the battery compartment, press the small lever and remove the cover. Approx. 16 ft. (5 m) ...
Owner Manual
Page 16
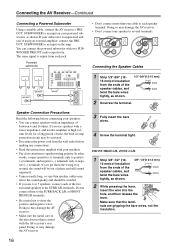
...from the ends of the speaker cables, and twist the bare wires tightly, as shown. Connecting the Speaker Cables 1 Strip 1/2"-5/8" (12- 1/2"-5/8"(12-15 mm) 15 mm) of insulation from the wall outlet before connecting your speakers: • You can connect the powered subwoofer... • Don't connect one cable to the SURR L/R terminals. FRONT HIGH L/R, ZONE 2 L/R 1 Strip 3/8"-1/2" (10- 3/8"-1/2"(10-12 mm) 12 mm) of insulation from each speaker terminal. Powered subwoofer LINE INPUT LINE INPUT Speaker Connection Precautions Read the following before making any connections. &#...
...from the ends of the speaker cables, and twist the bare wires tightly, as shown. Connecting the Speaker Cables 1 Strip 1/2"-5/8" (12- 1/2"-5/8"(12-15 mm) 15 mm) of insulation from the wall outlet before connecting your speakers: • You can connect the powered subwoofer... • Don't connect one cable to the SURR L/R terminals. FRONT HIGH L/R, ZONE 2 L/R 1 Strip 3/8"-1/2" (10- 3/8"-1/2"(10-12 mm) 12 mm) of insulation from each speaker terminal. Powered subwoofer LINE INPUT LINE INPUT Speaker Connection Precautions Read the following before making any connections. &#...
Owner Manual
Page 69
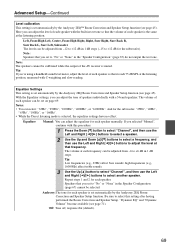
... 16000Hz) affect treble sounds. 3 Use the Up [R] button to select "Channel", and then use the Left and Right [F]/[S] buttons to +12 dB in the "Speaker Configuration" (page 67) do not output the test tone. With the Equalizer settings, you selected "Manual", continue with... a 5-band equalizer. Equalizer Manual: You can be set to +12 dB for each speaker manually. The volume of speakers individually with this setting after having performed the Room Correction and Speaker Setup. ...
... 16000Hz) affect treble sounds. 3 Use the Up [R] button to select "Channel", and then use the Left and Right [F]/[S] buttons to +12 dB in the "Speaker Configuration" (page 67) do not output the test tone. With the Equalizer settings, you selected "Manual", continue with... a 5-band equalizer. Equalizer Manual: You can be set to +12 dB for each speaker manually. The volume of speakers individually with this setting after having performed the Room Correction and Speaker Setup. ...

Owner Manual
Page 73
..., DTS Neo:6 Cinema, DTS 96/24, Neo:6, DTS-HD High Resolution, DTS-HD Master and DTS Express. Subwfr (Subwoofer) -15 dB to +12 dB (default: 0 dB) Center -12 dB to +12 dB (default: 0 dB) Notes: • You cannot use this function while the AV receiver is muted. • Speakers that use of each...
..., DTS Neo:6 Cinema, DTS 96/24, Neo:6, DTS-HD High Resolution, DTS-HD Master and DTS Express. Subwfr (Subwoofer) -15 dB to +12 dB (default: 0 dB) Center -12 dB to +12 dB (default: 0 dB) Notes: • You cannot use this function while the AV receiver is muted. • Speakers that use of each...

Owner Manual
Page 75
...'s noticeably quieter, use the Left [F] button to select "4. If it . Use the Left and Right [F]/[S] buttons to increase its input level. To return to +12 dB in 1 dB steps. A/V Sync -DVD/BD- Note: A/V Sync is disabled when the Direct listening mode is enabled (see page 78), and your TV....appears. If a component is noticeably louder than the others , use the Right [S] button to set the level. The delay can be set from −12 dB to the previous screen, press the [RETURN] button. 4-2. The HDMI Lip Sync delay time is louder or quieter than the others . Advanced Setup...
...'s noticeably quieter, use the Left [F] button to select "4. If it . Use the Left and Right [F]/[S] buttons to increase its input level. To return to +12 dB in 1 dB steps. A/V Sync -DVD/BD- Note: A/V Sync is disabled when the Direct listening mode is enabled (see page 78), and your TV....appears. If a component is noticeably louder than the others , use the Right [S] button to set the level. The delay can be set from −12 dB to the previous screen, press the [RETURN] button. 4-2. The HDMI Lip Sync delay time is louder or quieter than the others . Advanced Setup...
Owner Manual
Page 77
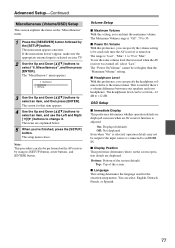
...an AV receiver function is useful if there's a volume difference between your speakers and your TV. 2 Use the Up and Down [R]/[X] buttons to +12 dB. OSD Setup 3 Use the Up and Down [R]/[X] buttons to 79 or "Max". OSD Setup ■ Immediate Display This preference determines whether ... selected on your headphones. Top: Top of the screen (default). Miscellaneous 1. The items are explained below. 5 When you can also be set from -12 dB to select "6. The "Power On Volume" cannot be performed on the AV receiver by the [SETUP] button. Volume Setup 2. The main menu appears...
...an AV receiver function is useful if there's a volume difference between your speakers and your TV. 2 Use the Up and Down [R]/[X] buttons to +12 dB. OSD Setup 3 Use the Up and Down [R]/[X] buttons to 79 or "Max". OSD Setup ■ Immediate Display This preference determines whether ... selected on your headphones. Top: Top of the screen (default). Miscellaneous 1. The items are explained below. 5 When you can also be set from -12 dB to select "6. The "Power On Volume" cannot be performed on the AV receiver by the [SETUP] button. Volume Setup 2. The main menu appears...

Owner Manual
Page 90
... or Standby. P AUDIO button* Selects foreign language soundtracks and audio formats (e.g., Dolby Digital or DTS). Q CLR button Cancels functions and clears entered numbers, or enters 12.
... or Standby. P AUDIO button* Selects foreign language soundtracks and audio formats (e.g., Dolby Digital or DTS). Q CLR button Cancels functions and clears entered numbers, or enters 12.

Owner Manual
Page 92
..., Pause, Play, Stop, and Fast Forward. P RETURN button Exits the menu or returns to On or Standby. S CLR button Cancels functions or enters the number 12. For details on some may not work at all . In this case, these buttons cannot be used to On or Standby. M CH +/- V CLR button Cancels...
..., Pause, Play, Stop, and Fast Forward. P RETURN button Exits the menu or returns to On or Standby. S CLR button Cancels functions or enters the number 12. For details on some may not work at all . In this case, these buttons cannot be used to On or Standby. M CH +/- V CLR button Cancels...

Owner Manual
Page 99
...is inserted properly in all the way. • Try resetting your TV or the AV receiver. • Some versions of bat- rect polarity (page 12). • Install new batteries. Connecting only an V cable won't work (page 36). • Make sure you've selected the correct remote controller ...90-96). • If you will need to select another manufacturer's component, point the remote controller at that component. • To control an Onkyo component that the remote controller is noisy, or the FM STEREO indicator doesn't appear • Relocate your iPod from a source connected to an ...
...is inserted properly in all the way. • Try resetting your TV or the AV receiver. • Some versions of bat- rect polarity (page 12). • Install new batteries. Connecting only an V cable won't work (page 36). • Make sure you've selected the correct remote controller ...90-96). • If you will need to select another manufacturer's component, point the remote controller at that component. • To control an Onkyo component that the remote controller is noisy, or the FM STEREO indicator doesn't appear • Relocate your iPod from a source connected to an ...

Owner Manual
Page 101
... Channel 40 General Power Supply AC 120 V, 60 Hz Power Consumption 5.5 A Dimensions (W × H × D) 435 × 176 × 329 mm (17-1/8" × 6-15/16" × 12-15/16") Weight 10.8 kg (23.8 lbs.) ■ Video Inputs HDMI Component Composite IN 1, IN 2, IN 3, IN 4, IN 5 IN 1, IN 2 DVD/BD, VCR/DVR, CBL...
... Channel 40 General Power Supply AC 120 V, 60 Hz Power Consumption 5.5 A Dimensions (W × H × D) 435 × 176 × 329 mm (17-1/8" × 6-15/16" × 12-15/16") Weight 10.8 kg (23.8 lbs.) ■ Video Inputs HDMI Component Composite IN 1, IN 2, IN 3, IN 4, IN 5 IN 1, IN 2 DVD/BD, VCR/DVR, CBL...

Owner Manual
Page 104
... Tel: +49-8142-4401-0 Fax: +49-8142-4401-555 http://www.eu.onkyo.com/ ONKYO EUROPE UK Office Suite 1, Gregories Court, Gregories Road, Beaconsfield, Buckinghamshire, HP9 1HQ UNITED KINGDOM Tel: +44-(0)1494-681515 Fax: +44(0)-1494-680452 ONKYO CHINA LIMITED Unit 1&12, 9/F, Ever Gain PlazaTower 1, 88, Container Port Road, Kwai Chung, N.T., HONG KONG Tel...
... Tel: +49-8142-4401-0 Fax: +49-8142-4401-555 http://www.eu.onkyo.com/ ONKYO EUROPE UK Office Suite 1, Gregories Court, Gregories Road, Beaconsfield, Buckinghamshire, HP9 1HQ UNITED KINGDOM Tel: +44-(0)1494-681515 Fax: +44(0)-1494-680452 ONKYO CHINA LIMITED Unit 1&12, 9/F, Ever Gain PlazaTower 1, 88, Container Port Road, Kwai Chung, N.T., HONG KONG Tel...

Owner Manual
Page 106
... and follow local regulations when disposing of the polarized or grounding-type plug. The wide blade or the third prong are covered by the manufacturer. 12. Use only with the manufacturer's instructions. 8. Important Safety Instructions 1. Adjust only those controls that there is used, use attachments/accessories specified by the operating instructions...
... and follow local regulations when disposing of the polarized or grounding-type plug. The wide blade or the third prong are covered by the manufacturer. 12. Use only with the manufacturer's instructions. 8. Important Safety Instructions 1. Adjust only those controls that there is used, use attachments/accessories specified by the operating instructions...

Owner Manual
Page 107
...where this unit will be used to know Your Speaker Package 7 Installing & Using Connecting the Speakers 10 Appendix Troubleshooting 12 Specifications 13 Universal Port Option Dock for iPod® Universal Port Option Dock for iPod 14 En-3 Modèle ... hard-toreach grilles. 3. The power cord plug is used meets the required voltage (AC 120 V, 60 Hz) written on , contact your Onkyo authorized service station. 2. Precautions Contents 1. Getting Started Important Safety Instructions 2 Precautions 3 Speaker Precautions 4 Package Contents 5 Enjoying Home Theater 6 Getting...
...where this unit will be used to know Your Speaker Package 7 Installing & Using Connecting the Speakers 10 Appendix Troubleshooting 12 Specifications 13 Universal Port Option Dock for iPod® Universal Port Option Dock for iPod 14 En-3 Modèle ... hard-toreach grilles. 3. The power cord plug is used meets the required voltage (AC 120 V, 60 Hz) written on , contact your Onkyo authorized service station. 2. Precautions Contents 1. Getting Started Important Safety Instructions 2 Precautions 3 Speaker Precautions 4 Package Contents 5 Enjoying Home Theater 6 Getting...

Owner Manual
Page 116
... coming from a TV or other Move the subwoofer and RCA cable away electronic device is not set correctly. connected to the subwoofer's LINE INPUT. En-12 minimum. content. The speaker configuration is grounded properly. The Subwoofer configuration is being picked up the OUTPUT LEVEL control. Troubleshooting Symptom Possible cause Remedy There...
... coming from a TV or other Move the subwoofer and RCA cable away electronic device is not set correctly. connected to the subwoofer's LINE INPUT. En-12 minimum. content. The speaker configuration is grounded properly. The Subwoofer configuration is being picked up the OUTPUT LEVEL control. Troubleshooting Symptom Possible cause Remedy There...