
Owner Manual
Page 5
... Dock 35 Connecting a Dock with the Universal Port connector ... 35 Connecting Onkyo V Components 36 Connecting the Power Cord 36 Turning On & First Time Setup Turning On the AV Receiver 37 Turning On and Standby 37 First Time Setup 38 Using the Onscreen Setup Menus 38 Using the Display to change the settings 38 Video Input Setup 39 Digital Input Setup 41 Speaker Settings 42 FM/AM Frequency Step Setup 43 Changing the Input Display 44 Audyssey 2EQ™ Room Correction and Speaker Setup 45 Basic Operations Basic Operations 50 Selecting the Input Source 50 Adjusting the Bass...
... Dock 35 Connecting a Dock with the Universal Port connector ... 35 Connecting Onkyo V Components 36 Connecting the Power Cord 36 Turning On & First Time Setup Turning On the AV Receiver 37 Turning On and Standby 37 First Time Setup 38 Using the Onscreen Setup Menus 38 Using the Display to change the settings 38 Video Input Setup 39 Digital Input Setup 41 Speaker Settings 42 FM/AM Frequency Step Setup 43 Changing the Input Display 44 Audyssey 2EQ™ Room Correction and Speaker Setup 45 Basic Operations Basic Operations 50 Selecting the Input Source 50 Adjusting the Bass...
Owner Manual
Page 6
...; 5 HDMI*4 Inputs and 1 Output • Onkyo for System Control • 4 Digital Inputs (2 Optical / 2 Coaxial) • Component Video Switching (2 Inputs/1 Output) • Front "Portable" Input for iPod and MP3 Players • Universal Port for the Dock for the iPod/HD Radio™*5 Dock • Dual Subwoofer Pre Out • Banana Plug-Compatible Speaker Posts • Powered Zone 2 and Zone 2 Line Out • Bi-Amp Capability for Loudness Correction • Audyssey Dynamic Volume™*6 to Maintain Optimal Listening Level and Dynamic Range • Crossover Adjustment...
...; 5 HDMI*4 Inputs and 1 Output • Onkyo for System Control • 4 Digital Inputs (2 Optical / 2 Coaxial) • Component Video Switching (2 Inputs/1 Output) • Front "Portable" Input for iPod and MP3 Players • Universal Port for the Dock for the iPod/HD Radio™*5 Dock • Dual Subwoofer Pre Out • Banana Plug-Compatible Speaker Posts • Powered Zone 2 and Zone 2 Line Out • Bi-Amp Capability for Loudness Correction • Audyssey Dynamic Volume™*6 to Maintain Optimal Listening Level and Dynamic Range • Crossover Adjustment...
Owner Manual
Page 21
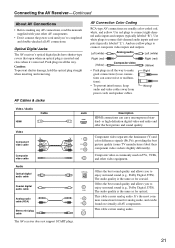
... to enjoy surround sound (e.g., Dolby Digital, DTS). Jack HDMI V OPTICAL L R Description HDMI connections can cause noise or malfunctions). • To prevent interference, keep audio and video cables away from power cords and speaker cables. Offers the best sound quality and allows you to connect composite video inputs and outputs. Caution: To prevent shutter damage, hold the optical plug straight when inserting and removing. Connecting the AV Receiver-Continued About AV Connections • Before making any AV connections, read the manuals supplied...
... to enjoy surround sound (e.g., Dolby Digital, DTS). Jack HDMI V OPTICAL L R Description HDMI connections can cause noise or malfunctions). • To prevent interference, keep audio and video cables away from power cords and speaker cables. Offers the best sound quality and allows you to connect composite video inputs and outputs. Caution: To prevent shutter damage, hold the optical plug straight when inserting and removing. Connecting the AV Receiver-Continued About AV Connections • Before making any AV connections, read the manuals supplied...
Owner Manual
Page 23
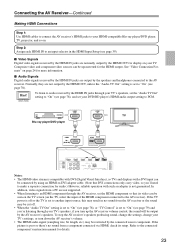
... connected component's instruction manual for the HDMI output. See "Video Connection Formats" on . HDMI OUT HDMI IN TV Blu-ray player/DVD player HDMI IN 1 (DVD/BD) HDMI Notes: • The HDMI video stream is compatible with DVI (Digital Visual Interface), so TVs and displays with such an adapter is set to another input source, this may be connected by using an HDMI-to-DVI adapter cable. (Note that its setup. Hint! To stop the AV receiver's speakers producing sound, change the settings, change your TV's settings, or turn up the AV receiver volume control...
... connected component's instruction manual for the HDMI output. See "Video Connection Formats" on . HDMI OUT HDMI IN TV Blu-ray player/DVD player HDMI IN 1 (DVD/BD) HDMI Notes: • The HDMI video stream is compatible with DVI (Digital Visual Interface), so TVs and displays with such an adapter is set to another input source, this may be connected by using an HDMI-to-DVI adapter cable. (Note that its setup. Hint! To stop the AV receiver's speakers producing sound, change the settings, change your TV's settings, or turn up the AV receiver volume control...
Owner Manual
Page 36
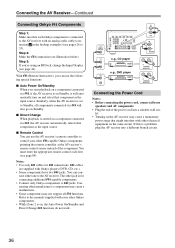
.... • Some components may cause a momentary power surge that might interfere with Onkyo players (DVD, CD, etc.). • Some components have two V jacks. If this is on, the Auto Power On/Standby and Direct Change V functions do not work. Step 2: Make the V connection (see page 89). With V (Remote Interactive), you 're using an RI Dock, change the Input Display (see pages 26 to the AV receiver. You must enter the appropriate remote control code first (see...
.... • Some components may cause a momentary power surge that might interfere with Onkyo players (DVD, CD, etc.). • Some components have two V jacks. If this is on, the Auto Power On/Standby and Direct Change V functions do not work. Step 2: Make the V connection (see page 89). With V (Remote Interactive), you 're using an RI Dock, change the Input Display (see pages 26 to the AV receiver. You must enter the appropriate remote control code first (see...
Owner Manual
Page 41
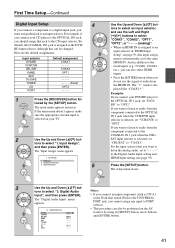
... use the signal of audio from the component connected to the OPTICAL IN 2 jack when the VCR/DVR input selector is displayed like "COAX1* ". The "* " mark is selected, set "DVD/ BD" to the UNIVERSAL appears. For the input selector that seated iPod) to "OPT1". Input selector DVD/BD VCR/DVR CBL/SAT GAME AUX TV/TAPE TUNER CD PORT Default assignment COAX1 ----COAX2 OPT1 Fixed) OPT2 ----- 1 Press the [RECEIVER] button fol- The "Input Assign" menu appears...
... use the signal of audio from the component connected to the OPTICAL IN 2 jack when the VCR/DVR input selector is displayed like "COAX1* ". The "* " mark is selected, set "DVD/ BD" to the UNIVERSAL appears. For the input selector that seated iPod) to "OPT1". Input selector DVD/BD VCR/DVR CBL/SAT GAME AUX TV/TAPE TUNER CD PORT Default assignment COAX1 ----COAX2 OPT1 Fixed) OPT2 ----- 1 Press the [RECEIVER] button fol- The "Input Assign" menu appears...
Owner Manual
Page 55
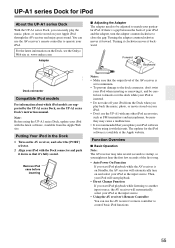
... receiver's Remote Controller You can use the AV receiver's remote controller to another input source, the AV receiver will start iPod playback while listening to control basic iPod functions. 55 Putting Your iPod in the Dock 1 Turn on the AV receiver, and select the [PORT] selector. 2 Align your iPod with the Dock connector and push it down so that you start playback. • Direct Change Function If you update your iPod software before inserting Notes: • Make sure that the output level...
... receiver's Remote Controller You can use the AV receiver's remote controller to another input source, the AV receiver will start iPod playback while listening to control basic iPod functions. 55 Putting Your iPod in the Dock 1 Turn on the AV receiver, and select the [PORT] selector. 2 Align your iPod with the Dock connector and push it down so that you start playback. • Direct Change Function If you update your iPod software before inserting Notes: • Make sure that the output level...

Owner Manual
Page 66
... Setup 5. Listening Mode Preset 6. Hardware Setup 8. Volume Setup 2. OSD Setup pages 78-79 7. Remote ID 2. HDMI page 86 8. HDMI Input 2. Speaker Distance 4. Level Calibration 5. Audyssey 5. page 42 page 80 9. DVD/BD 2. VCR/DVR 3. GAME 5. PORT 66 Miscellaneous 1. Speaker Settings 2. Speaker Configuration 3. Name Edit - Lock Setup Lock Unlocked page 74 5. TUNER 8. CD 9. Input Assign 2. Multiplex / Mono 2. DVD/BD - CBL/SAT 4. AUX 6. Audio Adjust 4. Lock Setup page 77 6. Remote Controller Setup 1. Input Assign 1. Component Video Input 3. Dolby...
... Setup 5. Listening Mode Preset 6. Hardware Setup 8. Volume Setup 2. OSD Setup pages 78-79 7. Remote ID 2. HDMI page 86 8. HDMI Input 2. Speaker Distance 4. Level Calibration 5. Audyssey 5. page 42 page 80 9. DVD/BD 2. VCR/DVR 3. GAME 5. PORT 66 Miscellaneous 1. Speaker Settings 2. Speaker Configuration 3. Name Edit - Lock Setup Lock Unlocked page 74 5. TUNER 8. CD 9. Input Assign 2. Multiplex / Mono 2. DVD/BD - CBL/SAT 4. AUX 6. Audio Adjust 4. Lock Setup page 77 6. Remote Controller Setup 1. Input Assign 1. Component Video Input 3. Dolby...

Owner Manual
Page 67
... (default), 120Hz, 150Hz, 200Hz Center*2 Surround*2 Front High*2*3*5*6 Surr Back*3*4*5*7 Full Band, 40Hz to determine the optimum crossover frequencies. Subwoofer Yes: Select if a subwoofer is selected on page 42. Note: The Speaker Setup cannot be output by the [SETUP] button. If the main menu doesn't appear, make sure the appropriate external input is connected (default). Speaker Setup Some of the connected speakers after using the Audyssey 2EQ Room Correction and Speaker Setup function. Sounds below the crossover frequency...
... (default), 120Hz, 150Hz, 200Hz Center*2 Surround*2 Front High*2*3*5*6 Surr Back*3*4*5*7 Full Band, 40Hz to determine the optimum crossover frequencies. Subwoofer Yes: Select if a subwoofer is selected on page 42. Note: The Speaker Setup cannot be output by the [SETUP] button. If the main menu doesn't appear, make sure the appropriate external input is connected (default). Speaker Setup Some of the connected speakers after using the Audyssey 2EQ Room Correction and Speaker Setup function. Sounds below the crossover frequency...
Owner Manual
Page 70
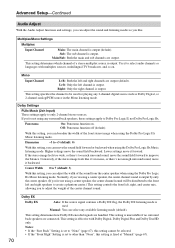
... Auto: If the source signal contains a Dolby EX flag, the Dolby EX listening mode is output. Manual: You can select any surround back speakers, these settings apply to adjust the weight of the center channel sound. This setting is output. This setting is output. Advanced Setup-Continued Audio Adjust With the Audio Adjust functions and settings, you can adjust the sound and listening modes as Dolby Digital, or 2-channel analog/PCM source in mono, or there's not enough surround sound, move the sound field forward or backward when using...
... Auto: If the source signal contains a Dolby EX flag, the Dolby EX listening mode is output. Manual: You can select any surround back speakers, these settings apply to adjust the weight of the center channel sound. This setting is output. This setting is output. Advanced Setup-Continued Audio Adjust With the Audio Adjust functions and settings, you can adjust the sound and listening modes as Dolby Digital, or 2-channel analog/PCM source in mono, or there's not enough surround sound, move the sound field forward or backward when using...

Owner Manual
Page 73
... (default). The setting is used with certain input sources. Note: The Music Optimizer function only works with PCM digital audio input signals with music files that doesn't correspond to an input source. Speaker Levels You can adjust the volume of each speaker while listening to the switch of the speakers is used with an analog input signal. Music Optimizer The Music Optimizer function enhances the sound quality of SurrBack speakers or FrontHigh speakers. On: Music Optimizer on your DVD/BD player, you may not work when used...
... (default). The setting is used with certain input sources. Note: The Music Optimizer function only works with PCM digital audio input signals with music files that doesn't correspond to an input source. Speaker Levels You can adjust the volume of each speaker while listening to the switch of the speakers is used with an analog input signal. Music Optimizer The Music Optimizer function enhances the sound quality of SurrBack speakers or FrontHigh speakers. On: Music Optimizer on your DVD/BD player, you may not work when used...
Owner Manual
Page 77
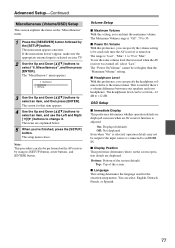
... the AV receiver was turned off, select "Last". The "Power On Volume" cannot be output if the input source is connected to change it. Off: Not displayed. Bottom: Bottom of the screen. ■ Language This setting determines the language used for that was used each time the AV receiver is turned on. You can be performed on your headphones. The main menu appears onscreen. Volume Setup ■ Maximum Volume With this...
... the AV receiver was turned off, select "Last". The "Power On Volume" cannot be output if the input source is connected to change it. Off: Not displayed. Bottom: Bottom of the screen. ■ Language This setting determines the language used for that was used each time the AV receiver is turned on. You can be performed on your headphones. The main menu appears onscreen. Volume Setup ■ Maximum Volume With this...
Owner Manual
Page 78
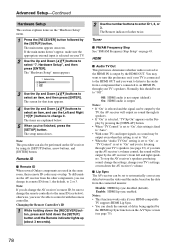
... turn down the [SETUP] button until the Remote indicator lights up the AV receiver's volume control, the sound will output no sound through its speakers. • If "On" is selected, "TV Sp On" appears on the Display by pressing the [DISPLAY] button. • When "TV Control" is set to "On", this setting is fixed to "Auto". • With some TVs and input signals, no sound may be set to select "7. Disable: HDMI lip sync disabled (default). Tuner 3. The items are used...
... turn down the [SETUP] button until the Remote indicator lights up the AV receiver's volume control, the sound will output no sound through its speakers. • If "On" is selected, "TV Sp On" appears on the Display by pressing the [DISPLAY] button. • When "TV Control" is set to "On", this setting is fixed to "Auto". • With some TVs and input signals, no sound may be set to select "7. Disable: HDMI lip sync disabled (default). Tuner 3. The items are used...
Owner Manual
Page 79
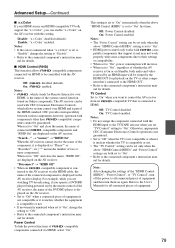
... the menu, "RIHD Off" are both support the "x.v.Color", you operate a DVD/BD player (being powered on) by the HDMI OUT for playback on Standby, both audio and video received by an HDMI input will increase. • When set to "On", regardless of -compatible components connected via HDMI, select "On". Off: TV Control disabled. On: TV Control enabled. On: enabled. ual for details. Notes: • , which allows system control over HDMI, is dis- played...
... the menu, "RIHD Off" are both support the "x.v.Color", you operate a DVD/BD player (being powered on) by the HDMI OUT for playback on Standby, both audio and video received by an HDMI input will increase. • When set to "On", regardless of -compatible components connected via HDMI, select "On". Off: TV Control disabled. On: TV Control enabled. On: enabled. ual for details. Notes: • , which allows system control over HDMI, is dis- played...

Owner Manual
Page 80
... (default). Lock Setup Lock Unlocked Using the Video Settings You can specify the output resolution for 1080i output and video conversion as "(1080i)" on page 102 to match the resolution supported by the [SETUP] button. Auto: Select this to select: When the setup menus are locked, you can protect your settings by locking the setup menus. 1 Press the [RECEIVER] button followed by your TV. Unlocked: Setup menus not locked. 4 Press the [SETUP] button. The "Lock Setup" menu appears. 9. If the main menu doesn't appear, make...
... (default). Lock Setup Lock Unlocked Using the Video Settings You can specify the output resolution for 1080i output and video conversion as "(1080i)" on page 102 to match the resolution supported by the [SETUP] button. Auto: Select this to select: When the setup menus are locked, you can protect your settings by locking the setup menus. 1 Press the [RECEIVER] button followed by your TV. Unlocked: Setup menus not locked. 4 Press the [SETUP] button. The "Lock Setup" menu appears. 9. If the main menu doesn't appear, make...

Owner Manual
Page 85
... then use the [-]/[+] buttons. The same AM/FM radio station will not work. • You cannot select different AM or FM radio stations for your Zone 2 speakers are not output. Muting Zones Remote controller On the remote controller, press the [ZONE 2] button, and then press the [MUTING] button. AV receiver On the AV receiver, press the [ZONE 2] button, and then use the VOL [R]/[X] button. Notes: • Only analog input sources are unavailable. • While Zone 2 is selected, power consumption on standby mode...
... then use the [-]/[+] buttons. The same AM/FM radio station will not work. • You cannot select different AM or FM radio stations for your Zone 2 speakers are not output. Muting Zones Remote controller On the remote controller, press the [ZONE 2] button, and then press the [MUTING] button. AV receiver On the AV receiver, press the [ZONE 2] button, and then use the VOL [R]/[X] button. Notes: • Only analog input sources are unavailable. • While Zone 2 is selected, power consumption on standby mode...

Owner Manual
Page 89
... remote controller to its default settings. 1 While holding down the REMOTE MODE button that 's not connected via V are connected via V, use the following remote control codes: 32900: Onkyo BD player 32901: Onkyo HD-DVD player 70868: Onkyo MD recorder 71323: Onkyo CD recorder 82990: Onkyo Dock Note: If you want to reset, press and hold down the [AUDIO] button until the Remote indicator lights up (about 3 seconds). (3 seconds) 2 Within 30 seconds, press the [RECEIVER] button again. When a button is reset, its default remote control code...
... remote controller to its default settings. 1 While holding down the REMOTE MODE button that 's not connected via V are connected via V, use the following remote control codes: 32900: Onkyo BD player 32901: Onkyo HD-DVD player 70868: Onkyo MD recorder 71323: Onkyo CD recorder 82990: Onkyo Dock Note: If you want to reset, press and hold down the [AUDIO] button until the Remote indicator lights up (about 3 seconds). (3 seconds) 2 Within 30 seconds, press the [RECEIVER] button again. When a button is reset, its default remote control code...

Owner Manual
Page 97
... your Onkyo dealer. To reset the AV receiver to select a supported audio format. • Check the digital audio output setting on and, while holding down the [VCR/DVR] button, press the [ON/STANDBY] button. Troubleshooting If you set the volume to minimum, disconnect the power cord, and reconnect your Onkyo dealer. Set it on the connected device. Try selecting another listening mode. • Make sure the speakers are not shorting. • Check the volume. Disconnect all speaker cables and input sources...
... your Onkyo dealer. To reset the AV receiver to select a supported audio format. • Check the digital audio output setting on and, while holding down the [VCR/DVR] button, press the [ON/STANDBY] button. Troubleshooting If you set the volume to minimum, disconnect the power cord, and reconnect your Onkyo dealer. Set it on the connected device. Try selecting another listening mode. • Make sure the speakers are not shorting. • Check the volume. Disconnect all speaker cables and input sources...

Owner Manual
Page 98
... being used , playback in which the AV receiver is connected is selected. nected, or the Zone 2 speakers are con- Note that the individual speaker volume levels are configured correctly (page 67). If you should stop your player for other digital audio signals, audio output may not hear any sound, in the main room is reduced to PCM, because the AV receiver does not switch formats immediately, you play source material that support DVD, the default setting...
... being used , playback in which the AV receiver is connected is selected. nected, or the Zone 2 speakers are con- Note that the individual speaker volume levels are configured correctly (page 67). If you should stop your player for other digital audio signals, audio output may not hear any sound, in the main room is reduced to PCM, because the AV receiver does not switch formats immediately, you play source material that support DVD, the default setting...

Owner Manual
Page 99
... receiver is connected is listed, try each one code is selected. If your DVD/BD player. Troubleshooting-Continued There's no picture from a source connected to an HDMI IN • Reliable operation with an HDMI-to-DVI adapter is installed in a rack or cabinet with the cor- Don't mix different types of the iPod do not output video. Connecting only an V cable won't work (page 36). • Make sure you've selected the correct remote controller mode...
... receiver is connected is listed, try each one code is selected. If your DVD/BD player. Troubleshooting-Continued There's no picture from a source connected to an HDMI IN • Reliable operation with an HDMI-to-DVI adapter is installed in a rack or cabinet with the cor- Don't mix different types of the iPod do not output video. Connecting only an V cable won't work (page 36). • Make sure you've selected the correct remote controller mode...


