
User Manual
Page 3
... area meets the voltage requirements printed on the unit's rear panel (e.g., AC 230-240 V, 50 Hz or AC 120 V, 60 Hz). Before you cannot turn it on a circuit dif- Pressing the [STANDBY/ON] button to country. models FCC Information for help. ferent from the AC power source. nician for User CAUTION: The user changes or modifications not expressly approved by...
... area meets the voltage requirements printed on the unit's rear panel (e.g., AC 230-240 V, 50 Hz or AC 120 V, 60 Hz). Before you cannot turn it on a circuit dif- Pressing the [STANDBY/ON] button to country. models FCC Information for help. ferent from the AC power source. nician for User CAUTION: The user changes or modifications not expressly approved by...

User Manual
Page 6
... 5 Package Contents 6 Front & Rear Panels 8 Speaker Package 11 Remote Controller 12 Before Using the AV receiver 19 Connection Enjoying Home Theater 20 Connecting Your Speakers 21 Connecting Antenna 24 Connecting Your Components 26 Turning On & First Time Setup Turning On 37 First Time Setup 38 Basic Operation Playing Your AV Components 39 Using the Tuner 41 Common Functions 45 Recording 48 Enjoying the Listening Modes Using the Listening Modes 49 Advanced Operation Adjusting the Listening Modes 51 Advanced Setup 53 Troubleshooting 58 If you...
... 5 Package Contents 6 Front & Rear Panels 8 Speaker Package 11 Remote Controller 12 Before Using the AV receiver 19 Connection Enjoying Home Theater 20 Connecting Your Speakers 21 Connecting Antenna 24 Connecting Your Components 26 Turning On & First Time Setup Turning On 37 First Time Setup 38 Basic Operation Playing Your AV Components 39 Using the Tuner 41 Common Functions 45 Recording 48 Enjoying the Listening Modes Using the Listening Modes 49 Advanced Operation Adjusting the Listening Modes 51 Advanced Setup 53 Troubleshooting 58 If you...

User Manual
Page 9
... setup menus. P TONE, [-] & [+] buttons (45) These buttons are used to select the Auto or Manual tuning mode. N PHONES jack (45) This 1/4-inch phone jack is used to turn speaker sets A and B on . R RETURN button (51, 53, 54, 56) This button is used to adjust the bass and treble. K TUNING MODE button (41) This button is used to select from the following input sources: MULTI CH, DVD, VIDEO 1/VCR, VIDEO 2, VIDEO 3, TAPE, TUNER, or CD. Q Input selector buttons (38-40) These buttons are used to return to the previously displayed setup menu. Front & Rear Panels...
... setup menus. P TONE, [-] & [+] buttons (45) These buttons are used to select the Auto or Manual tuning mode. N PHONES jack (45) This 1/4-inch phone jack is used to turn speaker sets A and B on . R RETURN button (51, 53, 54, 56) This button is used to adjust the bass and treble. K TUNING MODE button (41) This button is used to select from the following input sources: MULTI CH, DVD, VIDEO 1/VCR, VIDEO 2, VIDEO 3, TAPE, TUNER, or CD. Q Input selector buttons (38-40) These buttons are used to return to the previously displayed setup menu. Front & Rear Panels...

User Manual
Page 13
...-318 Home Theater Speaker Package. button (42) This button is used to set the CinemaFILTER function. G Arrow ENTER buttons (51, 53-56) These buttons are used to adjust the volume of the AV receiver regardless of each speaker. STEREO button This button selects the Stereo listening mode. SURROUND button This button selects the Dolby and DTS listening modes. [ ]/[ ] buttons These buttons can be used to display various information about the currently selected input source. M SLEEP button (46) This button is used to select and adjust settings. Q CINE FLTR button (52) This button...
...-318 Home Theater Speaker Package. button (42) This button is used to set the CinemaFILTER function. G Arrow ENTER buttons (51, 53-56) These buttons are used to adjust the volume of the AV receiver regardless of each speaker. STEREO button This button selects the Stereo listening mode. SURROUND button This button selects the Dolby and DTS listening modes. [ ]/[ ] buttons These buttons can be used to display various information about the currently selected input source. M SLEEP button (46) This button is used to select and adjust settings. Q CINE FLTR button (52) This button...

User Manual
Page 14
... the input source, press: RECEIVER 6 DVD To set the repeat playback functions. LEVEL+ PLAY MODE DISPLAY OR-EQ L NIGHT CINE FLTR RC-646S DVD K L M N O P A ON/STANDBY button This button sets the DVD player to right: Pause, Play, Stop, Fast Reverse, Fast Forward, Previous, and Next. button This button selects discs on . F RETURN button This button is used to exit the DVD player's onscreen setup menu and to select subtitles. H SUBTITLE button This button is used to restart menu playback. L MENU button This button is used to DVD mode, press the [DVD] REMOTE MODE button...
... the input source, press: RECEIVER 6 DVD To set the repeat playback functions. LEVEL+ PLAY MODE DISPLAY OR-EQ L NIGHT CINE FLTR RC-646S DVD K L M N O P A ON/STANDBY button This button sets the DVD player to right: Pause, Play, Stop, Fast Reverse, Fast Forward, Previous, and Next. button This button selects discs on . F RETURN button This button is used to exit the DVD player's onscreen setup menu and to select subtitles. H SUBTITLE button This button is used to restart menu playback. L MENU button This button is used to DVD mode, press the [DVD] REMOTE MODE button...
User Manual
Page 20
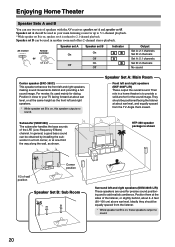
... and to 5.1-channel playback. *While speaker set B is on, speaker set B can be used for up to add realistic ambience. They should be equally spaced from the TV. Enjoying Home Theater Speaker Sets A and B You can be obtained by installing the subwoofer in another room and offers 2-channel stereo playback. Speaker set A is on , this speaker outputs no sound. 20 In general, a good bass sound can use two sets of the LFE (Low-Frequency Effects) channel.
... and to 5.1-channel playback. *While speaker set B is on, speaker set B can be used for up to add realistic ambience. They should be equally spaced from the TV. Enjoying Home Theater Speaker Sets A and B You can be obtained by installing the subwoofer in another room and offers 2-channel stereo playback. Speaker set A is on , this speaker outputs no sound. 20 In general, a good bass sound can use two sets of the LFE (Low-Frequency Effects) channel.

User Manual
Page 26
... for optical. Optical Digital Jacks The AV receiver's optical digital jack has shutter-type cover that open when an optical plug is typically used to make good connections (loose connections can cause noise or malfunctions). • To prevent interference, keep audio and video cables away from power cords and speaker cables. Use red plugs to connect composite video inputs and outputs. And use yellow plugs to connect right-channel audio inputs and outputs (typically labeled "R"). The audio quality is commonly used instead of a multichannel cable. 26 AV Connection Color Coding...
... for optical. Optical Digital Jacks The AV receiver's optical digital jack has shutter-type cover that open when an optical plug is typically used to make good connections (loose connections can cause noise or malfunctions). • To prevent interference, keep audio and video cables away from power cords and speaker cables. Use red plugs to connect composite video inputs and outputs. And use yellow plugs to connect right-channel audio inputs and outputs (typically labeled "R"). The audio quality is commonly used instead of a multichannel cable. 26 AV Connection Color Coding...

User Manual
Page 32
...video in jacks. You can enjoy Dolby and DTS listening modes with this connection. This offers better picture quality than composite video. b If your TV's video input jack. Connecting Your Components-Continued Connecting a Satellite, Cable, Set-top Box, or Other Video Source Step 1: Video Connection A Connect your set-top box's video output jack to the AV receiver's VIDEO 2 IN jack and connect the AV receiver's MONITOR OUT jack to your set-top box has an optical digital audio output jack, connect it to the AV receiver's DIGITAL IN COAXIAL jack, and set -top box, etc. C Connect...
...video in jacks. You can enjoy Dolby and DTS listening modes with this connection. This offers better picture quality than composite video. b If your TV's video input jack. Connecting Your Components-Continued Connecting a Satellite, Cable, Set-top Box, or Other Video Source Step 1: Video Connection A Connect your set-top box's video output jack to the AV receiver's VIDEO 2 IN jack and connect the AV receiver's MONITOR OUT jack to your set-top box has an optical digital audio output jack, connect it to the AV receiver's DIGITAL IN COAXIAL jack, and set -top box, etc. C Connect...
User Manual
Page 34
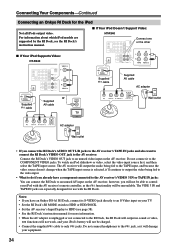
... Dock, connect its S-VIDEO jack directly to an S-Video input on your TV. • Set the RI Dock's RI MODE switch to HDD or HDD/DOCK. • Set the AV receiver's Input Display to HDD (see the RI Dock's instruction manual. ■ If Your iPod Doesn't Support Video: HT-R340 Connect one or the other ■ If Your iPod Supports Video: HT-R340 VIDEO 3 V IN L R VIDEO 3 REMOTE CONTROL Supplied cable IN IN L R TAPE VIDEO 3 Supplied AV cable AC adapter REMOTE CONTROL Supplied cable or Supplied AV cable VIDEO INPUT TV 5 Wall...
... Dock, connect its S-VIDEO jack directly to an S-Video input on your TV. • Set the RI Dock's RI MODE switch to HDD or HDD/DOCK. • Set the AV receiver's Input Display to HDD (see the RI Dock's instruction manual. ■ If Your iPod Doesn't Support Video: HT-R340 Connect one or the other ■ If Your iPod Supports Video: HT-R340 VIDEO 3 V IN L R VIDEO 3 REMOTE CONTROL Supplied cable IN IN L R TAPE VIDEO 3 Supplied AV cable AC adapter REMOTE CONTROL Supplied cable or Supplied AV cable VIDEO INPUT TV 5 Wall...

User Manual
Page 36
... your DVD player is connected to the AV receiver's multichannel DVD input, you'll need to press the [MULTI CH] button to jacks. Notes: • Use only cables for connecting additional -capable components. • Connect only Onkyo components to hear all of the component. REMOTE CONTROL e.g., CD player e.g., DVD player IN L R CD FRONT L R DVD R L ANALOG AUDIO OUT R L ANALOG AUDIO OUT Connecting the Power Cord Notes: • Before connecting the power cord, connect all channels (see page 38). You can use the AV receiver's remote controller to Standby, all functions...
... your DVD player is connected to the AV receiver's multichannel DVD input, you'll need to press the [MULTI CH] button to jacks. Notes: • Use only cables for connecting additional -capable components. • Connect only Onkyo components to hear all of the component. REMOTE CONTROL e.g., CD player e.g., DVD player IN L R CD FRONT L R DVD R L ANALOG AUDIO OUT R L ANALOG AUDIO OUT Connecting the Power Cord Notes: • Before connecting the power cord, connect all channels (see page 38). You can use the AV receiver's remote controller to Standby, all functions...

User Manual
Page 37
...; Have you may have set the speaker settings incorrectly (see page 55). 37 DIMMER SLEEP CH DISC ALBUM VOL Turning On the AV Receiver 1 AV receiver Remote controller STANDBY/ON RECEIVER or Press the [STANDBY/ON] button. Turning On STANDBY/ON STANDBY indicator STANDBY/ON A SPEAKERS B PHONES TUNING / PRESET STANDBY ENTER TONE MULTl CH + STEREO LISTENING MODE DISPLAY DIGITAL INPUT RT/PTY/TP MEMORY TUNING MODE RETURN SETUP CLEAR DVD VIDEO 1/VCR VIDEO 2 VIDEO 3 TAPE TUNER CD MASTER VOLUME RECEIVER ON/STANDBY ON/STANDBY REMOTE MODE RECEIVER DVD TAPE INPUT SELECTOR...
...; Have you may have set the speaker settings incorrectly (see page 55). 37 DIMMER SLEEP CH DISC ALBUM VOL Turning On the AV Receiver 1 AV receiver Remote controller STANDBY/ON RECEIVER or Press the [STANDBY/ON] button. Turning On STANDBY/ON STANDBY indicator STANDBY/ON A SPEAKERS B PHONES TUNING / PRESET STANDBY ENTER TONE MULTl CH + STEREO LISTENING MODE DISPLAY DIGITAL INPUT RT/PTY/TP MEMORY TUNING MODE RETURN SETUP CLEAR DVD VIDEO 1/VCR VIDEO 2 VIDEO 3 TAPE TUNER CD MASTER VOLUME RECEIVER ON/STANDBY ON/STANDBY REMOTE MODE RECEIVER DVD TAPE INPUT SELECTOR...

User Manual
Page 38
...3 DIGITAL INPUT Press the [DIGITAL INPUT] button repeatedly to select COAX, OPT1, OPT2, or "- - - -" (analog). 38 This setting can assign digital inputs to input sources. STANDBY/ON A SPEAKERS B PHONES TUNING / PRESET STANDBY ENTER TONE MULTl CH + STEREO LISTENING MODE DISPLAY DIGITAL INPUT RT/PTY/TP MEMORY TUNING MODE RETURN SETUP CLEAR DVD VIDEO 1/VCR VIDEO 2 VIDEO 3 TAPE TUNER CD MASTER VOLUME 1, 2 1, 2 iPod photo: If you're using a digital audio connection (coaxial or optical). For example, if you connect your DVD player to DIGITAL IN OPTICAL, you must change...
...3 DIGITAL INPUT Press the [DIGITAL INPUT] button repeatedly to select COAX, OPT1, OPT2, or "- - - -" (analog). 38 This setting can assign digital inputs to input sources. STANDBY/ON A SPEAKERS B PHONES TUNING / PRESET STANDBY ENTER TONE MULTl CH + STEREO LISTENING MODE DISPLAY DIGITAL INPUT RT/PTY/TP MEMORY TUNING MODE RETURN SETUP CLEAR DVD VIDEO 1/VCR VIDEO 2 VIDEO 3 TAPE TUNER CD MASTER VOLUME 1, 2 1, 2 iPod photo: If you're using a digital audio connection (coaxial or optical). For example, if you connect your DVD player to DIGITAL IN OPTICAL, you must change...

User Manual
Page 45
...A SPEAKERS B PHONES TUNING / PRESET STANDBY ENTER TONE MULTl CH + STEREO LISTENING MODE DISPLAY DIGITAL INPUT DVD VIDEO 1/VCR VIDEO 2 VIDEO 3 DIMMER MEMORY TUNING MODE RETURN SETUP CLEAR TAPE TUNER CD MASTER VOLUME PHONES DIMMER ON/STANDBY REMOTE MODE RECEIVER DVD TAPE INPUT SELECTOR 1 2 3 C D V1 V2 V3 4 5 6 MD MULTI CH DVD 7 8 9 CDR TAPE TUNER C D +10 0 CLR HDD --/--- STANDBY/ON A SPEAKERS B PHONES Notes: • Always turn down the volume before connecting your headphones. • Speaker sets A and B are turned off while the headphones plug...
...A SPEAKERS B PHONES TUNING / PRESET STANDBY ENTER TONE MULTl CH + STEREO LISTENING MODE DISPLAY DIGITAL INPUT DVD VIDEO 1/VCR VIDEO 2 VIDEO 3 DIMMER MEMORY TUNING MODE RETURN SETUP CLEAR TAPE TUNER CD MASTER VOLUME PHONES DIMMER ON/STANDBY REMOTE MODE RECEIVER DVD TAPE INPUT SELECTOR 1 2 3 C D V1 V2 V3 4 5 6 MD MULTI CH DVD 7 8 9 CDR TAPE TUNER C D +10 0 CLR HDD --/--- STANDBY/ON A SPEAKERS B PHONES Notes: • Always turn down the volume before connecting your headphones. • Speaker sets A and B are turned off while the headphones plug...

User Manual
Page 46
... music. LEVEL+ PLAY MODE DISPLAY OR-EQ L NIGHT CINE FLTR RC-646S OR-EQ Muting the AV Receiver With this function, you can set the AV receiver so that if you can set period. You can enjoy a powerful sound with the speakers included in 10 minute steps. Remote controller OR-EQ Press the remote controller's [OR-EQ] button to Standby. Common Functions-Continued ON/STANDBY REMOTE MODE RECEIVER DVD TAPE INPUT SELECTOR 1 2 3 C D V1 V2 V3 4 5 6 MD MULTI...
... music. LEVEL+ PLAY MODE DISPLAY OR-EQ L NIGHT CINE FLTR RC-646S OR-EQ Muting the AV Receiver With this function, you can set the AV receiver so that if you can set period. You can enjoy a powerful sound with the speakers included in 10 minute steps. Remote controller OR-EQ Press the remote controller's [OR-EQ] button to Standby. Common Functions-Continued ON/STANDBY REMOTE MODE RECEIVER DVD TAPE INPUT SELECTOR 1 2 3 C D V1 V2 V3 4 5 6 MD MULTI...

User Manual
Page 51
... all speaker configurations. LISTENING MODE STEREO SURROUND AUDIO SUBTITLE RANDOM REPEAT TEST TONE CH SEL LEVEL- LEVEL+ PLAY MODE DISPLAY OR-EQ L NIGHT CINE FLTR RC-646S CINE FLTR L NIGHT 4 5 SETUP Repeat step 3 to change the settings. Setup closes. SETUP The Audio Adjust functions are output. ■ Mono (2ch) This setting determines which channel is output. Use it to select the next setting. L+R: Both the left channel is used with a stereo source. Adjusting the Listening Modes ENTER RETURN ON/STANDBY REMOTE MODE RECEIVER DVD TAPE INPUT SELECTOR...
... all speaker configurations. LISTENING MODE STEREO SURROUND AUDIO SUBTITLE RANDOM REPEAT TEST TONE CH SEL LEVEL- LEVEL+ PLAY MODE DISPLAY OR-EQ L NIGHT CINE FLTR RC-646S CINE FLTR L NIGHT 4 5 SETUP Repeat step 3 to change the settings. Setup closes. SETUP The Audio Adjust functions are output. ■ Mono (2ch) This setting determines which channel is output. Use it to select the next setting. L+R: Both the left channel is used with a stereo source. Adjusting the Listening Modes ENTER RETURN ON/STANDBY REMOTE MODE RECEIVER DVD TAPE INPUT SELECTOR...

User Manual
Page 52
... center mix, allowing you use a center speaker. This setting is 3). Adjusting the Listening Modes-Continued PLII Music Mode Settings These settings apply to only 2-channel (stereo) sources. ■ Panorama With this function, you can adjust the width of the sound from 0 to 5 (default is set to Standby. Off: Panorama function off . 52 Higher settings move it backward. If the stereo image feels too wide, or there's too much the front left and right channel output...
... center mix, allowing you use a center speaker. This setting is 3). Adjusting the Listening Modes-Continued PLII Music Mode Settings These settings apply to only 2-channel (stereo) sources. ■ Panorama With this function, you can adjust the width of the sound from 0 to 5 (default is set to Standby. Off: Panorama function off . 52 Higher settings move it backward. If the stereo image feels too wide, or there's too much the front left and right channel output...

User Manual
Page 57
... is used with an analog input signal. 57 Format Dolby Digital DTS PCM Display PCM Normally, the AV receiver detects the signal format automatically. DTS or PCM: The DTS or PCM indicator, depending on your DVD player, you don't do anything for more than 4 seconds, the input selector but- STANDBY/ON A SPEAKERS B PHONES TUNING / PRESET STANDBY ENTER TONE MULTl CH + STEREO LISTENING MODE DISPLAY DIGITAL INPUT RT/PTY/TP MEMORY TUNING MODE RETURN SETUP CLEAR DVD VIDEO 1/VCR VIDEO 2 VIDEO 3 TAPE TUNER CD MASTER VOLUME Correcting Sound and Picture Sync When using...
... is used with an analog input signal. 57 Format Dolby Digital DTS PCM Display PCM Normally, the AV receiver detects the signal format automatically. DTS or PCM: The DTS or PCM indicator, depending on your DVD player, you don't do anything for more than 4 seconds, the input selector but- STANDBY/ON A SPEAKERS B PHONES TUNING / PRESET STANDBY ENTER TONE MULTl CH + STEREO LISTENING MODE DISPLAY DIGITAL INPUT RT/PTY/TP MEMORY TUNING MODE RETURN SETUP CLEAR DVD VIDEO 1/VCR VIDEO 2 VIDEO 3 TAPE TUNER CD MASTER VOLUME Correcting Sound and Picture Sync When using...

User Manual
Page 58
... [VIDEO 1] button, press the [STANDBY/ON] button. If the AV receiver turns off when you need to maximum. On some DVD-Video discs, you set the volume to select an audio format from a menu. • If your speakers and input sources properly. Try selecting another listening mode. • Make sure the speakers are configured correctly (page 55). If you can play DVDs, the default setting is properly plugged into the wall outlet. • Unplug the power cord from the wall...
... [VIDEO 1] button, press the [STANDBY/ON] button. If the AV receiver turns off when you need to maximum. On some DVD-Video discs, you set the volume to select an audio format from a menu. • If your speakers and input sources properly. Try selecting another listening mode. • Make sure the speakers are configured correctly (page 55). If you can play DVDs, the default setting is properly plugged into the wall outlet. • Unplug the power cord from the wall...

User Manual
Page 59
... processed (e.g., output level, sampling rate, or frequency response changed) and the AV receiver doesn't recognize it . • An audio cable may be picking up interference. Turn on speaker set A. • When you may not hear any sound, in which the AV receiver is connected is reduced proportionally. There's no sound with power cords, speaker cables, and so on your player from DTS to PCM, because the AV receiver does not switch formats immediately...
... processed (e.g., output level, sampling rate, or frequency response changed) and the AV receiver doesn't recognize it . • An audio cable may be picking up interference. Turn on speaker set A. • When you may not hear any sound, in which the AV receiver is connected is reduced proportionally. There's no sound with power cords, speaker cables, and so on your player from DTS to PCM, because the AV receiver does not switch formats immediately...

User Manual
Page 60
... wall outlet and connected to work ? • To use the AV receiver's remote controller, point it 's already set to Stereo, unless it toward your amp. • The RI Dock must make sure the correct input is selected. • To prevent signal loops and damage to the AV receiver, input signals are not supported. • Make sure your iPod is turned on the "4. Others The sound changes when I change the language of headphones is connected, the listening mode...
... wall outlet and connected to work ? • To use the AV receiver's remote controller, point it 's already set to Stereo, unless it toward your amp. • The RI Dock must make sure the correct input is selected. • To prevent signal loops and damage to the AV receiver, input signals are not supported. • Make sure your iPod is turned on the "4. Others The sound changes when I change the language of headphones is connected, the listening mode...


