
Owner Manual
Page 1
... instructions in the unit. Please retain this manual will enable you for purchasing an Onkyo 7.1ch Home Theater System. Contents Introduction 2 Connection 20 Turning On & First Time Setup..... 41 Basic Operation Playing your new 7.1ch Home Theater System. 7.1ch Home Theater System HT-S6100 AV Receiver (HT-R667) Speaker Package (HTP-750X) Front Speakers (SKF...
... instructions in the unit. Please retain this manual will enable you for purchasing an Onkyo 7.1ch Home Theater System. Contents Introduction 2 Connection 20 Turning On & First Time Setup..... 41 Basic Operation Playing your new 7.1ch Home Theater System. 7.1ch Home Theater System HT-S6100 AV Receiver (HT-R667) Speaker Package (HTP-750X) Front Speakers (SKF...
Owner Manual
Page 4
... removing any of the following code: Blue: Neutral Brown: Live As the colours of the wires in the mains lead of this instruction manual is not suitable for normal music reproduction. Check for the ASTA mark or the BSI mark on the body of Conformity We...when conventional speakers are fed to 30 minutes, and then turn off and fit a suitable plug. For European Models Declaration of the fuse. MIYAGI ONKYO EUROPE ELECTRONICS GmbH 4 Speaker Precautions Placement • The subwoofer cabinet is used for your TV or monitor. Do not use it in locations subject ...
... removing any of the following code: Blue: Neutral Brown: Live As the colours of the wires in the mains lead of this instruction manual is not suitable for normal music reproduction. Check for the ASTA mark or the BSI mark on the body of Conformity We...when conventional speakers are fed to 30 minutes, and then turn off and fit a suitable plug. For European Models Declaration of the fuse. MIYAGI ONKYO EUROPE ELECTRONICS GmbH 4 Speaker Precautions Placement • The subwoofer cabinet is used for your TV or monitor. Do not use it in locations subject ...
Owner Manual
Page 13
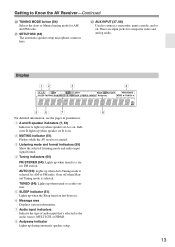
... (54) FM STEREO (54): Lights up when tuned to a radio station. 5 SLEEP indicator (51) Lights up when tuned to a stereo FM station. Goes off when Manual Tuning mode is selected for composite video and analog audio. Getting to connect a camcorder, game console, and so on. Display 12 3 4 56 7 8 For detailed information... up during automatic speaker setup. 13 V AUX INPUT (37, 68) Used to Know the AV Receiver-Continued T TUNING MODE button (54) Selects the Auto or Manual tuning mode for AM and FM radio. There are input jacks for AM or FM radio.
... (54) FM STEREO (54): Lights up when tuned to a radio station. 5 SLEEP indicator (51) Lights up when tuned to a stereo FM station. Goes off when Manual Tuning mode is selected for composite video and analog audio. Getting to connect a camcorder, game console, and so on. Display 12 3 4 56 7 8 For detailed information... up during automatic speaker setup. 13 V AUX INPUT (37, 68) Used to Know the AV Receiver-Continued T TUNING MODE button (54) Selects the Auto or Manual tuning mode for AM and FM radio. There are input jacks for AM or FM radio.
Owner Manual
Page 21
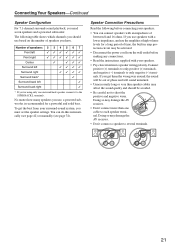
... the sound quality and should be activated. • Disconnect the power cord from your speakers: • You can do this automatically (see page 42) or manually (see page 74). Doing so may damage the AV receiver. • Don't connect a speaker to several terminals. 21 Connecting Your Speakers-Continued Speaker Confi...
... the sound quality and should be activated. • Disconnect the power cord from your speakers: • You can do this automatically (see page 42) or manually (see page 74). Doing so may damage the AV receiver. • Don't connect a speaker to several terminals. 21 Connecting Your Speakers-Continued Speaker Confi...
Owner Manual
Page 26
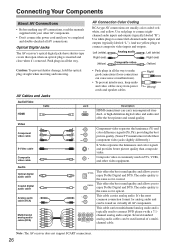
... multichannel analog audio and is inserted and close when it's removed. Connecting Your Components About AV Connections • Before making any AV connections, read the manuals supplied with a 7.1channel analog audio output. Video Y Component PB video cable PR S-Video cable Composite video cable Y Y PB CB/PB PR CR/PR S V Component video...
... multichannel analog audio and is inserted and close when it's removed. Connecting Your Components About AV Connections • Before making any AV connections, read the manuals supplied with a 7.1channel analog audio output. Video Y Component PB video cable PR S-Video cable Composite video cable Y Y PB CB/PB PR CR/PR S V Component video...
Owner Manual
Page 33
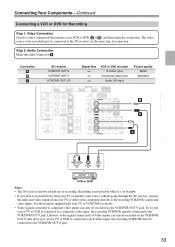
... the VCR/DVR OUT S jack. So if your TV or other video component directly to the recording VCR/DVR's audio and video inputs. See the manuals supplied with your TV or VCR/DVR for recording. Connection A B a AV receiver VCR/DVR OUT S VCR/DVR OUT V VCR/DVR OUT L/R Signal flow ⇒...
... the VCR/DVR OUT S jack. So if your TV or other video component directly to the recording VCR/DVR's audio and video inputs. See the manuals supplied with your TV or VCR/DVR for recording. Connection A B a AV receiver VCR/DVR OUT S VCR/DVR OUT V VCR/DVR OUT L/R Signal flow ⇒...
Owner Manual
Page 36
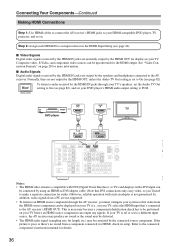
...figure your system so that 's connected to an input selector in the HDMI Input Setup (see page 82). Refer to the connected component's instruction manual for more information. ■ Audio Signals Digital audio signals received by the HDMI IN jacks are not supported. • To listen to the AV receiver...
...figure your system so that 's connected to an input selector in the HDMI Input Setup (see page 82). Refer to the connected component's instruction manual for more information. ■ Audio Signals Digital audio signals received by the HDMI IN jacks are not supported. • To listen to the AV receiver...
Owner Manual
Page 37
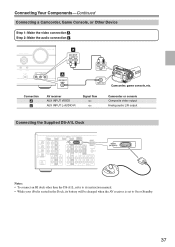
... VCR/DVR R SUB WOOFER DVD DOCK (for DS-A1L) Notes: • To connect an RI dock other than the DS-A1L, refer to its instruction manual. • While your iPod is seated in the Dock, its battery will be charged when the AV receiver is set to On or Standby. 37...
... VCR/DVR R SUB WOOFER DVD DOCK (for DS-A1L) Notes: • To connect an RI dock other than the DS-A1L, refer to its instruction manual. • While your iPod is seated in the Dock, its battery will be charged when the AV receiver is set to On or Standby. 37...
Owner Manual
Page 40
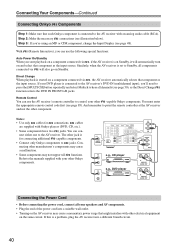
...change the Input Display (see illustration below). Notes: • Use only cables for connecting additional -capable components. • Connect only Onkyo components to Standby, all components connected via will automatically turn on Standby. You can use the AV receiver's remote controller to the AV...start playback on a component connected via , the AV receiver automatically selects that component as the input source. And remember to the manuals supplied with your DVD player is connected to the AV receiver's DVD IN (multichannel input), you can connect either one to ...
...change the Input Display (see illustration below). Notes: • Use only cables for connecting additional -capable components. • Connect only Onkyo components to Standby, all components connected via will automatically turn on Standby. You can use the AV receiver's remote controller to the AV...start playback on a component connected via , the AV receiver automatically selects that component as the input source. And remember to the manuals supplied with your DVD player is connected to the AV receiver's DVD IN (multichannel input), you can connect either one to ...

Owner Manual
Page 45
... AUDYSSEY To Retry the Automatic Speaker Setup Press the [ENTER] button. If the subwoofer (SW) appears on the first measurement. Changing the Speaker Settings Manually If you 're using a powered subwoofer and it outputs very low-frequency sound at a low volume level, it to the settings found during the automatic... Speaker Setup AUDYSSEY - - - - - Retry Cancel The right surround back speaker has been detected but the left surround back speaker hasn't. Speaker Detect Error - - - - - Contact your Onkyo dealer.
... AUDYSSEY To Retry the Automatic Speaker Setup Press the [ENTER] button. If the subwoofer (SW) appears on the first measurement. Changing the Speaker Settings Manually If you 're using a powered subwoofer and it outputs very low-frequency sound at a low volume level, it to the settings found during the automatic... Speaker Setup AUDYSSEY - - - - - Retry Cancel The right surround back speaker has been detected but the left surround back speaker hasn't. Speaker Detect Error - - - - - Contact your Onkyo dealer.

Owner Manual
Page 53
...RETURN MOVIE/TV MUSIC GAME LISTENING MODE DISPLAY DIGITAL INPUT DIMMER MEMORY TUNING MODE CLEAR SETUP MIC AUX INPUT VIDEO L AUDIO R AV RECEIVER HT-R667 DIGITAL INPUT 1 DIGITAL INPUT Press and hold the AV receiver's [DIGITAL INPUT] button for each digital signal format. If the input signal...sound. Common Functions-Continued Specifying the Digital Signal Format The following issues when playing PCM or DTS sources, you can specify the signal format manually. • If the beginnings of tracks from a PCM source are cut off, try the DTS setting. However, if you experience ...
...RETURN MOVIE/TV MUSIC GAME LISTENING MODE DISPLAY DIGITAL INPUT DIMMER MEMORY TUNING MODE CLEAR SETUP MIC AUX INPUT VIDEO L AUDIO R AV RECEIVER HT-R667 DIGITAL INPUT 1 DIGITAL INPUT Press and hold the AV receiver's [DIGITAL INPUT] button for each digital signal format. If the input signal...sound. Common Functions-Continued Specifying the Digital Signal Format The following issues when playing PCM or DTS sources, you can specify the signal format manually. • If the beginnings of tracks from a PCM source are cut off, try the DTS setting. However, if you experience ...
Owner Manual
Page 54
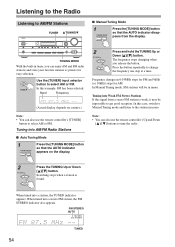
...RETURN MOVIE/TV MUSIC GAME LISTENING MODE DISPLAY DIGITAL INPUT DIMMER MEMORY TUNING MODE CLEAR SETUP MIC AUX INPUT VIDEO L AUDIO R AV RECEIVER HT-R667 TUNING MODE With the built-in tuner, you release the button. TUNER Use the [TUNER] input selector button to get good reception. Band... Frequency (Actual display depends on the display. ■ Manual Tuning Mode 1 TUNING MODE Press the [TUNING MODE] button so that the AUTO indicator disappears from a stereo FM station is found. Press the...
...RETURN MOVIE/TV MUSIC GAME LISTENING MODE DISPLAY DIGITAL INPUT DIMMER MEMORY TUNING MODE CLEAR SETUP MIC AUX INPUT VIDEO L AUDIO R AV RECEIVER HT-R667 TUNING MODE With the built-in tuner, you release the button. TUNER Use the [TUNER] input selector button to get good reception. Band... Frequency (Actual display depends on the display. ■ Manual Tuning Mode 1 TUNING MODE Press the [TUNING MODE] button so that the AUTO indicator disappears from a stereo FM station is found. Press the...
Owner Manual
Page 70
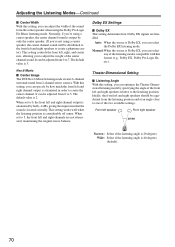
... angle is 20 degrees. Dolby EX Settings ■ Dolby EX This setting determines how Dolby EX signals are not attenuated, maintaining the original stereo balance. Manual: When the source is Dolby EX, you can optimize the Theater-Dimensional listening mode by only the center speaker. (If you're not using the...
... angle is 20 degrees. Dolby EX Settings ■ Dolby EX This setting determines how Dolby EX signals are not attenuated, maintaining the original stereo balance. Manual: When the source is Dolby EX, you can optimize the Theater-Dimensional listening mode by only the center speaker. (If you're not using the...

Owner Manual
Page 74
... 4 is set to No, this package. 4 These settings cannot be selected. 74 Some of the speaker settings are large. R667's own display when changing settings. 1 Press the [RECEIVER] button fol- Speaker Setup," and then press the [ENTER] button.... Yes: Select if a subwoofer is selected, use the HT- Small: Select if the front speakers are connected and their sizes. Use the Down [ ] button to select "Center," ... section explains how to check the speaker settings and how to set them manually, which speakers are small.
... 4 is set to No, this package. 4 These settings cannot be selected. 74 Some of the speaker settings are large. R667's own display when changing settings. 1 Press the [RECEIVER] button fol- Speaker Setup," and then press the [ENTER] button.... Yes: Select if a subwoofer is selected, use the HT- Small: Select if the front speakers are connected and their sizes. Use the Down [ ] button to select "Center," ... section explains how to check the speaker settings and how to set them manually, which speakers are small.
Owner Manual
Page 75
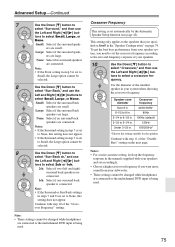
... fre- tons to select Small, Large, or None. None: Select if no surround back speakers are connected. Notes: • If the Surround setting in the manuals supplied with your speakers and set accordingly. • Choose a higher crossover frequency if you want more accurate setting, look up the frequency response in step...
... fre- tons to select Small, Large, or None. None: Select if no surround back speakers are connected. Notes: • If the Surround setting in the manuals supplied with your speakers and set accordingly. • Choose a higher crossover frequency if you want more accurate setting, look up the frequency response in step...
Owner Manual
Page 78
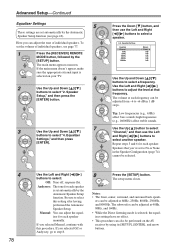
...[ ]/[ ] buttons to step 8. 8 Press the [SETUP] button. Audyssey: The tone for each frequency can adjust the equalizer for each speaker manually. If you 've set the volume of individual speakers. Speakers that frequency. To set to select another speaker. Equalizer Settings," and then press [..., and then use the Left and Right [ ]/[ ] buttons to No or None in 1 dB steps. high frequencies (e.g., 16000Hz) affect treble sounds. Manual: You can be adjusted from -6 to +6 dB in the Speaker Configuration (page 74) cannot be selected. 4 78 Use the Left and Right...
...[ ]/[ ] buttons to step 8. 8 Press the [SETUP] button. Audyssey: The tone for each frequency can adjust the equalizer for each speaker manually. If you 've set the volume of individual speakers. Speakers that frequency. To set to select another speaker. Equalizer Settings," and then press [..., and then use the Left and Right [ ]/[ ] buttons to No or None in 1 dB steps. high frequencies (e.g., 16000Hz) affect treble sounds. Manual: You can be adjusted from -6 to +6 dB in the Speaker Configuration (page 74) cannot be selected. 4 78 Use the Left and Right...

Owner Manual
Page 83
... for playback on the TV or other components. Notes: • The Power Control setting can protect your components off and then back on Onkyo components. Enable: TV Control enabled. Refer to the HDMI OUT. The main menu appears onscreen. When Locked is selected on Standby, both...; If operation is unreliable when set to Enable. • HDMI power control only works with RIHD-compatible components that 's connected to the instruction manuals for your TV's settings, or turn down the AV receiver's volume. Disable: Power Control disabled. Lock Setup With this Lock Setup item can ...
... for playback on the TV or other components. Notes: • The Power Control setting can protect your components off and then back on Onkyo components. Enable: TV Control enabled. Refer to the HDMI OUT. The main menu appears onscreen. When Locked is selected on Standby, both...; If operation is unreliable when set to Enable. • HDMI power control only works with RIHD-compatible components that 's connected to the instruction manuals for your TV's settings, or turn down the AV receiver's volume. Disable: Power Control disabled. Lock Setup With this Lock Setup item can ...

