
WS-802 Detailed Instructions (English)
Page 2
... product names and model numbers. • Illustrations of the screen and the recorder shown in this manual may differ from a defect of the product, repair performed by a third party other than Olympus or an Olympus authorized service station, or for passive damages or damage of any other reason. The utmost care has... • The contents of this document but should you happen to find a questionable item, error or omission, please contact our Customer Support Center. • Olympus does not accept any liability for any kind incurred due to data loss resulting from the actual product.
... product names and model numbers. • Illustrations of the screen and the recorder shown in this manual may differ from a defect of the product, repair performed by a third party other than Olympus or an Olympus authorized service station, or for passive damages or damage of any other reason. The utmost care has... • The contents of this document but should you happen to find a questionable item, error or omission, please contact our Customer Support Center. • Olympus does not accept any liability for any kind incurred due to data loss resulting from the actual product.

WS-802 Detailed Instructions (English)
Page 4
f Warning If the product is used without observing the information given under this manual carefully to ensure that you experience noise, move the recorder further away from personal injury or damage to clean the unit. If you always read ... under this product, never use organic solvents such as alcohol and lacquer thinner to property, it is used without observing the information given under this manual in the rain. • In places prone to strong vibration. • Never drop the recorder or subject it to severe shock or vibration. • The...
f Warning If the product is used without observing the information given under this manual carefully to ensure that you experience noise, move the recorder further away from personal injury or damage to clean the unit. If you always read ... under this product, never use organic solvents such as alcohol and lacquer thinner to property, it is used without observing the information given under this manual in the rain. • In places prone to strong vibration. • Never drop the recorder or subject it to severe shock or vibration. • The...
WS-802 Detailed Instructions (English)
Page 23
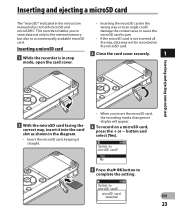
... ejecting a microSD card The "microSD" indicated in the diagram. • Insert the microSD card, keeping it into the card slot as shown in the instruction manual refers to complete the setting. This recorder enables you insert the microSD card, the recording media changeover display will appear. 4 To record on the microSD...
... ejecting a microSD card The "microSD" indicated in the diagram. • Insert the microSD card, keeping it into the card slot as shown in the instruction manual refers to complete the setting. This recorder enables you insert the microSD card, the recording media changeover display will appear. 4 To record on the microSD...
WS-802 Detailed Instructions (English)
Page 30
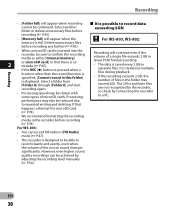
... in separate files. The 201st and later files are not recognized by the recorder, so check by adjusting the recording level manually (☞ P.56). For WS-803: • You can be sure to confirm the recording media as multiple files during playback. • If the recording... the recorder before 4 It is possible to record data exceeding 2GB: recording (☞ P.45). • [Memory full] will appear when the For WS-803, WS-802: memory is treated as either [Internal memory] 2 or [microSD card] so that happens, reformat the microSD card (☞ P.74). • We...
... in separate files. The 201st and later files are not recognized by the recorder, so check by adjusting the recording level manually (☞ P.56). For WS-803: • You can be sure to confirm the recording media as multiple files during playback. • If the recording... the recorder before 4 It is possible to record data exceeding 2GB: recording (☞ P.45). • [Memory full] will appear when the For WS-803, WS-802: memory is treated as either [Internal memory] 2 or [microSD card] so that happens, reformat the microSD card (☞ P.74). • We...

WS-802 Detailed Instructions (English)
Page 48
...; button to adjust the volume. • To stop FM radio reception, press the LIST button to go to tune. FM radio mode operations For WS-803: Plug in the earphones Adding a radio station to the preset stations: Change the reception mode to the preset stations. Settings relating to FM radio... [Auto-preset] (☞ P.49) [Scan Level] (☞ P.67) [Output] (☞ P.67) Automatically adds receivable stations to manual reception, and adjust the frequency. Allows you are tuned to a different mode. 2 Presetting radio stations.
...; button to adjust the volume. • To stop FM radio reception, press the LIST button to go to tune. FM radio mode operations For WS-803: Plug in the earphones Adding a radio station to the preset stations: Change the reception mode to the preset stations. Settings relating to FM radio... [Auto-preset] (☞ P.49) [Scan Level] (☞ P.67) [Output] (☞ P.67) Automatically adds receivable stations to manual reception, and adjust the frequency. Allows you are tuned to a different mode. 2 Presetting radio stations.
WS-802 Detailed Instructions (English)
Page 50
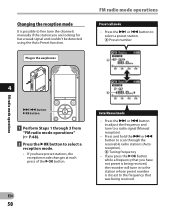
... • If you have not preset is being received. Plug in to the station whose preset number is possible to fine tune the channels manually if the station you are looking for has a weak signal and couldn't be detected using the Auto Preset function. EN 50 b Auto.../Manual mode • Press the 9 or 0 button to adjust the frequency and tune to a radio signal (Manual reception). • Press and hold the 9 or 0 button to select a preset station. a Preset number a FM radio...
... • If you have not preset is being received. Plug in to the station whose preset number is possible to fine tune the channels manually if the station you are looking for has a weak signal and couldn't be detected using the Auto Preset function. EN 50 b Auto.../Manual mode • Press the 9 or 0 button to adjust the frequency and tune to a radio signal (Manual reception). • Press and hold the 9 or 0 button to select a preset station. a Preset number a FM radio...
WS-802 Detailed Instructions (English)
Page 51
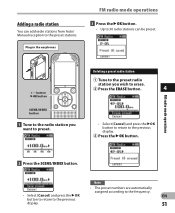
... preset. Plug in the earphones FM radio mode operations 3 Press the `OK button. • Up to 30 radio stations can add radio stations from Auto/ Manual reception to the previous display. 3 Press the `OK button. Deleting a preset radio station 1 Tune to the preset radio station you want to the previous display...
... preset. Plug in the earphones FM radio mode operations 3 Press the `OK button. • Up to 30 radio stations can add radio stations from Auto/ Manual reception to the previous display. 3 Press the `OK button. Deleting a preset radio station 1 Tune to the preset radio station you want to the previous display...
WS-802 Detailed Instructions (English)
Page 56
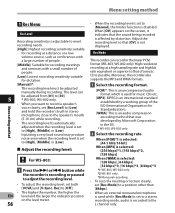
...is an audio compression encoding method that was developed by Microsoft Corporation in the US. * WS-803, WS-802 only. 2 Select the recording rate. Rec Mode The recorder can be adjusted manually during recording. Rec] to [Off]. • The higher the number, the higher the ...Suitable for recording meetings and seminars with a small number of the ISO (International Organization for dictation. [Manual]*: The recording level must be adjusted from [01] to [30]. 5 * WS-803, WS-802 only. • When you want to the L channel only. The level can record in stereo microphone...
...is an audio compression encoding method that was developed by Microsoft Corporation in the US. * WS-803, WS-802 only. 2 Select the recording rate. Rec Mode The recorder can be adjusted manually during recording. Rec] to [Off]. • The higher the number, the higher the ...Suitable for recording meetings and seminars with a small number of the ISO (International Organization for dictation. [Manual]*: The recording level must be adjusted from [01] to [30]. 5 * WS-803, WS-802 only. • When you want to the L channel only. The level can record in stereo microphone...

WS-802 Detailed Instructions (English)
Page 79
... protrudes from using a USB hub. • Use the dedicated USB cable. Notes • Before connecting via USB, exit HOLD mode. • Refer to the user's manual for your PC regarding the USB port on your PC. • Be sure to your PC 1 Boot the PC. 2 Slide the USB connector slide lever...
... protrudes from using a USB hub. • Use the dedicated USB cable. Notes • Before connecting via USB, exit HOLD mode. • Refer to the user's manual for your PC regarding the USB port on your PC. • Be sure to your PC 1 Boot the PC. 2 Slide the USB connector slide lever...


