VN-5200PC Instructions (English)
Page 1
... device Complies with Part 15 of Conformity Model Number: VN-5200PC/VN-3200PC Trade Name: DIGITAL VOICE RECORDER Responsible Party: OLYMPUS IMAGING AMERICA INC. Tested To Comply With FCC Standards FOR HOME OR OFFICE USE Canadian RFI: This digital apparatus does not exceed the Class B limits for purchasing an Olympus Digital Voice Recorder. U1-BS0175-01 AP0808 Please read these instructions for...
... device Complies with Part 15 of Conformity Model Number: VN-5200PC/VN-3200PC Trade Name: DIGITAL VOICE RECORDER Responsible Party: OLYMPUS IMAGING AMERICA INC. Tested To Comply With FCC Standards FOR HOME OR OFFICE USE Canadian RFI: This digital apparatus does not exceed the Class B limits for purchasing an Olympus Digital Voice Recorder. U1-BS0175-01 AP0808 Please read these instructions for...
VN-5200PC Instructions (English)
Page 2
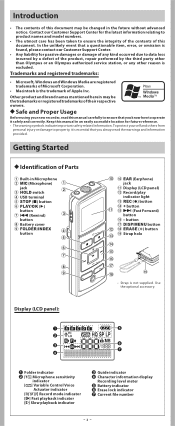
... 5 2 3 6 7 4 1 Folder indicator 2 [ ] Microphone sensitivity indicator [ ] Variable Control Voice Actuator indicator [ ] Record mode indicator [K] Fast playback indicator [J] Slow playback indicator 3 Guide indicator 4 Character information display Recording level meter 5 Battery indicator 6 Erase lock indicator 7 Current file number -2- Contact our Customer Support Center... loss incurred by a defect of the product, repair performed by the third party other than Olympus or an Olympus authorized service station, or any other reason is essential that you know how to ensure the ...
... 5 2 3 6 7 4 1 Folder indicator 2 [ ] Microphone sensitivity indicator [ ] Variable Control Voice Actuator indicator [ ] Record mode indicator [K] Fast playback indicator [J] Slow playback indicator 3 Guide indicator 4 Character information display Recording level meter 5 Battery indicator 6 Erase lock indicator 7 Current file number -2- Contact our Customer Support Center... loss incurred by a defect of the product, repair performed by the third party other than Olympus or an Olympus authorized service station, or any other reason is essential that you know how to ensure the ...
VN-5200PC Instructions (English)
Page 3
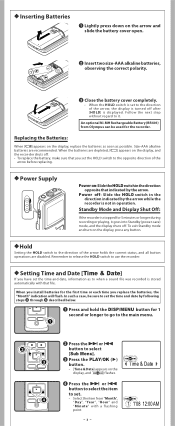
... and turn on the display, and [ ] flashes. 4 Press the 9 or 0 button to select the item to set. • Select the item from Olympus can be sure to set the time and date by following steps 4 through 6 described below. 1 Press and hold the DISP/MENU button for 5 minutes or...arrow before replacing. Replacing the Batteries: When [N] appears on : Slide the HOLD switch in the direction opposite that indicated by the arrow while the recorder is displayed. Size-AAA alkaline batteries are disabled. h Power Supply Power on the display, replace the batteries as soon as to the direction of...
... and turn on the display, and [ ] flashes. 4 Press the 9 or 0 button to select the item to set. • Select the item from Olympus can be sure to set the time and date by following steps 4 through 6 described below. 1 Press and hold the DISP/MENU button for 5 minutes or...arrow before replacing. Replacing the Batteries: When [N] appears on : Slide the HOLD switch in the direction opposite that indicated by the arrow while the recorder is displayed. Size-AAA alkaline batteries are disabled. h Power Supply Power on the display, replace the batteries as soon as to the direction of...
VN-5200PC Instructions (English)
Page 4
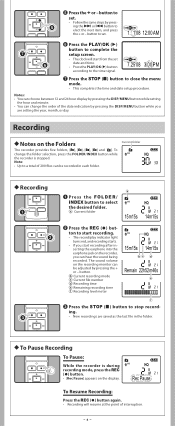
...button according to the time signal. 7.25'08 3:00 PM 7 Press the STOP (4) button to a total of 200 files can hear the sound being recorded. Notes: • You can choose between 12 and 24 hour display by pressing the DISP/MENU button while setting the hour and minute. • .... -4- button. a Current folder a 15m15s 14m15s 2 Press the REC (s) button to elect the next item, and press the + or - h To Pause Recording To Pause: While the recorder is stopped. button to set. 1. 1'08 12:00AM 6 Press the PLAY/OK ( `) button to complete the setup screen. • The clock will resume...
...button according to the time signal. 7.25'08 3:00 PM 7 Press the STOP (4) button to a total of 200 files can hear the sound being recorded. Notes: • You can choose between 12 and 24 hour display by pressing the DISP/MENU button while setting the hour and minute. • .... -4- button. a Current folder a 15m15s 14m15s 2 Press the REC (s) button to elect the next item, and press the + or - h To Pause Recording To Pause: While the recorder is stopped. button to set. 1. 1'08 12:00AM 6 Press the PLAY/OK ( `) button to complete the setup screen. • The clock will resume...
VN-5200PC Instructions (English)
Page 5
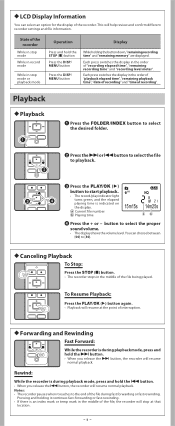
... or fast rewinding. To Resume Playback: Press the PLAY/OK (`) button again. • Playback will resume normal playback. Rewind: While the recorder is during playback mode, press and hold the STOP (4) button Press the DISP/ MENU button Press the DISP/ MENU button While holding it... a Current file number b Playing time 15m15s 14m25s ab 4 Press the + or - h Canceling Playback To Stop: Press the STOP (4) button. • The recorder stops in the order of "playback elapsed time", "remaining playback time", "date of the file during playback mode, press and hold the 9 button. • When...
... or fast rewinding. To Resume Playback: Press the PLAY/OK (`) button again. • Playback will resume normal playback. Rewind: While the recorder is during playback mode, press and hold the STOP (4) button Press the DISP/ MENU button Press the DISP/ MENU button While holding it... a Current file number b Playing time 15m15s 14m25s ab 4 Press the + or - h Canceling Playback To Stop: Press the STOP (4) button. • The recorder stops in the order of "playback elapsed time", "remaining playback time", "date of the file during playback mode, press and hold the 9 button. • When...
VN-5200PC Instructions (English)
Page 6
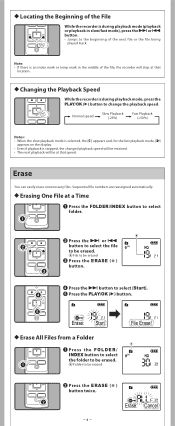
... ERASE (s ) button. 4 Press the 9 button to select [Start]. 5 Press the PLAY/OK (`) button. h Locating the Beginning of the File While the recorder is during playback mode, press the PLAY/OK (`) button to change the playback speed. Erase You can easily erase unnecessary files. a File to be erased... the middle of the next file or the file being played back. Sequential file numbers are reassigned automatically. h Changing the Playback Speed While the recorder is an index mark or temp mark in slow/fast mode), press the 9 or 0 button. • Jumps to be erased. h Erasing...
... ERASE (s ) button. 4 Press the 9 button to select [Start]. 5 Press the PLAY/OK (`) button. h Locating the Beginning of the File While the recorder is during playback mode, press the PLAY/OK (`) button to change the playback speed. Erase You can easily erase unnecessary files. a File to be erased... the middle of the next file or the file being played back. Sequential file numbers are reassigned automatically. h Changing the Playback Speed While the recorder is an index mark or temp mark in slow/fast mode), press the 9 or 0 button. • Jumps to be erased. h Erasing...
VN-5200PC Instructions (English)
Page 7
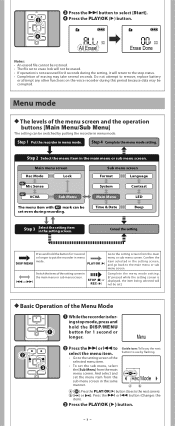
...displayed, the item being selected will not be set even during recording. 3 Press the 9 button to Guide icon: Tells you... may take several seconds. Step 1 Put the recorder in the setting screen. Main menu screen Rec Mode...ab a [ ]: Press the PLAY/OK (`) button (Goes to put the recorder in menu mode. Erase Done Notes: • An erased file cannot be...set .) h Basic Operation of the Menu Mode 1 While the recorder is not executed for 1 second or longer. Cancel the setting. ...menu screen. button to use by putting the recorder in the same manner. Step 4 Complete the menu ...
...displayed, the item being selected will not be set even during recording. 3 Press the 9 button to Guide icon: Tells you... may take several seconds. Step 1 Put the recorder in the setting screen. Main menu screen Rec Mode...ab a [ ]: Press the PLAY/OK (`) button (Goes to put the recorder in menu mode. Erase Done Notes: • An erased file cannot be...set .) h Basic Operation of the Menu Mode 1 While the recorder is not executed for 1 second or longer. Cancel the setting. ...menu screen. button to use by putting the recorder in the same manner. Step 4 Complete the menu ...
VN-5200PC Instructions (English)
Page 8
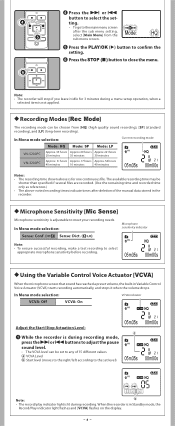
... to the set level) 05m35s a 05m35s 00m00s 00m00s Note: b • The record/play indicator light is lit during a menu setup operation, when a selected item is not applied. In Menu mode selection: VN-5200PC Mode: HQ Mode: SP Mode: LP Approx. 35 hours Approx.69 hours Approx... VCVA: Off VCVA: On Adjust the Start/Stop Actuation Level: 1 While the recorder is in Variable Control Voice Actuator (VCVA) starts recording automatically, and stops it idle for one continuous file. When the recorder is during recording mode, press the 9 or 0 buttons to adjust the pause sound level. &#...
... to the set level) 05m35s a 05m35s 00m00s 00m00s Note: b • The record/play indicator light is lit during a menu setup operation, when a selected item is not applied. In Menu mode selection: VN-5200PC Mode: HQ Mode: SP Mode: LP Approx. 35 hours Approx.69 hours Approx... VCVA: Off VCVA: On Adjust the Start/Stop Actuation Level: 1 While the recorder is in Variable Control Voice Actuator (VCVA) starts recording automatically, and stops it idle for one continuous file. When the recorder is during recording mode, press the 9 or 0 buttons to adjust the pause sound level. &#...
VN-5200PC Instructions (English)
Page 9
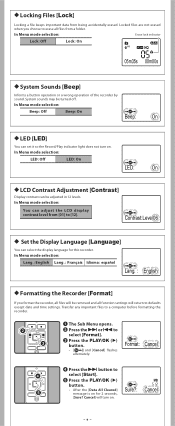
... You can select the display language for 2 seconds, [Sure? Contrast:Level06 h Set the Display Language [Language] You can set it so the Record/Play indicator light does not turn on . Format: Cancel 4 Press the 9 button to erase all function settings will turn on . In Menu ... selection: Erase lock indicator Lock: Off Lock: On 05m35s 00m00s h System Sounds [Beep] Informs a button operation or a wrong operation of the recorder by sound. In Menu mode selection: You can be turned off. h Locking Files [Lock] Locking a file keeps important data from [01] ...
... You can select the display language for 2 seconds, [Sure? Contrast:Level06 h Set the Display Language [Language] You can set it so the Record/Play indicator light does not turn on . Format: Cancel 4 Press the 9 button to erase all function settings will turn on . In Menu ... selection: Erase lock indicator Lock: Off Lock: On 05m35s 00m00s h System Sounds [Beep] Informs a button operation or a wrong operation of the recorder by sound. In Menu mode selection: You can be turned off. h Locking Files [Lock] Locking a file keeps important data from [01] ...
VN-5200PC Instructions (English)
Page 10
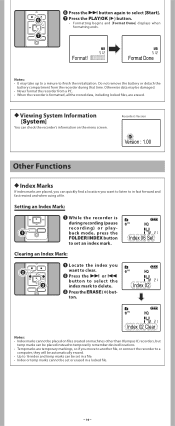
...8226; Formatting begins and [Format Done] displays when formatting ends. h Viewing System Information [System] You can check the recorder's information on machines other than Olympus IC recorders, but temp marks can be placed instead to temporarily remember desired locations. • Temp marks are temporary markings, so ...index marks are erased. Do not remove the battery or detach the battery compartment from a PC. • When the recorder is during that time. Setting an Index Mark: 1 While the recorder is formatted, all the stored data, including locked files, are placed, you can be ...
...8226; Formatting begins and [Format Done] displays when formatting ends. h Viewing System Information [System] You can check the recorder's information on machines other than Olympus IC recorders, but temp marks can be placed instead to temporarily remember desired locations. • Temp marks are temporary markings, so ...index marks are erased. Do not remove the battery or detach the battery compartment from a PC. • When the recorder is during that time. Setting an Index Mark: 1 While the recorder is formatted, all the stored data, including locked files, are placed, you can be ...

VN-5200PC Instructions (English)
Page 11
... to a PC USB port or USB hub. • Once [Remote] is named as inside a closed automobile under the operational warranty. Keep this recorder will be destroyed. • Refer to operate it as an external memory for future reference. • The warning symbols indicate important safety related informa tion. i.e.: VN-5200PC: VN_520001.WMA VN-3200PC: VN_320001...
... to a PC USB port or USB hub. • Once [Remote] is named as inside a closed automobile under the operational warranty. Keep this recorder will be destroyed. • Refer to operate it as an external memory for future reference. • The warning symbols indicate important safety related informa tion. i.e.: VN-5200PC: VN_520001.WMA VN-3200PC: VN_320001...
VN-5200PC Instructions (English)
Page 12
... SQ mode: 200 to 7,000 Hz LP mode: 200 to 3,000 Hz Recording time: VN-5200PC: 512 MB HQ mode: Approx. 35 hours 20 minutes SP mode: Approx. 69 hours 35 minutes LP mode: Approx. 221 hours 30 minutes VN-3200PC: 128 MB HQ mode: Approx. 8 hours 40 minutes SP mode: Approx. 17 hours... according to copyright law. • Specifications and design are for your dealer or local Olympus representative for improvement of children. • If you experience noise, move to another place, or move the recorder further away from the speaker while playing back. If you notice anything unusual when using ...
... SQ mode: 200 to 7,000 Hz LP mode: 200 to 3,000 Hz Recording time: VN-5200PC: 512 MB HQ mode: Approx. 35 hours 20 minutes SP mode: Approx. 69 hours 35 minutes LP mode: Approx. 221 hours 30 minutes VN-3200PC: 128 MB HQ mode: Approx. 8 hours 40 minutes SP mode: Approx. 17 hours... according to copyright law. • Specifications and design are for your dealer or local Olympus representative for improvement of children. • If you experience noise, move to another place, or move the recorder further away from the speaker while playing back. If you notice anything unusual when using ...


