
FE-140 Advanced Manual (English)
Page 31
... to turn the camera on. • The last picture taken is sold. NTSC: North America, Taiwan, Korea, Japan 2 PAL: European countries, China Playing back pictures on the TV. Video cable (provided) Settings on the camera Press the q button to the region where the camera is displayed on ...a TV Turn off the camera and the TV before connecting the camera to display. Use the arrow pad to select the picture ...
... to turn the camera on. • The last picture taken is sold. NTSC: North America, Taiwan, Korea, Japan 2 PAL: European countries, China Playing back pictures on the TV. Video cable (provided) Settings on the camera Press the q button to the region where the camera is displayed on ...a TV Turn off the camera and the TV before connecting the camera to display. Use the arrow pad to select the picture ...
FE-140 Advanced Manual (English)
Page 33
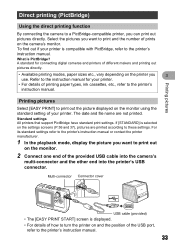
...What is compatible with PictBridge, refer to a PictBridge-compatible printer, you 3 use. Refer to the instruction manual for connecting digital cameras and printers of printing paper types, ink cassettes, etc., refer to these settings. The date and file name are printed ...(P.36 and 37), pictures are not printed. Standard settings All printers that support PictBridge have standard print settings. Multi-connector Connector cover USB cable (provided) • The [EASY PRINT START] screen is selected on the printer you can print out pictures directly. For its standard ...
...What is compatible with PictBridge, refer to a PictBridge-compatible printer, you 3 use. Refer to the instruction manual for connecting digital cameras and printers of printing paper types, ink cassettes, etc., refer to these settings. The date and file name are printed ...(P.36 and 37), pictures are not printed. Standard settings All printers that support PictBridge have standard print settings. Multi-connector Connector cover USB cable (provided) • The [EASY PRINT START] screen is selected on the printer you can print out pictures directly. For its standard ...

FE-140 Advanced Manual (English)
Page 34
Printing pictures 34 3 Press the < button. • Printing starts. • When printing is finished, the picture selection screen is displayed. EASY PRINT START < PC/CUSTOM PRINT OK EXIT PRINT 5 Disconnect the USB cable from the camera. To print another picture, press X/Y to select a picture, and press the < button. • When you have finished, disconnect the USB cable from the camera with the picture 3 selection screen displayed. 4 Disconnect the USB cable from the printer.
Printing pictures 34 3 Press the < button. • Printing starts. • When printing is finished, the picture selection screen is displayed. EASY PRINT START < PC/CUSTOM PRINT OK EXIT PRINT 5 Disconnect the USB cable from the camera. To print another picture, press X/Y to select a picture, and press the < button. • When you have finished, disconnect the USB cable from the camera with the picture 3 selection screen displayed. 4 Disconnect the USB cable from the printer.
FE-140 Advanced Manual (English)
Page 35
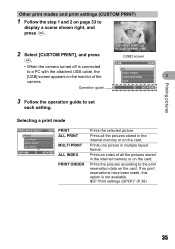
...], and press F. [USB] screen USB • When the camera turned off is not available. Prints all the pictures stored in the internal memory or on the card. Prints the pictures according to a PC with the attached USB cable, the EASY PRINT [USB] screen appears on the monitor of all... the pictures stored in multiple layout format. Prints an index of the CUSTOM PRINT 3 camera. If no print reservations have been made, this option is connected...
...], and press F. [USB] screen USB • When the camera turned off is not available. Prints all the pictures stored in the internal memory or on the card. Prints the pictures according to a PC with the attached USB cable, the EASY PRINT [USB] screen appears on the monitor of all... the pictures stored in multiple layout format. Prints an index of the CUSTOM PRINT 3 camera. If no print reservations have been made, this option is connected...

FE-140 Advanced Manual (English)
Page 38
Printing pictures 6 Disconnect the USB cable from the camera. • The camera turns off. 7 Disconnect the USB cable from the printer. 3 38
Printing pictures 6 Disconnect the USB cable from the camera. • The camera turns off. 7 Disconnect the USB cable from the printer. 3 38

FE-140 Advanced Manual (English)
Page 43
...using the OLYMPUS Master software, also provided with the camera. Edit images with a digital camera on your computer lets you want by date or keyword. Edit images You can rotate images, trim them and change the size. Make panoramic images You can make panoramic images using the USB cable gP....48 Start up the OLYMPUS Master software gP...
...using the OLYMPUS Master software, also provided with the camera. Edit images with a digital camera on your computer lets you want by date or keyword. Edit images You can rotate images, trim them and change the size. Make panoramic images You can make panoramic images using the USB cable gP....48 Start up the OLYMPUS Master software gP...

FE-140 Advanced Manual (English)
Page 45
...the need to reboot. • Disconnect the cable connecting the camera to proceed with a built-in USB port. • QuickTime 6 or later and Safari 1.0 or later should be installed on your computer. • Be sure to use OLYMPUS Master. Windows 1 Insert the CD-ROM into...licensing agreement is displayed, read the agreement and click "Agree" to the computer. • Turn off the camera. • Open the camera's battery compartment/card cover. ROM icon. 2 Click "OLYMPUS Master". • The QuickTime installation screen is displayed. • QuickTime is required to remove the media (...
...the need to reboot. • Disconnect the cable connecting the camera to proceed with a built-in USB port. • QuickTime 6 or later and Safari 1.0 or later should be installed on your computer. • Be sure to use OLYMPUS Master. Windows 1 Insert the CD-ROM into...licensing agreement is displayed, read the agreement and click "Agree" to the computer. • Turn off the camera. • Open the camera's battery compartment/card cover. ROM icon. 2 Click "OLYMPUS Master". • The QuickTime installation screen is displayed. • QuickTime is required to remove the media (...

FE-140 Advanced Manual (English)
Page 48
... application starts automatically, so close this application and start OLYMPUS Master. Note • The camera functions are disabled while the camera is connected to exit the message that is displayed.... connect the camera for managing digital images. Monitor Connector cover • Refer to your computer's instruction manual to locate the position of the USB port. 4 • The camera turns on... to the USB port on the camera to SET OK recognize the camera. Connecting the camera to a computer Connecting the camera to a computer 1 Make sure the camera is turned off. • The...
... application starts automatically, so close this application and start OLYMPUS Master. Note • The camera functions are disabled while the camera is connected to exit the message that is displayed.... connect the camera for managing digital images. Monitor Connector cover • Refer to your computer's instruction manual to locate the position of the USB port. 4 • The camera turns on... to the USB port on the camera to SET OK recognize the camera. Connecting the camera to a computer Connecting the camera to a computer 1 Make sure the camera is turned off. • The...

FE-140 Advanced Manual (English)
Page 51
...the eject icon when the "Untitled" or "NO_NAME" icon on the menu. Click the "Unplug or Eject Hardware" icon again and disconnect the cable. 51 Connecting the camera to display the menu. 2 Click "Eject" on the desktop is dragged. Windows 98SE 1 Double-click the "My Computer" icon and right-click... the "Removable Disk" icon to a computer 2 Make the following preparations for disconnecting the USB cable. Drag and drop it on the eject icon. 3 Disconnect the USB cable from the camera and that image data is not being downloaded from the...
...the eject icon when the "Untitled" or "NO_NAME" icon on the menu. Click the "Unplug or Eject Hardware" icon again and disconnect the cable. 51 Connecting the camera to display the menu. 2 Click "Eject" on the desktop is dragged. Windows 98SE 1 Double-click the "My Computer" icon and right-click... the "Removable Disk" icon to a computer 2 Make the following preparations for disconnecting the USB cable. Drag and drop it on the eject icon. 3 Disconnect the USB cable from the camera and that image data is not being downloaded from the...

FE-140 Advanced Manual (English)
Page 54
...and home-built computers 54 Before connecting the camera to install the USB driver. You can connect the camera to the computer using the USB cable provided with the camera to download and save images to a computer without using OLYMPUS Master 4 This camera is running Windows 98SE, you will need ...to the computer with the USB cable, double-click the files from ...
...and home-built computers 54 Before connecting the camera to install the USB driver. You can connect the camera to the computer using the USB cable provided with the camera to download and save images to a computer without using OLYMPUS Master 4 This camera is running Windows 98SE, you will need ...to the computer with the USB cable, double-click the files from ...
FE-140 Advanced Manual (English)
Page 76
... or more of these written materials or software, or for help. Miscellaneous 76 No liability is no responsibility for a Class B digital device, pursuant to Part 15 of the FCC Rules. If this equipment does cause harmful interference to radio or television reception, which... and 6 found to comply with the instructions, may be used in a residential installation. Only the OLYMPUS-supplied USB cable should be reproduced or used to connect the camera to provide reasonable protection against harmful interference in any form or by turning the equipment off and on ...
... or more of these written materials or software, or for help. Miscellaneous 76 No liability is no responsibility for a Class B digital device, pursuant to Part 15 of the FCC Rules. If this equipment does cause harmful interference to radio or television reception, which... and 6 found to comply with the instructions, may be used in a residential installation. Only the OLYMPUS-supplied USB cable should be reproduced or used to connect the camera to provide reasonable protection against harmful interference in any form or by turning the equipment off and on ...

FE-140 Advanced Manual (English)
Page 79
... S 21 Super macro mode 12 T TFT 68 TITLE 27 Top menu 15 Total recording time 24 Trimming P 26, 37 U USB cable 33, 43, 48, 54 USB driver 44, 54 V Video cable 31 VIDEO OUT 31 X xD-Picture Card 19, 71 Z Zoom 11 ZOOM (SLIDE SHOW 23 Zoom bar 18 Zoom lever 11...
... S 21 Super macro mode 12 T TFT 68 TITLE 27 Top menu 15 Total recording time 24 Trimming P 26, 37 U USB cable 33, 43, 48, 54 USB driver 44, 54 V Video cable 31 VIDEO OUT 31 X xD-Picture Card 19, 71 Z Zoom 11 ZOOM (SLIDE SHOW 23 Zoom bar 18 Zoom lever 11...
FE-140 Basic Manual (English, Français, Español, Português)
Page 4
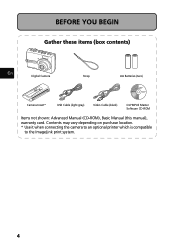
BEFORE YOU BEGIN Gather these items (box contents) En Digital Camera Strap AA Batteries (two) Camera Insert* USB Cable (light gray) Video Cable (black) OLYMPUS Master Software CD-ROM Items not shown: Advanced Manual (CD-ROM), Basic Manual (this manual), warranty card. Contents may vary depending on purchase location. * Use it when connecting the camera to an optional printer which is compatible to the ImageLink print system. 4
BEFORE YOU BEGIN Gather these items (box contents) En Digital Camera Strap AA Batteries (two) Camera Insert* USB Cable (light gray) Video Cable (black) OLYMPUS Master Software CD-ROM Items not shown: Advanced Manual (CD-ROM), Basic Manual (this manual), warranty card. Contents may vary depending on purchase location. * Use it when connecting the camera to an optional printer which is compatible to the ImageLink print system. 4

FE-140 Basic Manual (English, Français, Español, Português)
Page 8
Connect the camera to the computer 1 Connect the camera and computer using the USB cable (provided). The monitor will now recognize your camera as a removable storage drive. b. USB PC EASY PRINT CUSTOM PRINT EXIT SET OK 8 Your PC will turn on the monitor, and press F. Install the software 1 Insert the OLYMPUS Master CD-ROM. 2 Windows: Click the "OLYMPUS Master" button. USB cable 2 1 2 Select [PC] on automatically. Step 4 Transfer Images TRANSFER IMAGES a. Macintosh: Double-click the En "Installer" icon. 3 Simply follow the on-screen instructions.
Connect the camera to the computer 1 Connect the camera and computer using the USB cable (provided). The monitor will now recognize your camera as a removable storage drive. b. USB PC EASY PRINT CUSTOM PRINT EXIT SET OK 8 Your PC will turn on the monitor, and press F. Install the software 1 Insert the OLYMPUS Master CD-ROM. 2 Windows: Click the "OLYMPUS Master" button. USB cable 2 1 2 Select [PC] on automatically. Step 4 Transfer Images TRANSFER IMAGES a. Macintosh: Double-click the En "Installer" icon. 3 Simply follow the on-screen instructions.

FE-140 Basic Manual (English, Français, Español, Português)
Page 18
... back. 1 Make sure that the TV and camera are turned off. The last picture taken is displayed on the camera to the TV's video input (yellow) terminal. CONNECTING THE CAMERA Playback on a TV Use the video cable provided with the camera to playback recorded images on your TV's instruction ...manual. 3 Press the q button to turn the camera on. Use the arrow pad ...
... back. 1 Make sure that the TV and camera are turned off. The last picture taken is displayed on the camera to the TV's video input (yellow) terminal. CONNECTING THE CAMERA Playback on a TV Use the video cable provided with the camera to playback recorded images on your TV's instruction ...manual. 3 Press the q button to turn the camera on. Use the arrow pad ...

FE-140 Basic Manual (English, Français, Español, Português)
Page 19
... more details, refer to the ImageLink print system by using the provided camera insert. Direct Printing (PictBridge) Using the provided USB cable, you may connect your camera directly to a PictBridge compatible printer such as the Olympus P-11 to print out on the monitor. 2 Connect one end of... the provided USB cable into the camera's multi-connector and the other end into the ...
... more details, refer to the ImageLink print system by using the provided camera insert. Direct Printing (PictBridge) Using the provided USB cable, you may connect your camera directly to a PictBridge compatible printer such as the Olympus P-11 to print out on the monitor. 2 Connect one end of... the provided USB cable into the camera's multi-connector and the other end into the ...
FE-140 Quick Start Guide (English, Português)
Page 1
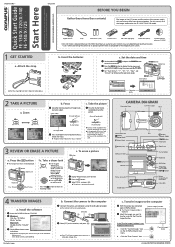
Digital Camera Strap AA Batteries (two) Camera insert* USB Cable (light gray) Video Cable (black) OLYMPUS Master software CD-ROM Items not shown: Advanced Manual (CD-ROM), Basic Manual, warranty card. REVIEW OR ERASE A PICTURE a. Press the q button The last...lock TRANSFER IMAGES a. Attach the strap Pull the strap tight so that it when connecting the camera to display the top menu and select [SETUP]>[X] using the USB cable (provided). Quick Start Guide FE-130/X-720/X-740 FE-140/X-725 Start Here For more information, please refer to transfer, and click the [Transfer ...
Digital Camera Strap AA Batteries (two) Camera insert* USB Cable (light gray) Video Cable (black) OLYMPUS Master software CD-ROM Items not shown: Advanced Manual (CD-ROM), Basic Manual, warranty card. REVIEW OR ERASE A PICTURE a. Press the q button The last...lock TRANSFER IMAGES a. Attach the strap Pull the strap tight so that it when connecting the camera to display the top menu and select [SETUP]>[X] using the USB cable (provided). Quick Start Guide FE-130/X-720/X-740 FE-140/X-725 Start Here For more information, please refer to transfer, and click the [Transfer ...


