
DM-620 Detailed Instructions (English)
Page 1
DIGITAL VOICE RECORDER DETAILED INSTRUCTIONS Thank you test the record function and volume before use. Please read these instructions for future reference. Register your product on www.olympus-consumer.com/register and get additional benefits from Olympus! To ensure successful recordings, we recommend that you for purchasing an Olympus Digital Voice Recorder. Keep the instructions handy for information about using the product correctly and safely. EN
DIGITAL VOICE RECORDER DETAILED INSTRUCTIONS Thank you test the record function and volume before use. Please read these instructions for future reference. Register your product on www.olympus-consumer.com/register and get additional benefits from Olympus! To ensure successful recordings, we recommend that you for purchasing an Olympus Digital Voice Recorder. Keep the instructions handy for information about using the product correctly and safely. EN
DM-620 Detailed Instructions (English)
Page 2
... our Customer Support Center for the latest information relating to product names and model numbers. • The illustration of the screen and the recorder shown in the future without advanced notice. Trademarks and registered trademarks • IBM and PC/AT are the trademarks or registered trademarks of ...utmost care has been taken to data loss incurred by a defect of the product, repair performed by the third party other than Olympus or an Olympus authorized service station, or any other reason is excluded. Introduction • The contents of this document may be changed in this ...
... our Customer Support Center for the latest information relating to product names and model numbers. • The illustration of the screen and the recorder shown in the future without advanced notice. Trademarks and registered trademarks • IBM and PC/AT are the trademarks or registered trademarks of ...utmost care has been taken to data loss incurred by a defect of the product, repair performed by the third party other than Olympus or an Olympus authorized service station, or any other reason is excluded. Introduction • The contents of this document may be changed in this ...
DM-620 Detailed Instructions (English)
Page 3
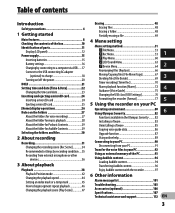
...About the folder for Audible Contents 29 Selecting the folders and files 30 2 About recording Recording 31 Changing the recording scene [Rec Scene 34 Recommended settings by recording condition ....35 Recording from your PC 92 Using as external memory of parts 11 Display (LCD panel 12... Ejecting a microSD card 25 [Home] display operations 26 Notes on your PC 6 Operating environment 80 Using Olympus Sonority 82 Functions available in the Olympus Sonority .........82 Installing software 83 Uninstalling software 85 Copying voice guide data 86 Upgrade function 87 Using online help...
...About the folder for Audible Contents 29 Selecting the folders and files 30 2 About recording Recording 31 Changing the recording scene [Rec Scene 34 Recommended settings by recording condition ....35 Recording from your PC 92 Using as external memory of parts 11 Display (LCD panel 12... Ejecting a microSD card 25 [Home] display operations 26 Notes on your PC 6 Operating environment 80 Using Olympus Sonority 82 Functions available in the Olympus Sonority .........82 Installing software 83 Uninstalling software 85 Copying voice guide data 86 Upgrade function 87 Using online help...

DM-620 Detailed Instructions (English)
Page 4
... game, loud speakers, large monitor unit, TV/radio tower, or transmission towers. In such cases, turn the recorder off and on again before further operation. • Avoid recording or playing back near other wireless equipment, as they may result. To protect yourself and others from such equipment..... • In places prone to strong vibrations. • Never drop the recorder or subject it to severe shocks or vibrations. • The recorder may result. Keep this product, never leave the recorder in the places listed below, no matter if in an easily accessible location for...
... game, loud speakers, large monitor unit, TV/radio tower, or transmission towers. In such cases, turn the recorder off and on again before further operation. • Avoid recording or playing back near other wireless equipment, as they may result. To protect yourself and others from such equipment..... • In places prone to strong vibrations. • Never drop the recorder or subject it to severe shocks or vibrations. • The recorder may result. Keep this product, never leave the recorder in the places listed below, no matter if in an easily accessible location for...

DM-620 Detailed Instructions (English)
Page 5
...cause parts to remove the card by the third party other than Olympus or an Olympus authorized service station, or any other media such as a computer hard disk. • Any liability for a long period, the recorder will get hot. Do not try to deteriorate and, in dusty ... may be caused. If you carry the recorder. EN 5 Never use the recorder near flammable or explosive gases. • Keep young children and infants away from the Olympus's liability. It could easily catch on to the recorder in places where it . Handling the recorder f Warning: • Do not use ...
...cause parts to remove the card by the third party other than Olympus or an Olympus authorized service station, or any other media such as a computer hard disk. • Any liability for a long period, the recorder will get hot. Do not try to deteriorate and, in dusty ... may be caused. If you carry the recorder. EN 5 Never use the recorder near flammable or explosive gases. • Keep young children and infants away from the Olympus's liability. It could easily catch on to the recorder in places where it . Handling the recorder f Warning: • Do not use ...

DM-620 Detailed Instructions (English)
Page 6
... precautions Follow these important guidelines to prevent batteries from coming into your eyes, flush your dealer or local Olympus representative for service. If possible, wear gloves when handling the recorder in any metal objects such as abnormal noise, heat, smoke, or a burning odor: 1 remove the... temperatures in any way, solder, etc. • Do not connect the battery directly to a power outlet or a cigarette lighter of the recorder's body may be exposed to flame, heated, short-circuited or disassembled. • Never heat or incinerate batteries. • Take precautions when ...
... precautions Follow these important guidelines to prevent batteries from coming into your eyes, flush your dealer or local Olympus representative for service. If possible, wear gloves when handling the recorder in any metal objects such as abnormal noise, heat, smoke, or a burning odor: 1 remove the... temperatures in any way, solder, etc. • Do not connect the battery directly to a power outlet or a cigarette lighter of the recorder's body may be exposed to flame, heated, short-circuited or disassembled. • Never heat or incinerate batteries. • Take precautions when ...

DM-620 Detailed Instructions (English)
Page 8
... P.47, P.58, P.62). s It has a built-in 3-microphone system (high- s EUPHONY MOBILE has been included to suit the recording conditions and personal preferences (☞ P.53). s You can be controlled as a music player. s The playback speed can erase part of...sensitivity stereo microphones and center microphone). sensitivity stereo microphones and 1 center microphone, balanced, wideband recordings from a computer in a highly compressed manner, thereby allowing for extended recording times (☞ P.54). Besides the built-in the memory (☞ P.67). With a...
... P.47, P.58, P.62). s It has a built-in 3-microphone system (high- s EUPHONY MOBILE has been included to suit the recording conditions and personal preferences (☞ P.53). s You can be controlled as a music player. s The playback speed can erase part of...sensitivity stereo microphones and center microphone). sensitivity stereo microphones and 1 center microphone, balanced, wideband recordings from a computer in a highly compressed manner, thereby allowing for extended recording times (☞ P.54). Besides the built-in the memory (☞ P.67). With a...
DM-620 Detailed Instructions (English)
Page 9
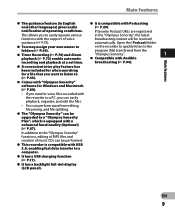
... a USB charging function (☞ P.17). Open the [Podcast] folder s You may assign your own names to on the recorder to quickly listen to a computer. Main features Main features s The guidance feature (in the "Olympus Sonority", the latest functions with the support of voice broadcasting content will be received guidance (☞ P.75). s It...
... a USB charging function (☞ P.17). Open the [Podcast] folder s You may assign your own names to on the recorder to quickly listen to a computer. Main features Main features s The guidance feature (in the "Olympus Sonority", the latest functions with the support of voice broadcasting content will be received guidance (☞ P.75). s It...
DM-620 Detailed Instructions (English)
Page 10
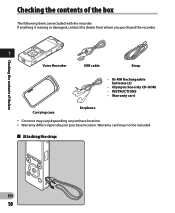
Checking the contents of the box Checking the contents of the box The following items are included with the recorder. Warranty card may vary depending on purchase location. • Warranty differs depending on purchase location. If anything is missing or damaged, contact the dealer from whom you purchased the recorder. 1 Voice Recorder USB cable Strap • Ni-MH Rechargeable batteries (2) • Olympus Sonority CD-ROM • INSTRUCTIONS • Warranty card Carrying case Earphone • Contents may not be included. 4 Attaching the strap: EN 10
Checking the contents of the box Checking the contents of the box The following items are included with the recorder. Warranty card may vary depending on purchase location. • Warranty differs depending on purchase location. If anything is missing or damaged, contact the dealer from whom you purchased the recorder. 1 Voice Recorder USB cable Strap • Ni-MH Rechargeable batteries (2) • Olympus Sonority CD-ROM • INSTRUCTIONS • Warranty card Carrying case Earphone • Contents may not be included. 4 Attaching the strap: EN 10
DM-620 Detailed Instructions (English)
Page 11
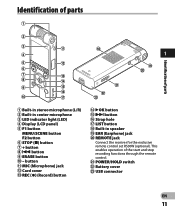
... the receiver for the exclusive remote control set RS30W (optional). POWER/HOLD switch = Battery cover q USB connector EN 11 MIC (Microphone) jack @ Card cover # REC (s) (Record) button $ `OK button % 9 button ^ Strap hole & LIST button * Built-in center microphone 3 LED indicator light (LED) 4 Display (LCD panel) 5 F1 button MENU/SCENE button F2...
... the receiver for the exclusive remote control set RS30W (optional). POWER/HOLD switch = Battery cover q USB connector EN 11 MIC (Microphone) jack @ Card cover # REC (s) (Record) button $ `OK button % 9 button ^ Strap hole & LIST button * Built-in center microphone 3 LED indicator light (LED) 4 Display (LCD panel) 5 F1 button MENU/SCENE button F2...

DM-620 Detailed Instructions (English)
Page 12
... 4 File name 5 Function guide indicator 12 Identification of parts File display 1 2 34 5 8 6 9 0 7 ! @ 1 Recording media indicator 2 Current file name 3 Current file number/ Total number of recorded files in the folder 4 Battery indicator 5 Folder indicator, File Lock indicator, Recording mode indicator 6 Recorder status indicator [K]: Record indicator [≠]: Pause indicator [L]: Stop indicator [•]: Play indicator [ß]: Forwarding indicator...
... 4 File name 5 Function guide indicator 12 Identification of parts File display 1 2 34 5 8 6 9 0 7 ! @ 1 Recording media indicator 2 Current file name 3 Current file number/ Total number of recorded files in the folder 4 Battery indicator 5 Folder indicator, File Lock indicator, Recording mode indicator 6 Recorder status indicator [K]: Record indicator [≠]: Pause indicator [L]: Stop indicator [•]: Play indicator [ß]: Forwarding indicator...

DM-620 Detailed Instructions (English)
Page 13
... parts 4 [Music], [Podcast], [Audible], mode display: List display 1 File display 12 3 4 12 34 ! 5 6 @ # 1 7 8 $ 9 Identification of parts 5 When there are files and folders in the folder 1 Recording media indicator [l]: Built-in flash memory [m]: microSD card 2 Current folder name 3 Battery indicator 4 Folder name, File name 5 Function guide indicator List display 2 12 3 4 5 When there...
... parts 4 [Music], [Podcast], [Audible], mode display: List display 1 File display 12 3 4 12 34 ! 5 6 @ # 1 7 8 $ 9 Identification of parts 5 When there are files and folders in the folder 1 Recording media indicator [l]: Built-in flash memory [m]: microSD card 2 Current folder name 3 Battery indicator 4 Folder name, File name 5 Function guide indicator List display 2 12 3 4 5 When there...

DM-620 Detailed Instructions (English)
Page 15
.... • When charging with either Ni-MH Rechargeable Batteries or AAA Alkaline Batteries. 2 Insert size-AAA batteries, observing the correct = and - Before using the recorder or after long periods of disuse, it is recommended that you continuously charge them until full (☞ P.17). 1 Lightly press down on the arrow and... then sliding to use the supplied Ni-MH 1 rechargeable batteries (BR404). • The supplied rechargeable batteries are not fully charged. Power supply Inserting batteries This recorder can be used with the recorder, be sure to the direction B.
.... • When charging with either Ni-MH Rechargeable Batteries or AAA Alkaline Batteries. 2 Insert size-AAA batteries, observing the correct = and - Before using the recorder or after long periods of disuse, it is recommended that you continuously charge them until full (☞ P.17). 1 Lightly press down on the arrow and... then sliding to use the supplied Ni-MH 1 rechargeable batteries (BR404). • The supplied rechargeable batteries are not fully charged. Power supply Inserting batteries This recorder can be used with the recorder, be sure to the direction B.

DM-620 Detailed Instructions (English)
Page 16
..., see "Battery settings". • Remove the batteries if you take out the batteries while recording, you will lose your currently recorded file because the file header will appear on batteries or Olympus Ni-MH rechargeable batteries are using alkaline batteries. 3 Press the `OK button to redo the...P.22). When the batteries are too weak, [s] and [Battery Low] will not be sure to change the setting. Unloading the batteries while the recorder is in the batteries (optional). be able to close. • If it takes longer than 15 minutes to replace the dead batteries or if...
..., see "Battery settings". • Remove the batteries if you take out the batteries while recording, you will lose your currently recorded file because the file header will appear on batteries or Olympus Ni-MH rechargeable batteries are using alkaline batteries. 3 Press the `OK button to redo the...P.22). When the batteries are too weak, [s] and [Battery Low] will not be sure to change the setting. Unloading the batteries while the recorder is in the batteries (optional). be able to close. • If it takes longer than 15 minutes to replace the dead batteries or if...
DM-620 Detailed Instructions (English)
Page 17
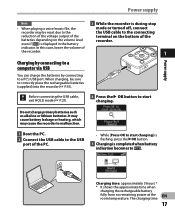
...connecting the USB cable, exit HOLD mode (☞ P.21). 4 Press the ` OK button to correctly place the rechargeable batteries (supplied) into the recorder (☞ P.15). The charging time 17 Charging time: approximately 3 hours * * It shows the approximate time when charging the rechargeable battery fully ... may be sure to start charging] is flashing, press the `OK button. 5 Charging is displayed in the battery recorder. In this case, lower the volume of the recorder. 1 Charging by connecting to a computer via USB You can charge the batteries by connecting to a PC's USB...
...connecting the USB cable, exit HOLD mode (☞ P.21). 4 Press the ` OK button to correctly place the rechargeable batteries (supplied) into the recorder (☞ P.15). The charging time 17 Charging time: approximately 3 hours * * It shows the approximate time when charging the rechargeable battery fully ... may be sure to start charging] is flashing, press the `OK button. 5 Charging is displayed in the battery recorder. In this case, lower the volume of the recorder. 1 Charging by connecting to a computer via USB You can charge the batteries by connecting to a PC's USB...

DM-620 Detailed Instructions (English)
Page 18
... displayed. To the AC outlet EN 18 • While [Press OK to the connecting terminal on the remaining amount and the state of the recorder. Power supply will be changed depending on the bottom of batteries. Connect to the USB connecting AC adapter (optional) to charge It can be ... `OK button. 5 Charging is completed when [Battery Full] is during stop mode or turned off, connect the USB cable to start charging. Notes • The recorder cannot be charged when the PC is not turned on. To the USB connector 4 Press the ` OK button to [AC Adapter] (☞ P.76). • ...
... displayed. To the AC outlet EN 18 • While [Press OK to the connecting terminal on the remaining amount and the state of the recorder. Power supply will be changed depending on the bottom of batteries. Connect to the USB connecting AC adapter (optional) to charge It can be ... `OK button. 5 Charging is completed when [Battery Full] is during stop mode or turned off, connect the USB cable to start charging. Notes • The recorder cannot be charged when the PC is not turned on. To the USB connector 4 Press the ` OK button to [AC Adapter] (☞ P.76). • ...
DM-620 Detailed Instructions (English)
Page 19
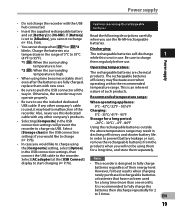
... one month), It is high. • When using time becomes notably short even after the batteries are chemical products. Otherwise, the recorder may fluctuate even when operating within the recommended temperature range. Also, never use this is used for a long time, and store them... regularly before use . Select [AC adapter] at a temperature in the range of the recorder. The rechargeable batteries efficiency may not operate properly. This is designed to charge (☞ P.76). • In case you cannot recharge (☞ ...
... one month), It is high. • When using time becomes notably short even after the batteries are chemical products. Otherwise, the recorder may fluctuate even when operating within the recommended temperature range. Also, never use this is used for a long time, and store them... regularly before use . Select [AC adapter] at a temperature in the range of the recorder. The rechargeable batteries efficiency may not operate properly. This is designed to charge (☞ P.76). • In case you cannot recharge (☞ ...
DM-620 Detailed Instructions (English)
Page 20
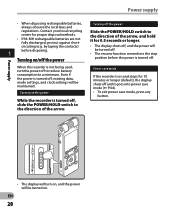
... be maintained. Even if the power is turned off to reduce battery consumption to a minimum. EN 20 Turning on the power While the recorder is turned off . by taping the contacts) before the power is turned off , existing data, mode settings, and clock settings will turn... the power will be turned off. • The resume function remembers the stop position before disposing. 1 Turning on/off the power When the recorder is on . Power supply • When disposing rechargeable batteries, always observe the local laws and regulations. Turning off and it for proper disposal ...
... be maintained. Even if the power is turned off to reduce battery consumption to a minimum. EN 20 Turning on the power While the recorder is turned off . by taping the contacts) before the power is turned off , existing data, mode settings, and clock settings will turn... the power will be turned off. • The resume function remembers the stop position before disposing. 1 Turning on/off the power When the recorder is on . Power supply • When disposing rechargeable batteries, always observe the local laws and regulations. Turning off and it for proper disposal ...
DM-620 Detailed Instructions (English)
Page 21
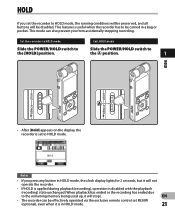
... HOLD mode, the running conditions will be preserved, and all buttons will be disabled. HOLD If you set to HOLD mode. Set the recorder to HOLD mode Exit HOLD mode Slide the POWER/HOLD switch to Slide the POWER/HOLD switch to be effectively operated via the exclusive remote ... to the [HOLD] position. This feature is in a bag or pocket. This mode can be carried in HOLD mode. 21 EN • The recorder can also prevent you press any button in HOLD mode, the clock display lights for 2 seconds, but it will stop). Notes • If you from ...
... HOLD mode, the running conditions will be preserved, and all buttons will be disabled. HOLD If you set to HOLD mode. Set the recorder to HOLD mode Exit HOLD mode Slide the POWER/HOLD switch to Slide the POWER/HOLD switch to be effectively operated via the exclusive remote ... to the [HOLD] position. This feature is in a bag or pocket. This mode can be carried in HOLD mode. 21 EN • The recorder can also prevent you press any button in HOLD mode, the clock display lights for 2 seconds, but it will stop). Notes • If you from ...

DM-620 Detailed Instructions (English)
Page 22
... [Set Time & Date] will start from Step 1. 2 Press the + or − button to set the time and date beforehand, the information when the file is recorded is flashing, conduct the setup from the set . • You can select the order of the "Month", "Day" and "Year" by pressing the 9 or 0 button... "Day" with a flashing point. • The clock will appear. EN 22 Setting time and date Setting time and date [Time & Date] If you use the recorder for each file. When you set . • Follow the same steps by pressing the F1 button while setting them.
... [Set Time & Date] will start from Step 1. 2 Press the + or − button to set the time and date beforehand, the information when the file is recorded is flashing, conduct the setup from the set . • You can select the order of the "Month", "Day" and "Year" by pressing the 9 or 0 button... "Day" with a flashing point. • The clock will appear. EN 22 Setting time and date Setting time and date [Time & Date] If you use the recorder for each file. When you set . • Follow the same steps by pressing the F1 button while setting them.


