
D-100 Instruction Manual
Page 1
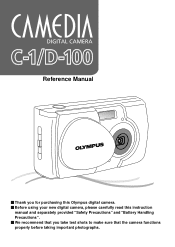
Reference Manual Ⅵ Thank you for purchasing this Olympus digital camera. Ⅵ Before using your new digital camera, please carefully read this instruction manual and separately provided "Safety Precautions" and "Battery Handling Precautions". Ⅵ We recommend that you take test shots to make sure that the camera functions properly before taking important photographs.
Reference Manual Ⅵ Thank you for purchasing this Olympus digital camera. Ⅵ Before using your new digital camera, please carefully read this instruction manual and separately provided "Safety Precautions" and "Battery Handling Precautions". Ⅵ We recommend that you take test shots to make sure that the camera functions properly before taking important photographs.
D-100 Instruction Manual
Page 5
... of Your Digital Camera 10 Operations Available with This Camera 12 PREPARATION Names of Parts 16 Attaching the Provided Strap 18 Loading the Battery 19 Selecting the Appropriate Batteries 20 Inserting the Provided Card (SmartMedia 22 Selecting the Appropriate Card 23 Using a New Card (Formatting 24 Setting the Date and Time 26...
... of Your Digital Camera 10 Operations Available with This Camera 12 PREPARATION Names of Parts 16 Attaching the Provided Strap 18 Loading the Battery 19 Selecting the Appropriate Batteries 20 Inserting the Provided Card (SmartMedia 22 Selecting the Appropriate Card 23 Using a New Card (Formatting 24 Setting the Date and Time 26...

D-100 Instruction Manual
Page 9
9 PREPARATION Adding comments to images P.76 Placing images in a document P.76 Processing images P.76 Printing images PP.72&74 ࡗAdditional Information Number of images you can shoot P.23 Usable batteries P.20 Color tone P.66 Brightness P.64 Unsatisfactory image quality P.93 Setting correct date and time P.26
9 PREPARATION Adding comments to images P.76 Placing images in a document P.76 Processing images P.76 Printing images PP.72&74 ࡗAdditional Information Number of images you can shoot P.23 Usable batteries P.20 Color tone P.66 Brightness P.64 Unsatisfactory image quality P.93 Setting correct date and time P.26
D-100 Instruction Manual
Page 15
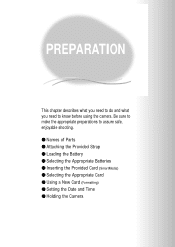
Be sure to make the appropriate preparations to know before using the camera. PREPARATION This chapter describes what you need to do and what you need to assure safe, enjoyable shooting. ⅷ Names of Parts ⅷ Attaching the Provided Strap ⅷ Loading the Battery ⅷ Selecting the Appropriate Batteries ⅷ Inserting the Provided Card (SmartMedia) ⅷ Selecting the Appropriate Card ⅷ Using a New Card (Formatting) ⅷ Setting the Date and Time ⅷ Holding the Camera
Be sure to make the appropriate preparations to know before using the camera. PREPARATION This chapter describes what you need to do and what you need to assure safe, enjoyable shooting. ⅷ Names of Parts ⅷ Attaching the Provided Strap ⅷ Loading the Battery ⅷ Selecting the Appropriate Batteries ⅷ Inserting the Provided Card (SmartMedia) ⅷ Selecting the Appropriate Card ⅷ Using a New Card (Formatting) ⅷ Setting the Date and Time ⅷ Holding the Camera
D-100 Instruction Manual
Page 16
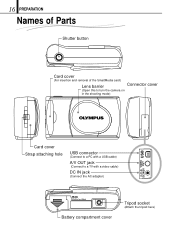
16 PREPARATION Names of Parts Shutter button Card cover (For insertion and removal of the SmartMedia card) Lens barrier Connector cover (Open this to turn the camera on in the shooting mode) Card cover Strap attaching hole USB connector (Connect to a PC with a USB cable) A/V OUT jack (Connect to a TV with a video cable) DC IN jack (Connect the AC adapter) Battery compartment cover Tripod socket (Attach the tripod here)
16 PREPARATION Names of Parts Shutter button Card cover (For insertion and removal of the SmartMedia card) Lens barrier Connector cover (Open this to turn the camera on in the shooting mode) Card cover Strap attaching hole USB connector (Connect to a PC with a USB cable) A/V OUT jack (Connect to a TV with a video cable) DC IN jack (Connect the AC adapter) Battery compartment cover Tripod socket (Attach the tripod here)

D-100 Instruction Manual
Page 19
...". ⅷ For information on what types of the arrow 1. 5. Lift the battery compartment cover in the direction of the arrow 2 until it clicks. [The battery compartment cover is displayed on the next page and separately provided "Battery Handling Precautions". Insert the battery in the direction shown in the direction of the arrow 1. 2. Press the...
...". ⅷ For information on what types of the arrow 1. 5. Lift the battery compartment cover in the direction of the arrow 2 until it clicks. [The battery compartment cover is displayed on the next page and separately provided "Battery Handling Precautions". Insert the battery in the direction shown in the direction of the arrow 1. 2. Press the...
D-100 Instruction Manual
Page 20
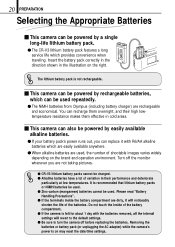
... not rechargeable. Ⅵ This camera can be powered by rechargeable batteries, which can be used repeatedly. ⅷ The NiMH batteries from Olympus (including battery charger) are used . The lithium battery pack is recommended that lithium battery packs or NiMH batteries be used. ⅷ Zinc-carbon (manganese) batteries cannot be used , the number of variation in the illustration on...
... not rechargeable. Ⅵ This camera can be powered by rechargeable batteries, which can be used repeatedly. ⅷ The NiMH batteries from Olympus (including battery charger) are used . The lithium battery pack is recommended that lithium battery packs or NiMH batteries be used. ⅷ Zinc-carbon (manganese) batteries cannot be used , the number of variation in the illustration on...

D-100 Instruction Manual
Page 21
... covered, or not covered at all , by an insulating sheet. ⅷ Batteries whose œ terminals are raised, but not covered by an insulating sheet. ⅷ Batteries whose exterior is not completely covered by an insulating sheet. (Such batteries cannot be used ⅷ Batteries whose œ terminals are flat and not completely covered by an...
... covered, or not covered at all , by an insulating sheet. ⅷ Batteries whose œ terminals are raised, but not covered by an insulating sheet. ⅷ Batteries whose exterior is not completely covered by an insulating sheet. (Such batteries cannot be used ⅷ Batteries whose œ terminals are flat and not completely covered by an...
D-100 Instruction Manual
Page 22
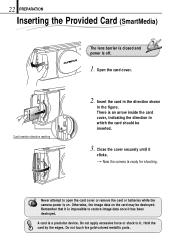
... edges. Card insertion direction marking 2. A card is on the card may be inserted. 3. Never attempt to open the card cover or remove the card or batteries while the camera power is a precision device. Do not apply excessive force or shock to it is off. 1. Do not touch the gold-colored metallic...
... edges. Card insertion direction marking 2. A card is on the card may be inserted. 3. Never attempt to open the card cover or remove the card or batteries while the camera power is a precision device. Do not apply excessive force or shock to it is off. 1. Do not touch the gold-colored metallic...

D-100 Instruction Manual
Page 27
.../menu button. [The date and time are set and the screen returns to the playback mode menu 3/3. 1. 2 .14 SELECT SET OK When the batteries are removed or battery power is exhausted, a screen prompting you to set the hour and minutes. Repeat the above . ⅷ The date and time can be set in...
.../menu button. [The date and time are set and the screen returns to the playback mode menu 3/3. 1. 2 .14 SELECT SET OK When the batteries are removed or battery power is exhausted, a screen prompting you to set the hour and minutes. Repeat the above . ⅷ The date and time can be set in...
D-100 Instruction Manual
Page 30
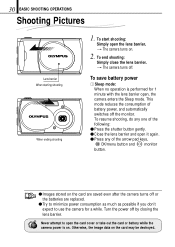
...8567; Try to minimize power consumption as much as possible if you don't expect to open the card cover or take out the card or battery while the camera power is performed for a while. Otherwise, the image data on the card are saved even after the camera turns off ...SHOOTING OPERATIONS Shooting Pictures Lens barrier When starting shooting When ending shooting 1. To start shooting: Simply open , the camera enters the Sleep mode. To save battery power 1 Sleep mode: When no operation is on . 2. This mode reduces the consumption of the arrow pad keys, OK/menu button and monitor ...
...8567; Try to minimize power consumption as much as possible if you don't expect to open the card cover or take out the card or battery while the camera power is performed for a while. Otherwise, the image data on the card are saved even after the camera turns off ...SHOOTING OPERATIONS Shooting Pictures Lens barrier When starting shooting When ending shooting 1. To start shooting: Simply open , the camera enters the Sleep mode. To save battery power 1 Sleep mode: When no operation is on . 2. This mode reduces the consumption of the arrow pad keys, OK/menu button and monitor ...

D-100 Instruction Manual
Page 33
... out, you will not be shot vary depending on the card may move and the image will be able to take out the card or batteries while the orange lamp is ready for the next shot and the number of time required before retrying shooting. ⅷ The blinking orange lamp indicates...
... out, you will not be shot vary depending on the card may move and the image will be able to take out the card or batteries while the orange lamp is ready for the next shot and the number of time required before retrying shooting. ⅷ The blinking orange lamp indicates...

D-100 Instruction Manual
Page 36
... when you take the picture. Accurate shooting by checking the area that of the actual picture when the distance from the subject is short . Also, battery power consumption is used. The monitor is switched on automatically when the Macro mode ( Page 60) is high. Also, less... battery power is possible without using the Macro mode, but in some cases correct focus and exposure may slightly be so clear when the surroundings are ...
... when you take the picture. Accurate shooting by checking the area that of the actual picture when the distance from the subject is short . Also, battery power consumption is used. The monitor is switched on automatically when the Macro mode ( Page 60) is high. Also, less... battery power is possible without using the Macro mode, but in some cases correct focus and exposure may slightly be so clear when the surroundings are ...
D-100 Instruction Manual
Page 37
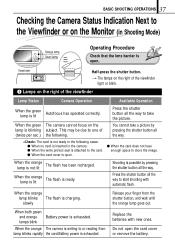
...reading from the shutter button, and wait until the orange lamp goes out. When the orange lamp blinks The flash is ready. Replace the batteries with automatic flash. When the orange lamp is exhausted. Press the shutter button all the way. Press the shutter button all the way. When...is inserted in Shooting Mode) Orange lamp Green lamp Operating Procedure Check that the lens barrier is open the card cover or remove the battery. Shooting is writing to store the image. lamps blink When the orange The camera is possible by pressing the shutter button all the way...
...reading from the shutter button, and wait until the orange lamp goes out. When the orange lamp blinks The flash is ready. Replace the batteries with automatic flash. When the orange lamp is exhausted. Press the shutter button all the way. Press the shutter button all the way. When...is inserted in Shooting Mode) Orange lamp Green lamp Operating Procedure Check that the lens barrier is open the card cover or remove the battery. Shooting is writing to store the image. lamps blink When the orange The camera is possible by pressing the shutter button all the way...

D-100 Instruction Manual
Page 38
..., which is not displayed on . ( The default setting is too low. of images you can shoot. (Green) Remaining battery power is insufficient. (The display goes out automatically.) The remaining battery power is no self-timer. The default setting is HQ (High Quality). ( Page 54) SQ ( Page 54) Flash ... (No display) ( Page 54) The default setting is the Auto-Flash mode, which is switched on the monitor. Page 61) W No. Replace the batteries with (Red) new ones. Self-timer Shows that the Self-Timer mode is not indicated explicitly. ( Pages 56-57) Red-Eye Reduction Flash ( Page...
..., which is not displayed on . ( The default setting is too low. of images you can shoot. (Green) Remaining battery power is insufficient. (The display goes out automatically.) The remaining battery power is no self-timer. The default setting is HQ (High Quality). ( Page 54) SQ ( Page 54) Flash ... (No display) ( Page 54) The default setting is the Auto-Flash mode, which is switched on the monitor. Page 61) W No. Replace the batteries with (Red) new ones. Self-timer Shows that the Self-Timer mode is not indicated explicitly. ( Pages 56-57) Red-Eye Reduction Flash ( Page...

D-100 Instruction Manual
Page 39
...without zooming. ( Page 59) The default setting is no zooming. White balance Auto (No display) Shows the use . ⅷ When NiMH batteries are used . The monitor may also show other indicators such as the "!" 39 BASIC SHOOTING OPERATIONS Exposure compensation +1.0 Shows the amount of exposure ...( Page 67) Fluorescent lighting ( Page 67) When the monitor is off, it will start blinking sooner than when a lithium battery pack is used , the battery alarm indicator will turn on for a moment after the following operation is performed, and then turn off again. ⅷ Pressing ...
...without zooming. ( Page 59) The default setting is no zooming. White balance Auto (No display) Shows the use . ⅷ When NiMH batteries are used . The monitor may also show other indicators such as the "!" 39 BASIC SHOOTING OPERATIONS Exposure compensation +1.0 Shows the amount of exposure ...( Page 67) Fluorescent lighting ( Page 67) When the monitor is off, it will start blinking sooner than when a lithium battery pack is used , the battery alarm indicator will turn on for a moment after the following operation is performed, and then turn off again. ⅷ Pressing ...

D-100 Instruction Manual
Page 42
... when no pictures have been saved, "NO PICTURE" appears on the left. [After a moment, all displayed data except the frame No. and remaining battery power indicators disappear. ⅷ If no operation has been performed for a moment. [The camera turns on . If the camera has turned off . .... ⅷ If there is a problem with the card, the monitor shows the corresponding message. ( Page 89) ⅷ If the remaining battery power is closed. 1. Keep the monitor button depressed for one minute. Date/time Monitor information Operating Procedure Check that the lens barrier is low,...
... when no pictures have been saved, "NO PICTURE" appears on the left. [After a moment, all displayed data except the frame No. and remaining battery power indicators disappear. ⅷ If no operation has been performed for a moment. [The camera turns on . If the camera has turned off . .... ⅷ If there is a problem with the card, the monitor shows the corresponding message. ( Page 89) ⅷ If the remaining battery power is closed. 1. Keep the monitor button depressed for one minute. Date/time Monitor information Operating Procedure Check that the lens barrier is low,...

D-100 Instruction Manual
Page 47
... pad key. 2. This is attached to the card. ( Page 51) ⅷ For details on the card, never attempt to open the card cover, remove the batteries, disconnect the AC adapter or remove the card during erasure. SELECT NO NO SET OK Check the following operation clears the card of all stored...
... pad key. 2. This is attached to the card. ( Page 51) ⅷ For details on the card, never attempt to open the card cover, remove the batteries, disconnect the AC adapter or remove the card during erasure. SELECT NO NO SET OK Check the following operation clears the card of all stored...
D-100 Instruction Manual
Page 55
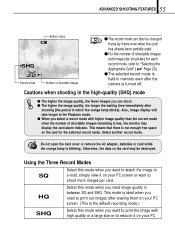
...Playback mode. ⅷ When you need image quality in between SQ and SHQ. Do not open the card cover or remove the AC adapter, batteries or card while the orange lamp is turned off. Otherwise, the data on your PC screen or want to attach the image to e-mail, simply...8567; For the number of shootable images and image size (in pixels) for the selected record mode. Select another record mode. 55 ADVANCED SHOOTING FEATURES Battery status SHQ Record mode Number of shootable images ⅷ The record mode can shoot. ⅷ The higher the image quality, the longer the waiting time...
...Playback mode. ⅷ When you need image quality in between SQ and SHQ. Do not open the card cover or remove the AC adapter, batteries or card while the orange lamp is turned off. Otherwise, the data on your PC screen or want to attach the image to e-mail, simply...8567; For the number of shootable images and image size (in pixels) for the selected record mode. Select another record mode. 55 ADVANCED SHOOTING FEATURES Battery status SHQ Record mode Number of shootable images ⅷ The record mode can shoot. ⅷ The higher the image quality, the longer the waiting time...
D-100 Instruction Manual
Page 63
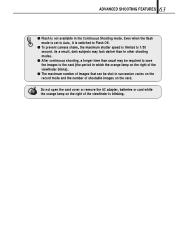
... the record mode and the number of the viewfinder is limited to 1/30 second. Do not open the card cover or remove the AC adapter, batteries or card while the orange lamp on the right of shootable images on the right of the viewfinder blinks). ⅷ The maximum number of images...
... the record mode and the number of the viewfinder is limited to 1/30 second. Do not open the card cover or remove the AC adapter, batteries or card while the orange lamp on the right of shootable images on the right of the viewfinder blinks). ⅷ The maximum number of images...


