
LE810DT UPS Safety and Regulatory Information (English, Fran栩s, Espa?ol, Portugu鱩
Page 1
... block the openings of all the equipment on the back of direct sunlight. • Always use liquid or aerosol cleaners. • Place your product serviced. Do not put the product on the product itself. • Unplug the product before you are some of the amperes required by qualified Oki Data technicians. Here are following the operating instructions. 1 You...
... block the openings of all the equipment on the back of direct sunlight. • Always use liquid or aerosol cleaners. • Place your product serviced. Do not put the product on the product itself. • Unplug the product before you are some of the amperes required by qualified Oki Data technicians. Here are following the operating instructions. 1 You...

LE810DT UPS Safety and Regulatory Information (English, Fran栩s, Espa?ol, Portugu鱩
Page 2
... radiate radio frequency energy and, if not installed and used in combination with the instructions, may not cause harmful interference, and (2) this device. It contains information technology that accurately processes date and time data between the equipment and the receiver. • Plug the unit into an outlet on , the user is connected. • Consult the dealer or an...
... radiate radio frequency energy and, if not installed and used in combination with the instructions, may not cause harmful interference, and (2) this device. It contains information technology that accurately processes date and time data between the equipment and the receiver. • Plug the unit into an outlet on , the user is connected. • Consult the dealer or an...
LE810DT UPS Setup Guide (English, Fran栩s, Espa?ol, Portugu鱩
Page 7
... to use this printer to from the list of Available Ports. Status Monitor is connected to be run automatically at any other time, just double click STATMON.EXE in the System Tray and monitoring the status of the label queue. Select the port that your default printer, then check the box next to "I want this printer as the Windows default printer". 6. If you want to install the Status monitor. Check the...
... to use this printer to from the list of Available Ports. Status Monitor is connected to be run automatically at any other time, just double click STATMON.EXE in the System Tray and monitoring the status of the label queue. Select the port that your default printer, then check the box next to "I want this printer as the Windows default printer". 6. If you want to install the Status monitor. Check the...
LE810DT Setup Guide
Page 5
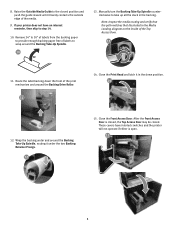
... Access Door is open. 15 b 5 Close the Print Head and latch it under and around the Backing Drive Roller. 11 14. These covers have an internal rewinder, then skip to take up all the slack in the down the front of the media. 9. Raise the Outside Media Guide to provide enough backing paper free of the Top Access Door. 13 11. If your printer...
... Access Door is open. 15 b 5 Close the Print Head and latch it under and around the Backing Drive Roller. 11 14. These covers have an internal rewinder, then skip to take up all the slack in the down the front of the media. 9. Raise the Outside Media Guide to provide enough backing paper free of the Top Access Door. 13 11. If your printer...

LE810DT Setup Guide
Page 7
... printer status, its operations and processing of the connected printer. If you want to use this printer to install the Status monitor. Status Monitor is connected to start it at system startup. It can be your LE810DT is stand-alone application running in the folder C:\Program Files\Oki\StatMon\ 7. Select the port that your default printer, then check the box next to "I want to from the list of Available Ports...
... printer status, its operations and processing of the connected printer. If you want to use this printer to install the Status monitor. Status Monitor is connected to start it at system startup. It can be your LE810DT is stand-alone application running in the folder C:\Program Files\Oki\StatMon\ 7. Select the port that your default printer, then check the box next to "I want to from the list of Available Ports...

LE810DT User Guide (English)
Page 2
... Computers Inc. All Rights Reserved Document Information LE810DT User's Guide P/N 59320201 Revision 1.2 April, 2010 Disclaimer Every effort has been made by the manufacturer . Note The appearance of your printer may differ somewhat from the web site: http://www.okiprintingsolutions.com Trademark Information Oki is complete, accurate, and up -to in it. Copyright Information Copyright © 2010 by Oki Data.
... Computers Inc. All Rights Reserved Document Information LE810DT User's Guide P/N 59320201 Revision 1.2 April, 2010 Disclaimer Every effort has been made by the manufacturer . Note The appearance of your printer may differ somewhat from the web site: http://www.okiprintingsolutions.com Trademark Information Oki is complete, accurate, and up -to in it. Copyright Information Copyright © 2010 by Oki Data.

LE810DT User Guide (English)
Page 3
... Advanced Mode 40 Counters Mode 41 Test Print Mode 42 Default Setting Mode 43 Hex Dump Mode 43 Troubleshooting 44 Test Label Printing 44 Sample Test Print Label 45 Maintenance 46 Cleaning the Printer 46 Removing Debris 46 Cleaning the Print Head and Platen . . . . 47 Cleaning the Printer Housing 48 Specifications 49 Physical Characteristics 49 Power 49 Environmental 49 Processing 49 Interfaces 50 Print Specifications 50 Sensing Specifications 50 Media 51 Commands 51 Character Font Capabilities 52 Bar Code Capabilities 53 LE810DT User's Guide 3
... Advanced Mode 40 Counters Mode 41 Test Print Mode 42 Default Setting Mode 43 Hex Dump Mode 43 Troubleshooting 44 Test Label Printing 44 Sample Test Print Label 45 Maintenance 46 Cleaning the Printer 46 Removing Debris 46 Cleaning the Print Head and Platen . . . . 47 Cleaning the Printer Housing 48 Specifications 49 Physical Characteristics 49 Power 49 Environmental 49 Processing 49 Interfaces 50 Print Specifications 50 Sensing Specifications 50 Media 51 Commands 51 Character Font Capabilities 52 Bar Code Capabilities 53 LE810DT User's Guide 3

LE810DT User Guide (English)
Page 7
... a printer error. 3 LINE button - Press to initiate other special functions as indicated later in this manual. 4 FEED button - Press to advance the label media. - Press top initiate other special functions as indicated later in this manual. Press to switch back and forth between online and offline state. - Blinks green when receiving data or the buffer is near full. - Press to scroll through menu options. - LE810DT User's Guide 7 Introduction...
... a printer error. 3 LINE button - Press to initiate other special functions as indicated later in this manual. 4 FEED button - Press to advance the label media. - Press top initiate other special functions as indicated later in this manual. Press to switch back and forth between online and offline state. - Blinks green when receiving data or the buffer is near full. - Press to scroll through menu options. - LE810DT User's Guide 7 Introduction...
LE810DT User Guide (English)
Page 11
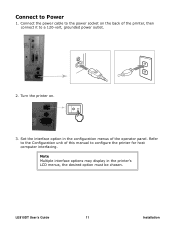
Connect to a 120-volt, grounded power outlet. 2. Set the interface option in the printer's LCD menus, the desired option must be chosen. Refer to configure the printer for host computer interfacing. Note Multiple interface options may display in the configuration menus of this manual to the Configuration unit of the operator panel. Turn the printer on the back of the printer, then connect it to Power 1. LE810DT User's Guide 11 Installation Connect the power cable to the power socket on . 3.
Connect to a 120-volt, grounded power outlet. 2. Set the interface option in the printer's LCD menus, the desired option must be chosen. Refer to configure the printer for host computer interfacing. Note Multiple interface options may display in the configuration menus of this manual to the Configuration unit of the operator panel. Turn the printer on the back of the printer, then connect it to Power 1. LE810DT User's Guide 11 Installation Connect the power cable to the power socket on . 3.

LE810DT User Guide (English)
Page 13
The printer will not print another label until the printed label is pulled back into the printer and wrapped around the rewinder shaft (2). Loading Media Roll-Type, with Liner Fed to Rewinder Shaft With roll-type media loaded this way, the liner (1) automatically separates from the media and is removed. 1. LE810DT User's Guide 13 The self-adhesive label (3) without its liner moves out the front of the printer for pickup and direct application. Lift up the Top Access Cover.
The printer will not print another label until the printed label is pulled back into the printer and wrapped around the rewinder shaft (2). Loading Media Roll-Type, with Liner Fed to Rewinder Shaft With roll-type media loaded this way, the liner (1) automatically separates from the media and is removed. 1. LE810DT User's Guide 13 The self-adhesive label (3) without its liner moves out the front of the printer for pickup and direct application. Lift up the Top Access Cover.

LE810DT User Guide (English)
Page 32
... printed (quantity depends upon label size). Tear-off Mode • For printing labels one at a time. • The liner remains with the label as it exits the printer. • The media remains in position for printing at all times. • A printed label is only available for printing the next label. Continuous Mode • For printing bulk quantities of printer operation; Tear-off , Continuous, and Dispense. LE810DT User's Guide...
... printed (quantity depends upon label size). Tear-off Mode • For printing labels one at a time. • The liner remains with the label as it exits the printer. • The media remains in position for printing at all times. • A printed label is only available for printing the next label. Continuous Mode • For printing bulk quantities of printer operation; Tear-off , Continuous, and Dispense. LE810DT User's Guide...
LE810DT User Guide (English)
Page 33
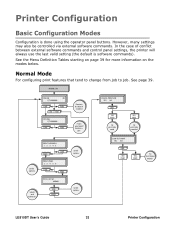
... external software commands and control panel settings, the printer will always use the last valid setting (the default is OFF. Scrolls options Selects and advances PRINT DARKNESS 12 3 4 5 LINE FEED PRINT SPEED 23 4 5 6 LINE FEED PITCH OFFSET +00MM LINE FEED Scrolls options Scrolls options CANCEL PRINT JOB YES NO LINE NO FEED All print jobs saved YES FEED All print jobs canceled USER TEST PRINT YES NO LINE NO FEED YES FEED TO TEST PRINT MENU LE810DT User's Guide 33 Printer Configuration See the Menu Definition Tables starting on page 39...
... external software commands and control panel settings, the printer will always use the last valid setting (the default is OFF. Scrolls options Selects and advances PRINT DARKNESS 12 3 4 5 LINE FEED PRINT SPEED 23 4 5 6 LINE FEED PITCH OFFSET +00MM LINE FEED Scrolls options Scrolls options CANCEL PRINT JOB YES NO LINE NO FEED All print jobs saved YES FEED All print jobs canceled USER TEST PRINT YES NO LINE NO FEED YES FEED TO TEST PRINT MENU LE810DT User's Guide 33 Printer Configuration See the Menu Definition Tables starting on page 39...

LE810DT User Guide (English)
Page 34
Typically, once these adjustment settings have been made, they will not require additional changes unless a new job is installed Scrolls options Scrolls options Selects and advances SET CALENDAR YES NO LINE Yes FEED No FEED CALENDAR YY / MM / DD HH : MM LINE FEED LINE + POWER Toggles Service Mode Scrolls options Scrolls options Scrolls options ADVANCED MODE LINE FEED DARKNESS RANGE AB LINE FEED AUTO ONLINE YES NO LINE FEED PRINT OFFSET V: +XXXX H: +XXX LINE FEED Selects and advances Scrolls...
Typically, once these adjustment settings have been made, they will not require additional changes unless a new job is installed Scrolls options Scrolls options Selects and advances SET CALENDAR YES NO LINE Yes FEED No FEED CALENDAR YY / MM / DD HH : MM LINE FEED LINE + POWER Toggles Service Mode Scrolls options Scrolls options Scrolls options ADVANCED MODE LINE FEED DARKNESS RANGE AB LINE FEED AUTO ONLINE YES NO LINE FEED PRINT OFFSET V: +XXXX H: +XXX LINE FEED Selects and advances Scrolls...

LE810DT User Guide (English)
Page 35
... reset each time the print head is replaced. • Life Counter. Scrolls options HD FEED HEAD COUNTER X.XM FEED HEAD COUNT CLEAR YES NO LINE FEED LINE + POWER Toggles Advanced Mode Toggles Service Mode Toggles Emulation Mode Scrolls options ADVANCED MODE FEED LINE SERVICE MODE FEED LINE COUNTERS MODE LINE FEED COUNTERS HD DSP CUT LIFE LINE DSP FEED DISPENSE COUNTER X.XM FEED DSP COUNT CLEAR YES NO LINE FEED CUT FEED CUT COUNTER X FEED CUT COUNT CLEAR YES NO LINE FEED LIFE FEED LIFE COUNTER X.XM FEED LE810DT User's Guide 35 Printer Configuration Counters...
... reset each time the print head is replaced. • Life Counter. Scrolls options HD FEED HEAD COUNTER X.XM FEED HEAD COUNT CLEAR YES NO LINE FEED LINE + POWER Toggles Advanced Mode Toggles Service Mode Toggles Emulation Mode Scrolls options ADVANCED MODE FEED LINE SERVICE MODE FEED LINE COUNTERS MODE LINE FEED COUNTERS HD DSP CUT LIFE LINE DSP FEED DISPENSE COUNTER X.XM FEED DSP COUNT CLEAR YES NO LINE FEED CUT FEED CUT COUNTER X FEED CUT COUNT CLEAR YES NO LINE FEED LIFE FEED LIFE COUNTER X.XM FEED LE810DT User's Guide 35 Printer Configuration Counters...

LE810DT User Guide (English)
Page 36
... options TEST PRINT MODE CONFIGURATION BARCODE HEADCHECK FACTORY LINE Configuration Barcode Headcheck FEED Factory FEED Scrolls options TEST PRINT SIZE XXCM LINE FEED PRINT SIZE SMALL LARGE LINE Scrolls options Test printing begins PRESS FEED KEY TO STOP PRINTING FEED Test printing stops Scrolls options PRINT CONTINUE YES NO LINE YES FEED NO FEED USER TEST PRINT YES NO LINE NO FEED YES FEED ONLINE MODE [Z] QTY: XXXXXX Scrolls options LE810DT User's Guide 36 Printer Configuration Test labels are designed to identify failures in configuration, adjustments problems...
... options TEST PRINT MODE CONFIGURATION BARCODE HEADCHECK FACTORY LINE Configuration Barcode Headcheck FEED Factory FEED Scrolls options TEST PRINT SIZE XXCM LINE FEED PRINT SIZE SMALL LARGE LINE Scrolls options Test printing begins PRESS FEED KEY TO STOP PRINTING FEED Test printing stops Scrolls options PRINT CONTINUE YES NO LINE YES FEED NO FEED USER TEST PRINT YES NO LINE NO FEED YES FEED ONLINE MODE [Z] QTY: XXXXXX Scrolls options LE810DT User's Guide 36 Printer Configuration Test labels are designed to identify failures in configuration, adjustments problems...

LE810DT User Guide (English)
Page 39
... on the bottom. LE810DT User's Guide 39 Printer Configuration The message will advance to darker pint images. Provides the specific sequence of events required by the operator, the printer, and the printer's software for a test label to be cleared. When a print job is switched online by pressing the LINE key. The OFFLINE status is displayed on the top line and the label quantity status is the distance from the print head while a negative (-) setting moves the label...
... on the bottom. LE810DT User's Guide 39 Printer Configuration The message will advance to darker pint images. Provides the specific sequence of events required by the operator, the printer, and the printer's software for a test label to be cleared. When a print job is switched online by pressing the LINE key. The OFFLINE status is displayed on the top line and the label quantity status is the distance from the print head while a negative (-) setting moves the label...

LE810DT User Guide (English)
Page 40
... the print data code requires deletion. This screen will not be deleted. INTERFACE TYPE IEEE RE232 USB • This menu will not require additional address unless a new job is an optional feature that allows the date and time to be manually set using the operator panel or through command codes. Advanced Mode Display Description ADVANCED MODE Is the first menu screen of the reference point respectively. DARKNESS RANGE A B AUTO ONLINE YES NO PRINT...
... the print data code requires deletion. This screen will not be deleted. INTERFACE TYPE IEEE RE232 USB • This menu will not require additional address unless a new job is an optional feature that allows the date and time to be manually set using the operator panel or through command codes. Advanced Mode Display Description ADVANCED MODE Is the first menu screen of the reference point respectively. DARKNESS RANGE A B AUTO ONLINE YES NO PRINT...

LE810DT User Guide (English)
Page 41
... printer setup. LIFE COUNTER XXXM Is an informational screen that provides the printed length of which counter to be viewed to access the Counters Mode. HD: Head counter LIFE: Life counter HEAD COUNTER XXXM Is an informational screen that provides the printed the length of the Counters Mode. YES NO LE810DT User's Guide 41 Printer Configuration HEAD COUNTER CLEAR Resets the print head counter to access the Counters Mode. COUNTERS HD LIFE Allows the selection of media using the existing print head. SERVICE MODE Second transitional menu screen to reset...
... printer setup. LIFE COUNTER XXXM Is an informational screen that provides the printed length of which counter to be viewed to access the Counters Mode. HD: Head counter LIFE: Life counter HEAD COUNTER XXXM Is an informational screen that provides the printed the length of the Counters Mode. YES NO LE810DT User's Guide 41 Printer Configuration HEAD COUNTER CLEAR Resets the print head counter to access the Counters Mode. COUNTERS HD LIFE Allows the selection of media using the existing print head. SERVICE MODE Second transitional menu screen to reset...

LE810DT User Guide (English)
Page 42
...XXCM PRINT SIZE SMALL LARGE PRESS FEED KEY TO STOP PRINTING PRINT CONTINUE YES NO USER TEST PRINT YES NO ONLINE MODE (Z) QTY: XXXXXX Is the initial screen of the Test Print Mode. • CONFIGURATION: The printer's configuration settings. • BARCODE: The printer's installed barcodes. • HEAD CHECK: A pattern to check print head elements. • FACTORY: A factory test label will advance to Online mode. Select YES to Online mode. LE810DT User's Guide 42 Printer Configuration Is a directional screen prompting action on the top line and the label quantity status...
...XXCM PRINT SIZE SMALL LARGE PRESS FEED KEY TO STOP PRINTING PRINT CONTINUE YES NO USER TEST PRINT YES NO ONLINE MODE (Z) QTY: XXXXXX Is the initial screen of the Test Print Mode. • CONFIGURATION: The printer's configuration settings. • BARCODE: The printer's installed barcodes. • HEAD CHECK: A pattern to check print head elements. • FACTORY: A factory test label will advance to Online mode. Select YES to Online mode. LE810DT User's Guide 42 Printer Configuration Is a directional screen prompting action on the top line and the label quantity status...

LE810DT User Guide (English)
Page 44
... change the size, use the LINE button to stop the test. 6. LE810DT User's Guide 44 Troubleshooting TEST PRINT MODE appears on the type of CONFIGURATION, BARCODE or HEADCHECK, then press FEED to select it. To exit the Test Print mode, turn off , then on . To enter the Test Print mode, turn the printer off the printer, then press and hold the FEED button while turning the printer on again. Once the appropriate size is designed to your choice of test label printed. The display shows...
... change the size, use the LINE button to stop the test. 6. LE810DT User's Guide 44 Troubleshooting TEST PRINT MODE appears on the type of CONFIGURATION, BARCODE or HEADCHECK, then press FEED to select it. To exit the Test Print mode, turn off , then on . To enter the Test Print mode, turn the printer off the printer, then press and hold the FEED button while turning the printer on again. Once the appropriate size is designed to your choice of test label printed. The display shows...


