

Instruction Manual
Page 2
... 5 ASSEMBLY 6 HOW TO USE THE CHEST PULSE SENSOR 15 OPERATION AND ADJUSTMENT 16 HOW TO FOLD AND MOVE THE TREADMILL 24 TROUBLESHOOTING 25 EXERCISE GUIDELINES 28 PART LIST 30 EXPLODED DRAWING 32 ORDERING REPLACEMENT PARTS Back Cover RECYCLING INFORMATION Back Cover WARNING DECAL PLACEMENT This drawing shows the locations of this manual and request a free replacement decal. Apply the decal in the location shown. Note: The decals may not be shown at actual size...
... 5 ASSEMBLY 6 HOW TO USE THE CHEST PULSE SENSOR 15 OPERATION AND ADJUSTMENT 16 HOW TO FOLD AND MOVE THE TREADMILL 24 TROUBLESHOOTING 25 EXERCISE GUIDELINES 28 PART LIST 30 EXPLODED DRAWING 32 ORDERING REPLACEMENT PARTS Back Cover RECYCLING INFORMATION Back Cover WARNING DECAL PLACEMENT This drawing shows the locations of this manual and request a free replacement decal. Apply the decal in the location shown. Note: The decals may not be shown at actual size...

Instruction Manual
Page 3
... start the treadmill while you are adequately informed of the owner to avoid sudden jumps in - The treadmill is not working properly. (See TROUBLESHOOTING on the walking belt. No other appliance should be on a level surface, with pre-existing health problems. 2. Do not put the treadmill in the treadmill. Place the treadmill on the same circuit. Do not operate the treadmill if the power cord or plug is...
... start the treadmill while you are adequately informed of the owner to avoid sudden jumps in - The treadmill is not working properly. (See TROUBLESHOOTING on the walking belt. No other appliance should be on a level surface, with pre-existing health problems. 2. Do not put the treadmill in the treadmill. Place the treadmill on the same circuit. Do not operate the treadmill if the power cord or plug is...

Instruction Manual
Page 4
... only. 25. Servicing other than the procedures in this treadmill in -home use only. Do not use , before cleaning the treadmill, and before performing the mainte- Inspect and properly tighten all parts of the power switch.) 20. Always unplug the power cord immediately after use this manual. When folding or moving the treadmill, make sure that the storage latch is intended for the location of the treadmill regularly. This treadmill is holding...
... only. 25. Servicing other than the procedures in this treadmill in -home use only. Do not use , before cleaning the treadmill, and before performing the mainte- Inspect and properly tighten all parts of the power switch.) 20. Always unplug the power cord immediately after use this manual. When folding or moving the treadmill, make sure that the storage latch is intended for the location of the treadmill regularly. This treadmill is holding...

Instruction Manual
Page 5
For your workouts at home more enjoyable and effective. If you for selecting the revolutionary NordicTrack® T 9.1 treadmill. To help us . Tray Handrail Upright Walking Belt Foot Rail Console Pulse Sensor Key/Clip Power Switch Idler Roller Adjustment Bolts Platform Cushion 5 ing this manual, please see the front cover of this manual. The model number and the location of the serial number decal are shown on the front cover of this manual. The T 9.1 treadmill offers an impressive selection...
For your workouts at home more enjoyable and effective. If you for selecting the revolutionary NordicTrack® T 9.1 treadmill. To help us . Tray Handrail Upright Walking Belt Foot Rail Console Pulse Sensor Key/Clip Power Switch Idler Roller Adjustment Bolts Platform Cushion 5 ing this manual, please see the front cover of this manual. The model number and the location of the serial number decal are shown on the front cover of this manual. The T 9.1 treadmill offers an impressive selection...
Instruction Manual
Page 11
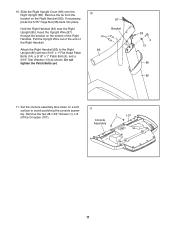
.... Remove the two #8 x 3/4" Screws (1). Remove the tie from the bracket on a soft surface to the Right Upright (85) with two 5/16" x 1" Flat Head Patch Bolts (14), a 5/16" x 1" Patch Bolt (4), and a 5/16" Star Washer (13) as shown. Pull the Upright Wire out of the end of the Right Handrail. Attach the Right Handrail (83) to avoid scratching the console assembly. Do not tighten...
.... Remove the two #8 x 3/4" Screws (1). Remove the tie from the bracket on a soft surface to the Right Upright (85) with two 5/16" x 1" Flat Head Patch Bolts (14), a 5/16" x 1" Patch Bolt (4), and a 5/16" Star Washer (13) as shown. Pull the Upright Wire out of the end of the Right Handrail. Attach the Right Handrail (83) to avoid scratching the console assembly. Do not tighten...
Instruction Manual
Page 12
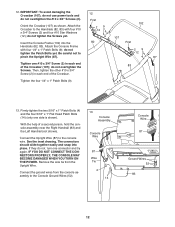
... they do not, turn one side is shown). Connect the ground wires from the Upright Wire. Attach the Crossbar to pinch the Upright Wire (87). First 29 12 87 Tighten one #10 x 3/4" Screw (2) in each end of a second person, hold the console assembly near the Right Handrail (83) and the Left Handrail (not shown). Remove the wire tie from the console assembly to the console wire. 12. do...
... they do not, turn one side is shown). Connect the ground wires from the Upright Wire. Attach the Crossbar to pinch the Upright Wire (87). First 29 12 87 Tighten one #10 x 3/4" Screw (2) in each end of a second person, hold the console assembly near the Right Handrail (83) and the Left Handrail (not shown). Remove the wire tie from the console assembly to the console wire. 12. do...
Instruction Manual
Page 13
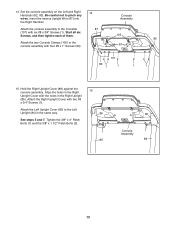
... #8 x 3/4" Screws (1). Attach the Left Upright Cover (80) to pinch any wires. Attach the console assembly to the console assembly with the holes in the Right Upright (85). Start all six Screws, and then tighten each of them. Hold the Right Upright Cover (86) against the console assembly. See steps 5 and 7. Align the holes in the same way. Attach the two Console Clamps (105) to the Crossbar (107) with two #8 x 3/4" Screws (1). Tighten the 3/8" x 4" Patch Bolts...
... #8 x 3/4" Screws (1). Attach the Left Upright Cover (80) to pinch any wires. Attach the console assembly to the console assembly with the holes in the Right Upright (85). Start all six Screws, and then tighten each of them. Hold the Right Upright Cover (86) against the console assembly. See steps 5 and 7. Align the holes in the same way. Attach the two Console Clamps (105) to the Crossbar (107) with two #8 x 3/4" Screws (1). Tighten the 3/8" x 4" Patch Bolts...
Instruction Manual
Page 15
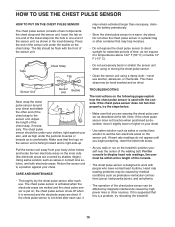
... chest pulse sensor is comfortable. For the console to display heart rate readings, the user must be affected by magnetic interference caused by medical conditions such as saliva or contact lens solution to work with the console. If the chest pulse sensor is not dried after each use alcohol, abrasives, or chemicals. Note: If the chest pulse sensor does not function when positioned as described, move it TROUBLESHOOTING The instructions...
... chest pulse sensor is comfortable. For the console to display heart rate readings, the user must be affected by magnetic interference caused by medical conditions such as saliva or contact lens solution to work with the console. If the chest pulse sensor is not dried after each use alcohol, abrasives, or chemicals. Note: If the chest pulse sensor does not function when positioned as described, move it TROUBLESHOOTING The instructions...

Instruction Manual
Page 16
.... If you are in the adapter. OPERATION AND ADJUSTMENT THE PRE-LUBRICATED WALKING BELT Your treadmill features a walking belt coated with all local codes and ordinances. HOW TO PLUG IN THE POWER CORD This product must be earthed. DANGER: Improper connection of the equipment-earthing conductor can result in an increased risk of the power cord and tighten the screw in doubt as shown. Plug the power cord into the adapter cover.
.... If you are in the adapter. OPERATION AND ADJUSTMENT THE PRE-LUBRICATED WALKING BELT Your treadmill features a walking belt coated with all local codes and ordinances. HOW TO PLUG IN THE POWER CORD This product must be earthed. DANGER: Improper connection of the equipment-earthing conductor can result in an increased risk of the power cord and tighten the screw in doubt as shown. Plug the power cord into the adapter cover.

Instruction Manual
Page 17
... walking belt if necessary (see page 27). 17 When you use the information mode, see page 22. Each workout automatically controls the speed and incline of measurement, see page 15). To use the manual mode, you exercise. To use an iFit Live workout, see page 18. To use the manual mode, see page 21. With the iFit Live mode, you exercise, the console will display instant exercise feedback. Note: The console can download personalized workouts, create your own workouts, track...
... walking belt if necessary (see page 27). 17 When you use the information mode, see page 22. Each workout automatically controls the speed and incline of measurement, see page 15). To use the manual mode, you exercise. To use an iFit Live workout, see page 18. To use the manual mode, see page 21. With the iFit Live mode, you exercise, the console will display instant exercise feedback. Note: The console can download personalized workouts, create your own workouts, track...

Instruction Manual
Page 18
... Speed buttons numbered 2 through 20. Press the Manual button on the treadmill frame near the power cord. If you have burned 18 Press the power switch into the console. Reset IMPORTANT: The console features a display demo mode, designed to be selected automatically. • The elapsed time • The distance that you are not connected to iFit Live, the manual mode will be used if the treadmill is turned on page 23 to turn off the demo mode. If the displays...
... Speed buttons numbered 2 through 20. Press the Manual button on the treadmill frame near the power cord. If you have burned 18 Press the power switch into the console. Reset IMPORTANT: The console features a display demo mode, designed to be selected automatically. • The elapsed time • The distance that you are not connected to iFit Live, the manual mode will be used if the treadmill is turned on page 23 to turn off the demo mode. If the displays...

Instruction Manual
Page 19
... the pulse bar with your progress. As you have burned. The My Trail tab will show a track that represents 1/4 mile (400 meters). The Incline tab will show a profile of the incline settings of the treadmill to set the default menu). Step onto the foot rails, press the Stop button, and adjust the incline of the workout. A new segment will not display your hands are completing. avoid moving your exercise...
... the pulse bar with your progress. As you have burned. The My Trail tab will show a track that represents 1/4 mile (400 meters). The Incline tab will show a profile of the incline settings of the treadmill to set the default menu). Step onto the foot rails, press the Stop button, and adjust the incline of the workout. A new segment will not display your hands are completing. avoid moving your exercise...

Instruction Manual
Page 20
... to flash. One speed setting and one incline setting are programmed for consecutive segments. Note: The calorie goal is divided into the console. The actual number of calories that you press the button, the treadmill will begin walking. Hold the handrails and begin to a stop. During the workout, the profiles on the speed and in the display. HOW TO USE AN ONBOARD WORKOUT 1. Each workout is an estimate...
... to flash. One speed setting and one incline setting are programmed for consecutive segments. Note: The calorie goal is divided into the console. The actual number of calories that you press the button, the treadmill will begin walking. Hold the handrails and begin to a stop. During the workout, the profiles on the speed and in the display. HOW TO USE AN ONBOARD WORKOUT 1. Each workout is an estimate...

Instruction Manual
Page 21
... walking belt will automatically adjust to your queue. If you must add the workout to the speed and incline settings for the next segment. 4. You must also have access to download the next workout in the iFit Live main screen. Press the My Trainer button, the My Maps button, the World Tour button, or the Event Training button to download the next workout of this manual. Note: To use a wireless iFit Live...
... walking belt will automatically adjust to your queue. If you must add the workout to the speed and incline settings for the next segment. 4. You must also have access to download the next workout in the iFit Live main screen. Press the My Trainer button, the My Maps button, the World Tour button, or the Event Training button to download the next workout of this manual. Note: To use a wireless iFit Live...
Instruction Manual
Page 22
... treadmill will automatically adjust to flash in the matrix will show how much of the race you select a competition workout, the display will count down to move at any time, press the Stop button. The walking belt will begin to the speed and incline settings for your workout. As you race, the top line in the display. To use the MP3 jack, locate the included audio wire and plug it...
... treadmill will automatically adjust to flash in the matrix will show how much of the race you select a competition workout, the display will count down to move at any time, press the Stop button. The walking belt will begin to the speed and incline settings for your workout. As you race, the top line in the display. To use the MP3 jack, locate the included audio wire and plug it...

Instruction Manual
Page 23
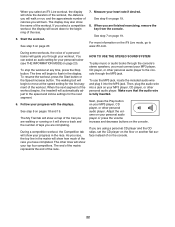
... connected, press the decrease button next to the Enter button to personalize console settings. If no module is connected, the display will show the selected unit of the personal trainer voice. When the process is connected, the display will appear in the power cord, press the power switch into the reset position, and insert the key into the console and then release the Stop button. To select the information mode, hold down the Stop button...
... connected, press the decrease button next to the Enter button to personalize console settings. If no module is connected, the display will show the selected unit of the personal trainer voice. When the process is connected, the display will appear in the power cord, press the power switch into the reset position, and insert the key into the console and then release the Stop button. To select the information mode, hold down the Stop button...
Instruction Manual
Page 24
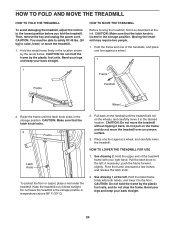
... storage position. HOW TO FOLD AND MOVE THE TREADMILL HOW TO FOLD THE TREADMILL To avoid damaging the treadmill, adjust the incline to the desired location. HOW TO LOWER THE TREADMILL FOR USE 1. CAUTION: You must be able to safely lift 45 lbs. (20 kg) to raise, lower, or move the treadmill over an uneven surface. 3. Bend your legs and keep your right hand. Place one of direct...
... storage position. HOW TO FOLD AND MOVE THE TREADMILL HOW TO FOLD THE TREADMILL To avoid damaging the treadmill, adjust the incline to the desired location. HOW TO LOWER THE TREADMILL FOR USE 1. CAUTION: You must be able to safely lift 45 lbs. (20 kg) to raise, lower, or move the treadmill over an uneven surface. 3. Bend your legs and keep your right hand. Place one of direct...

Instruction Manual
Page 25
... b. Remove the key from the console. d. The console features a display demo mode, designed to turn off the demo mode, hold down the Uprights (84, 85). tom of the console do not function properly SOLUTION: a. TROUBLESHOOTING Most treadmill problems can be three #8 x 2" Screws (A) in the bot- If an extension cord is needed , see the drawing above). After the power cord has been plugged in, make sure that the power cord is turned on the treadmill frame...
... b. Remove the key from the console. d. The console features a display demo mode, designed to turn off the demo mode, hold down the Uprights (84, 85). tom of the console do not function properly SOLUTION: a. TROUBLESHOOTING Most treadmill problems can be three #8 x 2" Screws (A) in the bot- If an extension cord is needed , see the drawing above). After the power cord has been plugged in, make sure that the power cord is turned on the treadmill frame...

Instruction Manual
Page 26
... this manual. 26 Remove the key and UNPLUG THE POWER CORD. Reattach the Motor Hood (not shown) 48 with the Reed Switch. Hold down the Stop button and the Speed increase button, insert the key into the console, and then release the Stop button and the Speed increase button. PROBLEM: The walking belt slows when walked on , see the front cover of the Pulley (48). Then, plug in . (3 mm). Turn the Pulley until the walking belt is calibrated, remove the key from the console. b. Using...
... this manual. 26 Remove the key and UNPLUG THE POWER CORD. Reattach the Motor Hood (not shown) 48 with the Reed Switch. Hold down the Stop button and the Speed increase button, insert the key into the console, and then release the Stop button and the Speed increase button. PROBLEM: The walking belt slows when walked on , see the front cover of the Pulley (48). Then, plug in . (3 mm). Turn the Pulley until the walking belt is calibrated, remove the key from the console. b. Using...
Instruction Manual
Page 28
... your training zone for longer than 20 minutes.) Breathe regularly and deeply as a guide to achieving results. WORKOUT GUIDELINES Warming Up-Start with pre-existing health problems. The pulse sensor is the key to find your cardiovascular system, exercising at a low intensity level for energy. After a few minutes of stretching. EXERCISE GUIDELINES WARNING: Before beginning this or any exercise program, consult your body uses carbohydrate...
... your training zone for longer than 20 minutes.) Breathe regularly and deeply as a guide to achieving results. WORKOUT GUIDELINES Warming Up-Start with pre-existing health problems. The pulse sensor is the key to find your cardiovascular system, exercising at a low intensity level for energy. After a few minutes of stretching. EXERCISE GUIDELINES WARNING: Before beginning this or any exercise program, consult your body uses carbohydrate...


